JBoss jBPM getting started guide
Work In Progress: [JBPM-1727]
The Getting Started Guide for jBPM 3.1 is still available.
Welcome to the JBoss jBPM getting started guide. In this guide, you will:
Download and unzip the JBoss jBPM JPDL Suite
Execute the JBoss jBPM engine
Interact with the Websale sample process
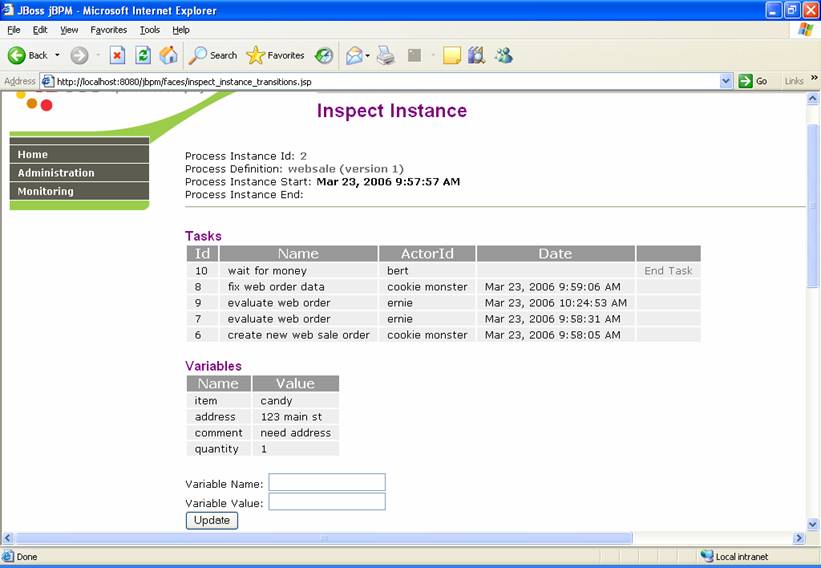
Execute and manage a process instance
Modify the Websale sample process both as straight JPDL and using the Graphical Process Designer
Add a mail action
Add a task to the process
Add a data entry page to support the new task
Deploy your process to JBoss jBPM
Before we get started, a couple of notes about this guide:
For those who are not familiar with workflow or business process management, please start with this article on the state of workflow: http://www.jboss.com/products/jbpm/stateofworkflow
This guide is not intended to show all of the features of JBoss jBPM. The intention is to show how to use the basic functionality of JBoss jBPM. At the bottom of this guide is a list of resources that will assist you with further use of JBoss jBPM.
This guide focuses on the jPDL process language, and does not go into web service orchestration using BPEL. BPEL is supported by JBoss jBPM, and more information about using BPEL with JBoss jBPM can be found in the BPEL extension download: http://www.jboss.com/products/jbpm/downloads
This guide was created with JBoss jBPM 3.2.1 and Eclipse 3.3.0 with the Graphical Process Designer (GPD) included in the suite. The GPD must be installed into Eclipse and instructions for doing so are available in the Suite. This guide has been tested with 3.2.1 and 3.2.2 and is expected to be forward compatible with future versions of jBPM (although the screenshots may vary slightly). If you find any errors in this document please correct the wiki page or email MModell@RedHat.com.
This demonstration will make use of an email server although jBPM itself does not require one. I have downloaded and configured James, an open source mail server from Apache, (http://james.apache.org/) with one user named ``micah``.
JBoss jBPM is platform independent, but this guide was developed on a Fedora Core linux platform. It has also been tested and demonstrated on Windows installations and there ought to be no problems on Mac OS X because JBoss jBPM is 100% Pure Java. However, you will likely need to adapt some of the system specific components (forward versus bacwkard slashes, chmod, .bat instead of .sh, etc.).
Download and unzip the JBoss jBPM Suite
The JBoss jBPM Suite contains everything needed to execute JBoss jBPM with the exception of Java itself and a JBoss AS Server. The JBoss Application Server in the JBoss jBPM Suite requires JDK 1.5. If you do not have one of these on the machine that JBoss jBPM will be running on, please download it here: http://java.sun.com/javase/downloads/index_jdk5.jsp
Download JBoss AS 4.2, 4.3, or 5.0 and unzip it in a directory near or in the jBPM install directory. The jBPM install modifies this JBoss AS install, so make sure no other product is using/depending on this JBoss AS install! You will go to this JBossAS install's /bin directory and execute ./run.sh after you get done installing.
Once you have Java installed and a JBoss AS instance ready, you are ready to download the JBoss jBPM Suite. The following link has the list of downloads for JBoss jBPM: http://www.jboss.org/jbossjbpm/jbpm_downloads/.
Next, you will need to install jBPM to your machine by opening a prompt and cd'ing to the download directory. Then running the following command:
java -jar jbpm-installer-3.<<x>>.<<y>>.GA.jar
Remember to specify the correct version and directory of your jBPM's JBoss AS install durring the GUI install.
Once you have installed it, you should have a directory structure with the following folders:
Jbpm-jpdl-3.2.2
   db - Contains sample configurations to connect JBoss jBPM to other
              databases
   deploy - Contains packages for use in deploying your applications
   designer - Contains the Eclipse plugin for the JBoss jBPM Graphical
              Process Designer
   doc - Contains documentation for jBPM, jPDL and other components
   examples - Contains various examples that can be used as learning
              tools or starting points for application development
   lib - Contains various libraries required by jBPM
   server - Contains the JBoss application server along with the
              JBoss jBPM engine and the sample websale process
   src - Contains the source code for the JBoss jBPM product
And another directory for the JBossAS instance.
Make the JBoss AS scripts executable (*nix only and only if needed)
Go to the JBoss AS server directory and execute the following command:
cd <<JBossASInstance>>/bin
chmod 755 *.sh
Execute the JBoss jBPM engine
Go to the jBPM JBoss AS install directory and run:
./run.sh
You should see the jBPM console (Figure 1).
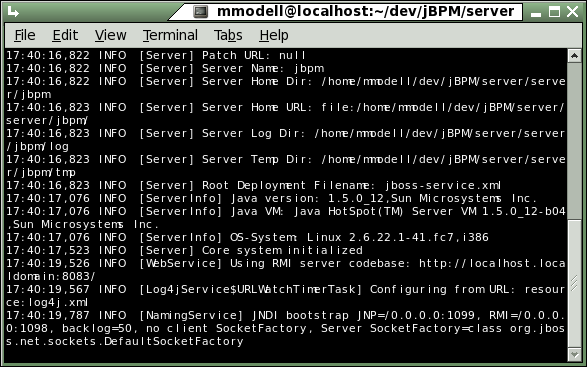
Figure 1: jBPM console
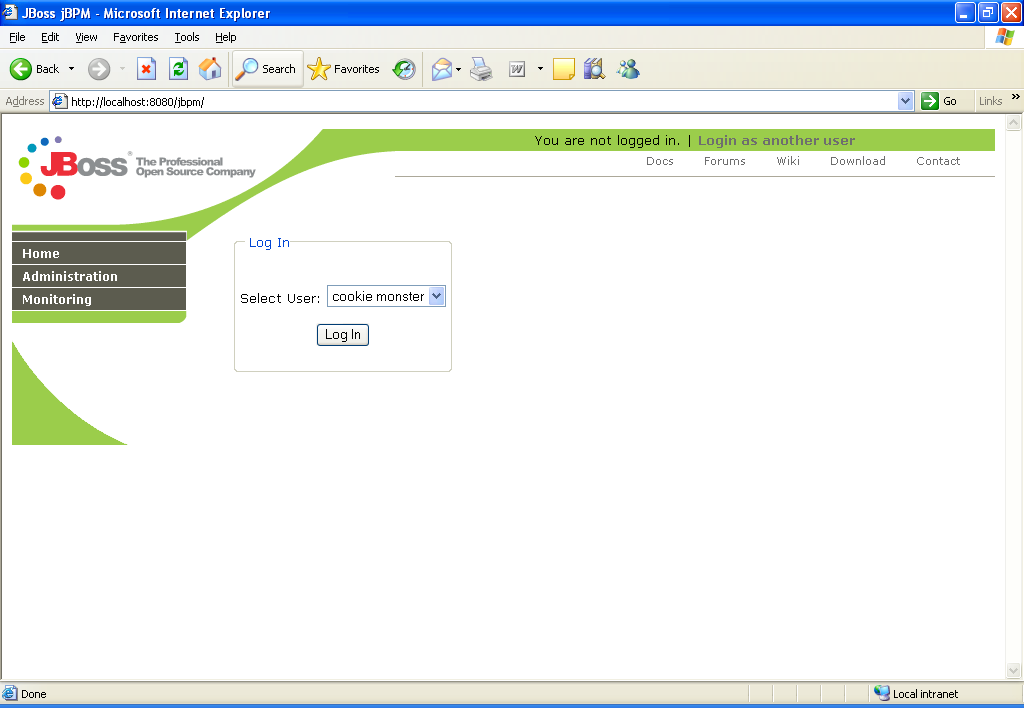
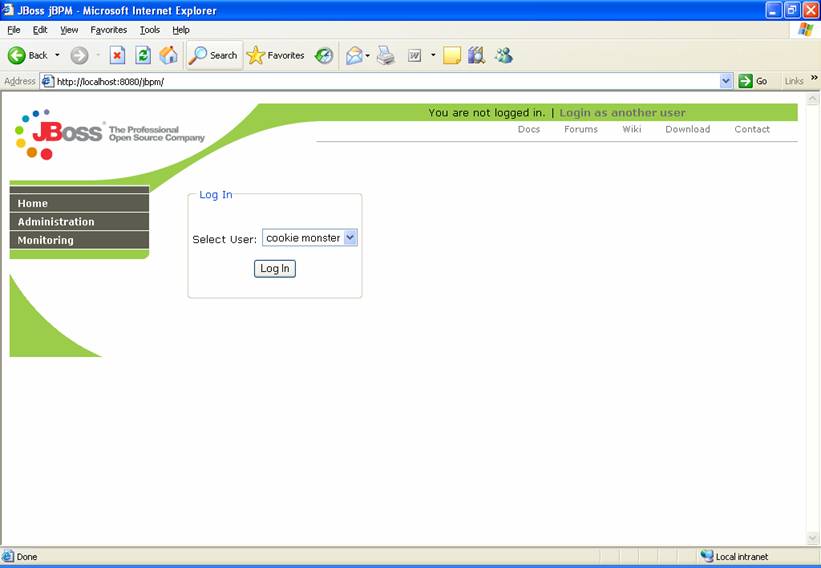
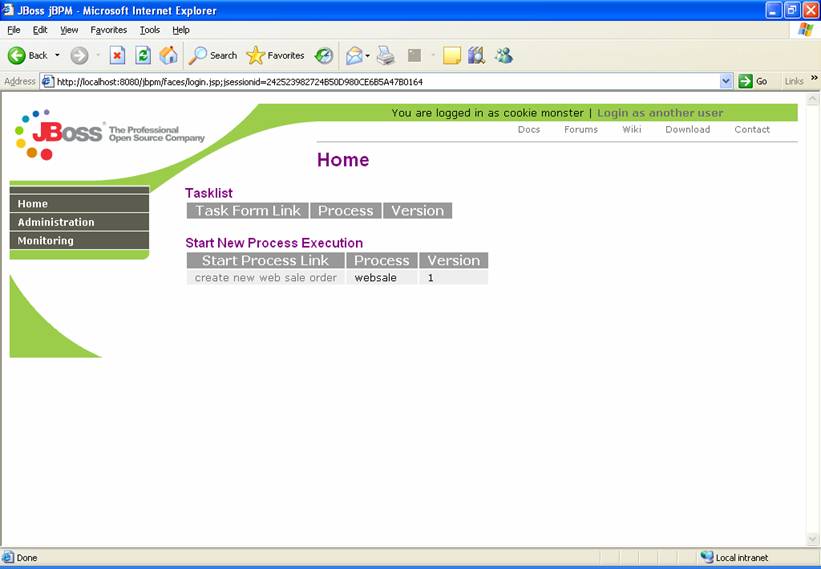
Now, bring up your favourite web-browser and go to the following URL: http://localhost:8080/jbpm-console. You should get a login page for the sample web application for JBoss jBPM (Figure 2).
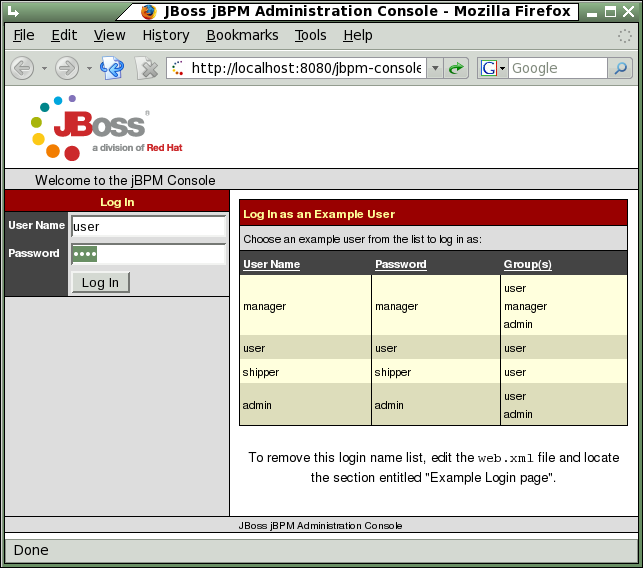
Figure 2. Login page for the JBoss jBPM sample websale application.
Interact with the websale sample process
The sample web application interacts with the sample websale process that is deployed to JBoss jBPM. We will now use the sample web application to execute the websale process. Keep in mind that your web application may look similar or provide an entirely different user interface from the one presented in this sample.
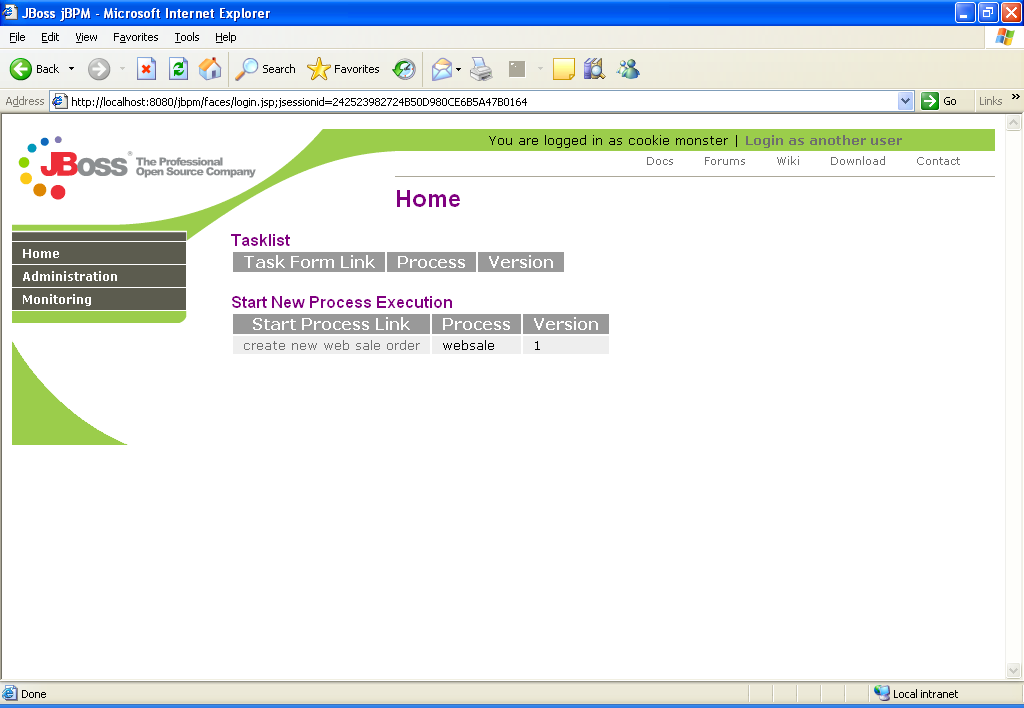
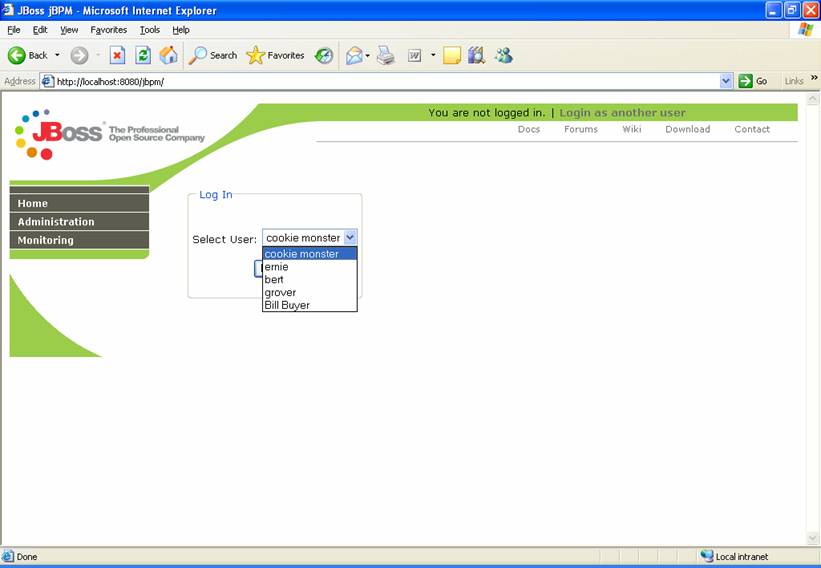
The first step is to log in. There is a list of several users and for this process, &147;user&147 is our buyer, &147;manager&147 is our manager, &147;shipper&147 is our accountant, &147;admin&147 is our shipper (that last part makes no sense to me either, but it's easy to change, it's just not done in the release version). We will choose &147;user&148; to start. When you login is user (using password user), you can see the Processes and Tasks available. The Tasks tabe shows no tasks available and the Processes tab shows only the websale process (Figure 3).
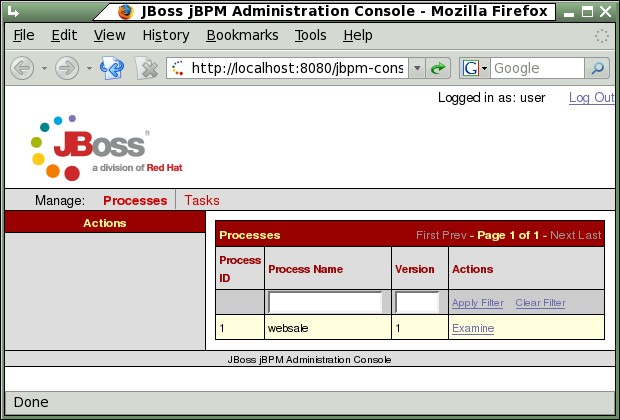
Figure 3. Processes tab for the web console. Only websale is available.
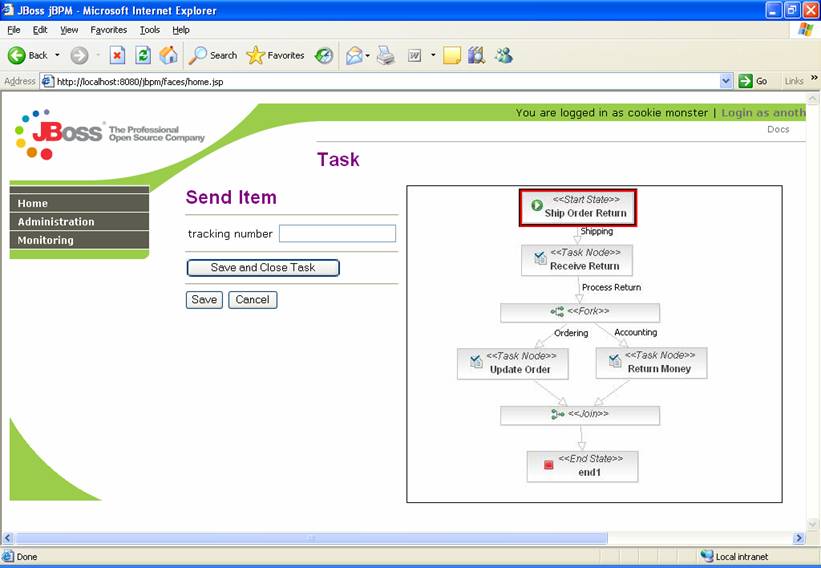
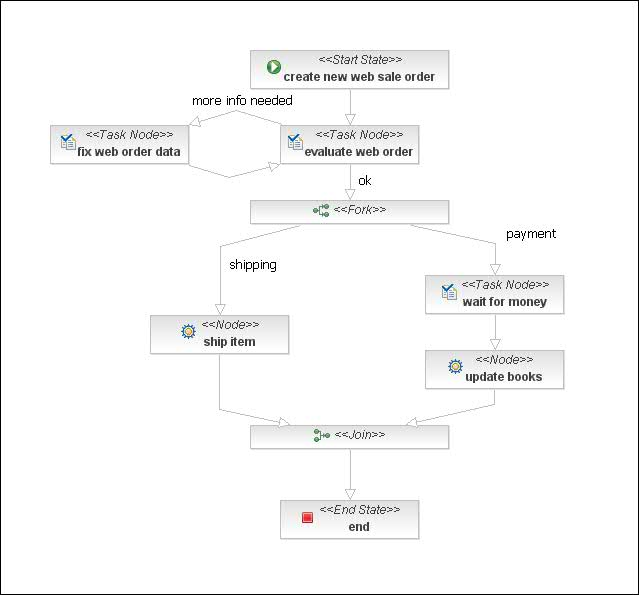
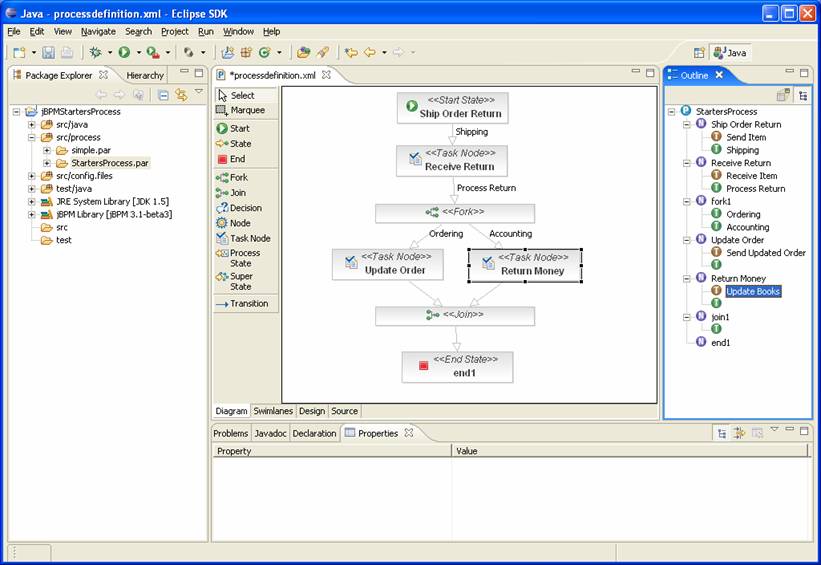
If click examine we find that no Process Instances exist and this makes sense because it's a clean system with no processes running. By the same logic, if we look in Tasks under Views on the left, we see that there are no tasks available. However, if we choose the Process Image view, the console presents us with a graphical image (Figure 4) representing the workflow currently deployed as jPDL code and associated with this Process. It is a fairly simple process and getting one's head around it should not take long, but it does provide the opportunity to demonstrate many powerful features of jBPM.
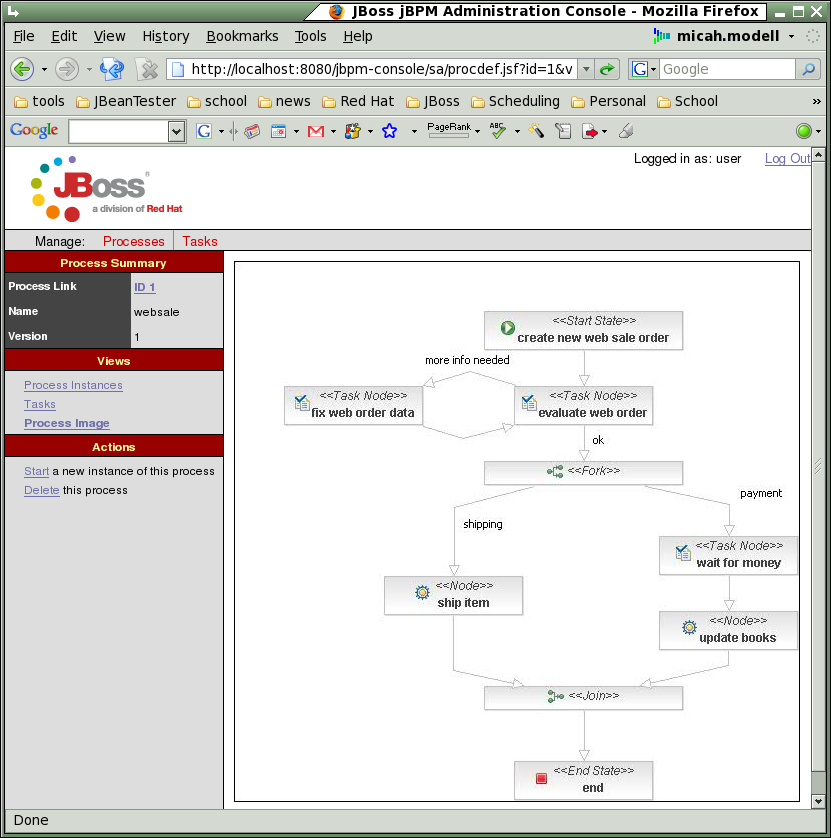
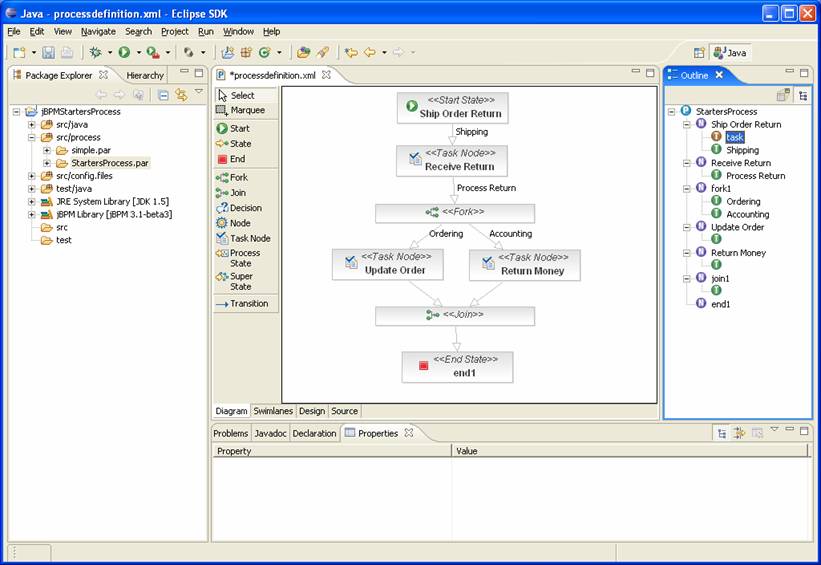
Figure 4. Websale process image for the deployed process.
As you can see, we have an order entry state followed by a managerial review. The manager can request more information from the customer until they are satisfied and then are able to move it on to a process fork where we the order both gets shipped and the customer is billed for the product. Once all of the above has completed, the two paths of execution get joined together and the Process Instance moves on to the End state.
Now that we understand what the process should do, let's go ahead and start one by selecting Start a new instance of this process from the Actions section on the left-hand side of the web console (Figure 5).
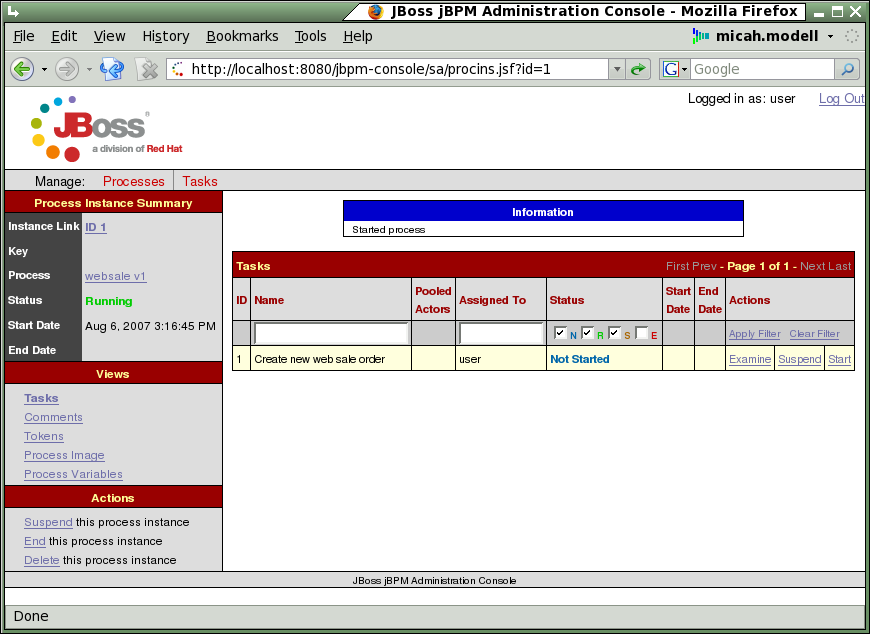
Figure 5. We have just begun a new instance of the websale process.
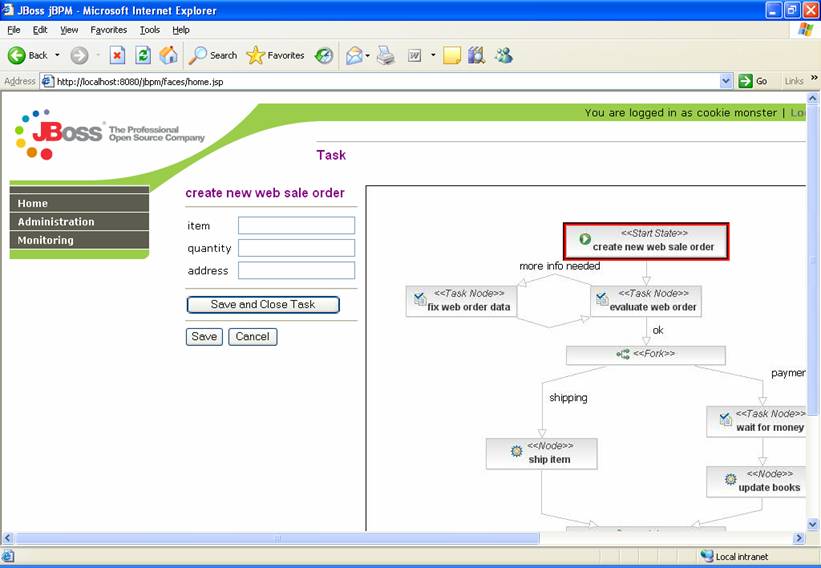
Next, we will click Examine to drill down into the process where we can enter the information for this order (Figure 6). In this case we are feeling very hot and therefore want to buy a few air conditioners and have them sent to our house. You will note the Save and Evaluate buttons under the order entry section. Save will save the data but not advance the Token to the next state. On the other hand, Evaluate will both save the data and advance to the next state. Since we're pretty sure this is what we want, we're going to click on Evaluate to send it on the manager for review.
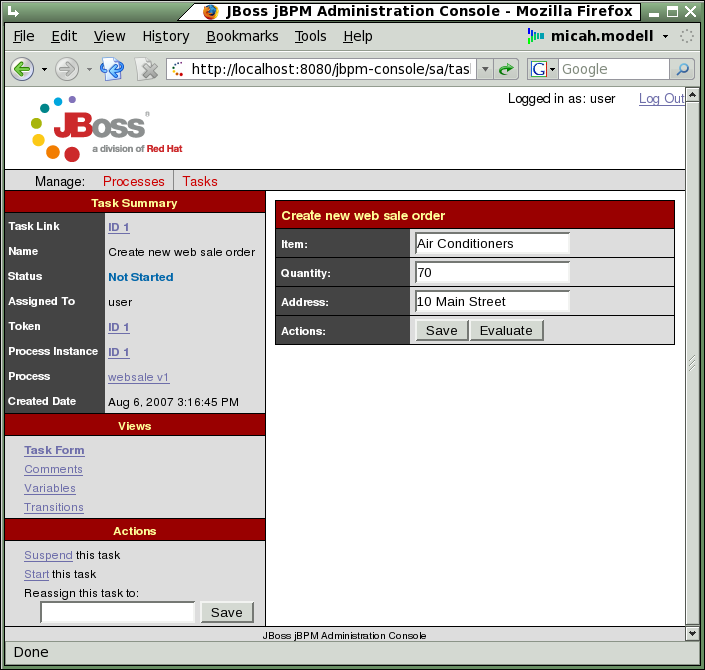
Figure 6. We are entering data into the system and will then move the system on to the next node using Evaluate.
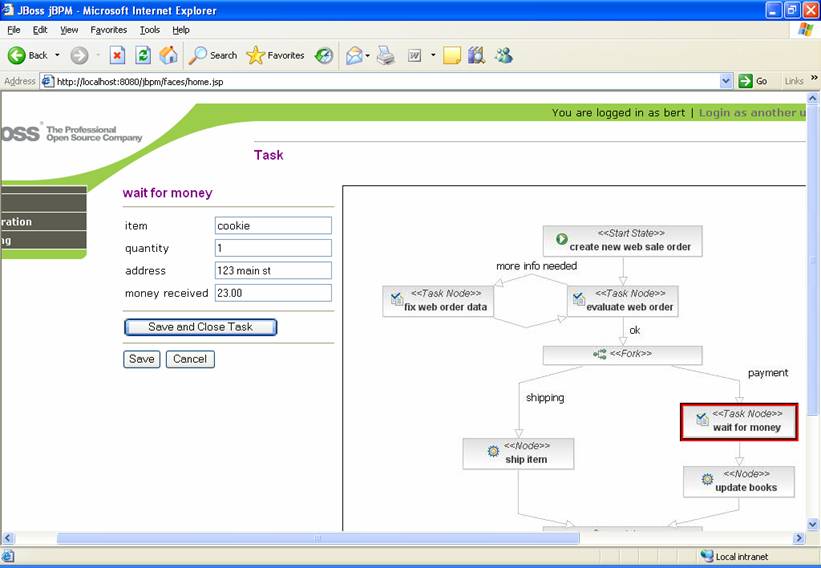
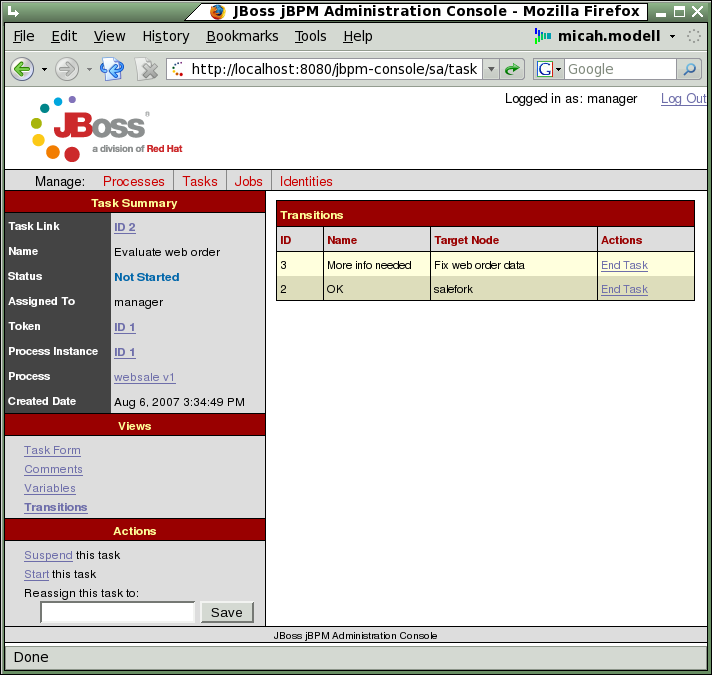
The next page allows you to enter a comment, but this is optional. Since the next task is for a Manager to perform, let's use the Log Out link at the top right and log back in as &147;manager&147;. Next we click on the Tasks tab and see that the Evaluate web order task is waiting for us (Figure 7). Now, clicking Examine will bring us to information regarding this task and allow us to perform operations on it.

Figure 7. Logged in now as &147;manager&147; we see a task is waiting for us.
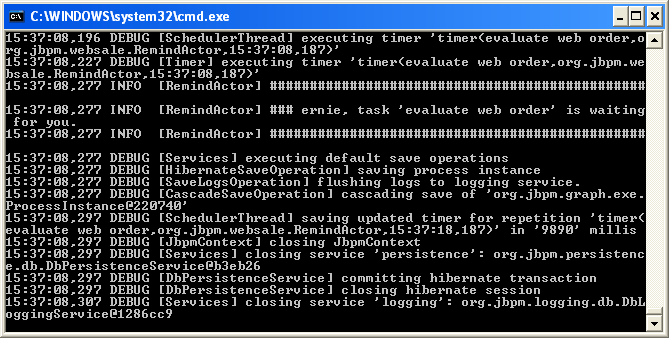
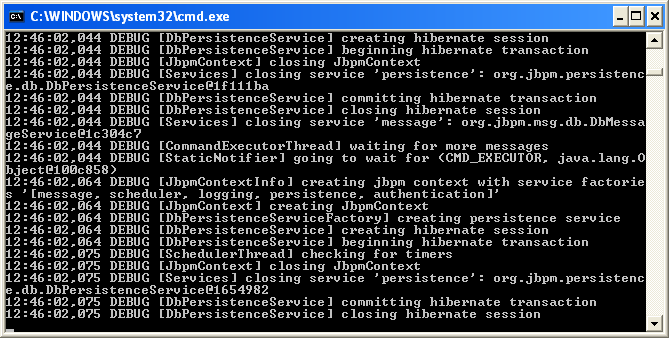
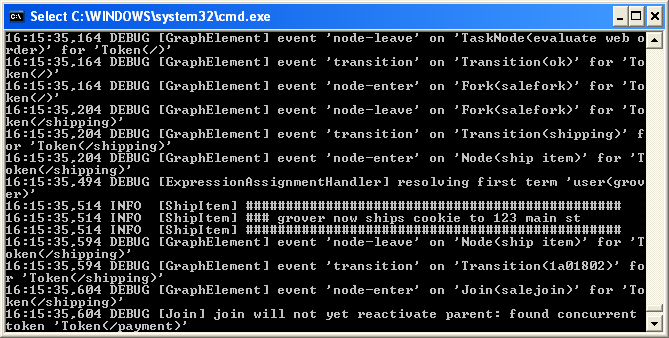
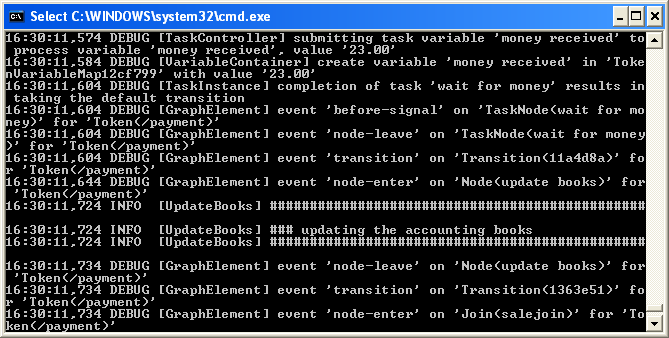
As we take a look at this task (Figure 8) we notice a problem - we don't sell Air Conditioners! At this point, we should switch over to the jBPM server's console to notice a recurring message on the console (Figure 9). If you watch for a minute, you will see that this message will repeat periodically. This notification is the result of a jPDL Timer Action executing and we will see how that is implemented later on when we visit the Graphical Process Designer.
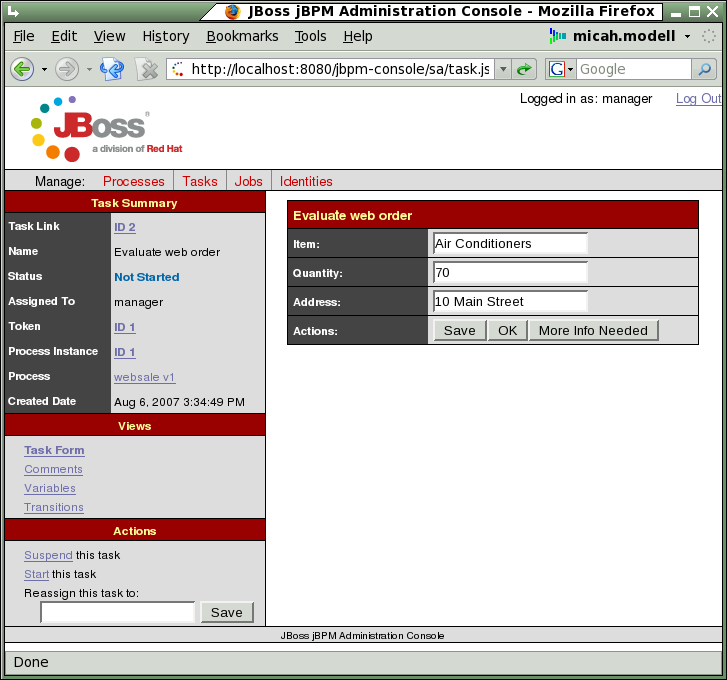
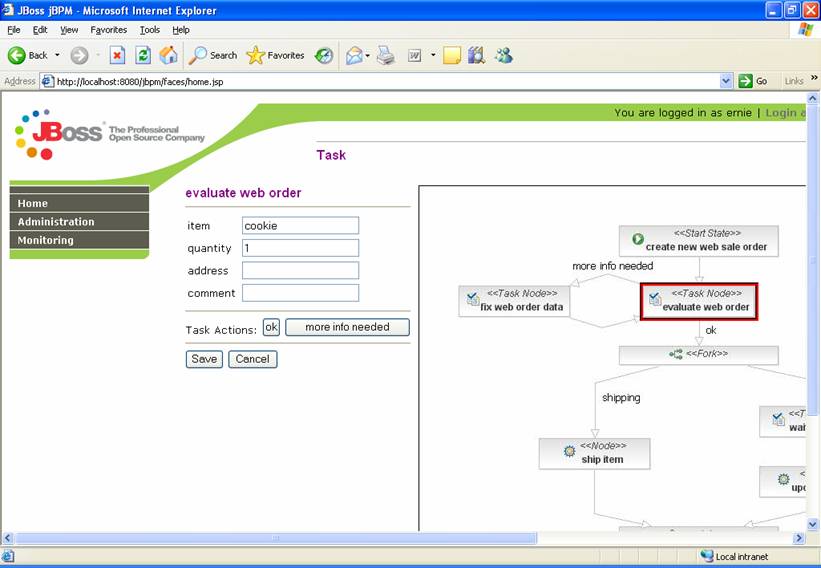
Figure 8. Review the order data as a &147;manager&147;.
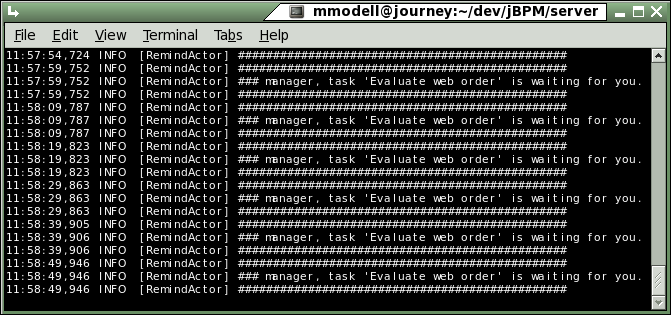
Figure 9. Notice the periodically repeated notification on the server console.
Let's add a comment to this Process Instance to that effect (Figure 10) and then navigate to Transitions (in the Views left-hand panel).
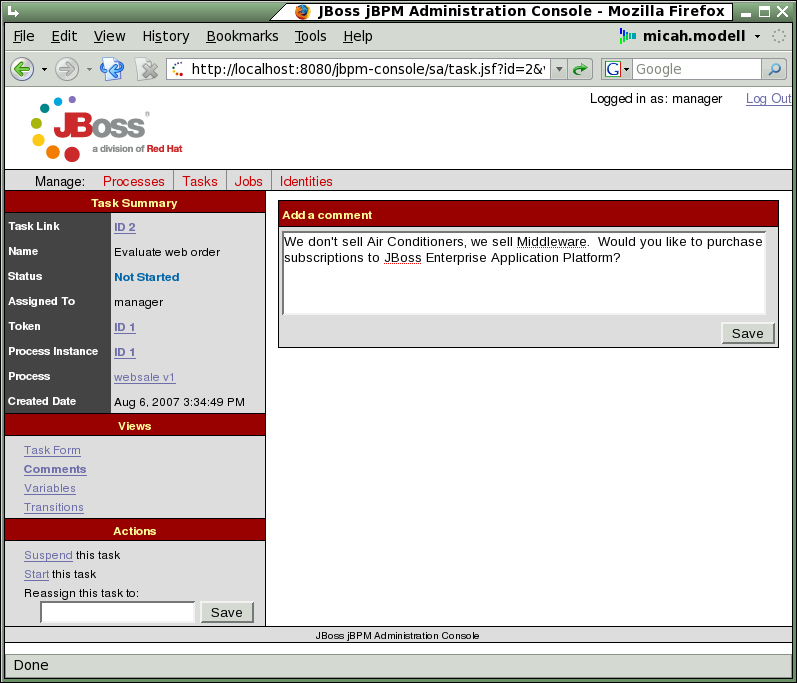
Figure 10. Add a comment to the Process Instance.
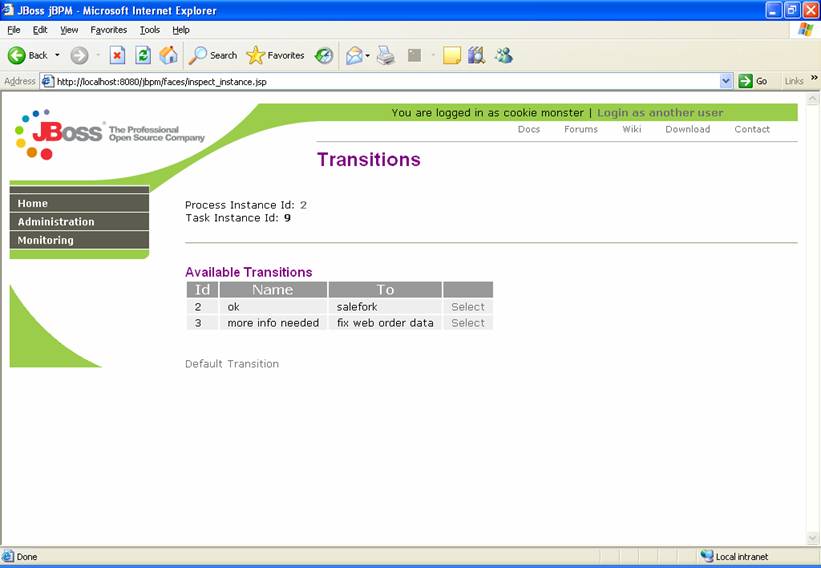
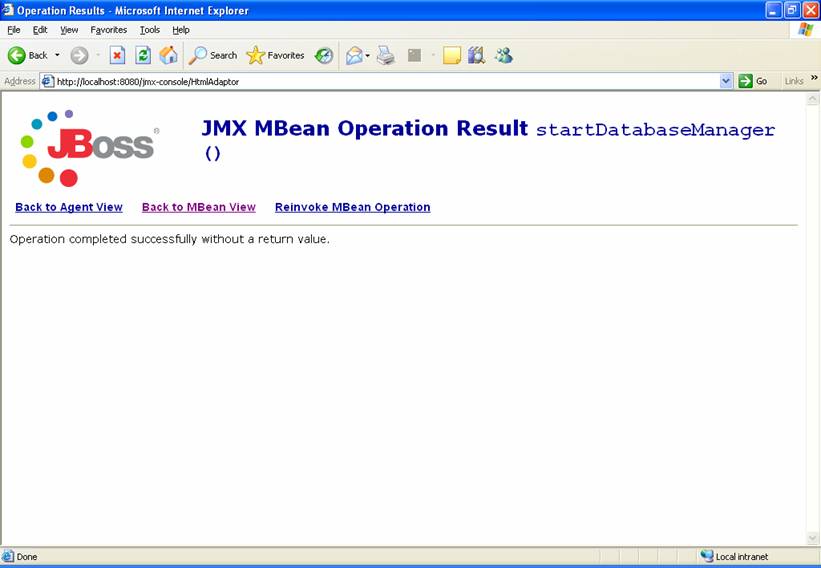
On the Transitions page, we see all the possible options for ending the Task and moving the Process Instance forward (or laterally) to the next state (Figure 11). In this case, we will choose the More info needed transition.
![]()
Figure 11. Choose the appropriate transition from this task to the next node.
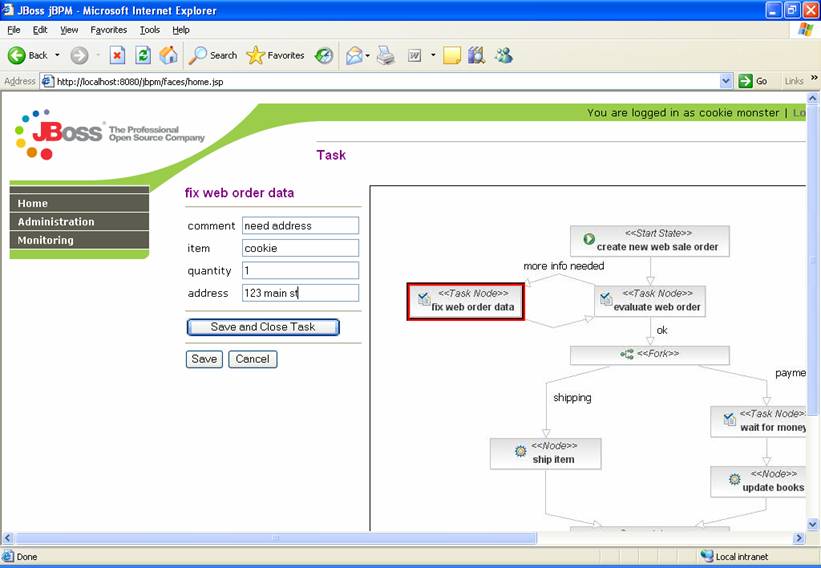
Since the process has been kicked back to the user now, let's log out and log back in as the user, view our Tasks, Examine the Fix web order data task and update the information to something more appropriate (Figure 12). Then we click Evaluate to save the data and move the process forward.
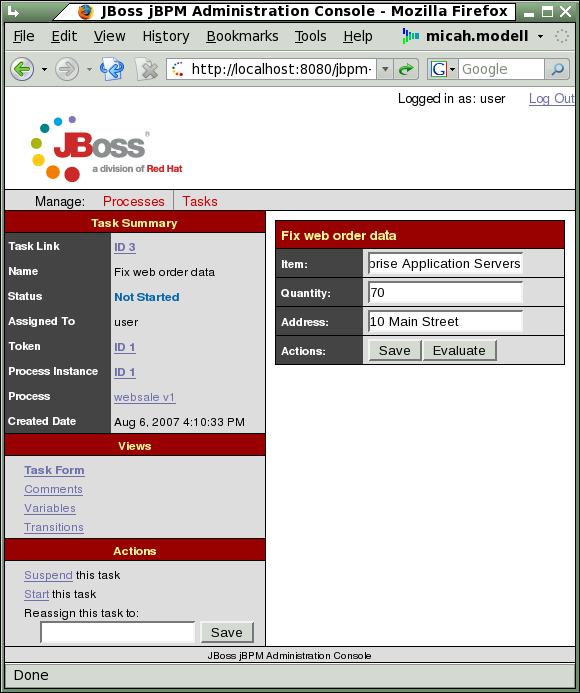
Figure 12. Modify the order data.
Now we log out and log back in as &147;manager&147; again, navigate to Tasks, examine the Evaluate web order task and see that it's been updated appropriately and we can now click OK to move it on to the next node.
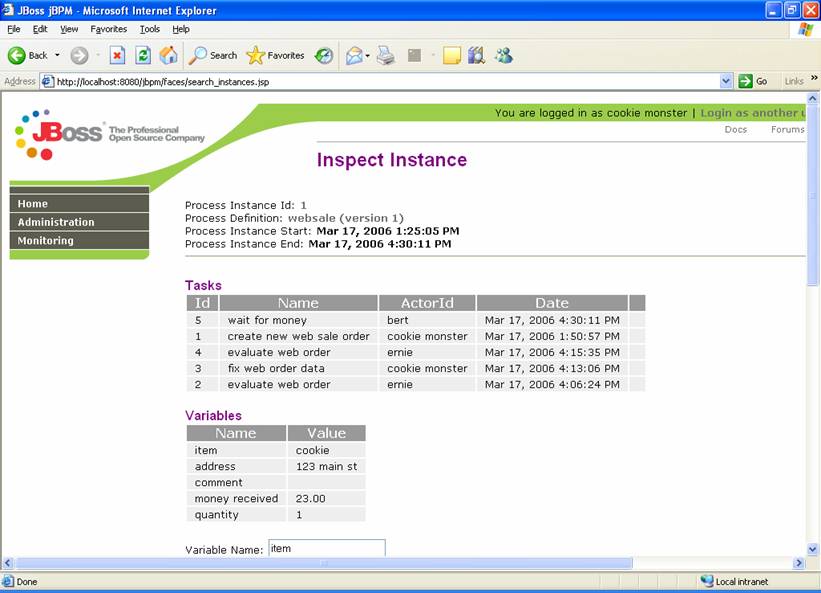
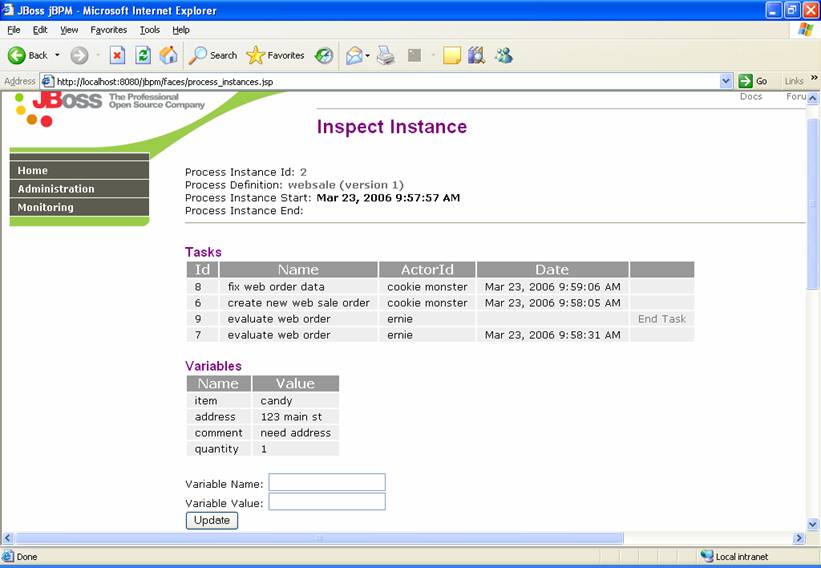
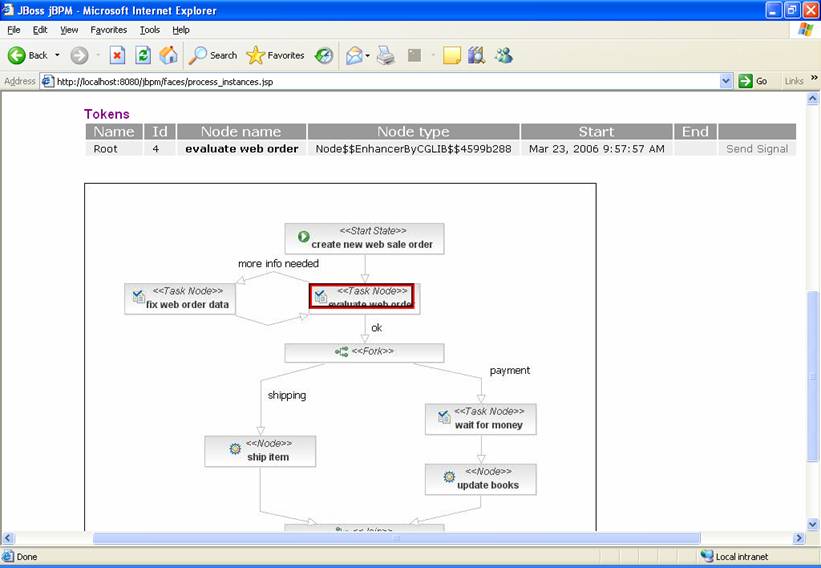
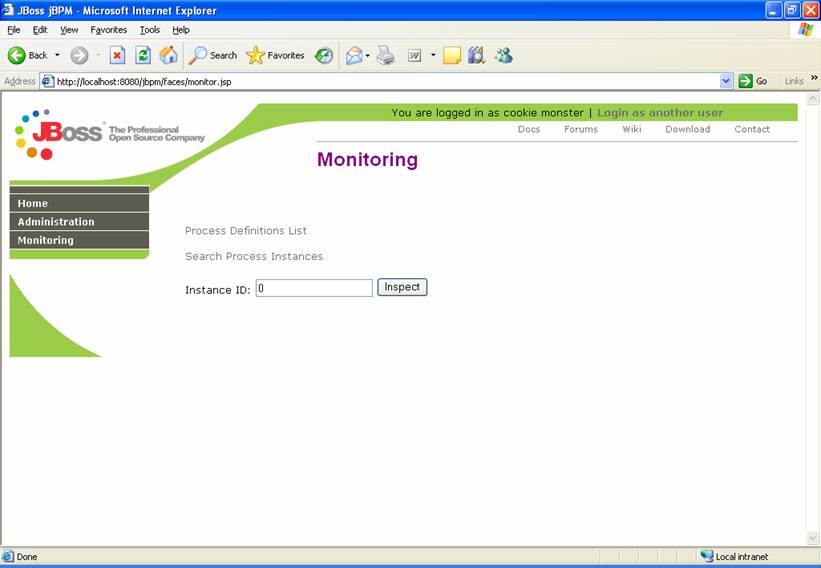
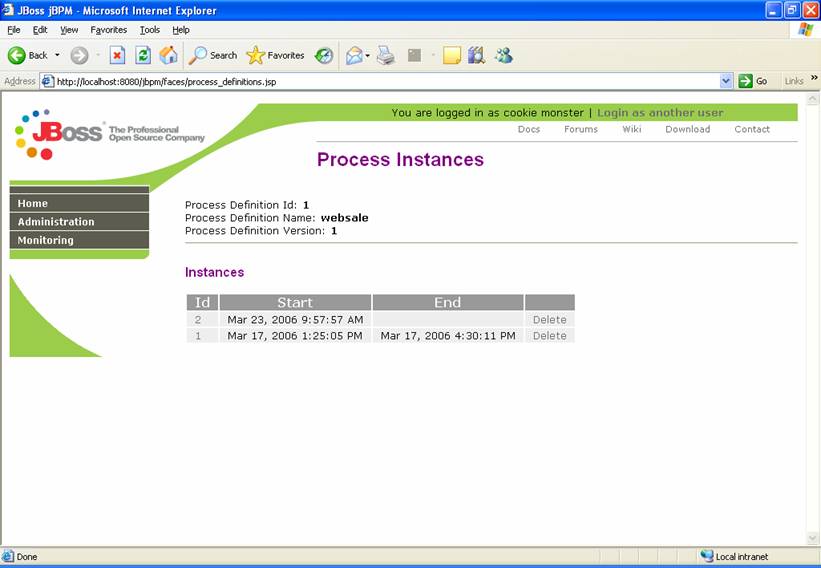
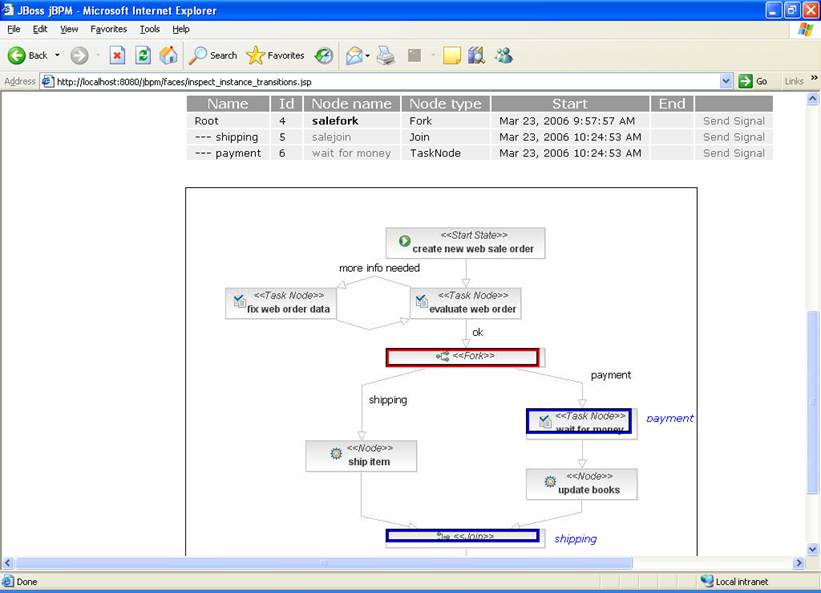
We are now nearly ready to fire up the Graphical Process Designer to take a look at the jPDL code which provides this functionality, but before we do, we should take a look at a visualisation feature of the console. Click on Processes, examine the running Process Instance (if you began with a clean system and have followed all the instructions exactly, this should be Instance ID 1) and select Process Image under Views (Figure 13).
On this screen you see a Process Image with three nodes highlighted in blue - these blue nodes are the active nodes in the process (or nodes with Tokens). If you click on one of these nodes, it will take to the Transitions view for the node where you have the option to signal the node and move it forward - but don't do that! We will take a different path.

Figure 13. This interactive image represents the current state of a Process Instance.
Let's look at the code driving this process in the Graphical Process Designer
To work with the code, we must first fire up Eclipse (with the GPD installed) and configure it to use the new jBPM download. To do so, select Window -> Preferences and navigate to JBoss jBPM/Runtime Locations (Figure 14).
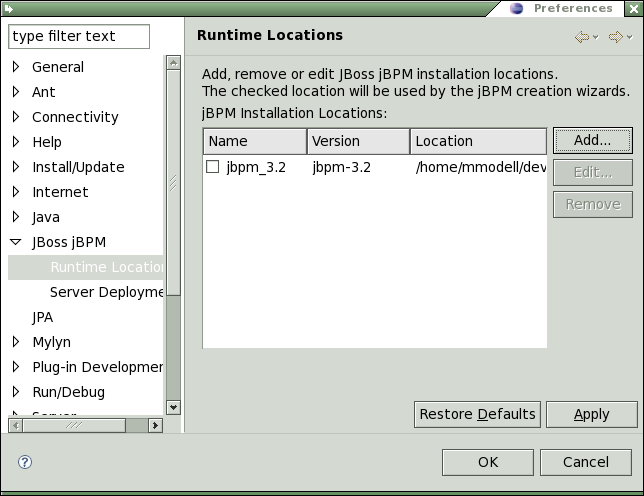
Figure 14. JBoss jBPM Preferences (I've already got one configured)
Next, click Add and select a new location and label it (Figure 15).
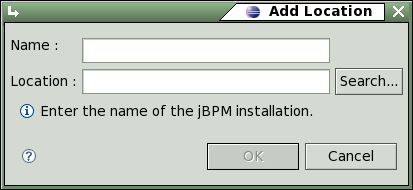
Figure 15. Add a location.
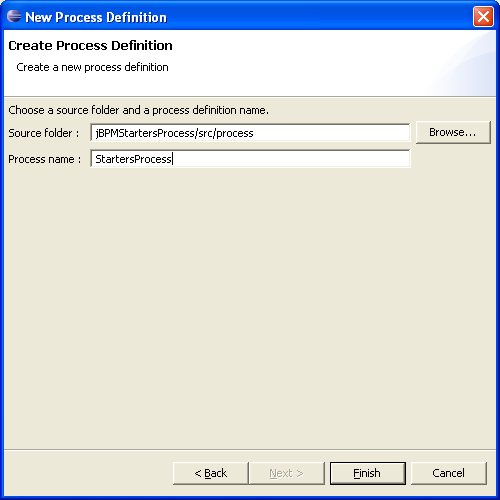
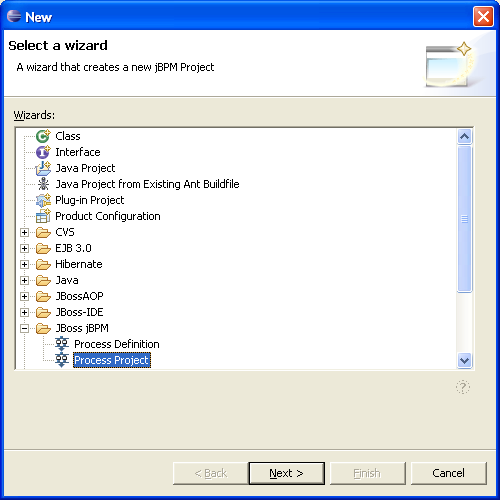
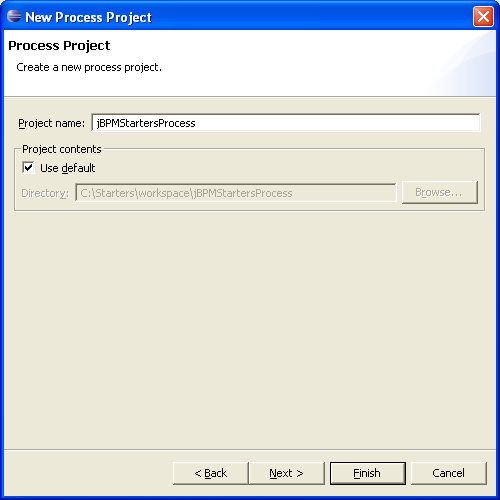
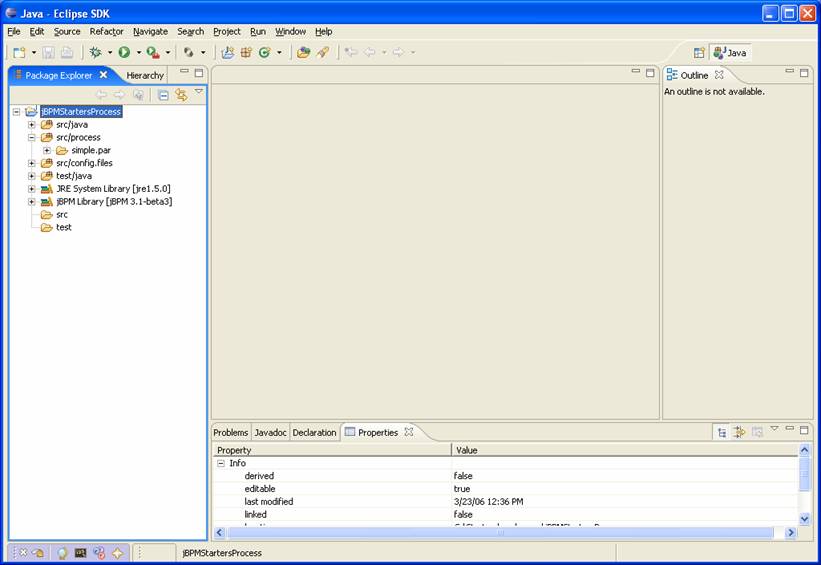
Now we are ready to create a new jBPM Process Project. Select File -> New -> Other.... On the resultant screen, choose Process Project (Figure 16) and give it a name (Figure 17) - I chose websale. On the next screen we select the Core jBPM location (from the previous steps), deselect Generate simple process definition, action handler and JUnite tests. (Figure 18) and click Finish to generate the project.
|
|
Figure 16. Choose the new project type. | Figure 17. Name the new process. |
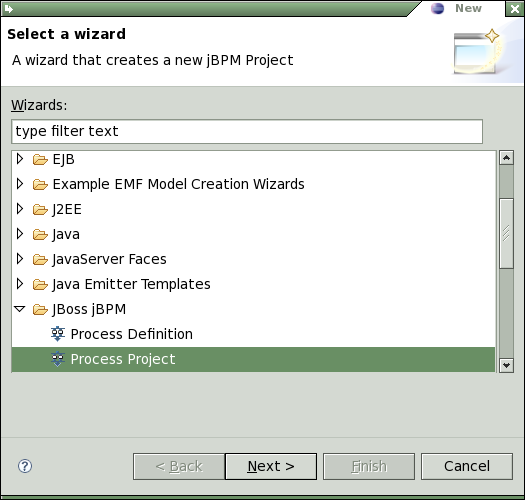
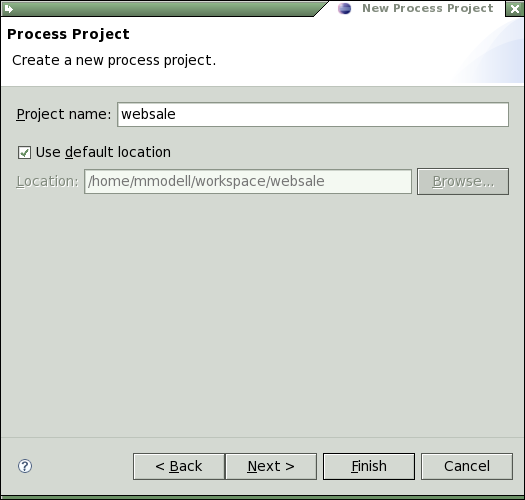
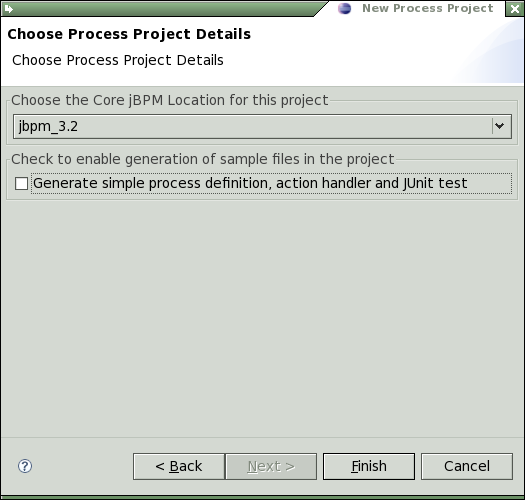
Figure 18. Project details.
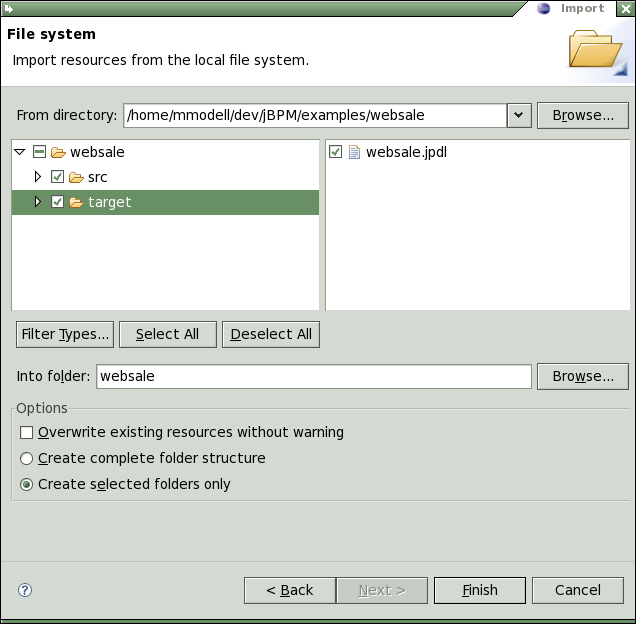
Now we must import the source for the websale process. Select File -> Import... (Figure 19) and, on the next screen, navigate to the location you unzipped the jBPM jPDL Suite and drill down to examples\websale and import the files as indicated in Figure 20.
|
|
Figure 19. Import Files. | Figure 20. Still importing files. |

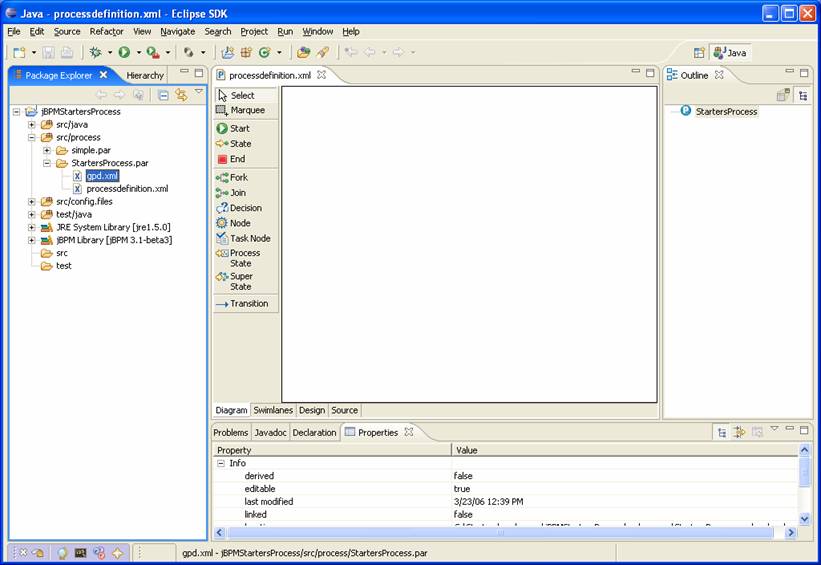
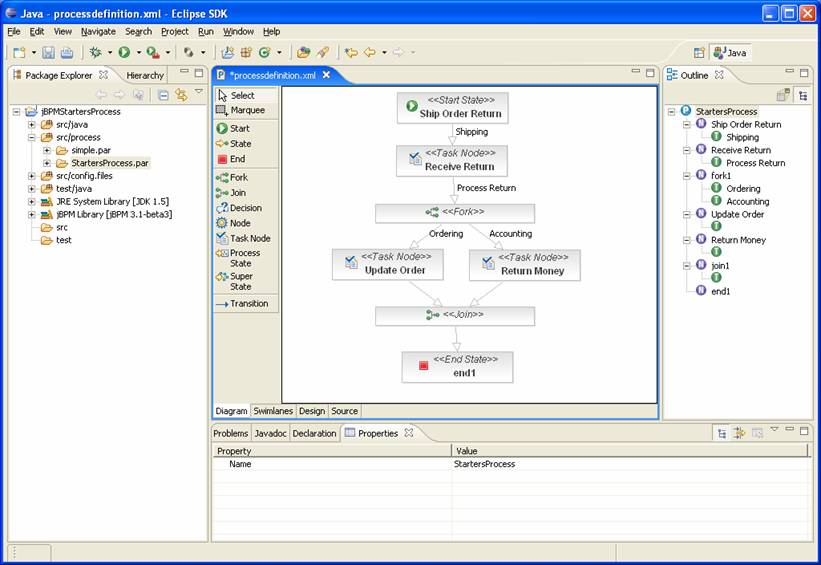
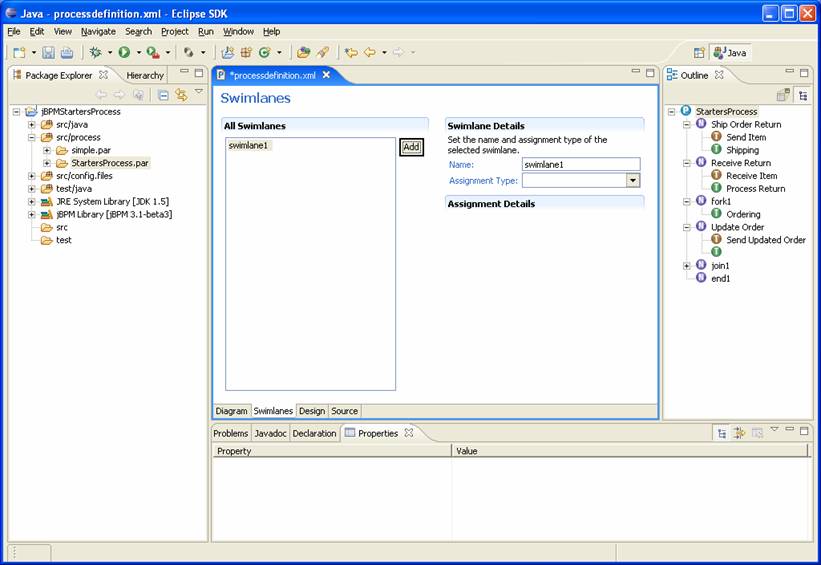
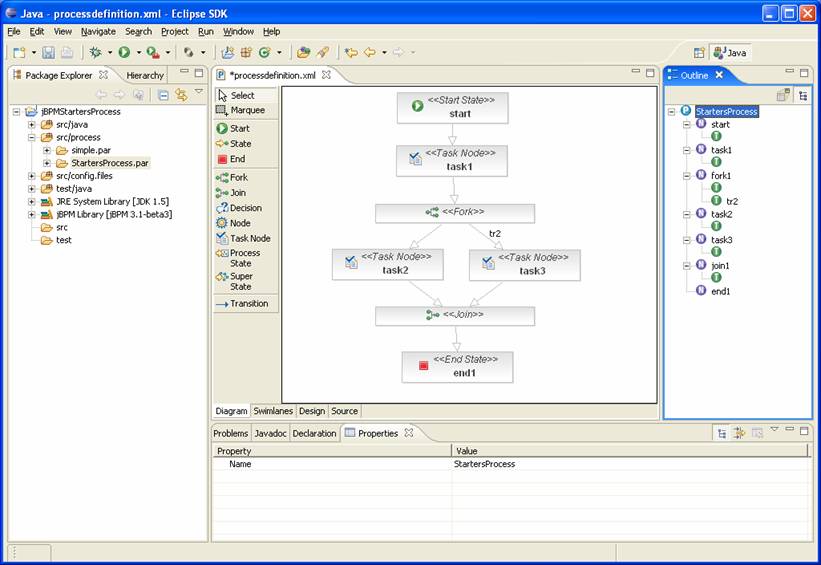
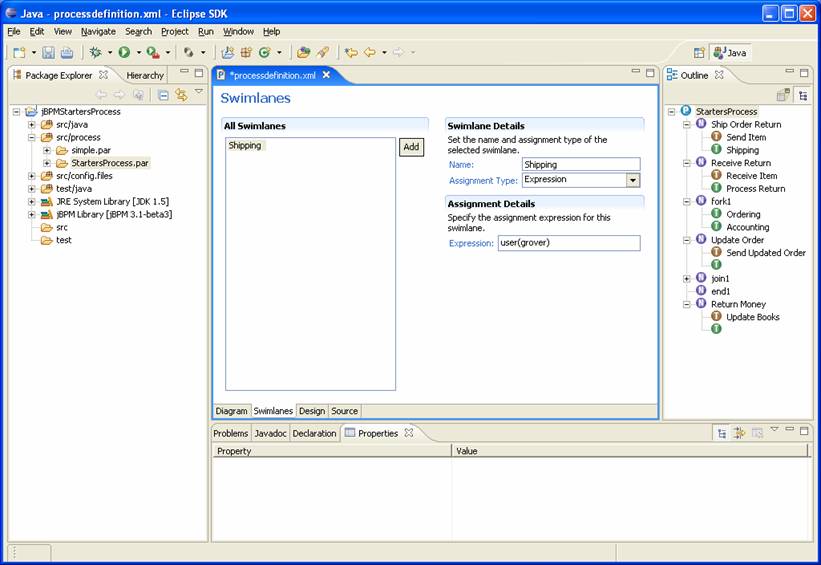
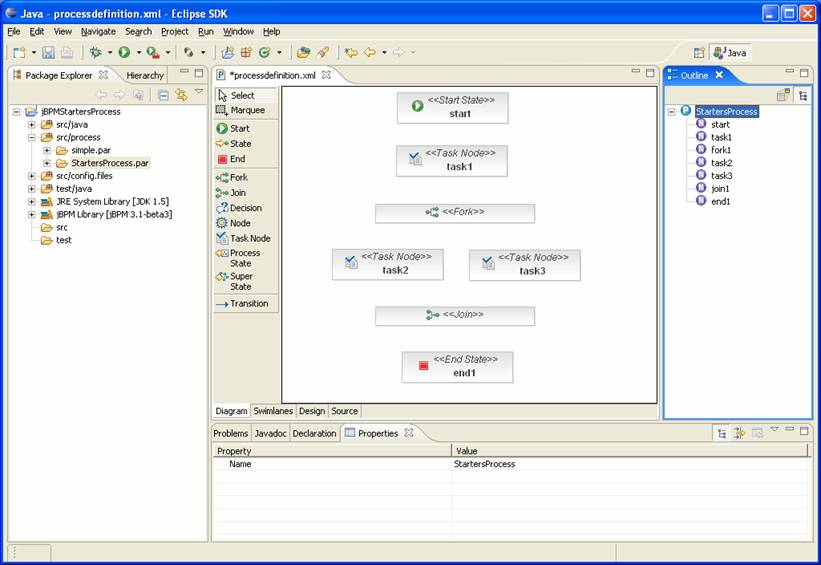
And now we're finally ready to start looking at the process code! So use the left navigation to open up the process. Double-click gpd.xml to open it up in the viewer (Figure 21).
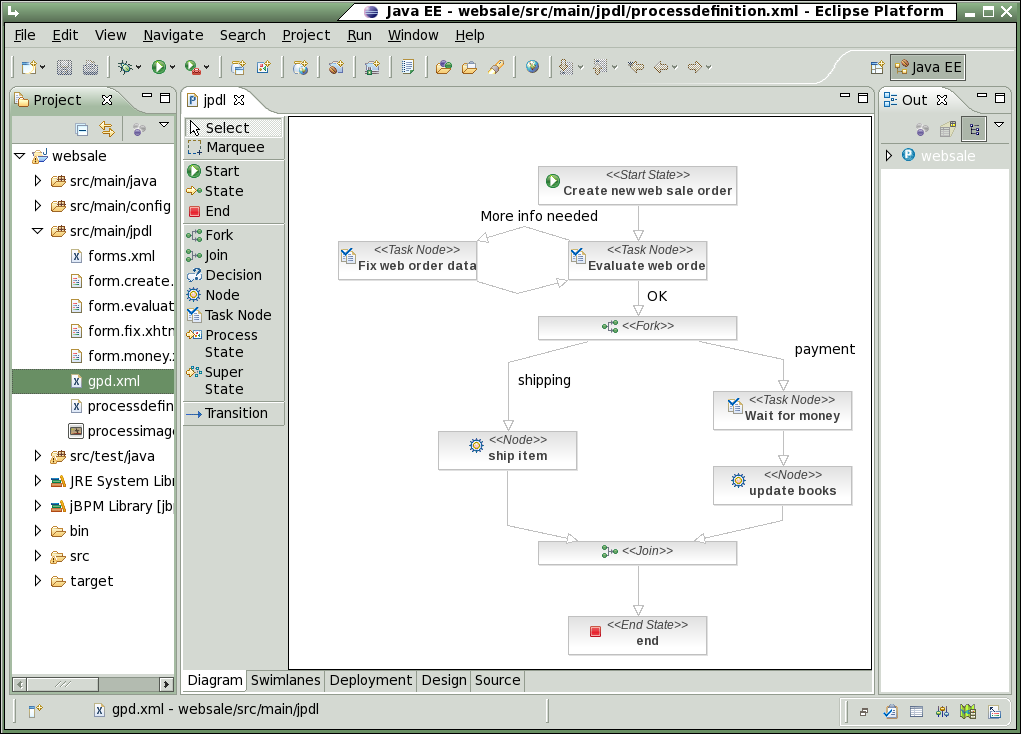
Figure 21. Our first look at the designer.
Now, we want to make our first changes to the process and since I'm a bit nervous about my business, I want to know when each order comes in. So, let's add a mail action to the Evaluate web order node so I gt an email with each new order. We do this by right-clicking the node and clicking Node Enter (Figure 22).
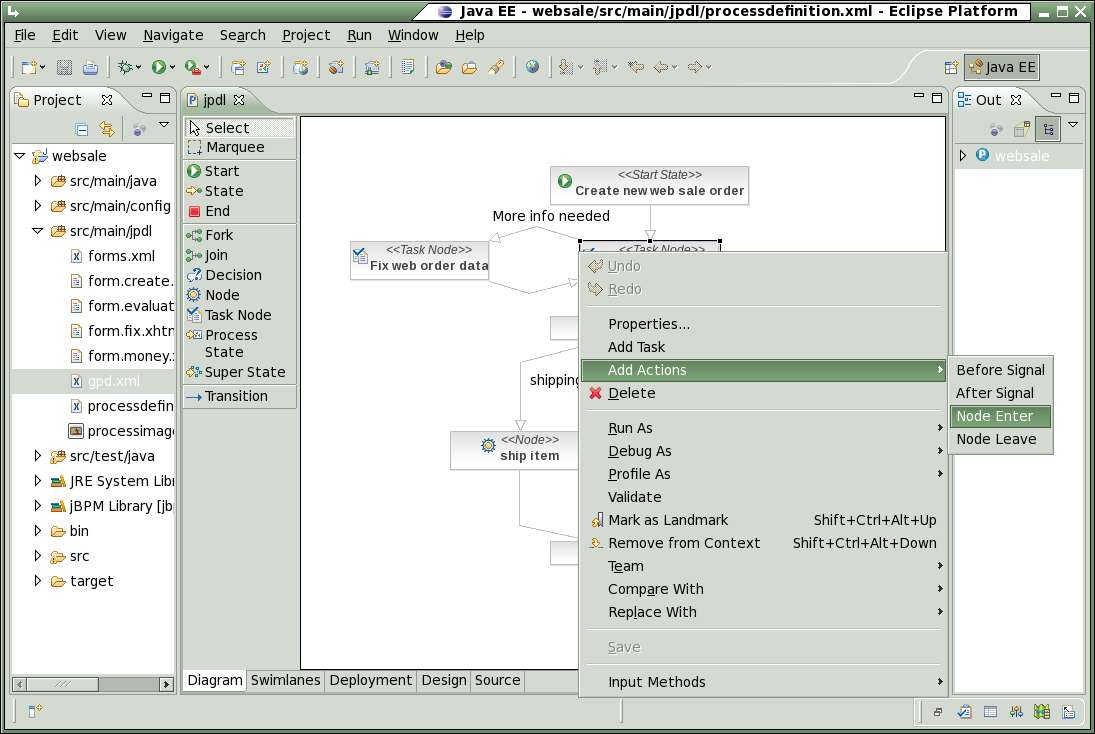
Figure 22. Adding a node-enter action.
Now let's switch over to the jPDL Source view and manipulate the XML. We do this by clicking the Source tab at the bottom (Figure 23). Here we should look for the new node-enter information. We are going to add the text as indicated in Figure 23:
         <mail name="mailIt" actors="buyer" to="micah@localhost">
              <subject>We got an order!</subject>
              <text>#{buyer} just ordered #{quantity} #{item}.  We're making money!</text>
         </mail>
The above is described in Chapter 16. Email support but I'd like to call your attention to the text tag as it makes use of Expression Language to dynamically create the text of the email body. will be replaced with the buyer for this Process Instance (in this case, user) and so on. We'll see the results of this later.
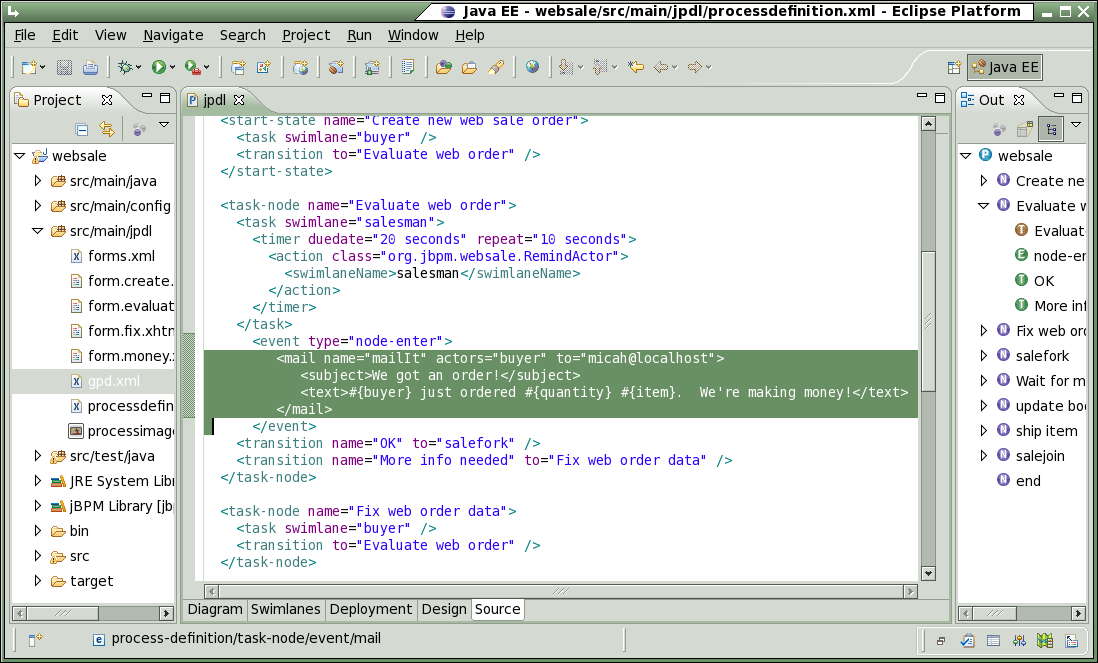
Figure 23. View the source of the websale process.
Additionally, if you look at the Evaluate web order task definition, you will notice a timer is defined as such:
      <timer duedate="20 seconds" repeat="10 seconds">
        <action class="org.jbpm.websale.RemindActor">
          <swimlaneName>salesman</swimlaneName>
        </action>
      </timer>
This resulted in the jBPM server console output of Figure 9 by calling out to the class RemindActor (Figure 24). This class is called and, as you can see, it pulls data from the ExecutionContext and outputs it to the logs (which, in turn, output it to the server console).
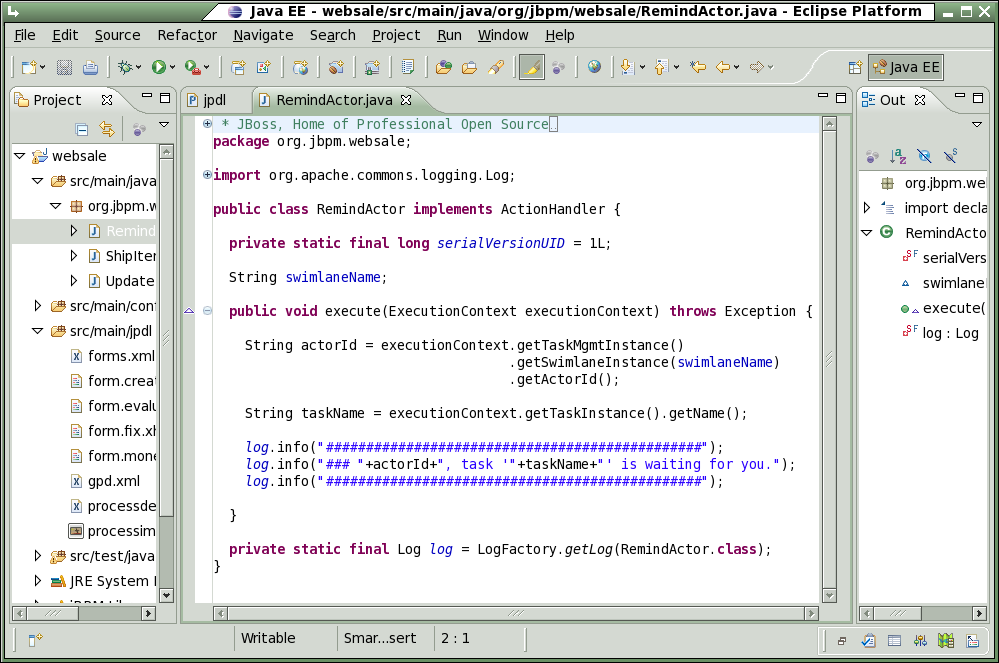
Figure 24. The body of org.jbpm.websale.RemindActor.
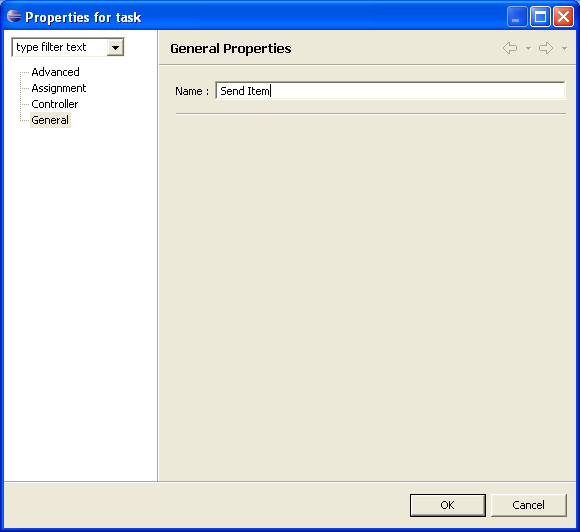
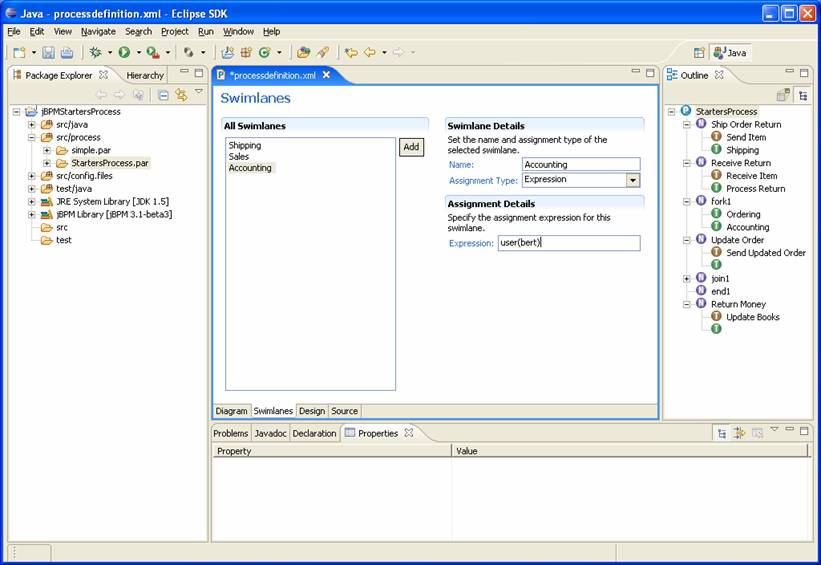
We're almost finished here but, with the holidays coming, I wanted to add a gift wrap task prior to shipping. So let's click Task Node on the left, click one onto the Process, double-click it and give it a name (Figure 25). Then we wire it in by clicking and removing the shipping transition, selecting Transitions from the left-hand toolbar and clicking in two new transitions: Fork -> gift wrap and gift wrap to ship item. Finally, double-click the new transitions and name them shipping and wrapped respectively - the naming dialog will look similar to Figure 25. The result should look similar to Figure 26.
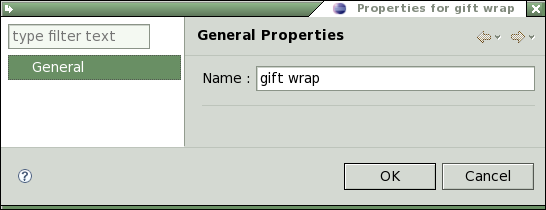
Figure 25. Let's name the new task.
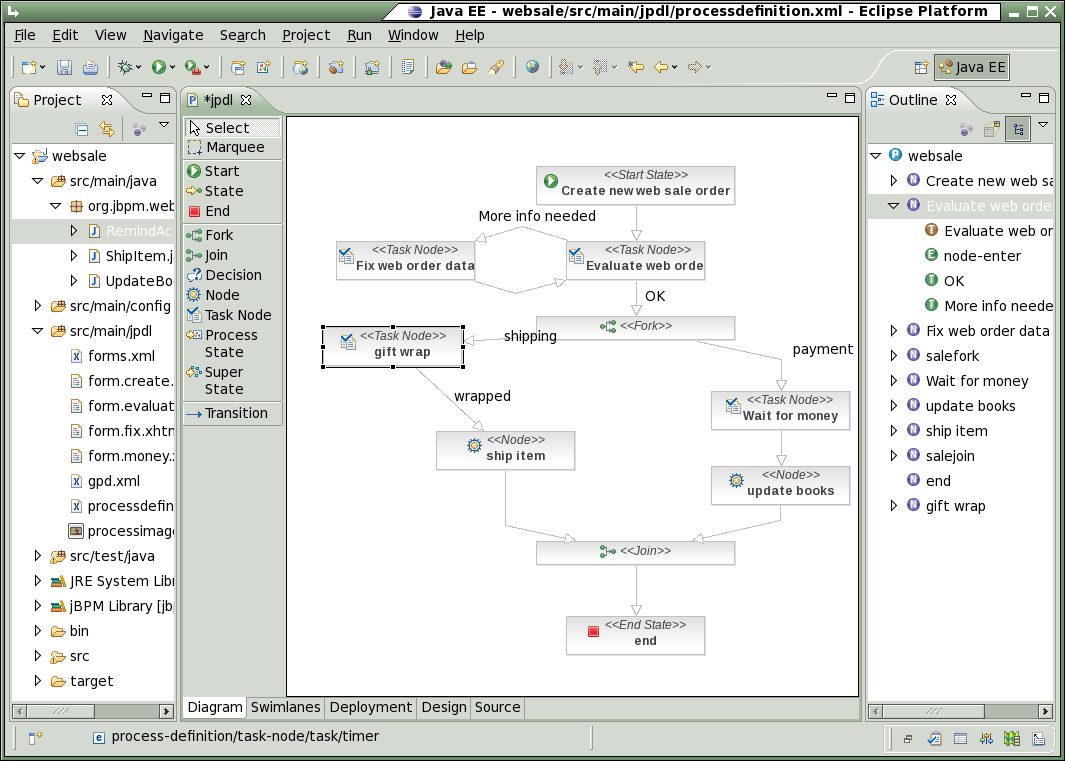
Figure 26. Add a new node and it's transitions.
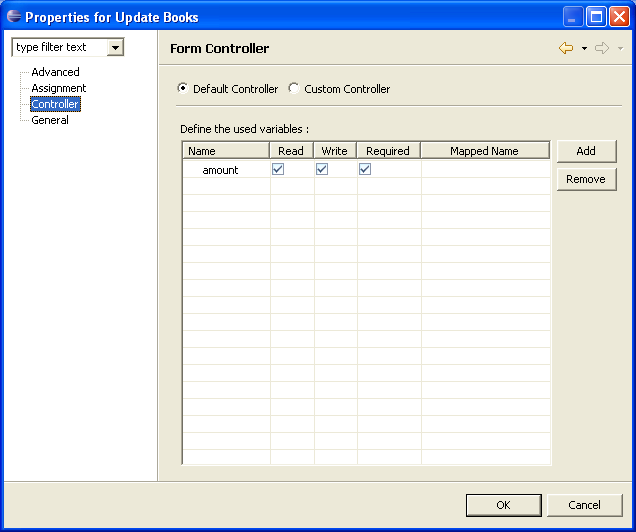
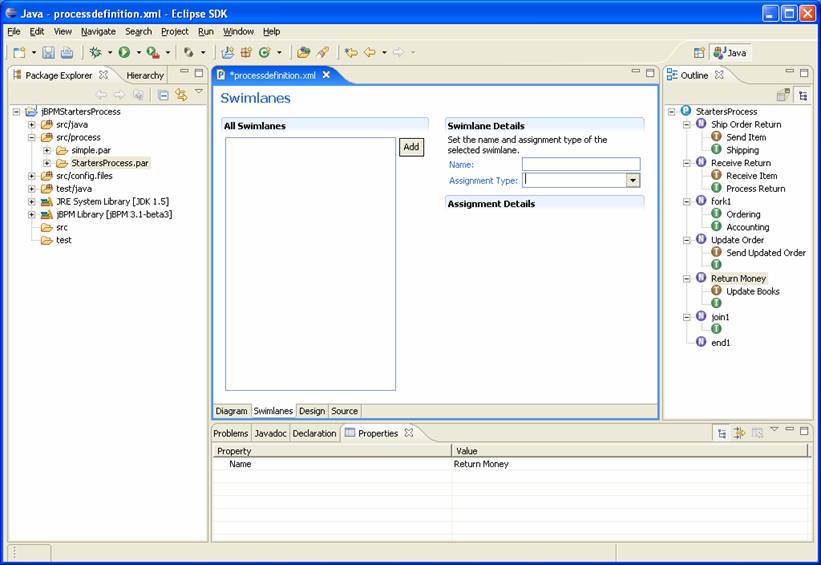
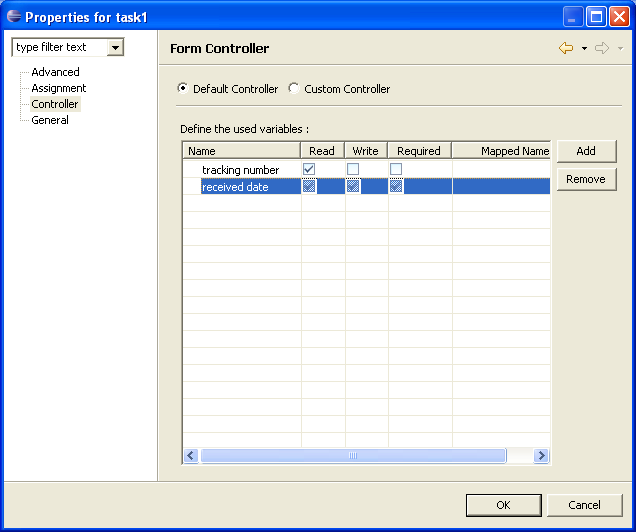
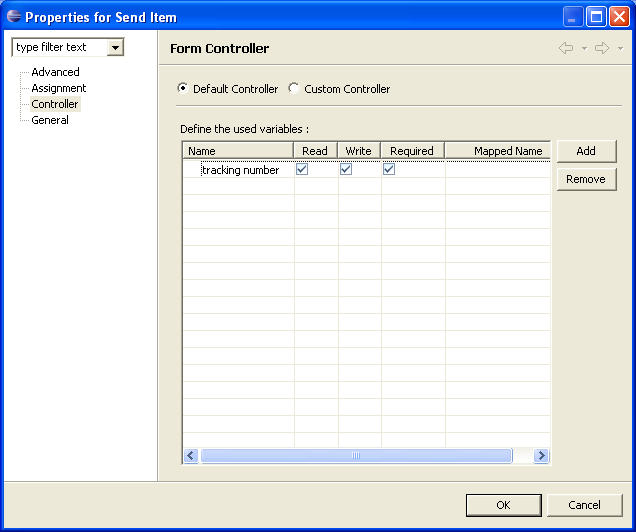
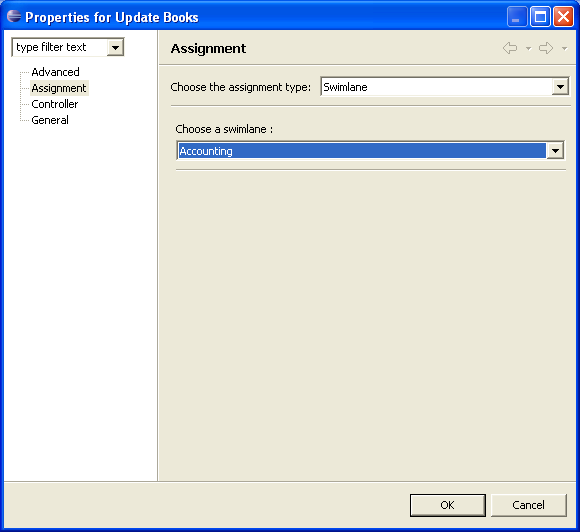
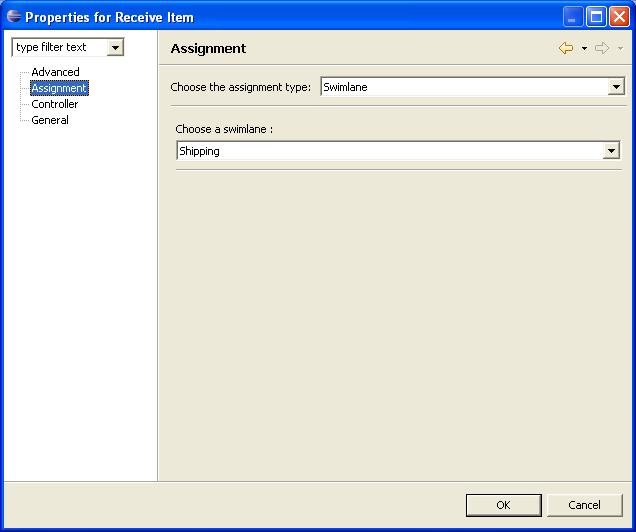
We now need to add a data entry screen so the wrapper can tell what is being wrapped and also to enable them to record the color of the wrapping paper. Therefore we right-click the new node and select Add Task and notice that a task1 appears on the bottom right. Double-click the new task to bring up its properties. In General we can give the task a name. In Assignment we will select __Swimlane__ as the type and shipper as the asignee (Figure 27). At this point, please save the information you've entered if you've changed the name of the task or the new generated form will not be properly associated with it.
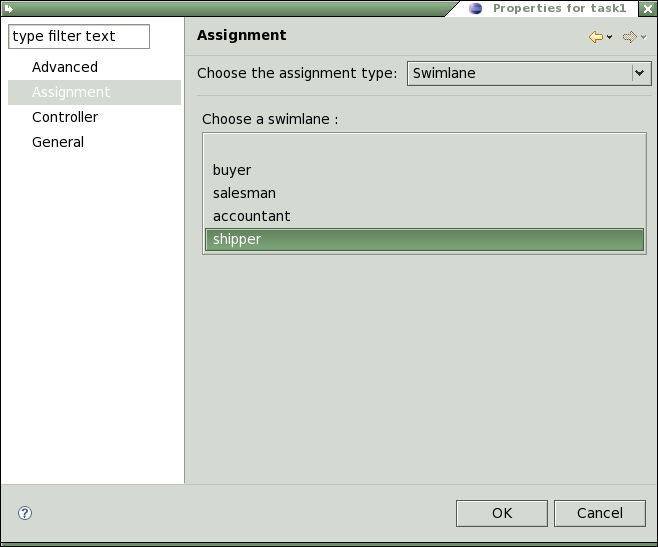
Figure 27. Assign this task to the swimlane shipper.
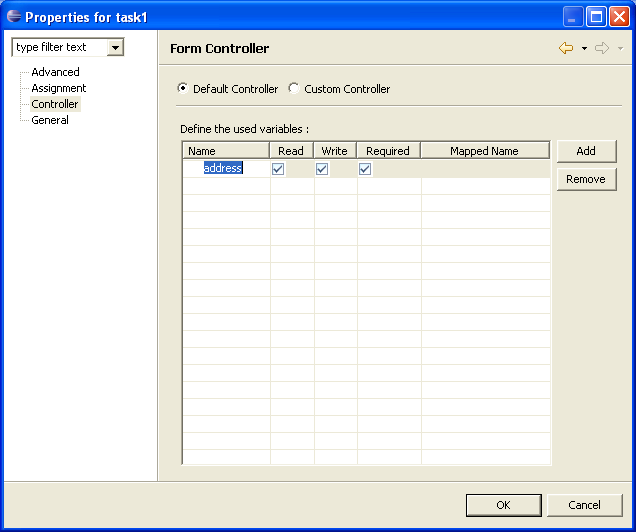
Our final change to the process is the generation of a data entry page. To do this we go to the Advanced section and click on Generate Form which presents us with a page builder(Figure 28). In this screen we start by assigning the page a name (I've chosen form.gift.wrap.xhtml) and then adding data elements. Let's add two elements: item and color. Note that since item is an existing data element (Figure 6), this form field will be automatically populated with existing data! You'll notice also that, after you hit OK you have a new file in the project on your left. You can then edit the
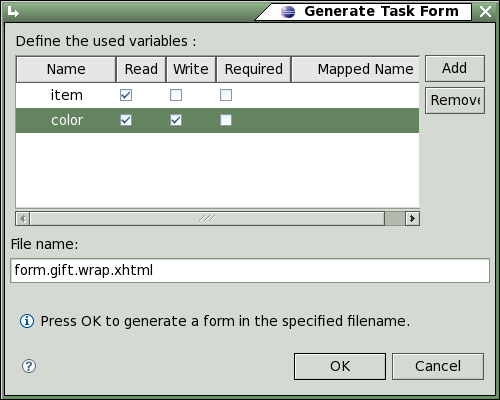
Figure 28. Use the builder to build a form.
Now it's time for deployment
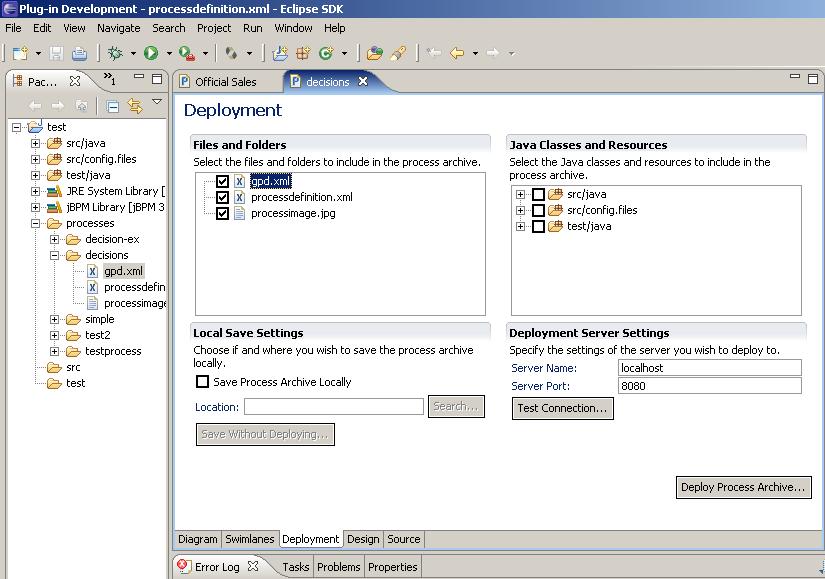
Now that we've made all the changes we wanted to the process, we want to deploy it to our jBPM engine so we can take advantage of the new functionality. We do not need to restart for this! Simply click the Deployment tab in the GPD and you will see something like Figure 29:
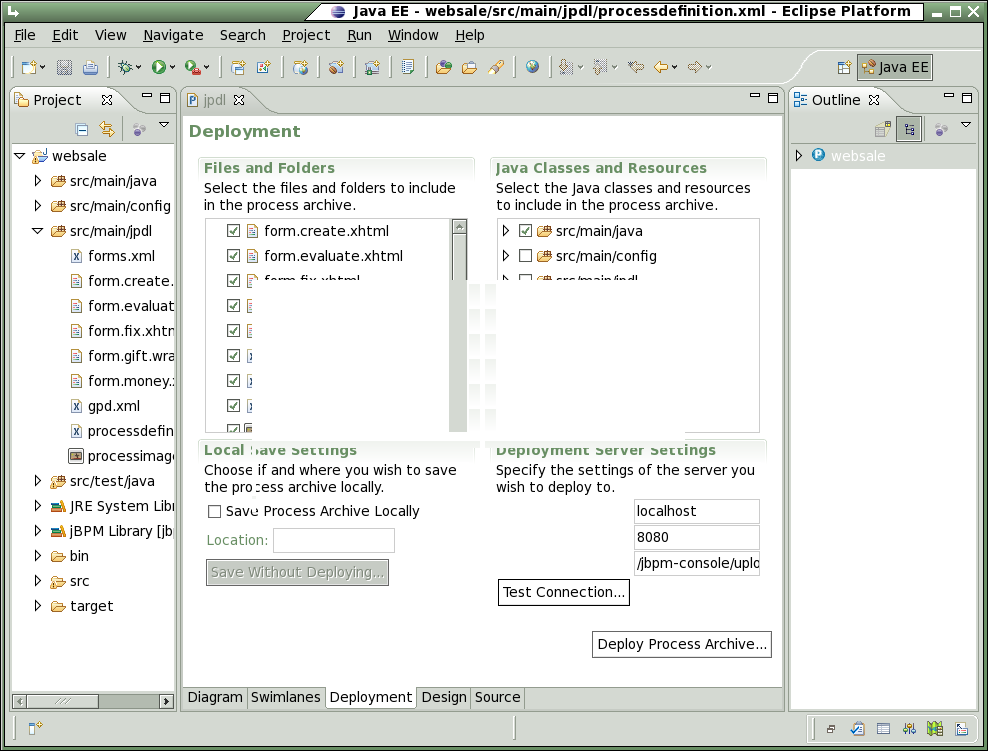
Figure 29. The deployment tab of the Graphical Process Designer.
I recommend using the Test Connection... button to make sure the default settings work on your machine (if you've followed all the directions, this should be the case). Now all you have left to do is to click Deploy Process Archive... which should yield a success message (Figure 30) indicating it's ready to be used in the system.

Figure 30. The updated process has been deployed successfully!
Interact with the new process
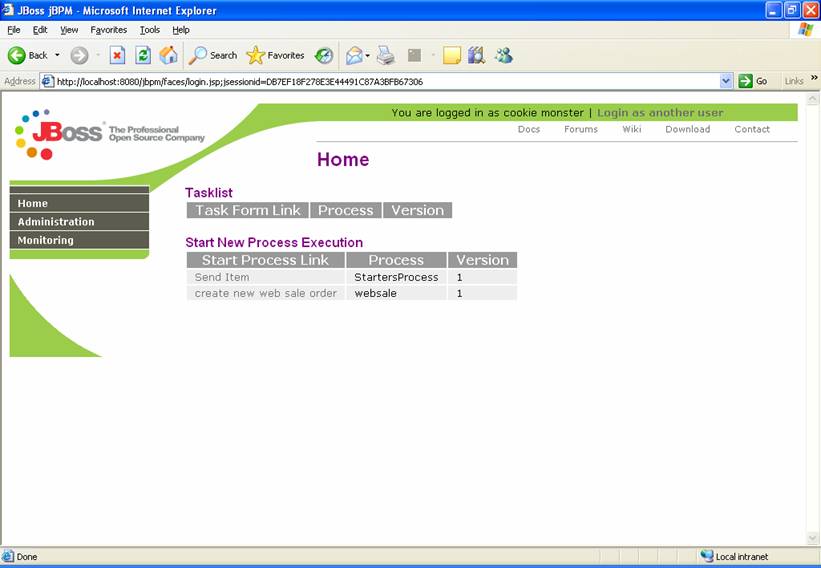
Now, when you log in as &147;user&147; and navigate to the Processes tab, you'll notice a second instance of the websale process exists (Figure 31). We can start a new instance and enter an order as usual (remember to use the Evaluate button!).
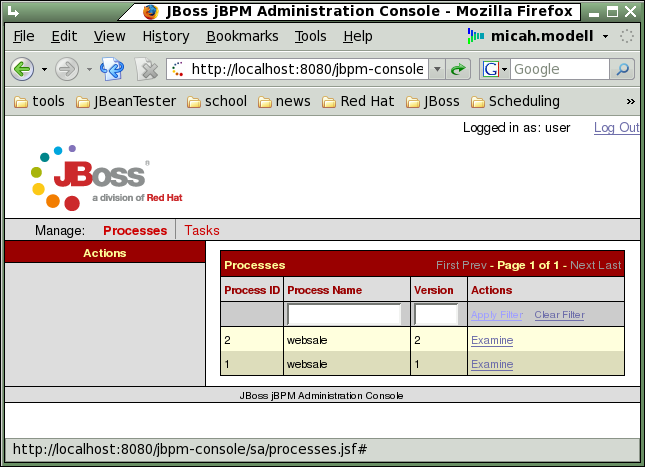
Figure 31. We now have a second version of the websale process.
This time, if we check our mailserver, we'll find that an email has been fired off indicating what we are trying to purchase (Figure 32).
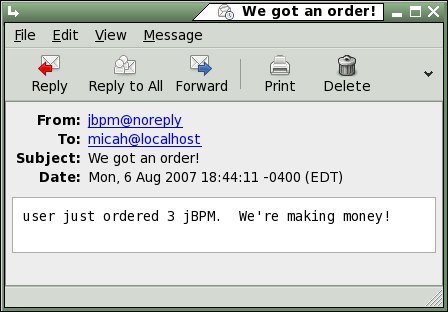
Figure 32. Notice the substitutions in the email message (remember Figure 23).
Now, if we log in as &147;manager&147;, we can OK the process and move it on to the next state. At this point, if we log in as &147;admin&147; (remember, he's our shipper) and navigate to Tasks, we should see three tasks, which may be confusing, so I recommend filtering on Assigned to to narrow it down to the single gift wrap task and drilling into it (using Examine - Figure 33).
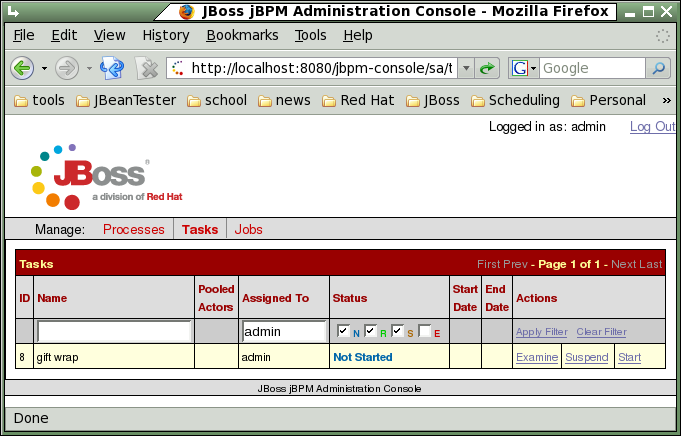
Figure 33. Filter the tasks to reduce noise.
Examining the task shows us the newly generated and deployed data entry task form (Figure 34) which is already populated with the item information from the initial order entry.
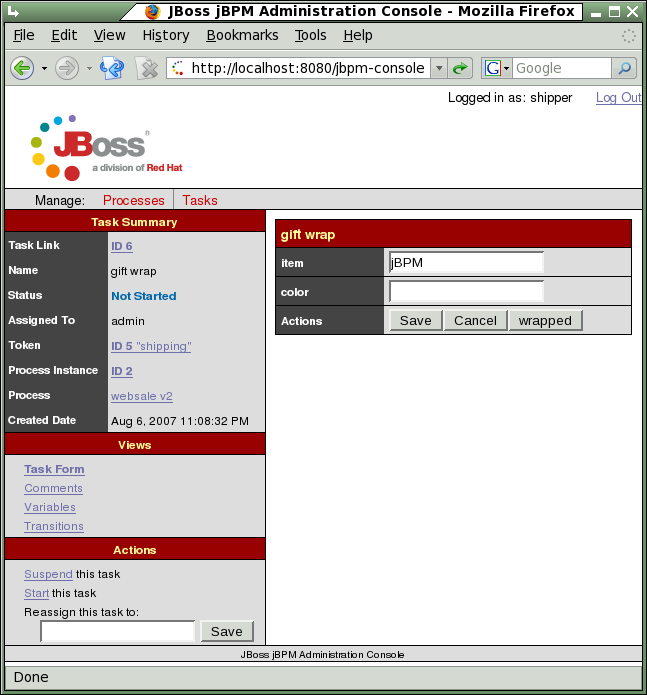
Figure 34. The new gift wrap data node.
Now, let's log in as shipper and finish off these processes. First, if we view the new Process Instance's Process Image we see the new nodes and the current location of the tokens (Figure 35).

Figure 35. The newly loaded and executing process image.
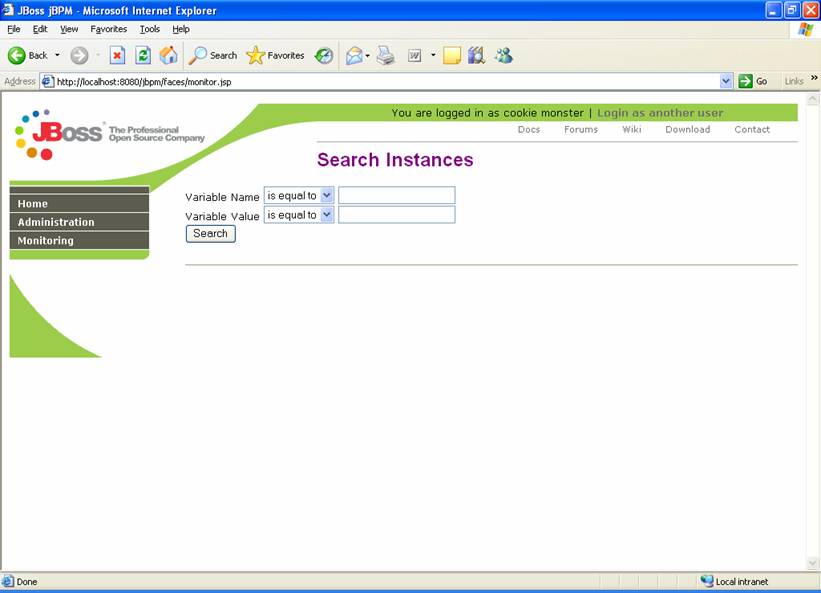
Finally, we go to Tasks and enter a payment ending the process. To see the completed process, we must filter for Process Instances in the End state (Figure 36) and then we can look at it's Process Image (Figure 37).
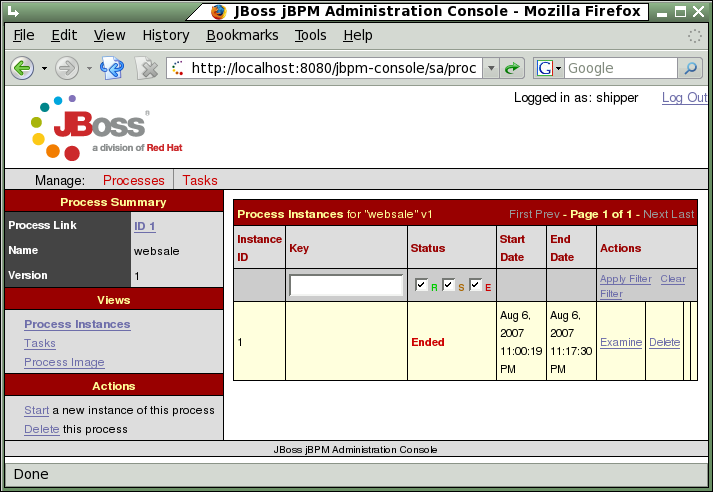
Figure 36. Searching for completed tasks.

Figure 37. Viewing the image of the ended task.
And now we're finished! A webinar version of this demonstration is available at https://www.redhat.com/promo/webinars/!


Comments