By default, JBoss uses the pure Java version of Tomcat. In production situations, it is recommended to use the tomcat-native plugin for optimal web performance. You can read more about the advantages of tomcat-native here.
There have also been situations were users have very large CA CRLs that do not perform will the Java only version of Tomcat. You can read about a possible reason for that here.
For production use, JBoss recommends installing and using tomcat-native rather that using the pure Java version of Tomcat. This wiki is an attempt to show how to install tomcat-native in JBoss and also how to configure SSL once tomcat-native is installed.
1.) Installing Tomcat-native
You may have seen a line like this in your JBoss log:
16:53:35,815 INFO [AprLifecycleListener] The Apache Tomcat Native
library which allows optimal performance in production environments was
not found on the java.library.path:
/usr/java/jdk1.6.0_11/jre/lib/i386/server:/usr/java/jdk1.6.0_11/jre/lib/i386:/usr/java/jdk1.6.0_11/jre/../lib/i386::/home/apestel/Products/PostgreSQL_8.3.7.1/lib:/home/apestel/Products/PostgreSQL_8.3.7.1/lib:/usr/java/packages/lib/i386:/lib:/usr/lib
Basically, tomcat-native is just a binary library. In the case of Red Hat / Fedora, it can be installed by this command:
[apestel@localhost SSL]$ sudo yum install tomcat-native
You can see what libraries were installed by running this command:
[apestel@localhost SSL]$ sudo rpm -ql tomcat-native
/usr/lib/libtcnative-1.so
/usr/lib/libtcnative-1.so.0
/usr/lib/libtcnative-1.so.0.1.15
/usr/share/doc/tomcat-native-1.1.15
/usr/share/doc/tomcat-native-1.1.15/CHANGELOG.txt
/usr/share/doc/tomcat-native-1.1.15/LICENSE
/usr/share/doc/tomcat-native-1.1.15/NOTICE.txt
If this library is not in a directory listed in the JBoss log above, then you'll need to change your LD_LIBRARY_PATH before starting JBoss so that it will find this new library. Once that is done, you should see this like when starting JBoss:
20:10:46,890 INFO [AprLifecycleListener] Loaded Apache Tomcat Native library 1.1.15.
Congratulations, tomcat-native is now installed!
2.) Generating certificates to enable SSL
If you already have a CA and already have your browser, server, and CA certificates, you can skip this step. If not, we will now walk through the steps of using OpenSSL to create and sign all the necessary certificates as well as generating a CRL that can be checked by the tomcat-native plugin to JBoss.
First, we need to setup a CA (certificate authority). I am going to setup the CA in this directory "/home/apestel/SSL". First, we need to create a file called ca.conf in that directory that has this content in it. Make sure you change the "dir" to point to where your CA directory is going to be.
[ ca ]
default_ca = ca_default
[ ca_default ]
dir = /home/apestel/SSL
certs = $dir
new_certs_dir = $dir/ca.db.certs
database = $dir/ca.db.index
serial = $dir/ca.db.serial
RANDFILE = $dir/ca.db.rand
certificate = $dir/ca.crt
private_key = $dir/ca.key
default_days = 365
default_crl_days = 30
default_md = md5
preserve = no
policy = generic_policy
[ generic_policy ]
countryName = optional
stateOrProvinceName = optional
localityName = optional
organizationName = optional
organizationalUnitName = optional
commonName = optional
emailAddress = optional
We also need to setup a couple directories and files that the CA need as shown below:
[apestel@localhost SSL]$ mkdir ca.db.certs
[apestel@localhost SSL]$ touch ca.db.index
[apestel@localhost SSL]$ echo "0001" > ca.db.serial
Now that the CA folder is setup, we need to generate the CA key and certificate.
[apestel@localhost SSL]$ openssl genrsa 1024 > ca.key
Generating RSA private key, 1024 bit long modulus
........................................++++++
............................................++++++
e is 65537 (0x10001)
[apestel@localhost SSL]$ openssl req -new -x509 -key ca.key -out ca.crt
You are about to be asked to enter information that will be incorporated
into your certificate request.
What you are about to enter is what is called a Distinguished Name or a DN.
There are quite a few fields but you can leave some blank
For some fields there will be a default value,
If you enter '.', the field will be left blank.
-----
Country Name (2 letter code) [GB]:US
State or Province Name (full name) [Berkshire]:Texas
Locality Name (eg, city) [Newbury]:Dallas
Organization Name (eg, company) [My Company Ltd]:Red Hat
Organizational Unit Name (eg, section) []:JBoss
Common Name (eg, your name or your server's hostname) []:Aaron CA
Email Address []:apestel@redhat.com
Now, we'll generate a server key, generate a certificate signing request for the key, and sign the certificate request with the CA's key. This is the certificate that will be used by our JBoss server. Note that I just used a default empty certificate signing request password since I'm signing the certificate myself and not sending the certificate request to anyone (like and external CA).
[apestel@localhost SSL]$ openssl genrsa 1024 > server.key
Generating RSA private key, 1024 bit long modulus
..................++++++
.............++++++
e is 65537 (0x10001)
[apestel@localhost SSL]$ openssl req -new -key server.key -out server.csr
You are about to be asked to enter information that will be incorporated
into your certificate request.
What you are about to enter is what is called a Distinguished Name or a DN.
There are quite a few fields but you can leave some blank
For some fields there will be a default value,
If you enter '.', the field will be left blank.
-----
Country Name (2 letter code) [GB]:US
State or Province Name (full name) [Berkshire]:Texas
Locality Name (eg, city) [Newbury]:Dallas
Organization Name (eg, company) [My Company Ltd]:Red Hat
Organizational Unit Name (eg, section) []:JBoss
Common Name (eg, your name or your server's hostname) []:Aaron Server
Email Address []:apestel@redhat.com
Please enter the following 'extra' attributes
to be sent with your certificate request
A challenge password []:
An optional company name []:
apestel@localhost SSL]$ openssl ca -config ca.conf -out server.crt -infiles server.csr
Using configuration from ca.conf
Check that the request matches the signature
Signature ok
The Subject's Distinguished Name is as follows
countryName RINTABLE:'US'
stateOrProvinceName RINTABLE:'Texas'
localityName RINTABLE:'Dallas'
organizationName RINTABLE:'Red Hat'
organizationalUnitName:PRINTABLE:'JBoss'
commonName RINTABLE:'Aaron Server'
emailAddress :IA5STRING:'apestel@redhat.com'
Certificate is to be certified until Nov 15 22:19:28 2010 GMT (365 days)
Sign the certificate? [y/n]:y
1 out of 1 certificate requests certified, commit? [y/n]y
Write out database with 1 new entries
Data Base Updated
Now we have the server certificate signed by our CA. So, let's create two browser certificates. One certificate we will use and one certificate that we will "revoke" and show that our JBoss server uses the CA's CRL to restrict access by clients with the "revoked" certificate.
First, let's generate the certificate we're going to use. We generate a key, generate a certificate signing request, sign the request with the CA, and then convert the browser certificate to a PKCS format that can be imported by browsers.
[apestel@localhost SSL]$ openssl genrsa 1024 > browser.key
Generating RSA private key, 1024 bit long modulus
......................++++++
................++++++
e is 65537 (0x10001)
[apestel@localhost SSL]$ openssl req -new -key browser.key -out browser.csr
You are about to be asked to enter information that will be incorporated
into your certificate request.
What you are about to enter is what is called a Distinguished Name or a DN.
There are quite a few fields but you can leave some blank
For some fields there will be a default value,
If you enter '.', the field will be left blank.
-----
Country Name (2 letter code) [GB]:US
State or Province Name (full name) [Berkshire]:Texas
Locality Name (eg, city) [Newbury]:Dallas
Organization Name (eg, company) [My Company Ltd]:Red Hat
Organizational Unit Name (eg, section) []:JBoss
Common Name (eg, your name or your server's hostname) []:Aaron Browser
Email Address []:apestel@redhat.com
Please enter the following 'extra' attributes
to be sent with your certificate request
A challenge password []:
An optional company name []:
[apestel@localhost SSL]$ openssl ca -config ca.conf -out browser.crt -infiles browser.csr
Using configuration from ca.conf
Check that the request matches the signature
Signature ok
The Subject's Distinguished Name is as follows
countryName RINTABLE:'US'
stateOrProvinceName RINTABLE:'Texas'
localityName RINTABLE:'Dallas'
organizationName RINTABLE:'Red Hat'
organizationalUnitName:PRINTABLE:'JBoss'
commonName RINTABLE:'Aaron Browser'
emailAddress :IA5STRING:'apestel@redhat.com'
Certificate is to be certified until Nov 15 22:24:56 2010 GMT (365 days)
Sign the certificate? [y/n]:y
1 out of 1 certificate requests certified, commit? [y/n]y
Write out database with 1 new entries
Data Base Updated
[apestel@localhost SSL]$ openssl pkcs12 -export -in browser.crt -inkey browser.key -out browser.p12
Enter Export Password:
Verifying - Enter Export Password:
Now, let's do the same thing again for a second browser certificate that we will revoke and add to a CRL.
[apestel@localhost SSL]$ openssl genrsa 1024 > browser_to_revoke.key
Generating RSA private key, 1024 bit long modulus
.............................................++++++
..............................................++++++
e is 65537 (0x10001)
[apestel@localhost SSL]$ openssl req -new -key browser_to_revoke.key -out browser_to_revoke.csr
You are about to be asked to enter information that will be incorporated
into your certificate request.
What you are about to enter is what is called a Distinguished Name or a DN.
There are quite a few fields but you can leave some blank
For some fields there will be a default value,
If you enter '.', the field will be left blank.
-----
Country Name (2 letter code) [GB]:US
State or Province Name (full name) [Berkshire]:Texas
Locality Name (eg, city) [Newbury]:Dallas
Organization Name (eg, company) [My Company Ltd]:Red Hat
Organizational Unit Name (eg, section) []:JBoss
Common Name (eg, your name or your server's hostname) []:Aaron Browser Revoked
Email Address []:apestel@redhat.com
Please enter the following 'extra' attributes
to be sent with your certificate request
A challenge password []:
An optional company name []:
[apestel@localhost SSL]$ openssl ca -config ca.conf -out browser_to_revoke.crt -infiles browser_to_revoke.csr
Using configuration from ca.conf
Check that the request matches the signature
Signature ok
The Subject's Distinguished Name is as follows
countryName RINTABLE:'US'
stateOrProvinceName RINTABLE:'Texas'
localityName RINTABLE:'Dallas'
organizationName RINTABLE:'Red Hat'
organizationalUnitName:PRINTABLE:'JBoss'
commonName RINTABLE:'Aaron Browser Revoked'
emailAddress :IA5STRING:'apestel@redhat.com'
Certificate is to be certified until Nov 15 22:27:40 2010 GMT (365 days)
Sign the certificate? [y/n]:y
1 out of 1 certificate requests certified, commit? [y/n]y
Write out database with 1 new entries
Data Base Updated
[apestel@localhost SSL]$ openssl pkcs12 -export -in browser_to_revoke.crt -inkey browser_to_revoke.key -out browser_to_revoke.p12
Enter Export Password:
Verifying - Enter Export Password:
Now, let's revoke the certificate that we just created and generate a CRL (ca.crl) for our CA.
[apestel@localhost SSL]$ openssl ca -config ca.conf -revoke browser_to_revoke.crt -keyfile ca.key -cert ca.crt
Using configuration from ca.conf
Revoking Certificate 03.
Data Base Updated
[apestel@localhost SSL]$ openssl ca -config ca.conf -gencrl -keyfile ca.key -cert ca.crt -out ca.crl
Using configuration from ca.conf
Let's recap what we just did in this step:
A.) We setup a CA (Certificate Authority) with a CA key and certificate.
B.) We generated a server certificate that was signed by our CA.
C.) We generated a browser certificate that was signed by our CA.
D.) We generated a second browser certificate that was signed by our CA.
E.) We told our CA to "revoke" the second browser certificate and generated a CRL (Certificate Revocation List) that our server will use to determine which certificates generated by our CA are valid and which have been revoked.
Now we can go about configuring JBoss with tomcat-native to use these SSL artifacts that we just created.
3.) Configuring JBoss with tomcat-native to use SSL
Actually, this is a very easy process once you know what to do. However, it is definitely different than configuring SSL for JBoss without tomcat native. I highly recommend that you read this page, especially if you want to do anything different than what I will be showing below.
So to configure our server to use the new SSL environment we created, we just need to edit <JBOSS_HOME>/server/default_ssl/deploy/jboss-web.deployer/server.xml and make sure that our SSL connector looks like this. Note that tomcat-native SSL does not use key stores or trust stores like the non-native version of Tomcat does.
<Connector port="8443" address="${jboss.bind.address}"
protocol="HTTP/1.1" SSLEnabled="true"
maxThreads="150" scheme="https" secure="true"
SSLCertificateFile="/home/apestel/SSL/server.crt"
SSLCertificateKeyFile="/home/apestel/SSL/server.key"
SSLPassword=""
SSLVerifyClient="require"
SSLCACertificateFile="/home/apestel/SSL/ca.crt"
SSLCARevocationFile="/home/apestel/SSL/ca.crl"
/>
This example above forces the client browsers to have have a certificate for two way SSL. By reading the paged referenced above, you'll note that there are lots of other options here as well, like being able to specify a CA Revocation directory if you have multiple CRLs from different CAs.
4.) Importing browser certificates and accessing the JBoss SSL server
To import our browser certificates into Firefox, simply choose:
"Edit | Preferences | Advanced | Encryption | View Certificates | Your Certificates | Import | <select the browser.p12 and browser_to_revoke.p12 certificates that we generated>
When you access the server now via https://localhost:8443, it should prompt you to select which browser certificate you want to use:
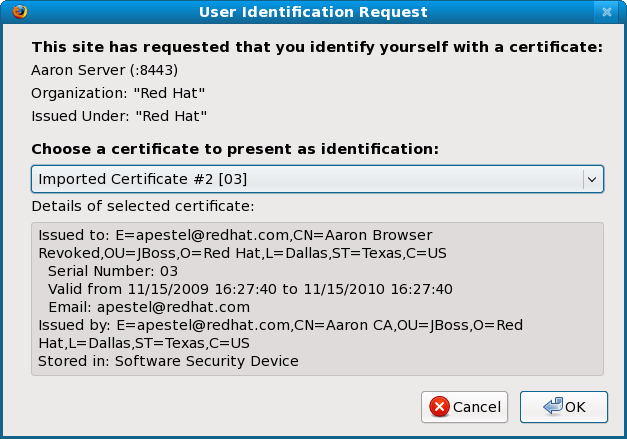
If you chose the "Revoked" certificate, you should see and error like this:
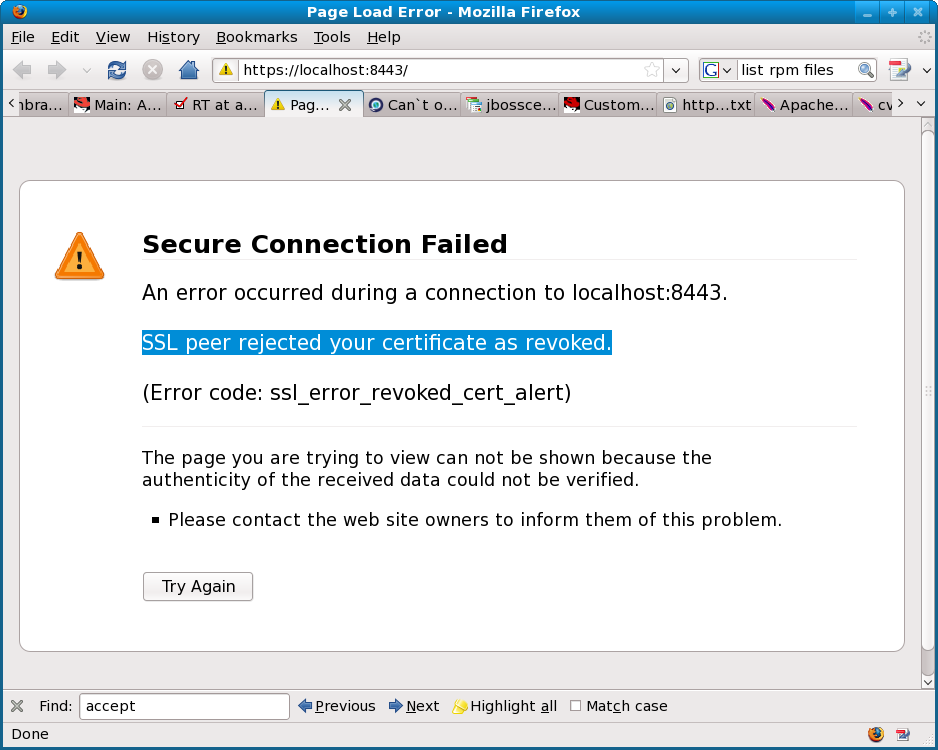
Then if you click "Shift - Refresh", you can select the other certificate and then you should see the default server page.
Congratulations, you've configured your server for production use by using tomcat-native and you've setup your server to use SSL - including CA CRLs!
Comments