This article is a guide to deploying jBPM 3.2 to Tomcat 5.5 and 6.0.
Tomcat 6.0
The basic procedure gets the jBPM console to work against an HSQL in-process database. It is advisable to attempt this procedure against a clean Tomcat 6.0 installation before going for Tomcat 5.5 or other databases.
Downloads
0. Download the jBPM installer installer. Launch the installer with the following command. Select the jBPM3 Standalone component only.
$ java -jar jbpm-installer-3.2.x.jar
1. Download the latest snapshot of jsf-console-tomcat.war, the web console based on JSF. Extract the contents to the tomcat-<version>/webapps/jbpm-console/ directory.
2. Download the latest snapshot of jbpm-tomcat.jar, the Tomcat integration bits, to tomcat-6.0.x/lib/
3. Download jta.jar to jbpm-console/WEB-INF/lib/
4. Download gravel-1.0.0.GA-JBPM-3302.jar to jbpm-console/WEB-INF/lib/ and delete jbpm-console/WEB-INF/lib/gravel-1.0.0.GA.jar.
- See JBPM-3302 for more information.
Dependencies
5. Copy all files from jbpm-3.2.x/lib/ except hsqldb.jar, jbpm-console.war, junit.jar and log4j.jar to jbpm-console/WEB-INF/lib/
6. Copy hsqldb.jar from jbpm-3.2.x/lib/ to tomcat-6.0.x/lib/
Configuration
7. Copy jbpm.cfg.xml and hibernate.cfg.xml from jbpm-3.2.x/config/ to jbpm-console/WEB-INF/classes.
8. Examine the data source preconfigured in jbpm-console/META-INF/context.xml. Open hibernate.cfg.xml and switch from JDBC connections to the data source as follows.
a) Uncomment the DataSource properties section.
<!-- DataSource properties (begin) -->
<property name="hibernate.connection.datasource">java:comp/env/jdbc/JbpmDataSource</property>
<!-- DataSource properties (end) -->
b) Comment out the JDBC connection properties section.
<!-- JDBC connection properties (begin) ===
<property name="hibernate.connection.driver_class">org.hsqldb.jdbcDriver</property>
<property name="hibernate.connection.url">jdbc:hsqldb:mem:jbpm</property>
<property name="hibernate.connection.username">sa</property>
<property name="hibernate.connection.password"></property>
==== JDBC connection properties (end) -->
c) Comment out the automatic schema creation property.
<!-- Automatic schema creation (begin) ===
<property name="hibernate.hbm2ddl.auto">create</property>
==== Automatic schema creation (end) -->
9. The configuration is correct and complete at this point. However, no user will be able to authenticate because the database is empty. To provide seed data, download the HSQLDB data files jbpmDB.script and jbpmDB.properties to tomcat-<version>/work/Catalina/localhost/jbpm-console/. Create the directory if necessary.
Launch
All set! Go ahead and start Tomcat. Point your browser to the jBPM web console. The login page should appear.
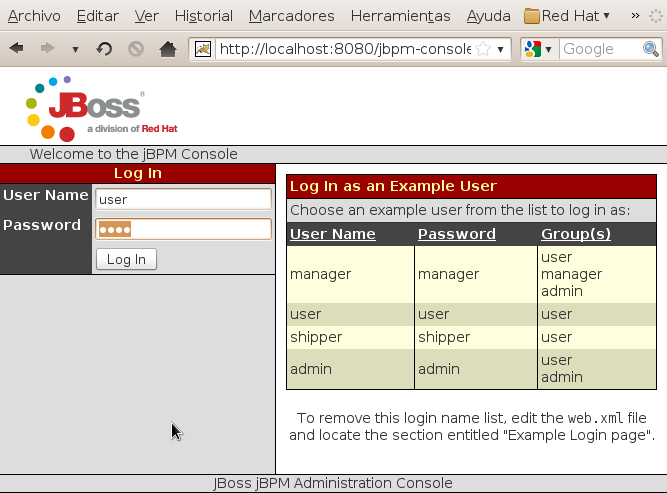
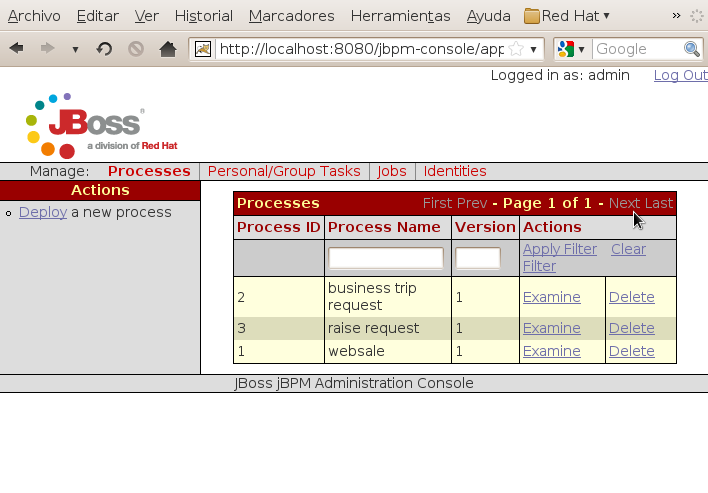
After logging in as one of the example users, the sample processes will be displayed. To deploy a new process definition, log in as a user in the admin group and click the Deploy link in the Actions panel on the left side.
Tomcat 5.5
Since the procedure is very similar to Tomcat 6.0, only the differences will be noted.
Downloads
2. Download the latest snapshot of jbpm-tomcat.jar, the Tomcat integration bits, to tomcat-5.5.x/server/lib/
3. Download jta.jar, el-api.jar and el-ri.jar to jbpm-console/WEB-INF/lib/
Dependencies
4. Copy hsqldb.jar from jbpm-3.2.x/lib/ to tomcat-5.5.x/common/lib/
Other Databases
Follow the base procedure for the selected Tomcat version, with the following changes depending on the target database.
Dependencies
4. Copy the JDBC driver file to tomcat-6.0.x/lib or tomcat-5.5.x/common/lib depending on the target Tomcat version.
Configuration
6. Copy jbpm.cfg.xml and hibernate.cfg.<database>.xml from jbpm-3.2.x/config/ to jbpm-console/WEB-INF/classes/
7. Edit the data source preconfigured in jbpm-console/META-INF/context.xml. Set the appropriate driverClassName, url, username and password attributes for the target database.
8. Create the database schema and load seed data as follows.
a) Execute the jbpm-3.2.x/database/jbpm.jpdl.<database>.sql script to create the required tables, indexes and constraints.
b) Run the following SQL statements to fill in the example users.
INSERT INTO JBPM_ID_USER VALUES(1,'U','user','user@sample.domain','user');
INSERT INTO JBPM_ID_USER VALUES(2,'U','manager','manager@sample.domain','manager');
INSERT INTO JBPM_ID_USER VALUES(3,'U','admin','admin@sample.domain','admin');
INSERT INTO JBPM_ID_USER VALUES(4,'U','shipper','shipper@sample.domain','shipper');
INSERT INTO JBPM_ID_GROUP VALUES(1,'G','sales','organisation',NULL);
INSERT INTO JBPM_ID_GROUP VALUES(2,'G','admin','security-role',NULL);
INSERT INTO JBPM_ID_GROUP VALUES(3,'G','hr','organisation',NULL);
INSERT INTO JBPM_ID_GROUP VALUES(4,'G','user','security-role',NULL);
INSERT INTO JBPM_ID_GROUP VALUES(5,'G','manager','security-role',NULL);
INSERT INTO JBPM_ID_MEMBERSHIP VALUES(1,'M',NULL,NULL,2,4);
INSERT INTO JBPM_ID_MEMBERSHIP VALUES(2,'M',NULL,NULL,3,4);
INSERT INTO JBPM_ID_MEMBERSHIP VALUES(3,'M',NULL,NULL,1,4);
INSERT INTO JBPM_ID_MEMBERSHIP VALUES(4,'M',NULL,NULL,4,4);
INSERT INTO JBPM_ID_MEMBERSHIP VALUES(5,'M',NULL,NULL,4,3);
INSERT INTO JBPM_ID_MEMBERSHIP VALUES(6,'M',NULL,NULL,2,3);
INSERT INTO JBPM_ID_MEMBERSHIP VALUES(7,'M',NULL,NULL,3,3);
INSERT INTO JBPM_ID_MEMBERSHIP VALUES(8,'M',NULL,NULL,3,2);
INSERT INTO JBPM_ID_MEMBERSHIP VALUES(9,'M',NULL,NULL,2,2);
INSERT INTO JBPM_ID_MEMBERSHIP VALUES(10,'M',NULL,NULL,2,5);
INSERT INTO JBPM_ID_MEMBERSHIP VALUES(11,'M',NULL,'boss',2,1);
INSERT INTO JBPM_ID_MEMBERSHIP VALUES(12,'M',NULL,NULL,1,1);
Launch
Logins as example users will work, although no sample processes will be immediately available. You will have to deploy processes through the web console as indicated above.
Comments