This article details the significant files, libraries, and source code for the AeroGear archetype and quickstart that are part of the JBoss-AS quickstart suite called kitchensink-html5-mobile. For instructions on getting started with the archetype and quickstart see: Getting Started With HTML5 Mobile Web Development with JBoss. The quickstart is nearly identical to the archetype, and for that reason this article will use the quickstart for reference, but the same files will exist if you create your own application using the archetype.
In many cases the source code is best location for updated comments and details, please refer there for any additional information.
Client Source Code
The web client side of this quickstart consists of single page application (index.html), its dependent libraries, and other standard resources (JavaScript, CSS, images).
index.html
Github Source: index.html
For this application we chose to follow the single page application approach where your entire client application can be encapsulated into a single html file. While this may sound crazy at first there are actually some very good reasons to do this, especially if it fits your use-case. For more complex use-cases other approaches may be appropriate. In order for this approach to work you must follow a concept called "responsive design" where your application can adjust based on the client accessing it. This application follows many of those tenants, and you can see this though our source comments, and sections below.
Header
From the header of the document you can see that this is a HTML5 file because of the <!DOCTYPE html> tag. We then set the <meta> tags to define the scaling and viewport properties for our application. In our case we are setting the initial width of the page to the width of the device and the initial scale to 1.
After this comes our 3rd party libraries that we are using. They are described in more detail in their own section below. We also pull our app.js file which contains the majority of our JavaScript logic. There are some notes about minifying app.js which you can read more about in the README.
<!DOCTYPE html>
<html>
<head>
    <title>AeroGear QuickStart</title>
    <meta http-equiv="Content-Type" content="text/html; charset=utf-8"/>
    <!-- Set viewport scaling and zoom features -->
    <meta name="viewport" content="width=device-width, initial-scale=1"/>

    <!-- Include the full development version of Modernizr. In production, you should use a -->
    <!-- minimized custom build to reduce file size -->
    <script type="text/javascript" src="js/libs/modernizr-2.5.3.min.js"></script>
    <script type="text/javascript" src="js/libs/underscore-min.js"></script>

    <!-- Minification - See Readme for details -->
    <!-- For minification, comment out this file -->
    <script type="text/javascript" src="js/app.js"></script>
    <!-- For minification, uncomment this file -->
    <!-- <script type="text/javascript" src="js/app.min.js"></script> -->
....
Directly after this part of the header comes our initialization logic for our application. This is best viewed in source code starting from line 44 or so.
In this section we do a couple of different things:
- Demonstrate how to use the yepnope library, which is included in Modernizr to conditionally load the jquery-min.js file from a CDN, or fallback to our own local non-minified version for development.
- Use Modernizr and new media queries to determine if this is a mobile device
- Using this information we toggle jQuery mobile support, and which CSS files to include in our app
- When that is completed we setup our initial event listeners, and populate the member table from the server.
HTML5 Semantic Tags & Structure
One of the new features of HTML5 is a whole suite of new semantic based tags. By which I mean descriptive tags that better describe the contained content, such as <section>, <footer>, <aside>, etc.... These make it possible to easily break up your structure without ending up with a forest of <div id=""> tags all over your document.
In the quickstart application we use them to break up the different sections of the page, define the footer, and various articles in the application. By having the desktop version of the application broken up in this way, it makes moving to a mobile browser using jQuery Mobile much easier. Each article is a different page, the aside is the "info" link, etc...
<section>
   <article/>
   <article/>
   <article/>
   <aside/>
   <footer/>
</section>
We also use CSS rules to "hide" various parts of the page based on the client type, and format. This is helped by the media queries described above, and also by how jQuery Mobile defines its page sections.
HTML5 Form API
Another new feature of HTML5 and its related specifications are the HTML form elements and API. In the quickstart we use several of the new features in the member form.
                        <fieldset>
                            <legend>Register a member:</legend>
                            <div>
                                <label for="name">Name:</label>
                                <input type="text" name="name" id="name" placeholder="Your Name" required autofocus/>
                            </div>
                            <div>
                                <label for="email">Email:</label>
                                <input type="email" name="email" id="email" placeholder="Your Email" required/>
                            </div>
                            <div>
                                <label for="phoneNumber">Phone #:</label>
                                <input type="tel" name="phoneNumber" id="phoneNumber" pattern="[0-9]{10,12}" placeholder="Your Phone #" required/>
                            </div>
                            <div id="formMsgs"></div>
                            <div data-role="controlgroup" data-type="horizontal">
                                <input type="submit" name="register" id="register" value="Register"/>
                                <input type="button" name="cancel" id="cancel" value="Cancel"/>
                            </div>
                        </fieldset>
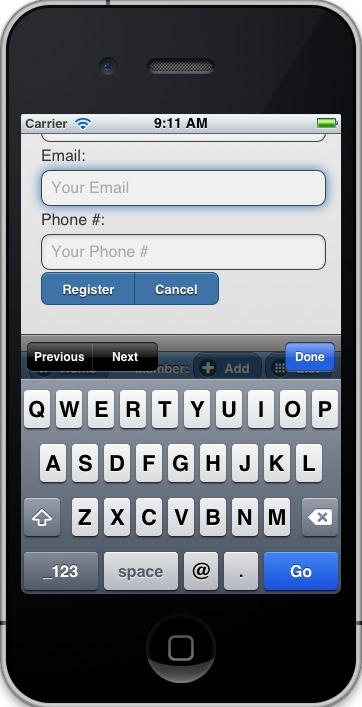
Input type attribute
By setting input type attribute based on the type of field it represents browsers can make various optimizations. Mobile browsers that support this attribute will display special optimized keyboards - as shown below. Some desktop browsers (webkit and firefox mainly) will automatically validate the field as well, for example checking that the field is a valid email.
Placeholder and Autofocus
You can also see the use of the "placeholder" and "autofocus" attributes. The placeholder attribute allows you to set a default text string that will display in your field when there is no value. This is great, especially for mobile devices where you can shrink or eliminate regular labels for fields. The autofocus attribute is exactly as you would expect, for browsers that support this tag the keyboard/input focus will automatically be on the specified field.
Input Validation
One of the more critical updates to the form fields is around built in, client validation. You'll notice attributes like "required" and "pattern". These along with input type discussed above allow browsers that support it to validate fields on the client side. For now this is limited to desktop Chrome, Safari, and Firefox, and their support is slightly different between them, but improvements are made all the time in this area.
Note: it is important that any validation you enter here should match the Bean Validation from Member.java class above. We'll be looking to make this process easier and/or automated for you in the future! It is also important not to assume this validation is available - it is always a good practice to validate at every tier.
app.js
Github Source: app.js
The app.js file contains the example's core JavaScript logic, and handles the RESTful requests to the server, as well as handling the updates to the UI based on them.
updateMemberTable
This method performs a simple GET call to the server, calls the buildMemberRows() method with the response data.
/* Uses JAX-RS GET to retrieve current member list */
function updateMemberTable() {
    $.ajax({
        url: "rest/members",
        cache: false,
        success: function(data) {
            $('#members').empty().append(buildMemberRows(data));
        },
        error: function(error) {
            //console.log("error updating table -" + error.status);
        }
    });
}
buildMemberRows & getMemberTemplate
Using underscore.js these methods retrieve the member.tmpl file from the server and populates it with the json data retrieved from the updateMemberTable method. The output of this process is the table body for the member table on the application's main page. For more on what underscore.js does check out the 3rd party section below and the project's home page.
function getMemberTemplate() {
    $.ajax({
        url: "tmpl/member.tmpl",
        dataType: "html",
        success: function( data ) {
            $( "head" ).append( data );
            updateMemberTable();
        }
    });
}

/* Builds the updated table for the member list */
function buildMemberRows(members) {
    return _.template( $( "#member-tmpl" ).html(), {"members": members});
}
registerMember
This method does the heavy lifting of creating a new member on the server using a POST request, and handling any error responses by highlighting fields that are not valid. Besides basic steps like clearing out older messages, if the request is successful it triggers the member table to update.
function registerMember(memberData) {
    //clear existing  msgs
    $('span.invalid').remove();
    $('span.success').remove();

    $.ajax({
        url: 'rest/members',
        contentType: "application/json",
        dataType: "json",
        type: "POST",
        data: JSON.stringify(memberData),
        success: function(data) {
            //console.log("Member registered");

            //clear input fields
            $('#reg')[0].reset();

            //mark success on the registration form
            $('#formMsgs').append($('<span class="success">Member Registered</span>'));

            updateMemberTable();
        },
        error: function(error) {
            if ((error.status == 409) || (error.status == 400)) {
                //console.log("Validation error registering user!");

                var errorMsg = $.parseJSON(error.responseText);

                $.each(errorMsg, function(index, val) {
                    $('<span class="invalid">' + val + '</span>').insertAfter($('#' + index));
                });
            } else {
                //console.log("error - unknown server issue");
                $('#formMsgs').append($('<span class="invalid">Unknown server error</span>'));
            }
        }
    });
}
If, on the other hand the request fails for some reason the method processes the JSON response and based on the JAX-RS response status displays validation errors to the user based on the field, and message provided by the server. For more on the response codes and format see the server side section below on the MemberService.java class.
CSS Files
Github Source: CSS directory
In our example we have two CSS files; screen.css, and m.screen.css. One is for desktop and the other is for mobile - guess which one ;-) These contain the various styles needed for our application. Most of it is standard CSS styling, but I wanted to point out where it uses the new CSS3 selectors to make styling table cells easy.
/* Using new CSS3 selectors for styling*/
#members tr:nth-child(odd) {
   background: #f4f3f3;
}

#members tr:nth-child(even) {
   background: #ffffff;
}
This is just one example of the many updates to the CSS selector options available in CSS3! This code allow us to style even odd rows easily. In the past we would have had to use generated style classes, or JavaScript - not any more!
3rd Party Libraries
Github Source: JavaScript libs directory
This application uses several 3rd party libraries to do some of the heavy lifting, and handle plumbing and boilerplate code. These libraries represent just one combination, and there are many other quality libraries out there. Look for more details and examples of these in the future.
All of these libraries are packaged in both development and minimized versions. We recommend using the minimized versions for production for best performance. Development versions are easier to work with while, you guessed it, developing, because you can easily debug into the source.
jQuery
Project Site: http://jquery.com/
One of the most popular general purpose JavaScript projects available. This example uses it mainly for DOM manipulation and ajax requests.
jQuery Mobile
Project Site: http://jquerymobile.com/
One of several JavaScript mobile framework projects available. This is very complete framework for mobile devices and has a great range of device support. This also means it is one of the larger libraries out there so performance should be considered. It does a great job of getting you running and is backed by the jQuery project.
Modernizr
Project Site: http://www.modernizr.com/
The Moderizr library is primarily used to check device, and browser capabilities allowing you to have a fine grain of control over your application no matter what device or client may be accessing it. This library integrates with yepnope to combine feature detection with media queries and conditional resource loading.
Yepnope (Included in Modernizr)
Project Site: http://yepnopejs.com/
As the yepnope web site says it is an asynchronous conditional resource loader that's super-fast, and allows you to load only the scripts that your users need. Our example uses it with modernizr to control resource loading and behavior based on the client accessing the application.
Underscore.js
Project Site: http://documentcloud.github.com/underscore/
This is great utility library that has many great functions. This examples primary use for it is to process templating of new member table rows by dynamically loading and populating the member.tmpl file.
JAX-RS Endpoint Source Code
The server side of this application consists of a basic domain model using Bean Validation, and JAX-RS service endpoints using RESTEasy to provide access.
Member.java
Github Source: Member.java
@Entity
@XmlRootElement
@Table(name = "Member_html5mobi", uniqueConstraints = @UniqueConstraint(columnNames = "email"))
public class Member implements Serializable {
   /** Default value included to remove warning. Remove or modify at will. **/
   private static final long serialVersionUID = 1L;

   @Id
   @GeneratedValue
   private Long id;

   @NotNull
   @Size(min = 1, max = 25, message = "1-25 letters and spaces")
   @Pattern(regexp = "[A-Za-z ]*", message = "Only letters and spaces")
   private String name;

   @NotNull
   @NotEmpty
   @Email(message = "Invalid format")
   private String email;

   @NotNull
   @Size(min = 10, max = 12, message = "10-12 Numbers")
   @Digits(fraction = 0, integer = 12, message = "Not valid")
   @Column(name = "phone_number")
   private String phoneNumber;
Here you can see the domain object that is the base of our quickstart. This class has three fields (Name, Email, and PhoneNumber). It uses Bean Validation annotations to define constraints for each of these fields so that only valid values will be accepted.
Also note that at the top we are defining a table name for this object, and specifying that the Email field must be unique in the data table. This will come into play later when need to validate this in the JAX-RS services, and process the response codes effectively.
MemberService.java
Github Source: MemberService.java
This class contains the actual RESTful endpoint definitions and processing code. It uses RESTEasy which is JBoss's implementation of the JAX-RS specification to make this easy to do, and is configured using annotations. A general discussion of JAX-RS is beyond the scope of this article but checkout the RESTEasy site for more!
@Path("/members")
@RequestScoped
@Stateful
public class MemberService {
    ....
Any requests to /members will be routered to this class and be processed by its methods that are defined below.
   @GET
   @Produces(MediaType.APPLICATION_JSON)
   public List<Member> listAllMembers()
   ...

   @GET
   @Path("/{id:[0-9][0-9]*}")
   @Produces(MediaType.APPLICATION_JSON)
   public Member lookupMemberById(@PathParam("id") long id) {
   ...
The methods above define the different ways of "getting" data from the service. Not only can you get a full list of members, and individual members, you can get them in either JSON format. The power of JAX-RS is that these are automatically marshaled from one form to another - we are just dealing with POJOs!
Adding members is where it gets more interesting. We're creating new members using the traditional POST approach with the @POST annotation, you can see that the POST method is using form parameters. As alternative GET method could be used for JSONP support (see the JSONP section below). This method delegate to the MemberRegistration class that processes the request.
  @POST
  @Consumes(MediaType.APPLICATION_JSON)
  @Produces(MediaType.APPLICATION_JSON)
  public Response createMember(Member member) {
  ...
JAX-RS allows our method to accept standard URL encoding form variables, and make it easy to map these to method parameters using the @FormParam annotation.
      //Create a new member class from fields
      Member member = new Member();
      member.setName(name);
      member.setEmail(email);
      member.setPhoneNumber(phone);
Using those values it then constructs a new member object. We don't want to just commit this to the database though. We want to make sure it is valid first!
      try {
         //Validates member using bean validation
         validateMember(member);
The validateMember method validates the given Member variable and throws validation exceptions based on the type of error. If the error is a standard bean validation violation then it will throw a ConstraintValidationException containing a set of the constraints violated. If the error is caused because an existing member with the same email is registered it throws a regular validation exception so that it can be interpreted separately by the catch block.
} catch (ConstraintViolationException ce) {
            //Handle bean validation issues
       builder = createViolationResponse(ce.getConstraintViolations());
} catch (ValidationException e) {
       //Handle the unique constrain violation
       Map<String, String> responseObj = new HashMap<String, String>();
       responseObj.put("email", "Email taken");
       builder = Response.status(Response.Status.CONFLICT).entity(responseObj);
}
If the member is not valid them a map is created that contains the field name(s) that are not valid, and the error message associated with them from model class. It is also very important to set the response code correctly. In our case with use 400 BAD REQUEST for standard constraints, and 409 CONFLICT is another member already has the same email.
If the member is valid the object is committed to the database and a CDI event is triggered just in case anything in the application wanted to know when a new member was created. The method then returns a standard HTTP 200 OK message using the Response.OK() method.
         //Register the member
         log.info("Registering " + member.getName());
         em.persist(member);


         //Trigger the creation event
         memberEventSrc.fire(member);


         //Create an "ok" response
         builder = Response.ok();
         ...
JSONP Support
Github Source: JSONPRequestFilter.java
JSONP support makes requests accessible across domains by adding a callback function to the response. This may be necessary in certain situations like requesting information from a sub-domain of your site. Look for more specific information on JSONP in a separate article, as it is a topic all its own.
Misc
Github Source: JaxRsActivator.java
The JaxRsActivator class does two things for us. First is initializes JAX-RS without the need of a web.xml file, and second it defined the root path for all other JAX-RS HTTP call like this:
@ApplicationPath("/rest")
public class JaxRsActivator extends Application {
   /* class body intentionally left blank */
}
Github Source: Resources.java
The Resources class uses CDI to alias Java EE resources, such as the persistence context, to CDI beans. This makes them available to all other CDI beans, ala MemberSerice.java.
Testing the Application Code
Testing an HTML5 based application requires some addition considerations. First you need to test the JAX-RS back end services. Second with more logic existing in JavaScript you need an effective way of unit testing that.
We will cover this in more detail in: Testing HTML5 Mobile Quickstart & Archetype
Comments