Salesforce as a REST service using Data Virtualization
This article will guide you through the Teiid Designer steps to expose a select set of Salesforce data as a REST endpoint. This article demonstrats using an OpenShift Data Virtualization instance, but any Data Virtualization or Teiid instance may be used. Also, the process demonstrated is not specific to Salesforce data sources. Any other source (or combination of sources) can be used instead.
Prerequisites:
1. Install JBoss Developer Studio with Data Virtualization
- Install Developer Studio with Data Virtualization tooling to your system. Just follow the instructions here to install JBoss Developer Studio.
2. Add a JBoss Server with Teiid instance in Developer Studio
- Refer to the Provision Data Virtualization on OpenShift instructions . Creation of a local server is essentially the same process.
3. Get a Salesforce developer account
- Go to http://www.developerforce.com/events/regular/registration.php?d=70130000000EjHb , to register for your account. You will get an email with a link to login into your account.
- Login to Salesforce interface with your user/password, then go to "Personal Setup > Reset My Security Token". Reset the security token. You will get another email with the security token.
- When connecting from Teiid Designer, use the Salesforce username. The password is the combination of Salesforce password + security token.
- The developer account is populated with some data, but you can create more demo data easily via the Salesforce interface.
Create the Model project and Salesforce source model
1. Launch JBoss Developer Studio and switch to the Teiid Designer perspective. The perspectives are shown in the upper right corner of JBDS.
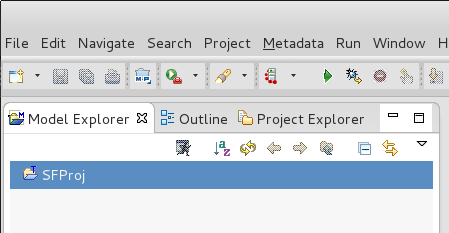
2. Create a Model Project
- in ModelExplorer, Rt-click > New > Teiid Model Project
- in the Model Project wizard, enter SFProj for the Project name. Click Finish to create the empty project:
3. 'Import' the source model from your salesforce account
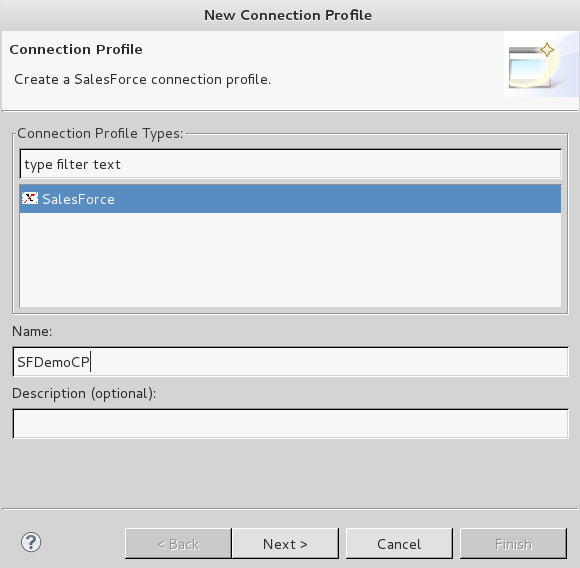
- Select File > Import... > Salesforce >> Source Model , then click Next

- On the 'New Connection Profile' page, Salesforce should be selected. Type in SFDemoCP for the profile Name, then click Next
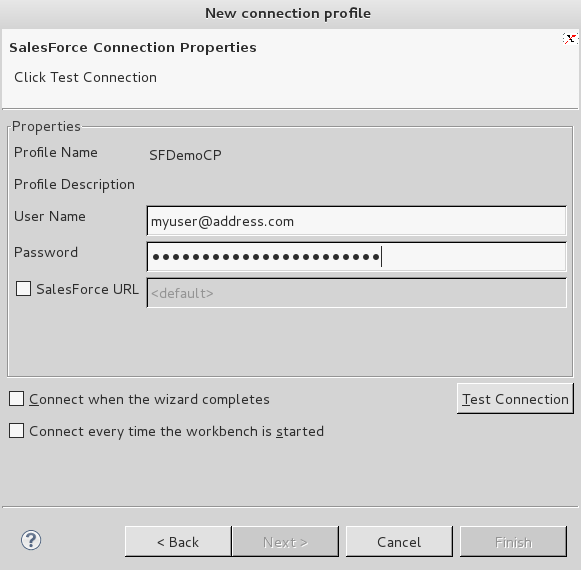
- On the Salesforce Connection Properties page of the Connection Profile Wizard, enter your Salesforce User Name <myuser@mycompany.com> and Salesforce Password. The 'Password' is the Salesforce password and security token combination as required by Salesforce. Your Salesforce user must also have API access permission granted in Salesforce. Click on the 'Test Connection' button to verify a successful connection. Click Next.
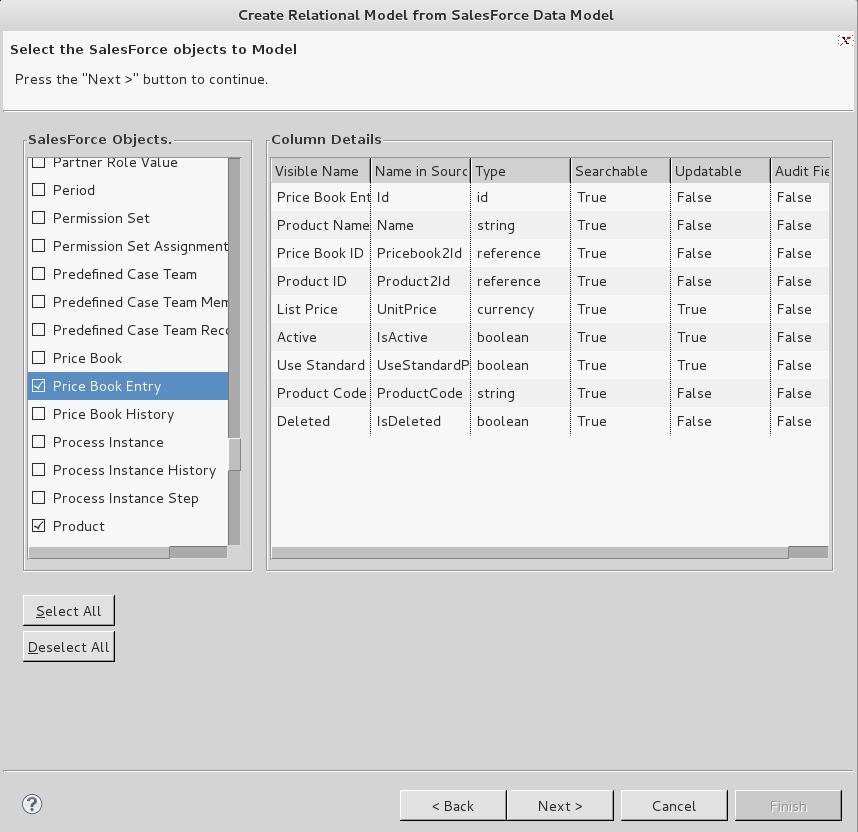
- Click Finish on the Connection Profile wizard summary page. Then back in the wizard, on the 'Salesforce Credentials' page, click Next. Assuming a successful connection, the Salesforce details will be presented as shown below. On the 'Select the Salesforce objects to Model' page, you can choose the Salesforce Objects that you want to import. For this demo, click Deselect All. Then check only the Price Book Entry and Product tables. click Next
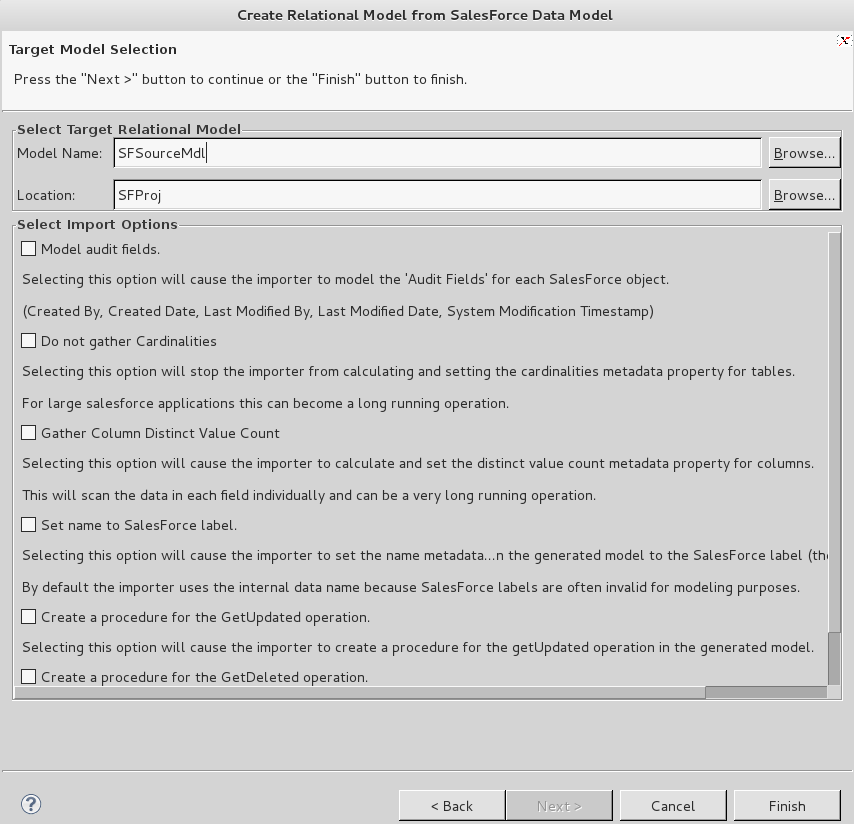
- On the 'Target Model Selection' page you are presented with some additional import options. For the Model Name, enter SFSourceMdl. Under Import Options, leave everything unchecked. Click Finish
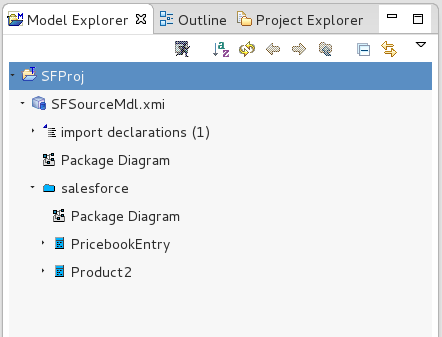
- Upon finish, you will see the source model in Model Explorer. SFSourceMdl is the relational represention of your Salesforce source.
Create custom views
Data Virtualization allows you to abstract your data in any number of ways with multiple view layers. We will add a single view layer which exposes the Salesforce source as a view and a procedure.
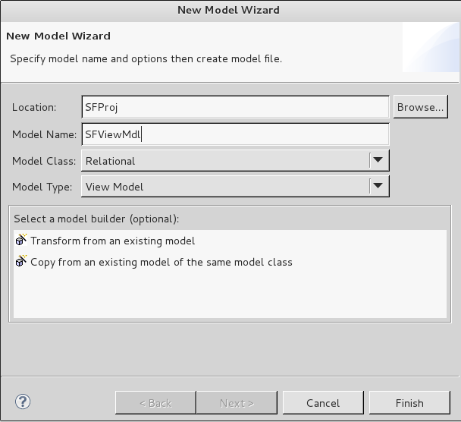
- Create a View Model. In Model Explorer select SFProj then Rt-Click > New > Teiid Metadata Model. In the New Model Wizard, enter SFViewMdl for the Model Name. Choose Model Class : Relational and Model Type : View Model. Click Finish
- In Model Explorer, select the empty view model SFViewMdl. Rt-Click > New Child > Table...

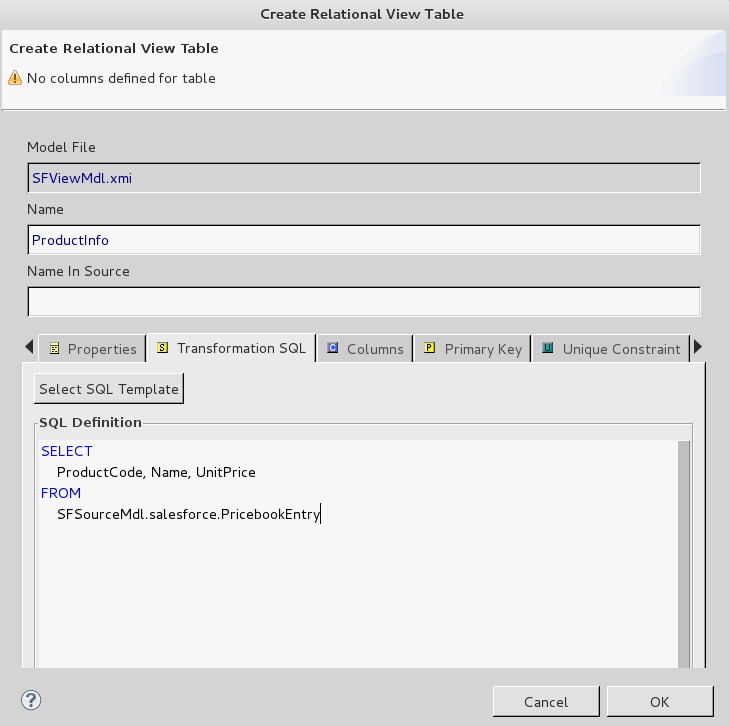
On the Create Relational View Table dialog, enter ProductInfo for the name.
We want our view to contain just a few of the available columns. Select the Transformation SQL tab. Enter the SQL below for the Transformation SQL. Click Finish.
SELECT ProductCode, Name, UnitPrice
FROM SFSourceMdl.salesforce.PricebookEntry
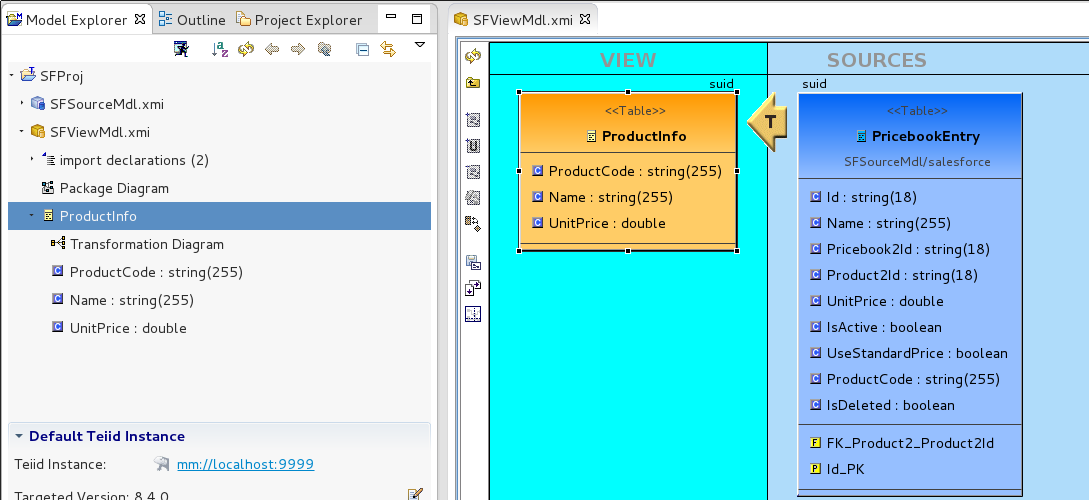
- The ProductInfo view is added as shown in ModelExplorer
- Next, we will create a procedure to return the ProductInfo as an XML literal result. We'll tag the procedure as a REST procedure so that teiid will generate the REST service.
In Model Explorer, select SFViewMdl then Rt-Click > New Child > Procedure... Choose Procedure and click OK.
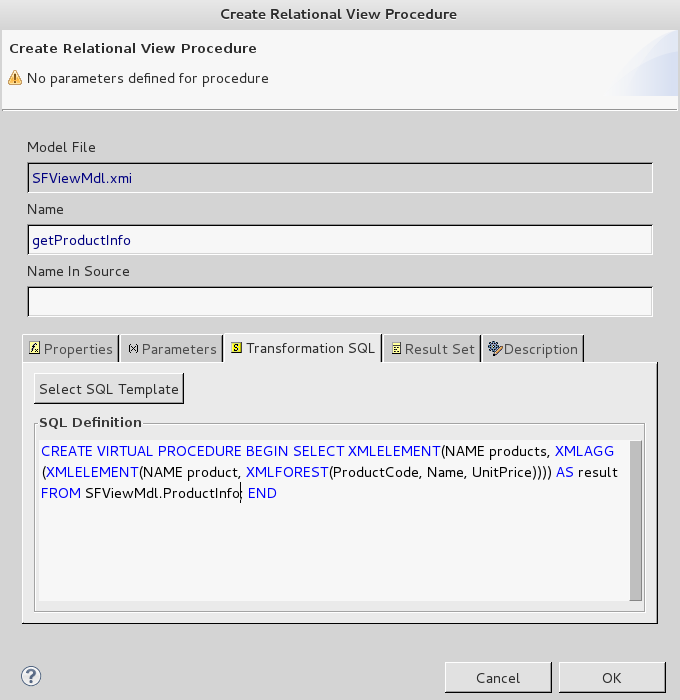
On the Create Relational View Procedure dialog, enter getProductInfo for the Name.
Select the Transformation SQL tab, then enter the SQL below into the Transformation SQL. Click Finish.
CREATE VIRTUAL PROCEDURE
BEGIN
    SELECT XMLELEMENT(NAME products, XMLAGG(XMLELEMENT(NAME product, XMLFOREST(ProductCode, Name, UnitPrice)))) AS result FROM SFViewMdl.ProductInfo;
END
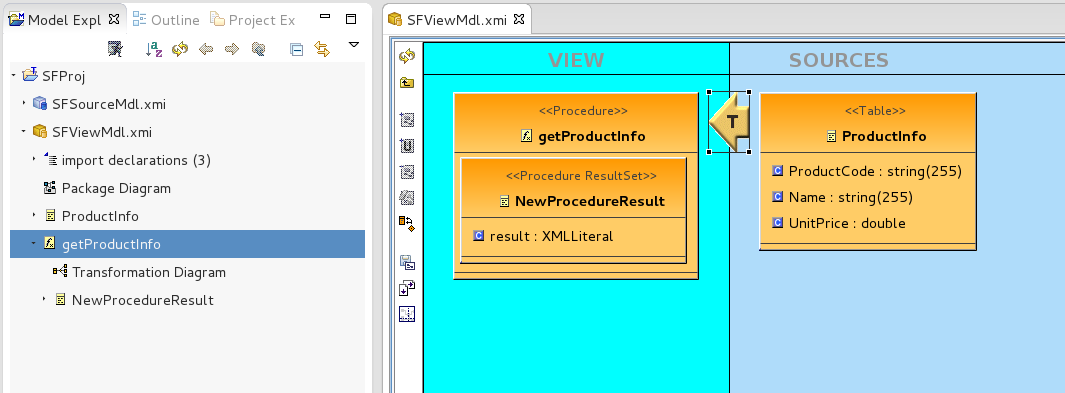
- The getProductInfo procedure is shown as below in Model Explorer:
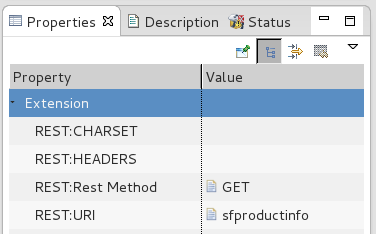
- Next we need to set two REST properties on the procedure. In Model Explorer, click on the getProductInfo procedure. In the properties panel (see below),
- Set REST:Rest Method to GET
- Set REST:URI to sfproductinfo
Create a VDB for deployment
We've finished the view definitions for our demo. Now we need to bundle everything into a VDB (Virtual Database) for deployment to our Teiid instance.
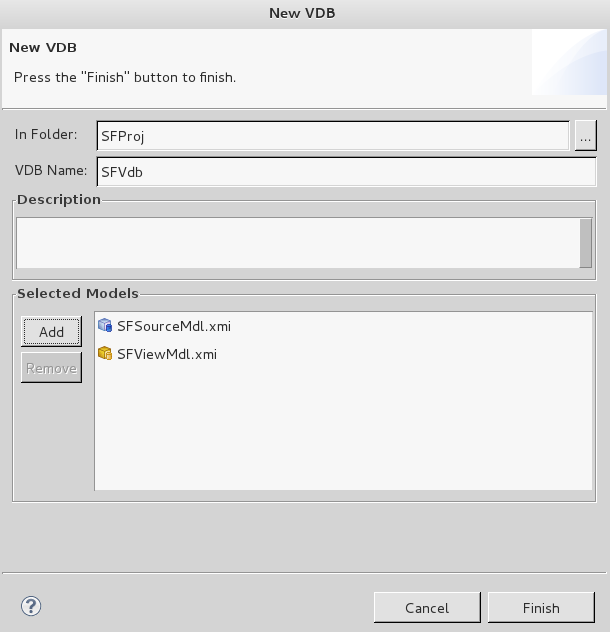
In Model Explorer select SFProj then Rt-Click > New > Teiid VDB. On the New VDB dialog, enter SFVdb for VDB Name. Then click the Add button - add SFSourceMdl and SFViewMdl from your workspace. Click Finish.
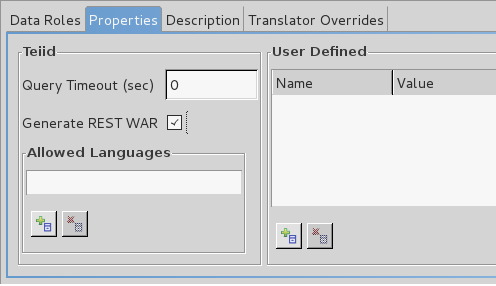
- The VDB is created and is shown in Model Explorer. The VDB Editor automatically opens. On the VDB editor, select the properties tab. Check the Generate REST WAR checkbox. Close the VDB Editor and click Save All. We are now ready to deploy the VDB
Deploy the VDB
- First, make sure your Data Virtualization server instance is started. This can be an instance on your local system, or it may be an Data Virtualization instance on OpenShift. If OpenShift, refer to the Provision Data Virtualization on OpenShift instructions.
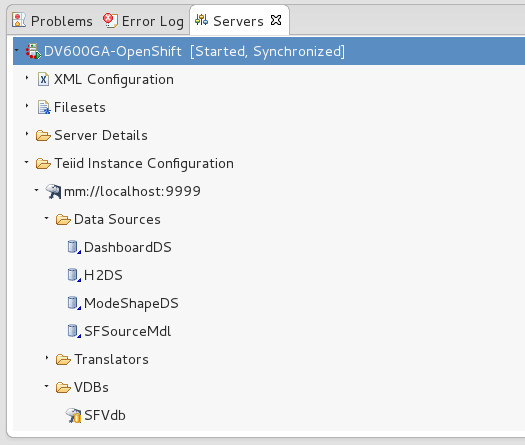
- Deploy the VDB. In Model Explorer, select SFVdb. Rt-Click > Modeling > Deploy - to deploy the VDB. You will see a status dialog as datasources are created (if necessary) and the VDB is deployed. At completion, check the Servers View. See below that the Data Source SFSourceMdl has been created and the SFVdb has been deployed.
Verify the REST endpoint
On completion of the VDB deployment, we can now verify that our REST service is available. We created the getProductInfo procedure and set the REST properties. Then we set the Generate REST WAR property on the VDB. When the VDB is deployed, teiid then will create the REST service.
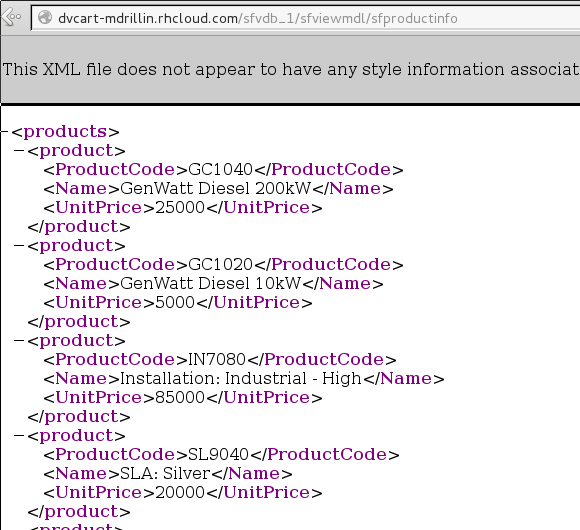
- To verify the REST endpoint, open a browser. I've deployed to OpenShift, so the URL looks like this:
http://[app]-[domain].rhcloud.com/sfvdb_1/sfviewmdl/sfproductinfo
on a local server, it would be
http://localhost:8080/sfvdb_1/sfviewmdl/sfproductinfo
Notice the url format after the hostName is [vdbname]_[vdbversion] / [viewmodelname] / [procUriProperty] . The [procUriProperty] portion is the REST:URI propery i supplied for the procedure.
You are prompted for username and password. The user must be defined for the teiid instance and must have the rest role. For the OpenShift instance enter user / user.
The browser output:
Conclusion
This ends our demo - illustrating how to use Data Virtualization to access a Salesforce source and expose a selected set of data as a REST endpoint. This process can be applied to any datasource that Data Virtualization supports, not just Salesforce! Any you can join disparate sources if you wish - in any combination!
Comments