Overview
This article describes how to install and configure Dataservice Builder (ds-builder) on OpenShift version 3 (Next Gen Web Console). The image configuration includes a Wildfly data-source that provides a connection to an existing MySQL database. Instructions for installing the latter are supplied here but can be substituted for an alternative database if required.
Pre-Requisites
- An OpenShift Online Next-Gen developer account, available by signing-up here;
- Install the oc command-line utility;
- A blank OpenShift project, named appropriately, eg. DSB.
Glossary
- Image: a configuration of a container, akin to a docker image;
- Deployment: when an image is deployed an instance of an image is created;
- Pod: On completion of a deployment, an instance, or pod, of the image is started up and becomes available accessibile through exposed ports.
Installing the MySQL Test Database
The test database used is created from a Docker image and is provided with schema and test data. Should an alternative be preferred then this step can be skipped. However, the Wildfly data-source does assume a connection url at localhost:3306 and user/password credentials of 'admin'.
- In OpenShift console, click on Add to Project;
- Select Deploy Image, enter teiidkomodo/mysql-openshift as the image name and click the search button;
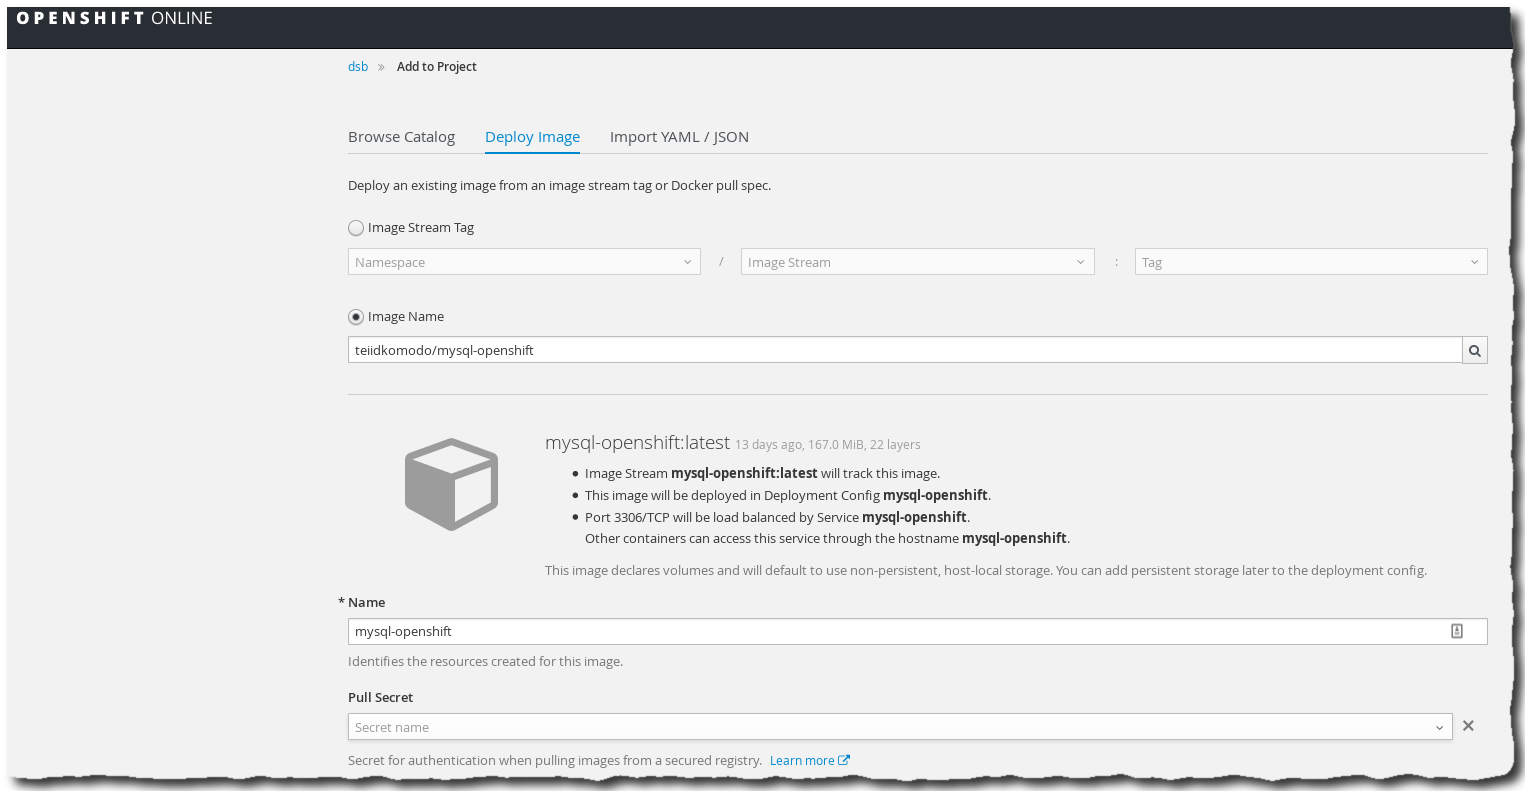
- Click the create button to import the image configuration.
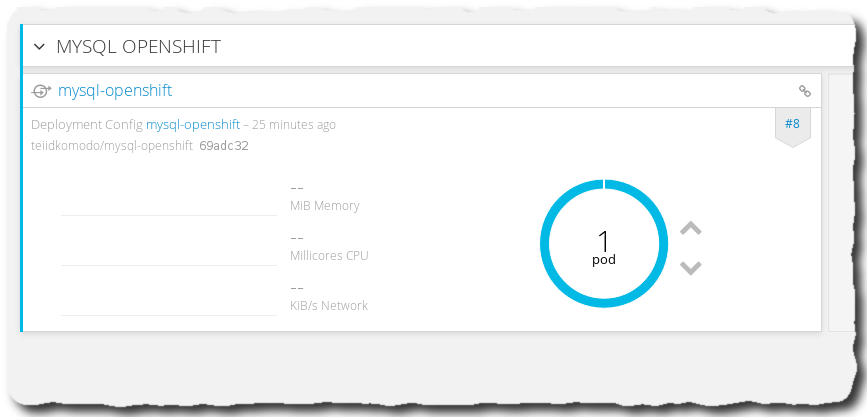
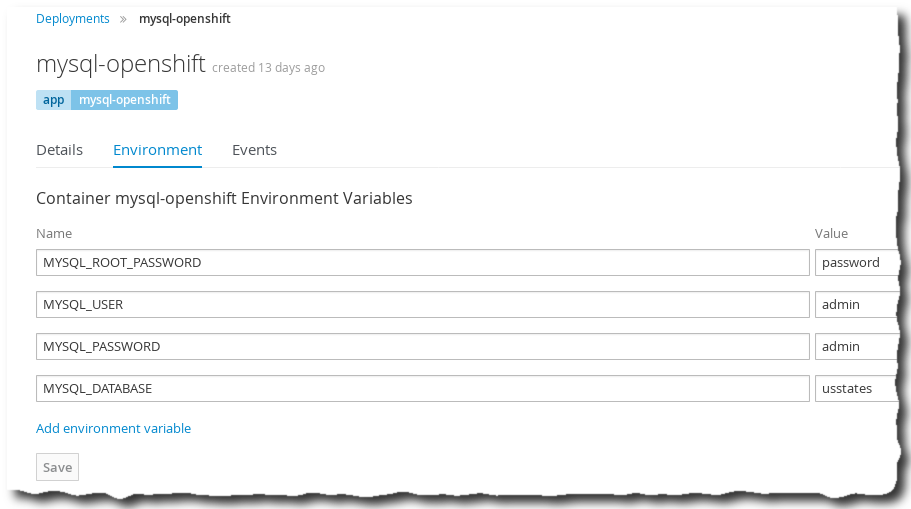
- With the image imported, a deployment is initiated. However, runtime environment variables are still required. In the OpenShift console, navigate to Applications -> Deployments and click mysql-openshift. Click the Environment tab and enter the following variables and values:

- MYSQL_ROOT_PASSWORD: password
- MYSQL_USER: admin
- MYSQL_PASSWORD: admin
- MYSQL_DATABASE: usstates
- Click the Save button to commit the environment variables to the deployment configuration which should initiate a new deployment. If a deployment is not started then click Applications -> Deployments, click the mysql-openshift link and click the Deploy button at the top-right of the page.
- With the mysql-openshift container up and running, it should be possible to remote login to the container and access the mysql database instance.
- Use the oc tool to login, if not already done so;
- Find the id of the running mysql pod using the command: oc get pods;
- Connect to the running pod using the command: oc rsh mysql-openshift-xxx (where xxx is the id of the running pod);
- The new terminal prompt displayed will be a remote shell from the mysql pod. At this point it should be possible to login to the mysql database instance using the credentials specified in the environment variables listed above, eg. mysql -uadmin -padmin;
- The mysql database is visible to the OpenShift project but not available to external clients. This should be sufficient in most cases. However, it is possible to create a route to the database's open port to allow external clients to access and debug the database.
- In the OpenShift console, navigate to Applications -> Routes and click Create Route;
- Enter or select the following values, leaving all other either blank or at their defaults:
- Name: mysql-openshift;
- Service: mysql-openshift
- Target Port: 3306 -> 3306 (TCP)
- Click Create to create the route;
- Even with a route connection to the container is still limited to http. Thus, it is necessary to port-forward the route to localhost using the oc tool.
- In a separate terminal, execute the command oc port-forward mysql-openshift-xxx 3306:3306 (where xxx is the id of the container);
- The port-forward will display the ports forwarded and will remain engaged with the terminal;
- The result of the port-forward is port 3306 is now opened on localhost so it should be possible to login to mysql using the command: mysql -uadmin -padmin --protocol tcp -h localhost (the protocol is necessary to bypass the localhost UNIX socket file)


Installing DSB
The DSB applications (ds-builder and vdb-builder) are deployed to OpenShift using the latter's source-2-image (s2i) framework built on top of an already configured s2i-wildfly image. There are a couple of points to note:
- the container has a maximum memory of 1GB while the Wildfly instance has a maximum memory of 512MB (configured to be half the size of the container). Leaving container with only 512MB (the default) only allows Wildfly 256MB of memory which is not sufficient and causes Wildfly to be killed and restart ad infinitum;
- in theory it should be possible to use any maven repository for compiling source and deploying an application. In practice, the vdb-builder repository appeared to be require too much memory to allow for a successful build. To workaround this, both ds-builder and vdb-builder builds were pushed as snapshots to maven's nexus and a new dedicated openshift repository was created that downloaded the application wars as dependencies and presented them to OpenShift.
- OpenShift containers try and avoid running as the root user, which is common practice for many Docker images (leading to many Docker images failing to install in OpenShift due to the user lacking permissions - although policies can be tinkered with if really necessary);
- In OpenShift console, click on Add to Project;
- Under Browse Catalog, type 'Wildfly' into the filter and click Select under version 10.1 - latest;
- Enter the following configuration values into the page, ensuring 'Show advanced routing, build, deployment and source options' link is clicked:
- Name: dsb-openshift;
- Git Repository Url: https://github.com/Teiid-Designer/komodo-openshift;
- Untick the 'Create a route to the application' as this assumes port 8080 while DSB connects via port 8443;
- Change Memory to 1GB;
- Click Create to begin compilation of the image
- A build will be listed under Builds -> Builds;
- On successful completion of the build, an image will be listed under Builds -> Images;
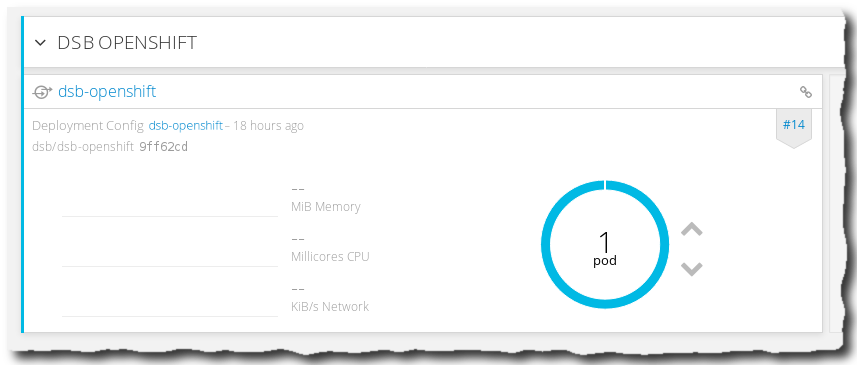
- A deployment of the image may already have been initiated under Application -> Deployments.
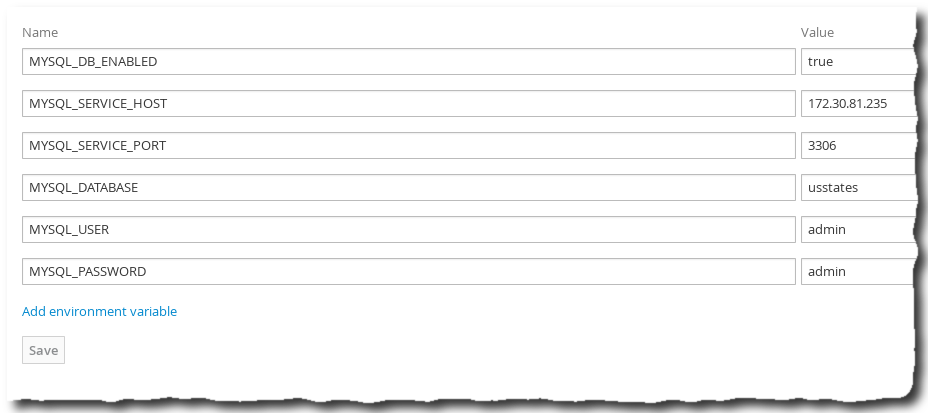
- To connect to the Mysql test database runtime environment variables are required. In the OpenShift console, navigate to Applications -> Deployments and click dsb-openshift. Click the Environment tab and enter the following variables and values:
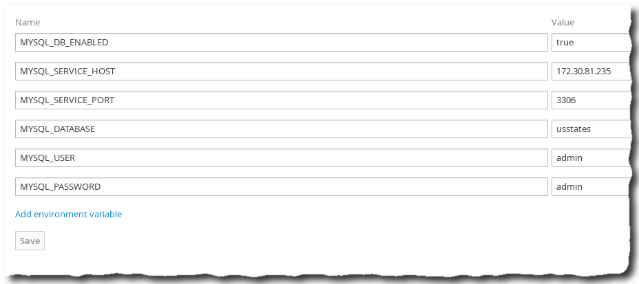
- MYSQL_DB_ENABLED: true
- MYSQL_SERVICE_HOST: <ip address of the mysql-openshift container>
- The IP address can be found by navigating to Applications -> Services and noting the address listed next to mysql-openshift
- MYSQL_SERVICE_PORT: 3306
- MYSQL_DATABASE: usstates
- MYSQL_USER:admin
- MYSQL_PASSWORD: admin
- Click the Save button to commit the environment variables to the deployment configuration which should initiate a new deployment. If a deployment is not started then click Applications -> Deployments, click the dsb-openshift link and click the Deploy button at the top-right of the page.

- With the mysql-openshift container up and running, it should be possible to remote login to the container and access the Wildfly instance filesystem.
- Use the oc tool to login, if not already done so;
- Find the id of the running dsb pod using the command: oc get pods;
- Connect to the running pod using the command: oc rsh dsb-openshift-xxx (where xxx is the id of the running pod);
- The new terminal prompt displayed will be a remote shell from the dsb pod. At this point, it is possible to navigate the filesystem to observe the Wildfly filesystem, including /wildfly/standalone/configuration and /wildfly/standalone/deployments. Both vdb-builder.war and ds-builder.war should be deployed successfully in the latter directory.
- The Wildfly server log is also available in the /wildfly/standalone/log directory. However, this output can also be obtained locally using the command oc logs dsb-openshift-xxx (where xxx is the id of the running pod);
- The Wildfly instance is only visible to the OpenShift project but not available to external clients. Thus, routes need to be created to allow external clients to access the deployed applications.
- In the OpenShift console, navigate to Applications -> Routes and click Create Route;
- Enter or select the following values, leaving all other either blank or at their defaults:
- Name: dsb-openshift-8443;
- Service: dsb-openshift
- Target Port: 8080 -> 8080 (TCP)
- Click Create to create the route;
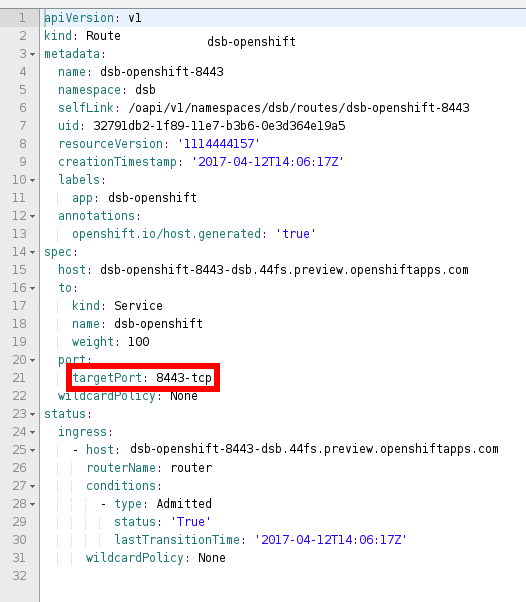
- The route should have been created but is not yet finished. The only selectable target port was 8080 as this is the only port that has been defined in the Wildfly-OpenShift template. However, DSB applications do not work through http (8080) but through https (8443) so the route requires editing to correct this.
- Click on the dsb-openshift-8443 route entry in the routes page and, in the Actions dropdown, click Edit YAML;
- Update the YAML text by modifying the port to 8443

- Since DSB requires access not only to port 8443 but also to ports 9990 (teiid admin) and 31000 (teiid jdbc), two additional routes must be created for these ports as well. Unfortunately, the fiddly process described above must be performed for both of these ports as well.
- Even with routes conigured, the container appears still limited to http. Thus, it is necessary to port-forward the routes to localhost using the oc tool.
- In a separate terminal, execute the command oc port-forward mysql-openshift-xxx 8443:8443 9990:9990 31000:31000 (where xxx is the id of the container);
- The port-forward will display the ports forwarded and will remain engaged with the terminal;
- The result of the port-forward is that the ports are now opened on localhost so should be possible to access vdb-builder's doc-api and ds-builder.
Creating the US-States Dataservice
DSB does not contain any existing data services or data sources hence both summary pages are empty. However, the dsb-openshift container's configuration does already contain the connection configuration for accessing the neighbouring Mysql database. Therefore, it is simply a matter of moving through the appropriate DSB controls in order to deploy a useful data service.
Create the Data Source
- After logging-in to ds-builder, click Data Sources;
- Click the New Data Source button to display the data source wizard page;
- Enter a name for the data source, eg. UsStatesDS, and select MySQLDS;
- Select mysql as the translator and click Finish;
- The Data Source Summary page is redisplayed and lists the new data source.
Create the Data Service
- Click Data Services to display the Data Service Summary page;
- Click New Data Service to display the data service wizard page;
- Enter a name for the data service, eg. UsStatesDataService;
- Click on the UsStatesDS root of the Data Source tree and expand it to show its tables;
- Click the states entry which should add it to the Selected Tables box;
- Click Finish to generate the data service.

Test the Data Service
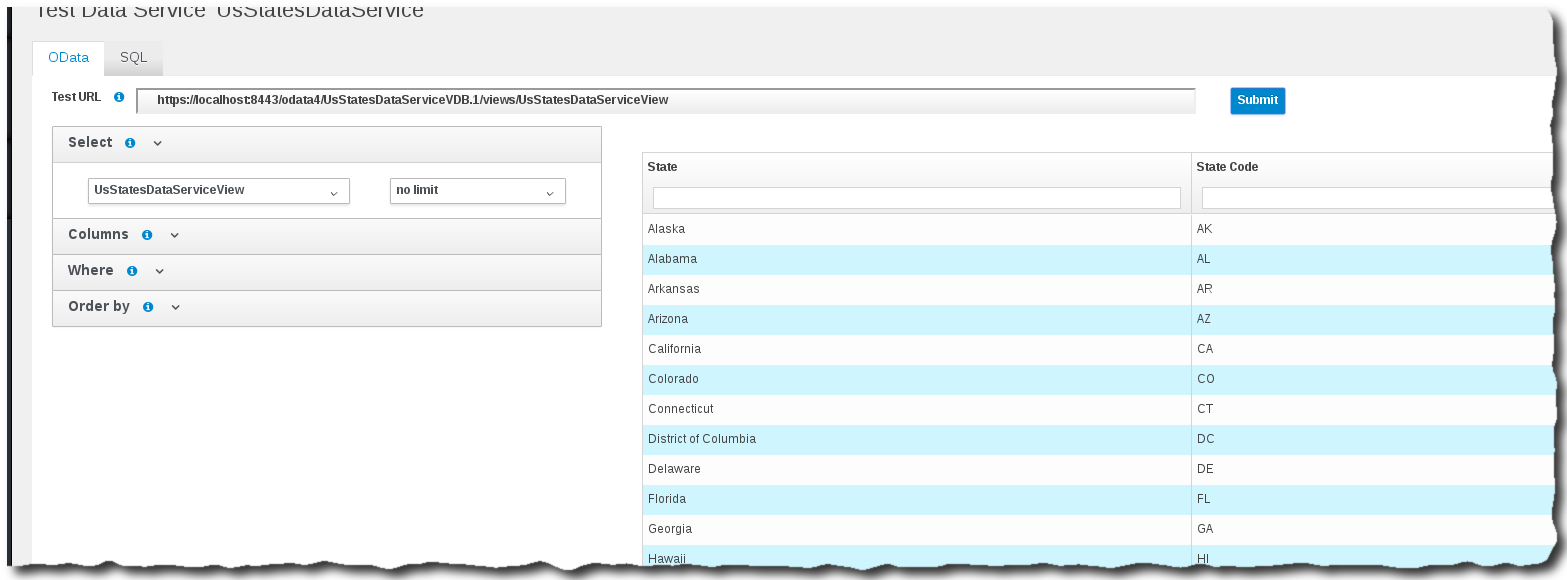
- In the Data Service Summary page, click the UsStateDataService'sTest button;
- Once the data service has been deployed, the Test page control should be displayed. Clicking on Submit immediately should return the content of the states table from the Mysql database.
Comments