This document should summarize way to run Red Hat MSA hello world example (https://github.com/redhat-helloworld-msa/helloworld-msa) while utilizing the Narayana LRA/REST-AT transaction handling. The MSA hello world does not process any transaction work directly - it does not use any transactional resource (ie. jms broker, database…) but it provides an environment that is use as a stage to show usage of Narayana LRA/REST-AT.
Minishift
The MSA hello world example is expected to be run on OpenShift platform. We will use Minishift as a tool to start OpenShift environment locally.
Minishift is a tool helping running OpenShift locally. OpenShift `oc` console already offers option to start OpenShift locally with `oc cluster up`, where all-in-one cluster is started and uses existing Docker on the machine. The minishift is different in booting up the OpenShift all-in-one cluster in a virtual machine.
The installation steps for Minishift installation is described at https://docs.openshift.org/latest/minishift/getting-started/installing.html. The page contains other information of configuring VM drivers and similar.
For starting Minishift (installed manually) and reuses Minishift docker deamon in the console, I use these commands.
I use the virtualbox vm-driver which could be provided as parameter to `minishift start` command `--vm-driver virtualbox` or you can configure the through the configuration saved at `.minishift/config/config.json` and/or with commands `minishift config`. Here I set limits for Minishift does not overload my laptop CPU/memory/disk.
minishift config set memory 6000
minishift config set cpus 2
minishift config set disk-size 10G
minishift config set vm-driver virtualbox
When a new version of minishift is released you can easily update your minishift installation by `minishift update` command.
The commands to start are
# go to folder where minishift was downloaded to
cd $MINISHIFT_HOME
# setting bash to be able to see ‘minishift’ command
export PATH=$PATH:$PWD
# setting path of OpenShift client binary, 'oc'.
eval $(minishift oc-env)
# starting minishift when not started
minishift status | grep -q Running && echo "Already running" || minishift start
# log in as developer role
oc login -u developer -p developer
# setting the docker environment to use minishift docker daemon and registry
minishift docker-env
eval $(minishift docker-env)
docker login -u developer -e 'ochaloup@redhat.com' -p $(oc whoami -t) $(minishift openshift registry)
On Fedora 23 I have trouble with the docker client as Minishift required newer one than the one provided in the Fedora installation. I was experiencing issue of not able to push the image to the minishift registry.
```
docker push 172.30.1.1:5000/testing/wildfly-admin
The push refers to a repository [172.30.1.1:5000/testing/wildfly-admin]
f7e1879ab33f: Preparing
074c49c7ad53: Preparing
fef12de4c7da: Preparing
3bf2c105669b: Preparing
85c6e373d858: Preparing
dc1e2dcdc7b6: Waiting
unauthorized: authentication required
```
After some experimentation (https://github.com/minishift/minishift/issues/817) I found I need a new docker client. Installation of the `docker-ce` package is supported from Fedora 24. Thus I switched to unzip binaries and reset PATH to the new docker client. Downloaded base on the info at https://get.docker.com/builds
# using new version of docker client than is one installed in Fedora 23
export PATH=/opt/minishift/docker-install/docker:$PATH
LRA
When Minishift is started is time to create a project.
oc new-project helloworld-msa-lra
You can run `minishift console` to get shown the OpenShift console in the browser default to your system.
The next step is create applications from all projects part of the MSA hello world example. One way is to use the prepared ansible script (https://cdn.rawgit.com/redhat-helloworld-msa/helloworld-msa/master/readme.html#__option_1_install_all_microservices_using_ansible) and let it to create and deploy applications for you. I don’t go that route as for the deploying LRA example we need get source with lra changes.
...yes, changing the ansible script to automate the LRA deployment plus directly deploy the LRA coordinator is a good idea for a future work.
Manual steps for the hola microservice are just copied(!) from the MSA installation instructions.
Hola microservice
# hola microservice with updates to work as a lra participant
git clone https://github.com/ochaloup/hola.git -b lra
cd hola/
# binary build - generating the ImageStream
oc new-build --binary --name=hola -l app=hola
mvn package
# build using local resources
oc start-build hola --from-dir=. --follow
# openshift app created
oc new-app hola -l app=hola,hystrix.enabled=true
# route created
oc expose service hola
oc set probe dc/hola --readiness --get-url=http://:8080/api/health
You can check if all works fine by call with curl
curl -X GET http://hola-helloworld-msa-lra.`minishift ip`.nip.io/api/hola-chaining
At this time you will get an error like: ‘not present: null: RESTEASY004655: Unable to invoke request’ but when you get an error response from RestEasy then it’s good starting point.
For this curl command works you have to be able to connect to ‘nip.o’ thus you will need to work connected to internet.
When you do some changes to the hola microservice and you want that being rebuilt and redeployed to the Minishift you can just do.
mvn package && oc start-build hola --from-dir=. --follow
For checking logs of the hola microservice you can run `oc logs <pod-name>` command. The command which checks the currently running pod you can do
oc logs -f `oc get pods | grep ^hola | grep Running | awk '{ print $1 }'`
To connect to the bash console of the pod you can use `oc rsh <pod-name>`.
The setup of the other microservices will be here sketched just briefly
Aloha microservice
git clone https://github.com/ochaloup/aloha -b lra
cd aloha/
oc new-build --binary --name=aloha -l app=aloha
mvn package; oc start-build aloha --from-dir=. --follow
oc new-app aloha -l app=aloha,hystrix.enabled=true
oc expose service aloha

oc env dc/aloha AB_ENABLED=jolokia; oc patch dc/aloha -p '{"spec":{"template":{"spec":{"containers":[{"name":"aloha","ports":[{"containerPort": 8778,"name":"jolokia"}]}]}}}}'
oc set probe dc/aloha --readiness --get-url=http://:8080/api/health
Ola microservice
git clone https://github.com/ochaloup/ola -b lra
cd ola/
oc new-build --binary --name=ola -l app=ola
mvn package; oc start-build ola --from-dir=. --follow
oc new-app ola -l app=ola,hystrix.enabled=true
oc expose service ola

oc env dc/ola AB_ENABLED=jolokia; oc patch dc/ola -p '{"spec":{"template":{"spec":{"containers":[{"name":"ola","ports":[{"containerPort": 8778,"name":"jolokia"}]}]}}}}'
oc set probe dc/ola --readiness --get-url=http://:8080/api/health
Bonjour microservice
git clone https://github.com/ochaloup/bonjour -b lra
cd bonjour/
oc new-build --binary --name=bonjour -l app=bonjour
npm install; oc start-build bonjour --from-dir=. --follow
oc new-app bonjour -l app=bonjour
oc expose service bonjour


oc set probe dc/bonjour --readiness --get-url=http://:8080/api/health
Frontend
git clone https://github.com/redhat-helloworld-msa/frontend
cd frontend/
oc new-build --binary --name=frontend -l app=frontend
npm install; oc start-build frontend --from-dir=. --follow
oc new-app frontend -l app=frontend
oc expose service frontend

oc env dc/frontend OS_SUBDOMAIN=`minishift ip`.nip.io
# this is a difference against the msa setup as we use different project name
oc env dc/frontend OS_PROJECT=helloworld-msa-lra

oc set probe dc/frontend --readiness --get-url=http://:8080/
I’m intentionally omitting deploying of the gateway and other services (keycloak, tracing…) as it’s not needed for the LRA demo purpose.
LRA coordinator
LRA coordinator is SWARM application which offers capabilities of transaction coordination defined in our spec proposal: https://github.com/jbosstm/microprofile-sandbox/blob/0009-LRA/proposals/0009-LRA/0009-LRA.md
To get it deployed on the Minishift you need to clone the Narayana, build the coordinator, provide a Dockerfile and deploy.
git clone https://github.com/jbosstm/narayana
cd narayana
# building whole Narayana project
./build.sh clean install -Pcommunity -fae -Dmaven.test.skip.exec=true -Didlj-enabled=true -pl rts/lra/lra-coordinator -am
# step to lra coordinator folder
cd rts/lra/lra-coordinator
# binary build - default: imagestream, buildconfig
oc new-build --binary --name=lra-coordinator -l app=lra-coordinator
# adding a docker used for building the lra coordinator for the minishift
cat  > Dockerfile << EOF
FROM fabric8/java-jboss-openjdk8-jdk:1.2.3

ENV JAVA_APP_JAR lra-coordinator-swarm.jar
ENV AB_ENABLED off
# to get more info about LRA processing in console you can add switch
#  -Dswarm.logging=TRACE
ENV JAVA_OPTIONS -Xmx512m

EXPOSE 8080

ADD target/lra-coordinator-swarm.jar /deployments/

EOF
# build using local resources
oc start-build lra-coordinator --from-dir=. --follow
# openshift app created
oc new-app lra-coordinator -l app=lra-coordinator
# route created
oc expose service lra-coordinator
# optionally using the lra coordinator swagger json endpoint to set the readiness check
# oc set probe dc/lra-coordinator --readiness --get-url=http://:8080/swagger.json
Setup with Ansible
The Red Hat Open Shift MSA example contains ansible playbook that prepares the environment. If you configure the example enriched with the LRA functionality you can use the lra branch of the ansible playbook from here:
GitHub - ochaloup/helloworld-msa at lra
The steps that are needed are
- Checkout the repository
- git clone https://github.com/ochaloup/helloworld-msa.git -b lra
- Go to directory with ansible scripts
- cd helloworld-msa/ansible
- Adjust the vars.yml file to contain varibables corresponding with your environment. You will probably need to change the following attributes
- workdir defines where sources of the microservices will be cloned to
- openshift defines IP address that your openshift instances run at
- domain is need to be changed to contain the corresponding IP address that the openshift variable defines. Domain is used for frontend service to know where to contact the other services. The domain defines a DNS name translated with use http://nip.io service. This is what OpenShift uses for routes to be contacted from outside world.
- Run the playbook
- ansible-playbook helloworld-msa.yml
- Your openshift installation should contain project with name helloworld-msa-lra (or what project_name you used in vars.xml)
Running LRA
The MSA example works with 3 design approaches to your microservice environment - direct connection from client to each microservice, calling microservices in chain - client calls a one microservice which calls other etc., client connect to gateway which directs call to microservices. The changes for LRA to work were done only for the chaining approach. That means the LRA will come into play when the HTTP call aims to a `*-chaining` REST point.
The chaining of the services is
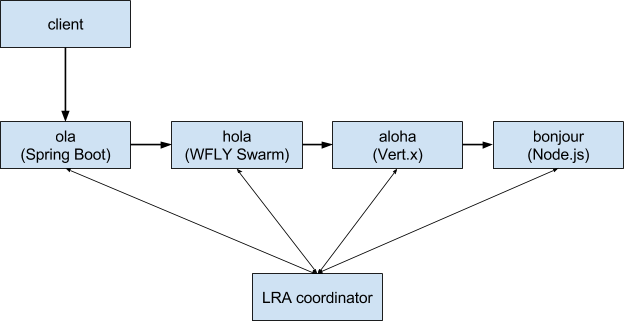
If all the services are at their places in the Minishift you can run the call to ola service (ola-chaining endpoind). Information of what the services are doing could be found currently just in the log. Let’s look on logs of the all services
- oc logs -f `oc get pods | grep ^ola | grep Running | awk '{ print $1 }'`
- oc logs -f `oc get pods | grep ^hola | grep Running | awk '{ print $1 }'`
- oc logs -f `oc get pods | grep ^aloha | grep Running | awk '{ print $1 }'`
- oc logs -f `oc get pods | grep ^bonjour | grep Running | awk '{ print $1 }'`
- oc logs -f `oc get pods | grep ^lra-coordinator | grep Running | awk '{ print $1 }'`
Invoking the chaining REST call covered by LRA action
curl -X GET http://ola-helloworld-msa-lra.`minishift ip`.nip.io/api/ola-chaining
You expect to get similar to this
["Olá de ola-3-wkqv5","Hola de hola-2-9lbkn","Aloha mai aloha-2-6j1v5","Bonjour de bonjour-2-kjqjt"]
Unfortunatelly first invocation could fail with fallback information from Hola service as the Hystrix fallback timeout is not tuned good enough. But any next invocation should pass.
The ola log then is expected to show starting the LRA transaction and being completed (there is currently not implemented any failure during the processing)
OK, lra client is ready to go: org.jboss.narayana.rts.lra.client.LRAClient@11b40d28 with current lra: null
Starting LRA: http://lra-coordinator:8080/lra-coordinator/0_ffffac110003_-18fce802_59b150c8_14 when joining with baseUri: http://ola-helloworld-msa-lra.192.168.99.100.nip.io/api on enlistment gets recovery path "http://lra-coordinator:8080/lra-recovery-coordinator/0_ffffac110003_-18fce802_59b150c8_14/0_ffffac110003_-18fce802_59b150c8_15"
[HolaService#hola] ---> GET http://hola:8080/api/hola-chaining HTTP/1.1
[HolaService#hola] <--- HTTP/1.1 200 OK (142ms)
Ola LRA completing 0_ffffac110003_-18fce802_59b150c8_14, returning url:http://ola-helloworld-msa-lra.192.168.99.100.nip.io/api/0_ffffac110003_-18fce802_59b150c8_14/completed
You can invoke the client request by visiting the frontend at http://frontend-helloworld-msa-lra.`minishift ip`.nip.io, clicking at ‘Service chaining’ and ‘Refresh Results’
You can check the logs of particular pod when going to console `minishift console`, opening the helloworld-msa-lra project -> Applications -> Pods -> lra-coordinator-* (Running) -> Logs
REST-AT
REST-AT is concept of distributing ACID transaction through of rest calls. It's the same you can know from the ejb remote calls in WFLY where transactions can be spread over multiple WildFly server but here the transaction context is passed over HTTP rest calls. This configuration creates new OpenShift project and REST-AT is completely different technology to LRA.
Configuring REST-AT example running on the Minishift will be put here just briefly only in form of bash commands to run.
oc new-project helloworld-msa-lra

git clone https://github.com/ochaloup/hola.git -b restat
cd hola/
oc new-build --binary --name=hola -l app=hola
mvn package
oc start-build hola --from-dir=. --follow
oc new-app hola -l app=hola,hystrix.enabled=true
oc expose service hola
oc set probe dc/hola --readiness --get-url=http://:8080/api/health

cd ..

git clone https://github.com/ochaloup/aloha -b restat
cd aloha/
oc new-build --binary --name=aloha -l app=aloha
mvn package; oc start-build aloha --from-dir=. --follow
oc new-app aloha -l app=aloha,hystrix.enabled=true
oc expose service aloha

oc env dc/aloha AB_ENABLED=jolokia; oc patch dc/aloha -p '{"spec":{"template":{"spec":{"containers":[{"name":"aloha","ports":[{"containerPort": 8778,"name":"jolokia"}]}]}}}}'
oc set probe dc/aloha --readiness --get-url=http://:8080/api/health

cd ..

git clone https://github.com/ochaloup/ola -b restat
cd ola/
oc new-build --binary --name=ola -l app=ola
mvn package; oc start-build ola --from-dir=. --follow
oc new-app ola -l app=ola,hystrix.enabled=true
oc expose service ola
oc env dc/ola AB_ENABLED=jolokia; oc patch dc/ola -p '{"spec":{"template":{"spec":{"containers":[{"name":"ola","ports":[{"containerPort": 8778,"name":"jolokia"}]}]}}}}'
oc set probe dc/ola --readiness --get-url=http://:8080/api/health

cd ..

git clone https://github.com/ochaloup/bonjour -b restat
cd bonjour/
oc new-build --binary --name=bonjour -l app=bonjour
npm install; oc start-build bonjour --from-dir=. --follow
oc new-app bonjour -l app=bonjour
oc expose service bonjour
oc set probe dc/bonjour --readiness --get-url=http://:8080/api/health

cd ..

git clone https://github.com/redhat-helloworld-msa/frontend
cd frontend/
oc new-build --binary --name=frontend -l app=frontend
npm install; oc start-build frontend --from-dir=. --follow
oc new-app frontend -l app=frontend
oc expose service frontend
oc env dc/frontend OS_SUBDOMAIN=`minishift ip`.nip.io
# this is a difference against the msa setup as we use different project name
oc env dc/frontend OS_PROJECT=helloworld-msa-restat
oc set probe dc/frontend --readiness --get-url=http://:8080/

cd ..

oc new-build --binary --name=wildfly-rts -l app=wildfly-rts
cat  > Dockerfile << EOF
FROM jboss/wildfly
# RUN /opt/jboss/wildfly/bin/add-user.sh admin admin --silent
USER root
RUN yum -y install bash
USER jboss

RUN cp "/opt/jboss/wildfly/docs/examples/configs/standalone-rts.xml" "/opt/jboss/wildfly/standalone/configuration/"

# ADD set-trace.sh /opt
# RUN bash /opt/set-trace.sh

CMD ["/opt/jboss/wildfly/bin/standalone.sh", "-c", "standalone-rts.xml", "-b", "0.0.0.0", "-bmanagement", "0.0.0.0"]
EOF
oc start-build wildfly-rts --from-dir=. --follow
oc new-app wildfly-rts -l app=wildfly-rts
oc expose service wildfly-rts
Now for testing you can run
curl -X GET http://ola-helloworld-msa-restat.`minishift ip`.nip.io/api/ola-chaining
When you check the 'ola' console: oc logs -f `oc get pods | grep ^ola | grep Running | awk '{ print $1 }'`
You should see output similar as
Header :<http://ola:8080/api/1499959765/participant>; rel="participant",<http://ola:8080/api/1499959765/terminator>; rel="terminator"
Enlistment url: http://wildfly-rts:8080/rest-at-coordinator/tx/transaction-manager/0_ffffac110008_46797bed_59b29027_81
Enlisted participant url: http://wildfly-rts:8080/rest-at-coordinator/tx/recovery-coordinator/0_ffffac110008_46797bed_59b29027_81/0_ffffac110008_46797bed_59b29027_82
[HolaService#hola] ---> GET http://hola:8080/api/hola-chaining?tmEnlistUri=http%3A%2F%2Fwildfly-rts%3A8080%2Frest-at-coordinator%2Ftx%2Ftransaction-manager%2F0_ffffac110008_46797bed_59b29027_81 HTTP/1.1
[HolaService#hola] <--- HTTP/1.1 200 OK (588ms)
Service: PUT request to terminate url: wId=1499959765, status:=txstatus=TransactionPrepared, of status: TransactionPrepared
Service: preparing
Service: PUT request to terminate url: wId=1499959765, status:=txstatus=TransactionCommitted, of status: TransactionCommitted
Service: committing
Notes
- It could be interesting for you to check the MSA example use case where applications is configured with OpenShift environmental variables and ConfigMaps. See the Use case at
https://cdn.rawgit.com/redhat-helloworld-msa/helloworld-msa/master/readme.html#_use_case_configuring_your_application
Comments