This post provides a brief introduction to Switchyard, what it is, and how to use it to build a service-oriented application.
This post also provides a hands-on introduction to the new SwitchYard graphical editor. We’ll build an application from scratch, but our focus will be on the tools that SwitchYard provides you, and not on the business logic of our application.
(Please note, that this post was written with the "nightly" build of Switchyard 0.5 in June 2012. The eclipse based tooling introduced in this post will be released in version 0.5 of SwitchYard.)
The post is divided into 10 sections. Let’s get started in the first section with a question, actually a few questions.
Section 1: Starting with a few Questions
Just what is Switchyard? Is it another Enterprise Service Bus (ESB)? How can I use it? Better yet, why do I want to use it? And, did I mention that I’m in a hurry? Don’t waste my time - I’ll give you 15 minutes to get me the answers.
The top level page at http://www.jboss.org/SwitchYard defines SwitchYard as:
‘...a lightweight service delivery framework providing full life-cycle support for developing, deploying, and managing service-oriented applications...’
Hang on for a minute! That’s a pretty heavyweight sentence for a lightweight framework. Let’s dissect that sentence into smaller bites to see if we can better understand SwitchYard:
- Service-oriented applications - OK, we’re talking about Service Oriented Architecture or “SOA.” In this type of architecture, we want to design our applications around performing discrete services. Each service performs one or more functions. The services, which can be local or remote, communicate by delivering messages between each other and to and from external applications. But, SOA has been around for a while and it is supported by several large frameworks and products. What makes SwitchYard so different?
- Lightweight service delivery framework - How lightweight is it? For other frameworks, your main task can be redesigning (shoehorning?) your application to fit the form that the framework needs. In other words, the most important element is where your service runs. SwitchYard is different and lightweight in that it enables you to better focus on the task that you want your service to performed. SwitchYard achieves this through its modular design - instead of “plugging” your service into a standardized “plug” in the whole framework, SwitchYard enables you to embed only those pieces (services) of the Swithyard framework that your service needs. It’s like a cafeteria, you pick only what you want.
- Providing full life-cycle support - Let’s take each of these next three subjects separately:
- Developing - What kind of support do you need when you are developing an application? Well, you will want to work in an IDE such as eclipse, so some wizards to create new projects and services would be nice, but what else? How about tooling to help you to create new projects and automatically set up all the framework services (for example, CDI/Bean Services, BPM Services, Rules Services, or Camel Services) that your application needs? SwitchYard uses JBoss Forge (https://docs.jboss.org/author/display/FORGE/Home) to do this. We’ll walk through an example later in this post.
- Deploying - Applications really don’t do very much until you get them onto a server where they be run. SwitchYard applications can be hot-deployed and the SwitchYard eclipse tooling supports deploying your applications to your servers, and starting, stopping and managing those servers. And, SwitchYard full supports the new JBoss AS7 server.
- Managing - Once you have your application deployed, you have to be able to keep an eye on and keep it out of trouble. SwitchYard includes a new web-based management console for you to manage applications, services, and the server itself.
Section 2: What About JBoss ESB?
So far so good, but if we’re talking about a JBoss framework for SOA, aren’t we talking about JBossESB? Does SwitchYard mean that JBossESB is dead?
No, JBossESB is not dead. JBossESB is alive and well. A new update (version 4.11) scheduled for this week. The community is growing and as vibrant as ever. There’s even a beautifully written new Beginner’s Guide (http://www.packtpub.com/jboss-esb-beginners-guide/book). (Full disclosure, I’m one of the books authors.)
Well, if JBossESB is not going away, If I want to build a new SOA application starting today, should I use ESB or SwitchYard?
The answer to this question is, “it depends.”
At this point in time, SwitchYard is very much a work in progress. It’s design and implementation are evolving and will evolve significantly in the future months as it grows toward its 1.0 release. JBoss ESB is more mature, and is undergoing primarily incremental changes and improvements.
So, if you are building an SOA application that you want to go into production in the near future, you should look at JBoss ESB. Actually, if you need enterprise level support, you should really buy a subscription for the JBoss SOA Platform (http://www.redhat.com/products/jbossenterprisemiddleware/soa), which has at its core JBoss ESB.
For the longer term future, you should look at some of the ways in which SwitchYard will make some aspects of SOA application development easier.
Section 3: Making Your SOA Life Easier with SwitchYard
The primary ways in which SwitchYard differs from a traditional ESB highlight some of the ways in which SwitchYard can make SOA application services development easier:
- Install only the Services that you Need - One drawback of a traditional ESB is that while you may only want to use some services provided by the ESB (for example, data transformation), you have to deploy the ESB’s entire framework, including services that you don’t need. The result is a larger installation footprint (both memory and disk usage) that would be necessary if you could use only the ESB services that you require. In contrast, SwitchYard enables you to configure and then utilitze only those services that you want.
- Run your Services Anywhere you Want - Another aspect of a traditional ESB is just where it enables you to run your services. With an ESB, you deploy your services into the ESB. Part of the logical visualization of an ESB mirrors that of a hardware bus in that you “plug” your services into the bus. Your services communicate via messages sent over the bus. The messages sent over the bus are said to be “ESB-aware” in that they conform to the message format required by the ESB. Messages are “on-boarded” from external sources to the ESB through adapters that translate the message formats into ESB-aware messages. In contrast, SwitchYard lets you run your services in your own application, inside unit tests, or deployed to your own application server.
- Focus on Writing your Services’ Code, Not the Code to get your Services to Run - One of the most helpful features of JBossESB is the extensive library of predefined actions that it provides. These “out of the box” (OOTB) (see: http://soa.dzone.com/articles/works-great-right-out-box) actions perform tasks such as message routing, business process management integrations, integrations with scripting languages, and others. One advantage that using these OOTB actions should appeal to your interests in building reliable services. If you had to construct your services only using new new code that you create, you would have to debug and test that code thoroughly. The OOTB actions have already been thoroughly tested and documented by the JBossESB community, so you can use them with confidence. Another advantage should appeal to your lazy programmer interests. By using the OOTB actions, you can build reliable services without having to write that much new code. This model, however, reaches its limits with some operations such as message transformation. With JBoss ESB, the transformation of data fro one form to another is a procedural operation. SwitchYard, however, supports declarative transformation, where all you have to do is to define the transformation and the types to which you want it performed, and Swithyard does the rest.
- Compose your Services with CDI - With traditional ESBs, you have to adapt your service design to fit the form that the ESB wants. In contrast, SwitchYard uses Context Dependency Injection (CDI) provided by the JBoss Weld (http://seamframework.org/Weld) project to enable you to easily create services from Java beans through annotations. You can convert a bean to a service just by adding the @Service annotation. When it sees this annotation, SwitchYard registers them as services at runtime. Within a service, references to other services can be injected as other CDI beans with the @Inject annotation.
- Take Advantage of Integrations - One of the great strengths of JBossESB is its rich set of integrations with other technologies such as jBPM (http://www.jboss.org/jbpm) for business process orchestration. SwitchYard carries on that tradition and expands JBossESB’s integration with Apache Camel (http://camel.apache.org). With Camel, SwitchYard enables you to use Camel components (http://camel.apache.org/components.html) as gateways to integrate applications and services with your services.
- Forge Ahead, with Forge - Sometimes the hardest thing to do is to start a new project. Copying an existing example is a common route, but you end up having to edit files to match your new application and services. SwitchYard ships with built-in Forge (https://docs.jboss.org/author/display/FORGE/Home) plugins to help you to build Maven (http://maven.apache.org/) based applications easily.
- Testing, and Not as an Afterthought - As a QE engineer, it can sometimes seem like testing is never a primary concern when a new technology is introduced. (Or maybe it’s just that when you spend your days finding bugs, you develop a certain form of paranoia. ;-) SwitchYard includes unit test support out of the box, so you can build tests for your services while you build the services.
Section 4: Visualizing SwitchYard?
It’s easy to visualize an ESB. You just think of a bus with services “plugged” into it. But what about SwitchYard. What does SwitchYard “look like?”

An ESB, and in this context, SwitchYard is an ESB, is really a means to an end. It’s a tool for creating service-oriented applications. To create a service-oriented application you look inward at your application architecture, not outward at the runtime architecture of the bus. Your concern and your focus in on the application that you’re building and not on the runtime and tooling. SwitchYard is the tooling and runtime for your service-oriented applications.
It’s a little more difficult to draw a picture of SwitchYard, as one of its main goals is to enable you to focus on what your application looks like!
The contents of a SwitchYard project however do have a different configuration than JBoss ESB project. We’ll take a look at these differences next.
Section 5: Anatomy of a SwitchYard Project Configuration
Unlike traditional ESBs, the configuration requirements imposed by SwitchYard are minimal. Let’s use JBossESB as reference point. A service-based application deployed to JBossESB requires configuration files to define the JMS topics and queues on which it depends. It also requires a “jboss-esb.xml” file to define the resource providers (such as JMS) on which the services depend, the services themselves, the gateways through which messages are “on-boarded” to the ESB and the notifiers through which messages are sent off of the ESB, and the “pipeline” of actions that perform the tasks that comprise the services. Creating and maintaining a jboss-esb.xml file for a services-based application can be a difficult and time-consuming task.
A SwitchYard application has two primary configuration files:
- beans.xml - This file simply indicates that an application is making use of Context Dependency Injection (CDI).
- switchyard.xml - This file defines the service implementations, gateways, transformations, validations, and deployment dependencies.
At first glace, this may seem like a trivial change from jboss-esb.xml to switchyard.xml. What’s the big deal, only the file name changed, right?
The major difference is that the elements defined in switchyard.xml conform to the OASIS Service Component Architecture Assembly Model Specification (http://docs.oasis-open.org/opencsa/sca-assembly/sca-assembly-spec-v1.1.html). The Service Component Architecture (SCA) model provides standards for building SOA applications.
Why was this standard selected as the lingua franca of SwitchYard configuration? What advantages does using this standard give us? There are multiple levels of advantages:
- SwitchYard wanted to get away from the model followed by jboss-esb.xml where the service implementation details are closely tied up with the gateway definition details. We're trying for a more modular approach that makes it easier to define and maintain a service's configuration. A switchyard.xml can contain binding info in the same file as the service implementation, but SCA also supports recursive composition, so that one service with just implementation details, can be included inside another. This level of modularization is not possible in JBoss-ESB.xml. We’ll take a look at the SCA files and pictures that Swithyard tooling makes easy to create and maintain.
- SwitchYard also wanted to make service interface (or the service "contract") information more explicit, and therefore easier to find. JBossESB does this to some extent with EBWS (ESB enhanced Web Services).
- Finally, the SwitchYard team had a choice. They could create a new configuration syntax, or they could try to use something that already existed, was an accepted open standard, and was supported by a vibrant community. Not A tough choice. ;-) Also, SCA is a well-known model for service-oriented applications. But, it's important to not get too hung-up over the underlying configuration model. The capabilities that the model makes possible, such as modularity, are more important. And, another reason to not worry too much about the configuration model is that SwitchYard provides you with tools such as Forge scripting (and someday soon a SCA editor) to make it easier to create and maintain services' configurations.
It’s also important (as we’re all lazy programmers who want to avoid error-prone manual tasks, after all) that SwitchYard provides tools to automatically populate the contents of switchyard.xml. We’ll see these tools in action in a bit.
Section 6: Services
When we talk about SwitchYard services, we're concerned with how we can create a service, and then how that service can be used (or "consumed") by other services.
How exactly do you create a SwitchYard service? Watch closely because SwitchYard makes this simple:
- You start with a Java POJO (plain old Java object) and add a “@Service” annotation.
- The you create a Java interface representing the “contract” (in other words, the signatures of the methods used to interact with the with that object)
- Then you create a Java class implementing the interface
And that’s all folks. You’ve got a service. Yeah, SwitchYard tries to keep this simple.
Here’s an example (thanks to Keith Babo - as I’m borrowing this code from his demo):
1) Start with a POJO:
public interface OrderService {
OrderAck submitOrder(Order order);
}
2) Create an interface:
public class OrderServiceBean implements OrderService {
public OrderAck submitOrder(Order order) {
...
}
}
3) Annotate the POJO - and it’s a service!
@Service(OrderService.class)
public class OrderServiceBean implements OrderService {
public OrderAck submitOrder(Order order) {
...
}
}
Once you have a service, how do you access/consume it? Through Context Dependency Injection (CDI) in three more steps:
(1) Add an @Reference and @Inject annotation
(2) Add a field representing the consumed service
(3) Invoke methods on the injected reference
@Service(OrderService.class)
public class OrderServiceBean implements OrderService {
@Inject @Reference (1)
private InventoryService inventory; (2)
public OrderAck submitOrder(Order order) {
Item orderItem = inventory.lookupItem(order.getItemId()); (3)
…
}}
What types of services does Switchard support?
- Bean Services - Such as the example we just mentioned.
- BPM Services - Where bean services can be invoked from a BPMN2 process.
- BPEL Services - Where you can access WS-BPEL business processa exposed as services through their WSDL inteface.
- Camel Services - Camel enables you to integrate systems together, even if they each a speak a different API. Camel provides a flexible message routing and mediation engine (in this context, “mediation” refers to the processing of messages, for example examining or modify message contents on the fly). Camel supports a large set of “components” (http://camel.apache.org/components.html) that enable you to tie together technologies such as EJBs, with transports such as http or ftp, messaging, and many others. SwitchYard uses Camel as a Swiss Army knife sort of framework to perform many tasks by re-using Camel components, instead of having to write the integration code yourself.
At this point, let’s switch into to a hands on mode and perform some tasks with SwitchYard.
Section 8: Getting SwitchYard
When I first started working with JBoss software, I asked a co-worker, how do I perform an installation? His response was a blank stare for a few seconds, after which he said, “You download the .zip and unzip it.”
It might sound trivial, or obvious, but the ease, and low entry cost (you can’t get cheaper than free!) with which you can get started using JBoss projects is a great feature. You can download whatever projects you want and try them out at no cost.
To get a copy of SwitchYard, the steps you have to do are:
Go to this page: http://www.jboss.org/SwitchYard/downloads - you’ll see a display similar to this:

Your download choices are:
- SwitchYard Tools - These are Eclipse plugins that support operations for working with SwitchYard projects. We’ll talk about how to install and use these plugins in a later section of this post.
- SwitchYard Source Distribution - Like the name says, download gets you all source code for SwitchYard.
- SwitchYard Installer - This distribution contains all the bits you need to deploy SwitchYard to a JBoss AS7 server. But, since we’re in a hurry, we’ll use the next one.
- SwitchYard AS7 Distribution - This distribution is the easiest to use as it includes SwitchYard deployed to a full JBoss AS7 server distribution. All we have to do to use this distribution is to download it and unzip it.
For the purposes of this impatient discussion, we’ll use the SwitchYard AS7 Distribution.
Section 9: Running SwitchYard and the JBoss AS7 Server
The JBoss AS7 (http://www.jboss.org/as7) server is JBoss’ newest application server release. AS7 is compliant with the Java Enterprise Edition 6 specification, and is the preferred deployment platform for SwitchYard.
(Note that by the time you read this, SwitchYard 0.5 will probably be available as a download.)
To install the SwitchYard AS7 Distribution, simply select a directory where you want to run the server, and unzip the http://downloads.jboss.org/switchyard/releases/v0.4.Final/switchyard-as7-0.4.0.Final.zip file into that directory.
In this post, we’ll use the /opt/SwitchYard directory:
mkdir /opt/SwitchYard
cd /opt/SwitchYard
unzip switchyard-as7-0.4.0.Final.zip
Let’s jump right in and start up the server:
cd switchyard-as7-0.4.0.Final/bin
sh ./standalone.sh
After a very short time (Did I mention how fast JBoss AS7 is? It starts up and runs very quickly!), you’ll see logging messages that look like this that indicate the server is up and running:
23:05:13,608 INFO [org.apache.coyote.http11.Http11Protocol] (MSC service thread 1-3) Starting Coyote HTTP/1.1 on http--127.0.0.1-8080
23:05:13,718 INFO [org.jboss.as.connector] (MSC service thread 1-5) Starting JCA Subsystem (JBoss IronJacamar 1.0.3.Final)
23:05:13,775 INFO [org.jboss.as.connector.subsystems.datasources] (MSC service thread 1-7) Bound data source [java:jboss/datasources/ExampleDS]
23:05:14,173 INFO [org.jboss.as.deployment] (MSC service thread 1-2) Started FileSystemDeploymentService for directory /opt/local/SwitchYard/SwitchYard-as7-0.3/standalone/deployments
23:05:14,192 INFO [org.jboss.as] (Controller Boot Thread) JBoss AS 7.0.2.Final "Arc" started in 2137ms - Started 97 of 152 services (55 services are passive or on-demand)
Section 10: Creating a New SwitchYard Project From Scratch
Now that we have SwitchYard running, let’s create a new project. We’ll do this the easy way and take advantage of some new JBoss eclipse-based tooling, the SwitchYard Graphical Editor. Note that as of this writing, the editor has not been released. It will be released in SwitchYard 0.5
First, we need to install a few things:
- Eclipse - We’re using version 3.7 (Indigo) in this paper. You can get your free copy here: http://www.eclipse.org/downloads/
- JBoss Tools - JBoss Tools (http://download.jboss.org/jbosstools/updates/development/indigo/) is a great collection of development tools, all packaged and tested together. We’ll want to install JBoss Tools to get JBoss AS support tools such as a server runtime detector. The tools that we want to install are packaged as “JBoss Tools Abridged.”

- The GEF Graphical Editing Framework (http://download.eclipse.org/tools/gef/updates/releases/). This is needed by the SwitchYard graphical editor.
- And finally, the Graphical Editor - http://download.jboss.org/jbosstools/updates/nightly/soa-tooling/trunk/
Once all the tools are in place, we can create a new SwitchYard project. Before we do that, however, let’s think about the application that we want to build, and the steps that we have to perform.
The application exposes a simple web service implemented in a Java bean. The service accepts a string, and prefixes the world “hello” to it. That’s right, if we pass the word “world” to the service, it returns “hello world.” We’ll access the service by sending it a SOAP message. For our “client,” we’ll use soapUI (http://www.soapui.org/).
The function performed by the application is not the important thing. What’s important is how you can build it with the SwitchYard tooling, especially the new SwitchYard graphical editor.
The major steps that we’ll perform are:
- Create a new SwitchYard project, configure the project with the bean and SOAP facets. We’ll need these facets to support the bean where we implement the web service and for the SOAP access to the service.
- Create a composite service
- Then create the component service, including the service interface and implementation bean.
- Connect the composite service to its component service.
- Create the SOAP binding for the service.
- Add a transformer to convert the messages from between SOAP XML to a String that the service can manipulate.
OK, let’s begin!
Note: This article was originally written in July 2012. The following sections are an update to the article using the latest release (0.7) of SwitchYard as of March 2013. The UI has changed and improved a great deal since July 2012. The screenshots that are used in the following sections reflect the current (0.7) UI.
The steps that we'll follow are:
- Create a new SwitchYard project
- Create a bean component, and in the course of doing so, create its contract (interface)
- Fill in the business logic of the bean and the details of the contract (interface)
- Promote the service so that it is visible as a web service, and in the course of doing so generate the service's WSDL, and create the necessary transformations
- Create a SOAP binding
- Deploy the service
- Invoke the service
Let's take these steps one-by-one:
Create a new SwitchYard project
To create a new SwitchYard project, select File->New->Project->SwitchYard->SwitchYard Project
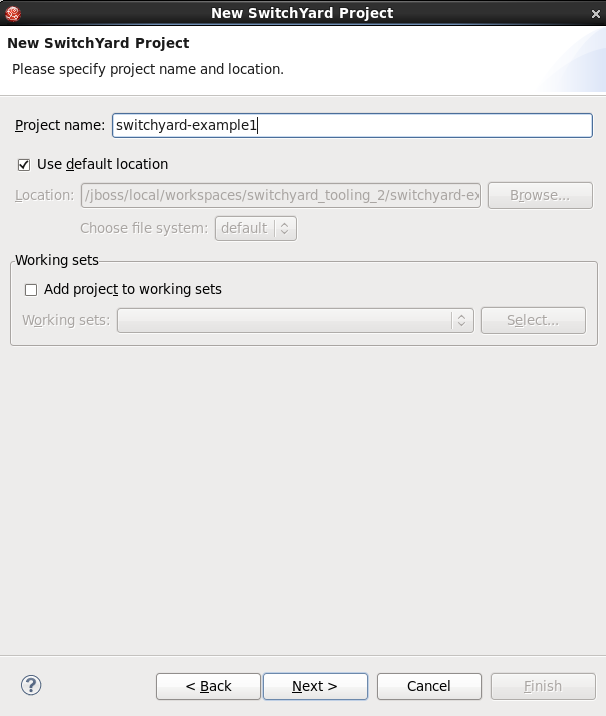
We can accept most of the default settings for this project, the exception being that we have to set the bean and SOAP facets:
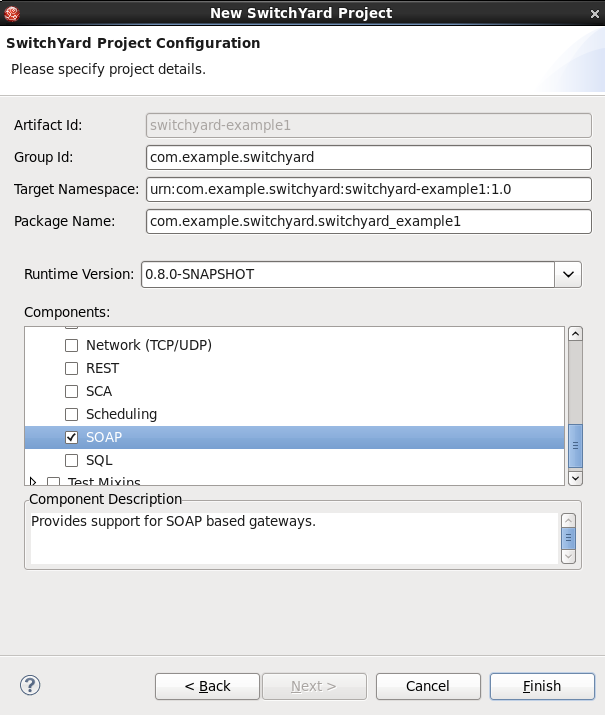
When the new project wizard completes, we access the new SwitchYard graphical editor by double-clicking on the SwitchYard icon in the project explorer:

And the editor is opened.
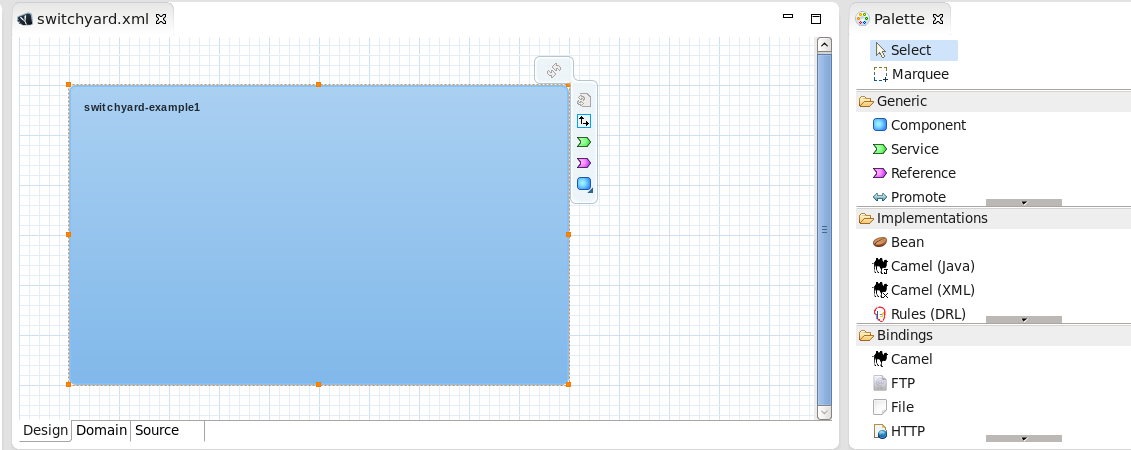
The editor consists of:
- The canvas (displayed in blue on the left of the screen) - The canvas is workspace where you create and manipulate project elements.
- The palette (displayed on the right margin) - The palette contains the elements that you can add to your project.
Create a bean component, and in the course of doing so, create its contract (interface)
To create a new bean component, select the Bean implementation icon from the palette and drag it onto the canvas. The Bean definition dialog opens:
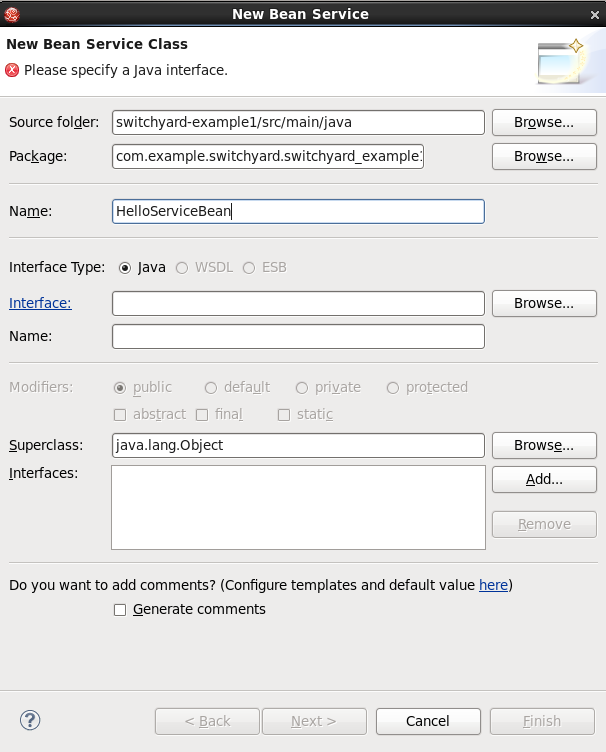
To create the corresponding contract (interface) click on the blue "Interface:" text and this dialog opens:
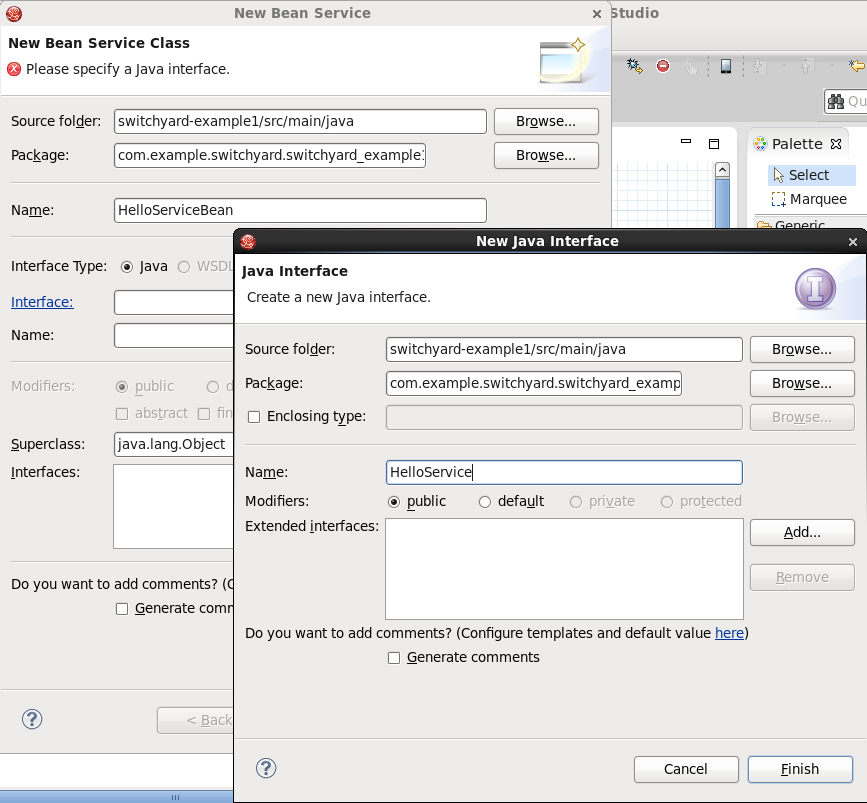
After we select "Finish" to save the definition, we see the bean component on the canvas:

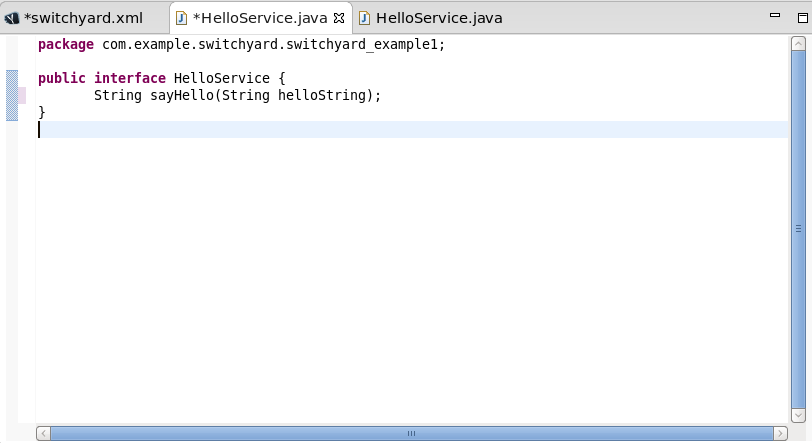
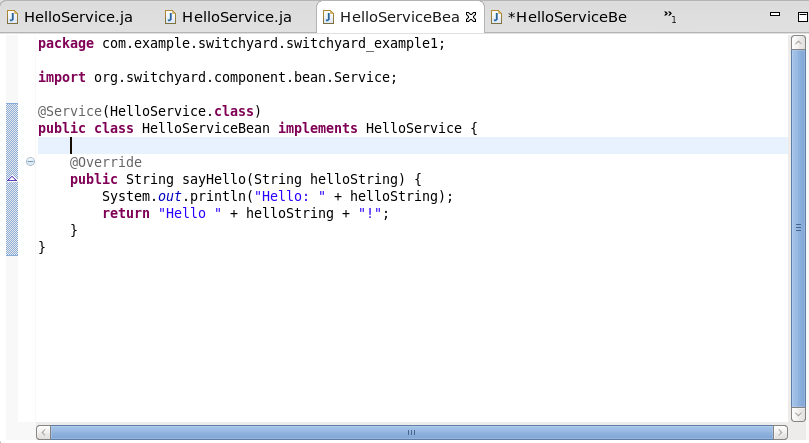
Fill in the business logic of the bean and the details of the contract (interface)
At this point, we need to fill in the code for the bean and its interface:
Promote the service so that it is visible as a web service, and in the course of doing so generate the service's WSDL, and create the necessary transformations
Next, we promote the service to make it visible (right-click on the service's green icon):
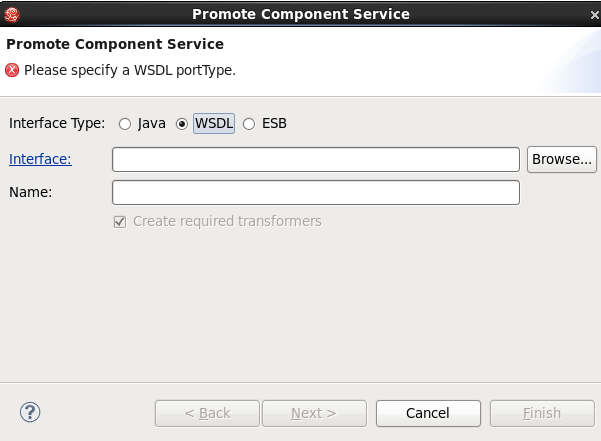
We want to make the service visible as a web service, so we'll select WSDL as the interface type - and the UI will generate a WSDL for us, based on the contract (interface) that we defined earlier:

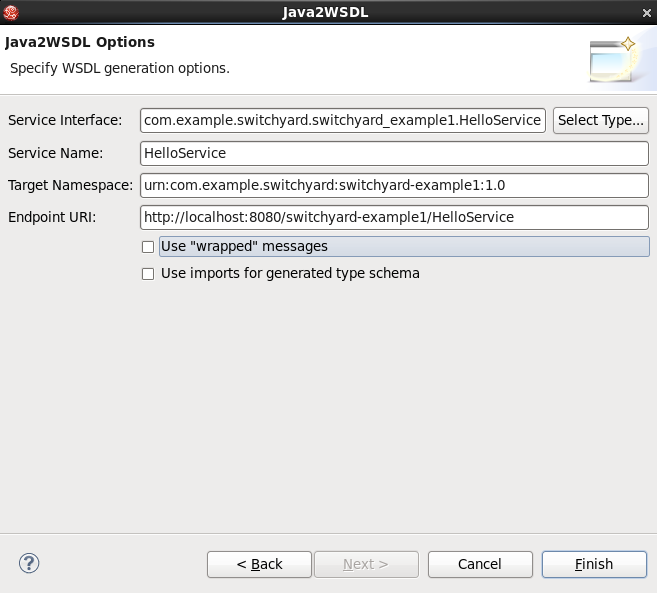
Note that we selected to not use wrapped messages, so that our transformations can access only what is inside the elements they receive.
Our service has to transform data between objects and strings, so we next have to generate transformations:
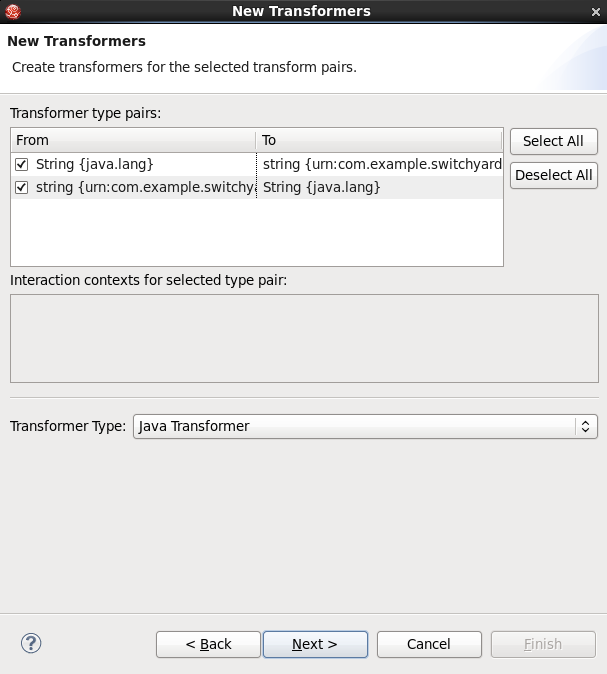
Our (Java) transformers are quite simple:
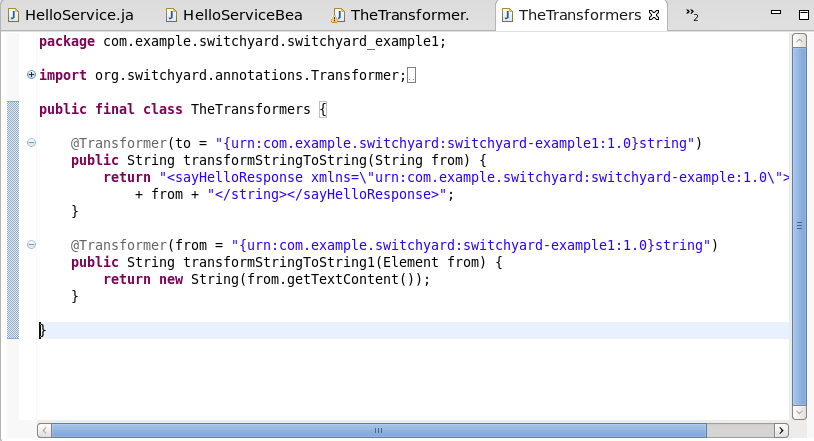
We're almost done!
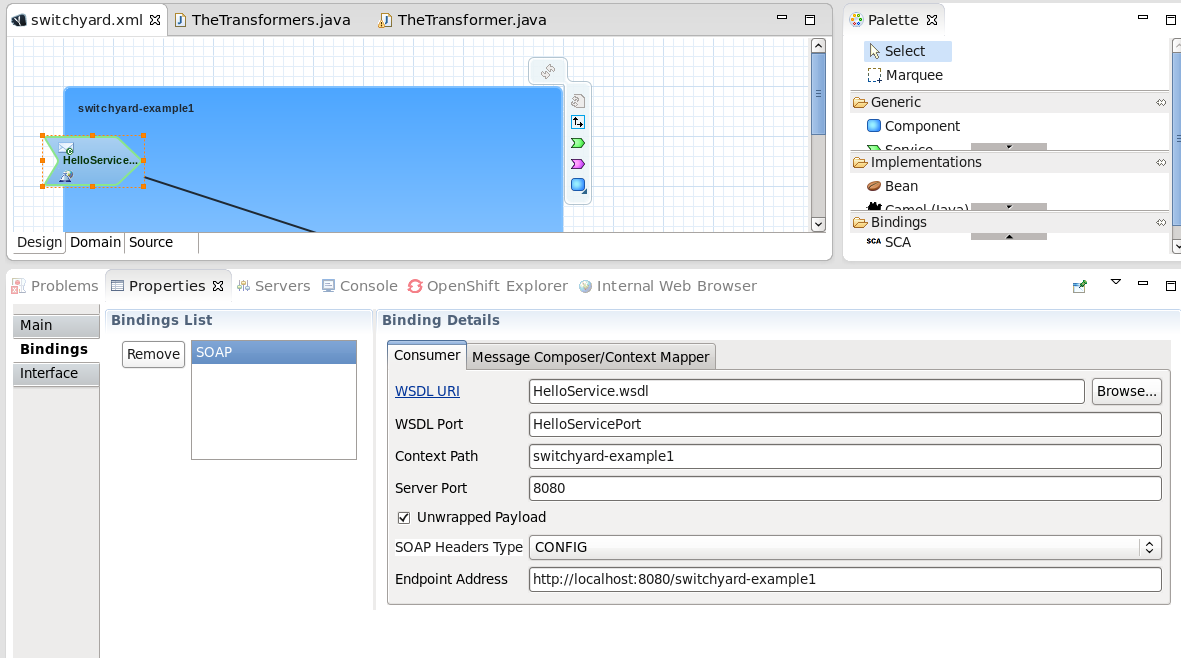
Create a SOAP binding
Now, we create a SOAP binding:
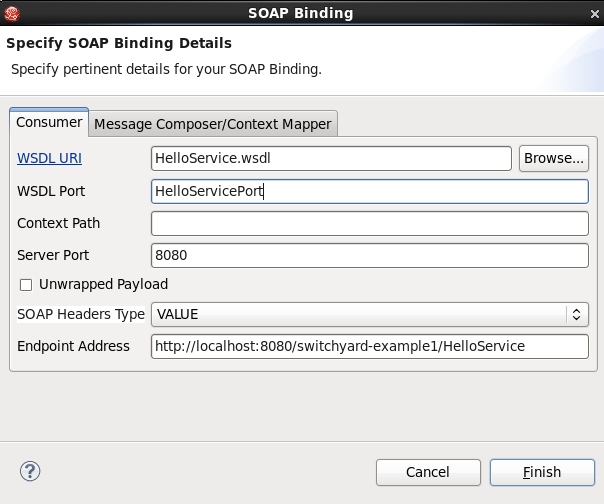
Note that you can always view/edit the binding after it's created by accessing its properties:
OK. It’s time for action. Let’s deploy our application:

And fire up soapUI, we can easily create a request by accessing the deployed service’s WSDL:
http://localhost:8080/switchyard-example1/HelloService?wsdl
http://127.0.0.1:18001/switchyard-example/HelloService?wsdl

And there it is, the output from our very small SwitchYard service.
Section 11: What’s Next?
Well, that’s a brief (impatient) introduction to Switchyard, where to get it, how to install it, and how to build a service from the bottom up. What’s next? In a followup post, we’ll take an in-depth look at the services Switchyard provides by examining some of the SwitchYard quickstarts in detail.
There are a number of great demos of SwitchYard available at the SwitchYard video channel - check it out! https://community.jboss.org/wiki/SwitchYardVideoSeries
Acknowledgements
I’d like to thank Keith Babo, Tom Cunningham, Rob Cernich, and Brian Fitzpatrick for their (never impatient) review comments and suggestions on writing this post!