Sure, I wouldn't advise you to do this if you don't really have to, but nevertheless I want to share my findings on how to install jBPM (including the demo jBPM web-console) on Websphere Application Server. Please note that I'm no WAS pro at all, so I'm sure there might be better ways for accomplishing certain things on that system, but this is how I managed to stumble through the process.
Environment:
Component | Note | |
|---|---|---|
Websphere Application Server 6.1.0.0 | (downloaded the free trial version from http://www.ibm.com/developerworks/downloads/ws/was/index.html) | |
jBPM 3.1.4 | (downloaded the jbpm-starters-kit-3.1.4 from http://labs.jboss.com/jbossjbpm/downloads/ and extracted it to a directory, which will further be refered to as '$JBPM31'. The reason for downloading the starters kit instead of the 'normal' distribution was that the starters kit also contains the DDL scripts for the most popular databases to create the jBPM schema.) | |
MySQL 5.0.15 | - | |
Windows XP Professional | - |
1. Prepare the jBPM schema on MySQL
First, I created a new schema 'jbpm31' on my MySQL instance, and gave the user 'jbossjbpm' all rights to manipulate it.
Now I changed into the folder containing the scripts to create the database schema, for mysql this is:
cd $JBPM31/jbpm-db/build/mysql/scripts
Started the mysql shell:
$JBPM31/jbpm-db/build/mysql/scripts > mysql jbpm31 --user=jbossjbpm --password=jbossjbpm
mysql > source mysql.create.sql;
Ok, that created the db schema, to really get started I also inserted the default sesame street demo users. Just copy the sql statements below to a file 'sesame.street.users.sql' in the above mentioned scripts folder:
INSERT INTO JBPM_ID_USER VALUES(1,'U','cookie monster','cookie.monster@sesamestreet.tv','crunchcrunch'); INSERT INTO JBPM_ID_USER VALUES(2,'U','bert','bert@sesamestreet.tv','ernie,theresabananainyourear'); INSERT INTO JBPM_ID_USER VALUES(3,'U','ernie','ernie@sesamestreet.tv','canthereyoubert,theresabananainmyear'); INSERT INTO JBPM_ID_USER VALUES(4,'U','grover','grover@sesamestreet.tv','mayday mayday'); INSERT INTO JBPM_ID_GROUP VALUES(1,'G','participant','security-role',NULL); INSERT INTO JBPM_ID_GROUP VALUES(2,'G','hr','organisation',NULL); INSERT INTO JBPM_ID_GROUP VALUES(3,'G','sales','organisation',NULL); INSERT INTO JBPM_ID_GROUP VALUES(4,'G','manager','security-role',NULL); INSERT INTO JBPM_ID_GROUP VALUES(5,'G','administrator','security-role',NULL); INSERT INTO JBPM_ID_MEMBERSHIP VALUES(1,'M',NULL,NULL,1,3); INSERT INTO JBPM_ID_MEMBERSHIP VALUES(2,'M',NULL,'boss',3,3); INSERT INTO JBPM_ID_MEMBERSHIP VALUES(3,'M',NULL,NULL,3,4); INSERT INTO JBPM_ID_MEMBERSHIP VALUES(4,'M',NULL,NULL,3,5); INSERT INTO JBPM_ID_MEMBERSHIP VALUES(5,'M',NULL,NULL,3,1); INSERT INTO JBPM_ID_MEMBERSHIP VALUES(6,'M',NULL,NULL,3,2); INSERT INTO JBPM_ID_MEMBERSHIP VALUES(7,'M',NULL,NULL,2,2); INSERT INTO JBPM_ID_MEMBERSHIP VALUES(8,'M',NULL,NULL,2,1); INSERT INTO JBPM_ID_MEMBERSHIP VALUES(9,'M',NULL,NULL,1,1);
Then execute it in mysql:
mysql > source sesame.street.users.sql;
If you have come this far, well done, your database is prepared now!
2. Assemble the jbpmwas.war application to be deployed on WAS
Probably the most tricky part to get it working, and I will provide the exact information later on. For now I just highlight the most critical points:
define the right jBPM and Hibernate configuration settings
adapt the web.xml to suite the datasource mappings
include the right libs
get the logging configuration right (this helped me a lot: http://www.mail-archive.com/commons-user@jakarta.apache.org/msg16833.html//www.mail-archive.com/commons-user@jakarta.apache.org/msg16833.html)
Ok, let's build the 'jbpmwas.war' ready for deployment on Websphere and go into the details.
First, we will build a default jbpm.war using ant, which will create a 'jbpm.war', but also a folder with the war contents 'jbpm.war.dir', which we will use for further manipulation:
cd $JBPM31/jbpm $JBPM31\jbpm > ant -f build.deploy.xml build.webapp ... BUILD SUCCESSFUL $JBPM31\jbpm > dir build ... 11.01.2008 09:33 <DIR> jbpm.war.dir $JBPM31\jbpm > cd build\jbpm.war.dir
This is the basis for the further build of the customized jbpm.war for Websphere. As on a deployment on JBoss AS a service archive (jbpm.sar) is deployed along with the war, some important files such as configs and core libraries are still missing in our web app. Let's continue by copying the jBPM core libraries in the WEB-INF/lib folder:
$JBPM31\jbpm\build\jbpm.war.dir > copy ..\jbpm-3.1.4.jar .\WEB-INF\lib $JBPM31\jbpm\build\jbpm.war.dir > copy ..\jbpm-identity-3.1.4.jar .\WEB-INF\lib
Next, we need the configuration files, which are normally bundled in a jar inside the jbpm.sar
$JBPM31\jbpm\build\jbpm.war.dir > copy ..\..\src\config.files .\WEB-INF\classes ..\..\src\config.files\hibernate.cfg.xml ..\..\src\config.files\jbpm.cfg.xml ..\..\src\config.files\log4j.properties
Next, we need to fill in the specifics for our environment in the config files. Let's start by changing the Hibernate configuration file, so open $JBPM31\jbpm\build\jbpm.war.dir\WEB-INF\classes\hibernate.cfg.xml in an editor of your choice and replace the following
<!-- jdbc connection properties --> <property name="hibernate.dialect">org.hibernate.dialect.HSQLDialect</property> <property name="hibernate.connection.driver_class">org.hsqldb.jdbcDriver</property> <property name="hibernate.connection.url">jdbc:hsqldb:mem:.;sql.enforce_strict_size=true</property> <property name="hibernate.connection.username">sa</property> <property name="hibernate.connection.password"></property>
by this
<property name="hibernate.dialect">org.hibernate.dialect.MySQLDialect</property> <property name="hibernate.connection.datasource">java:comp/env/jdbc/JbpmDS</property>
We can leave the default jbpm.cfg.xml as it is for the moment.
Next thing we have to take care of is the referencing of the datasource. For this we have to insert the following at the end of $JBPM31\jbpm\build\jbpm.war.dir\WEB-INF\classes\web.xml:
<resource-ref> <res-ref-name>jdbc/JbpmDS</res-ref-name> <res-type>javax.sql.DataSource</res-type> <res-auth>Container</res-auth> <res-sharing-scope>Shareable</res-sharing-scope> </resource-ref>
In order to get the logging right, please use the files
log4j.properties
commons-logging.properties
which are attached to this wiki, save them in the $JBPM31\jbpm\build\jbpm.war.dir\WEB-INF\classes folder and adapt them if you want. Please note that I only managed to produce a logging output from the log4j framework if I set the value of the log4j.appender.Default.File= to an absolute path. Would be nice to have this fixed.
To complete this, we need to copy all different libraries needed for the web app to work in the WEB-INF\lib folder:
$JBPM31\jbpm\build\jbpm.war.dir > copy ..\..\lib\jboss\antlr-2.7.5H3.jar .\WEB-INF\lib $JBPM31\jbpm\build\jbpm.war.dir > copy ..\..\lib\jboss\asm.jar .\WEB-INF\lib $JBPM31\jbpm\build\jbpm.war.dir > copy ..\..\lib\jboss\asm-attrs.jar .\WEB-INF\lib $JBPM31\jbpm\build\jbpm.war.dir > copy ..\..\lib\jboss\bsh-1.3.0.jar .\WEB-INF\lib $JBPM31\jbpm\build\jbpm.war.dir > copy ..\..\lib\jboss\commons-collections.jar .\WEB-INF\lib $JBPM31\jbpm\build\jbpm.war.dir > copy ..\..\lib\jboss\commons-logging.jar .\WEB-INF\lib $JBPM31\jbpm\build\jbpm.war.dir > copy ..\..\lib\jboss\cglib-2.1_2jboss.jar .\WEB-INF\lib $JBPM31\jbpm\build\jbpm.war.dir > copy ..\..\lib\jboss\log4j.jar .\WEB-INF\lib $JBPM31\jbpm\build\jbpm.war.dir > copy ..\..\lib\hibernate\hibernate3.jar .\WEB-INF\lib
We are ready to create the web application archive for Websphere now:
$JBPM31\jbpm\build\jbpm.war.dir > jar -cvf ..\jbpmwas.war . $JBPM31\jbpm\build\jbpm.war.dir > dir ..\jbpmwas.war ... 11.01.2008 09:46 6.361.755 jbpmwas.war
3. Create a MySQL datasource in Websphere
Basically, I followed a tutorial I found in the web, which outlines all necessary steps very well:
http://www.webspherepower.com/issues/issue200403/00001236001.html
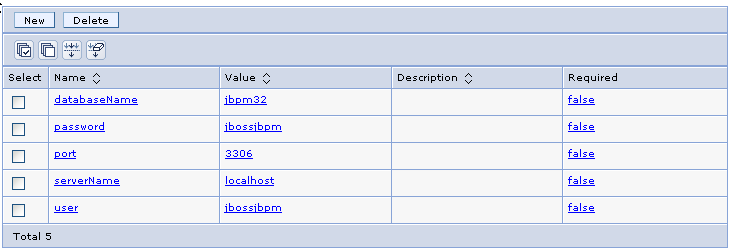
These are the custom properties I used in my datasource definition:
I ended up with a datasource of name 'JbpmDS' and JNDI name 'jdbc/JbpmDS'.
4. Deploy using the Websphere Console
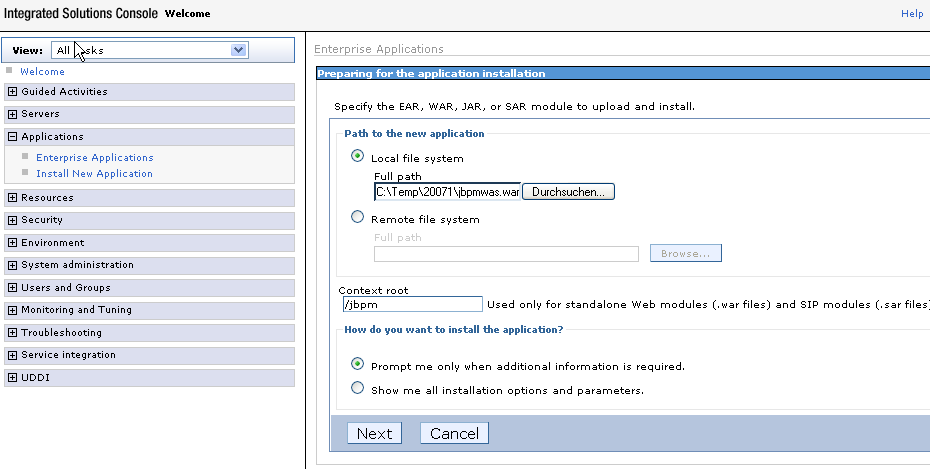
4.1 Start deployment: Applications > Install New Application
As shown on the above figure, define the path to the war - in our case $JBPM31\jbpm\build\jbpmwas.war and a context root, for which I've chosen '/jbpm', hit 'Next'
4.2 Left the default settings on the next two screens, so you can hit 'Next', 'Next'
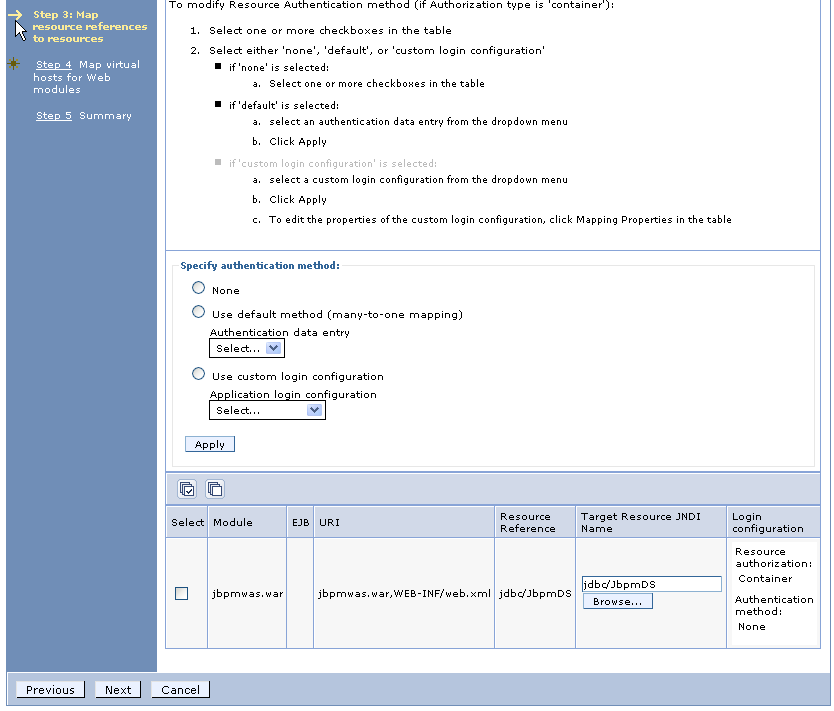
4.3 In 'Step 3: Map resource references to resources' I defined the mapping to the 'jdbc/JbpmDS' datasource previously created:
Continued with 'Next'
4.4 Hit 'Next' and 'Finish' on Step 4 and 5
4.5 The installation has hopefully succeeded: 'Application jbpmwas_war installed successfully.', after that I hit 'Save' to make these config changes permanent.
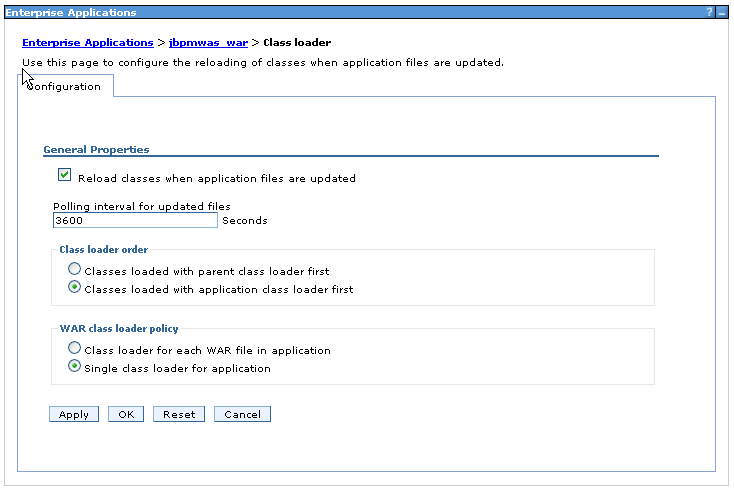
4.6 Now 'Applications > Enterprise Applications' list my newly deployed 'jbpmwas_war', not yet started. Before this should be started, it is very important to change the classloader settings. Click on the linked 'jbpmwas_war' > 'Class loading and update detection' and change the settings to PARENT last:
After defining an interval as well I could persist these changes with 'OK', and 'Save' afterwards.
4.7 Start the application
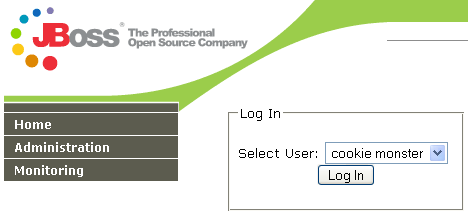
4.8 After it has started, it should be available, eg. at http://localhost:9080/jbpm/index.jsp, depending on your machine name and Virtual Host port settings.
If you see the welcome screen like this, CONGRATULATIONS!
Known Issues
Clicking the "Home" link results in a MyFaces error:
_id1 is duplicated in the faces tree*
This MyFaces problem was fixed in a later MyFaces version (the console uses 1.1.0). Instead of upgrading MyFaces and its dependant libraries, you could make a small fix to home.jsp following the suggestions from the jBPM forum: http://www.jboss.com/index.html?module=bb&op=viewtopic&p=3957569#3957569
-
Back to JbpmOnWebsphere | JbpmServerCompatibility
Comments