This article will use the example of AeroGear's kitchensink quickstart, converted to an Apache Cordova based, hybrid application to illustrate the concepts. What does all of that mean? Basically, this takes our HTML5 + REST/ jQuery Mobile based web app and converts it to a native app for both iOS and Android. Currently, these apps will need to be built separately but in the future, we hope to provide a single build step for all supported mobile OS types. These concepts can be applied to the conversion of most HTML5/JS based web apps by just replacing the specific paths described in this article with paths that match your environment.
Repo Structure
Before getting started, it is important to note the structure of this repo and how it may affect your environment. In order to avoid duplicating both files and effort, the web app assets (HTML, CSS, JS) files have been housed in a separate folder called shared. In there, you will find a folder called www under which are the files. In order for this structure to work during your builds, a symbolic link to the www folder from each of the app's respective www folders has been created. In iOS, that is in the /ios/KitchensinkCordova folder and in Android, the symbolic link is in the /android/assets folder.
iOS Build
System Requirements
- A Mac running OSX 10.7 Lion or later
- XCode 4.3 or later
- The appropriate iOS SDK for your needs
- To test on iOS devices instead of the simulator:
- An Apple Developer account
- An iOS Development Certificate
- A provisioning profile for each device you plan to test with
Building the App for the Simulator
First, we will look at building the app for the iOS Simulator. Once you have cloned the repo, it is time to start the build process. In order to build a Cordova iOS app, you need to install CordovaLib, Cordova Framework and Cordova XCode templates. At this time, there is not a pre-built installer so it must be built from source before it can be installed. Go to https://github.com/apache/incubator-cordova-ios, click the Tags link and download the latest release which at this time is 1.5.0. Unzip the file to a known location, then follow the instructions here under the section titled "Build and install the Installer Package".
Next, just open Xcode, then select File -> Open, then browse to the <repo-folder>/ios/KitchensinkCordova folder and select the KitchensinkCordova.xcodeproj file. Click Open and you should see the project in XCode. If the www folder is not visible in the project or appears broken, that means your OS was unable to create the symbolic link from the file in the repo. If it is there but XCode shows it as missing or broken, all you have to do is create the symbolic link. Now you can just open Terminal, navigate to the <repo-folder>/ios/KitchensinkCordova folder and then create the link like this:
bq. {noformat}ln -s <full-path-to-your-repo>/shared/www www{noformat}
This will create the symbolic link and the folder should be fixed in XCode. If the folder is missing, there is a little trick that you have to do to get XCode to see it. First in the <repo-folder>/ios/KitchensinkCordova delete the www file which came from the repo if it exists. Then create a new folder called www. Now from finder, drag that folder into XCode and drop it on the KitchensinkCordova project on the left side of the window. A dialog window should appear and you want to select the option to add the folder as a reference. You should now see that folder listed in XCode. This is where it gets tricky. Go back to Finder and delete the www folder you just created. It will now show as broken in XCode but that's ok. In Terminal, create the symbolic link using the instructions above and you should be ready to go.
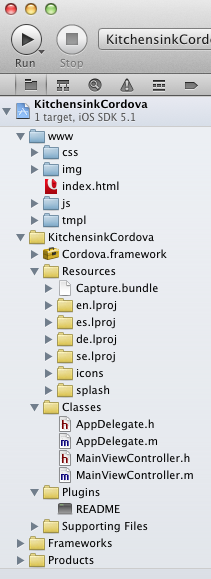
The last step before we can test is to update the path to our Cordova JavaScript file. In order to share the www resources, a placeholder has been added to the index.html file that must be replaced with the path to the appropriate Cordova file for the app you are building.
In XCode, expand the www folder and click on the index.html file. This will open the file for editing in the center pane in XCode. Around line 40, you should see
bq. {noformat}<!-- Cordova script will be replaced with appropriate version at build time -->
<script type="text/javascript" src="{{CORDOVA_SCRIPT}}"></script>{noformat}
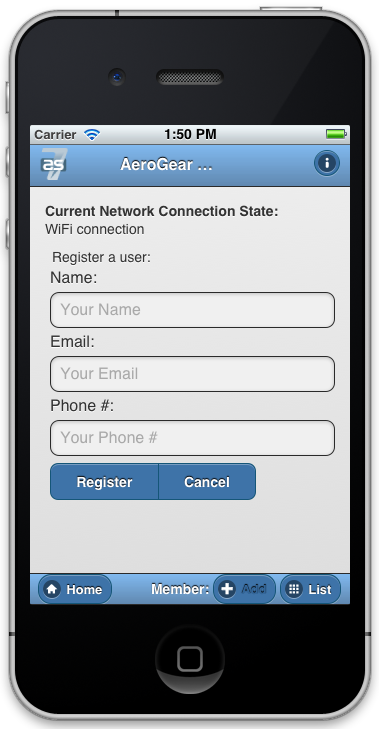
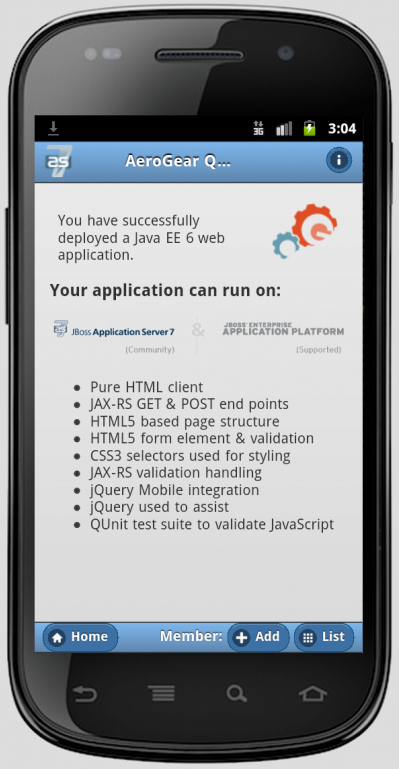
Replace the {{CORDOVA_SCRIPT}} with js/libs/cordova-ios-<version>.js and save the file. That's it! You should now be ready to see it in action. Click the Run button in the upper left corner of XCode and the iOS Simulator should start and you will see the Kitchensink app running. Going to the list page should show you the list of members from poh5-aerogear.rhcloud.com, which is the OpenShift hosted version of the AeroGear kitchensink quickstart. You can also add to that member list from the add screen of the app and also on that add screen, you will see a note referring to your current network connection. That note is proof that Cordova has given you access to native APIs.
Building the App for Devices
After you are able to successfully test your app with the iOS Simulator, it is time to test it on a device. As stated above in the system requirements, this is going to require an Apple Developer account, an iOS development certificate (downloaded to your machine) and a provisioning profile (also downloaded and installed in XCode) for the device(s) you plan to test on. For more information about these requirements, visit the Apple Developer site. Now, on to the steps to deploy to your device.
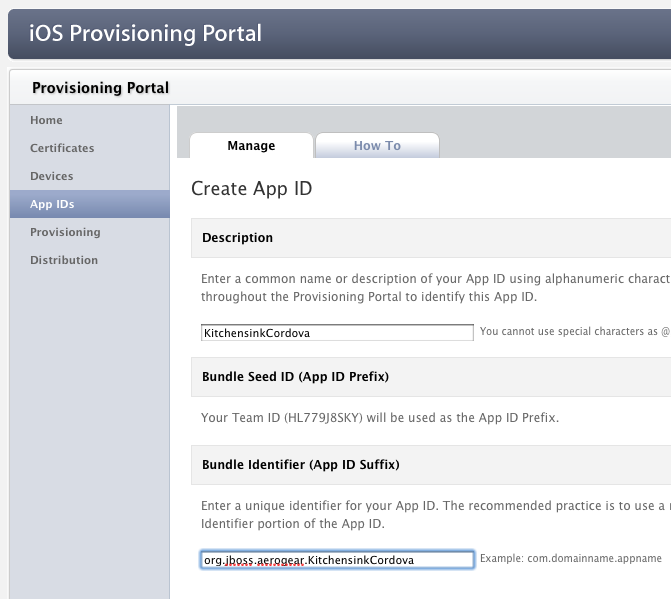
One important note about the provisioning profile is that the when you create your App ID, it must match the App ID of the app exactly or it won't work. For this example, we have used org.jboss.aerogear.KitchensinkCordova as the App ID so you must also create that App ID in your profile and create a provisioning profile for it if you wish to test this example.
Once you have your provisioning profile set up and installed, open your project in XCode again. In the center pane, on the left side under Projects, click on your project (in this case KitchensinkCordova). Now, to the right of that, at the top, click Build Settings. In the build settings, there is a section named Code Signing. Next to the Code Signing Identity, click to change the value to your certificate which should be in the list if you followed the steps from the Apple Developer site on installing your certificate. Your certificate name should look something like iPhone Developer: Kristopher Borchers (<some_random_string>).
Next, make sure your device is attached to your machine, then in XCode, near the top-left corner of the window, you will see the name of your app, followed by the device or simulator that it will run on. Click the device name and select your connected device. Click Run, and it should deploy to and run on your device. That's it!
Android Build
System Requirements
- Android SDK r17 starter package - http://developer.android.com/sdk/index.html
- Android Development Tools (ADT) Plugin for Eclipse
- Java JDK 1.6
- Eclipse Helios (3.6.2) or higher
- Android SDK Tools r17 (included in the Android SDK starter package)
- At least the Android 2.3 SDK (installed via the Android SDK manager in the ADT)
Building the App for the Simulator
Once your environment is all set, getting this app built and running is a snap. First, you need to import the project into Eclipse. Open Eclipse and go to File -> Import and select General -> Existing Projects into Workspace and click Next.

Next, click Browse next too Select root directory and browse to the <repo-folder>/android folder. You should see the KitchensinkCordova project appear in the projects list. Make sure there is a check next to it and then click Finish to import the project.

Now the project is in Eclipse. We need to make one small change to it before it is ready to test. Expand the project and go into the assets/www folder and double-click on the index.html file. This will open the file for editing in the center pane. Around line 40, you should see
bq. {noformat}<!-- Cordova script will be replaced with appropriate version at build time -->
<script type="text/javascript" src="{{CORDOVA_SCRIPT}}"></script>{noformat}
Replace the {{CORDOVA_SCRIPT}} with js/libs/cordova-android-<version>.js and save the file. That's it! You should now be ready to see it in action. Near the upper left corner of Eclipse, there is a button that looks like a little phone with a green Android on the screen, click that and it will launch the Android Virtual Device (AVD) manager.
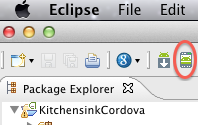
If you have not yet created a virtual device, you will need to do this now. You should have installed an Android 2.x or 4.0 SDK through the SDK manager (button next to the AVD manager in the preceding image). You will want to choose this as your target when creating a virtual device. This sample was built for the Android 2.1 SDK for maximum compatibility with current devices but should work on any 2.x or 4.0 SDK. The sample was not tested on the 3.x series.
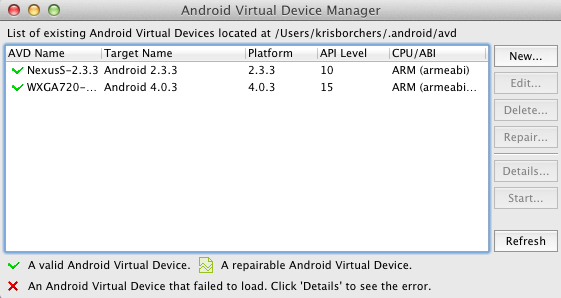
Now that you have a virtual device, select it and click Start. On the following screen, keep the default settings and click Launch and the simulator will start. Now that you have a running simulator, go back to Eclipse, close the AVD window, then right-click (control+click) the project in the left pane, and go to Run as -> Android Application. Select your simulator from the list of running devices, and click OK. This will launch the app in the simulator and you are off and running.
Building the App for Devices
Running the app on your Android device is even easier. First, make sure your device has USB debugging enabled. This is usually done by going to Settings -> Applications -> Development -> USB debugging. Once you have done this, make sure there are no virtual devices running, then connect your device to your computer with your USB cable. In Eclipse, go to Run -> Run (or click the green "Play" button in the toolbar) and the app should start on your device. If you still have the simulator running, the app may start in the simulator. If this happens, or you would like to have both the simulator running and your device connected, you can use the method outlined in the section on running your app in the simulator. When you get to the part on selecting a running device, both your simulator and your physical device should be in the list and you can select from there.
Android FAQ
- When trying to run the project, I receive a message similar to "Android requires compiler compliance level 5.0 or 6.0. Found '1.4' instead." What do I do?
- As recommended by Eclipse, "Please use Android Tools > Fix Project Properties" will fix this issue
- I receive the error "Unable to resolve target 'android-7'", what do I do?
- This is due to an incorrect SDK version. This app was built for Android 2.1 and should work on any 2.x or 4.0 device. In order to build the project though, you will need to have the Android 2.1 (API 7) installed using the Android SDK Manager which can be found in the Eclipse toolbar.
- Why do the transitions look so shaky or choppy?
- jQuery Mobile has some issues with Android and transitions. The Android browser has some issues with these transitions which causes a flicker or jump during or at the end of the animation. This is further exagerated in the emulators. You can read more about jQuery Mobile's work with page transitions on Android here https://github.com/jquery/jquery-mobile/issues/3217
Comments