All People > bpmn2user > bpmn2 user's Blog > 2011 >
February
2011

Here is an example that shows the required steps to create a HelloWorld example with jBPM5 plug-in in Eclipse.
First install jBPM5 plugin using the steps (http://community.jboss.org/people/bpmn2user/blog/2011/02/27/eclipse-plug-in-installation-for-jbpm5) or using the install script (http://kverlaen.blogspot.com/2011/01/jbpm-50-released.html).
A simple example (http://people.redhat.com/kverlaen/jBPM5-guvnor-integration.swf) is considered here to show the features of jBPM5 eclipse plug-in.
'Hello Task' is created as follows. Attached files (HelloProcess.bpmn, HelloTask.ftl and Hello.ftl) can be imported into the HelloProcess project created in http://community.jboss.org/people/bpmn2user/blog/2011/02/27/eclipse-plug-in-installation-for-jbpm5.
The user form for the task 'HelloTask' is created using the pattern {TaskName}.ftl as shown below.

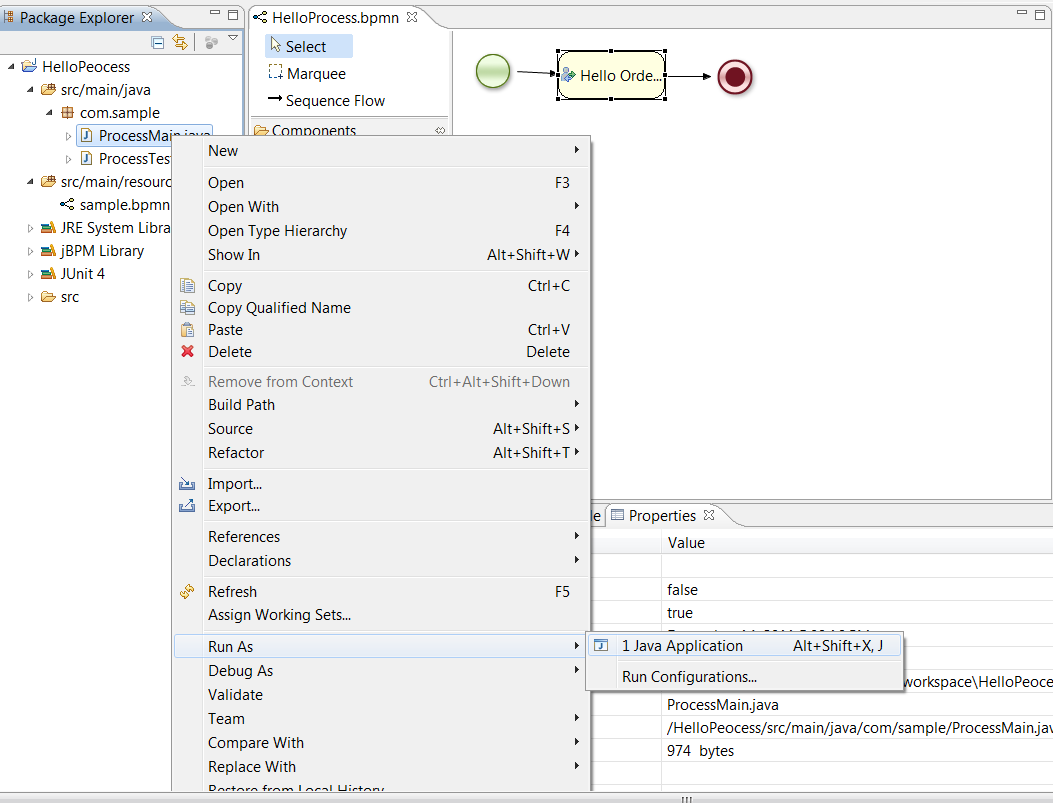
The 'HelloProcessTest.java' is created to read the 'HelloProcess.bpmn' file as shown below (also find the complete file as an attachement below):
public class HelloProcessTest {
public static final void main(String[] args) {
try {
EntityManagerFactory emf = Persistence.createEntityManagerFactory("org.jbpm.task");
TaskService taskService = new TaskService(emf, SystemEventListenerFactory.getSystemEventListener());
/*
* Add the required users
*/
TaskServiceSession taskSession = taskService.createSession();
taskSession.addUser(new User("Administrator"));
taskSession.addUser(new User("krisv"));
/* Start Mina server for HT*/
MinaTaskServer server = new MinaTaskServer(taskService);
Thread thread = new Thread(server);
thread.start();
System.out.println("Server started ...");
/*Create the knowledge base for HelloProcss.bpmn */
KnowledgeBase kbase = readKnowledgeBase();
StatefulKnowledgeSession ksession = createSession(kbase);
KnowledgeRuntimeLogger logger = KnowledgeRuntimeLoggerFactory.newThreadedFileLogger(ksession, "testlog", 1000);
ksession.getWorkItemManager().registerWorkItemHandler("Human Task", new WSHumanTaskHandler());
System.out.println(" started the humantask");
ksession.startProcess("Hello");
logger.close(); }
Select the 'Human Task View' using Window->ShowView->Drools Task->Human Task View. Start the program 'HelloProcessTest.java' and look for the tasks using the userID 'krisv'. 'Hello Task' can then be selected to perform tasks such as 'Start', 'Complete' etc.
Here are the manual steps to install jBPM5 plug-in and run a sample example in Eclipse.This install is done automatically after running jBPM5 installer (http://kverlaen.blogspot.com/2011/06/jbpm-510-released.html). Following procedure, however, might be useful if you want to understand (or having problems completing the install) the main install steps provided in the automated install script for JBPM5.2. The install instructions for the previous release 5.1 can also be found in the attachment jbpm5.1install.zip.
1.) Download Eclipse Helios:
Unzip this into a directory, say JBPM5
2.) Download Drools and JBPM5 plugin, i.e., org.drools.updatesite-5.3.1.Final-assembly.zip:
Unzip this plugin to a temp directory, say TEMP\drools-update-site. Copy 'features' and 'plugins' directories from TEMP\drools-update-site into
JBPM5\eclipse
It is required to have a runtime dependant libraries that a jBPM5 sample can use.
3.) Download the libraries (jbpm-5.2.0.Final-bin.zip ) from http://sourceforge.net/projects/jbpm/files/jBPM%205/jbpm-5.2.0.Final/jbpm-5.2.0.Final-bin.zip/download and unzip into a directory, say JBPM5\runtime.
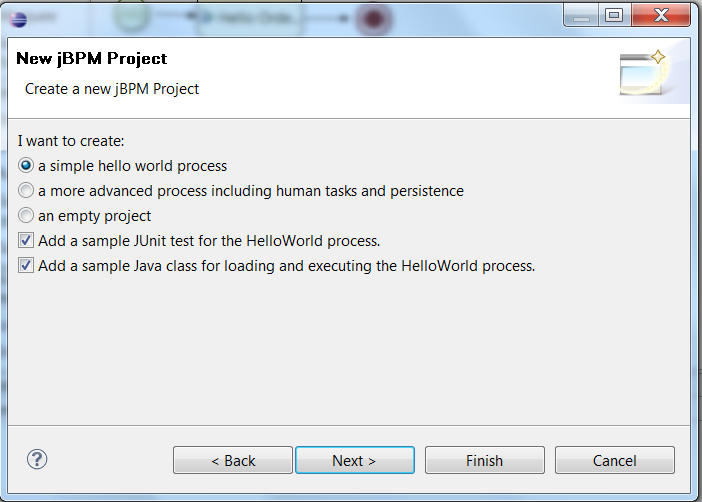
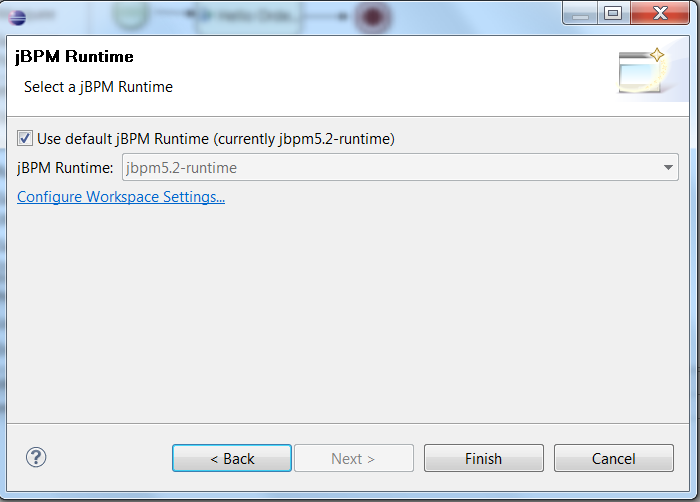
4.) Create a new jBPM sample project in Eclipse and use the runtime libraries downloaded in Step 4.
Select 'Configure Workspace Setting' link below and set it to 'JBPM5\runtime' directory created in Step4.
Update for the version 5.4:
Following two links can be used in Steps 2 and 3 for JBPM 5.4 plugin and the runtime libraries.
jBPM Plugin: http://download.jboss.org/drools/release/5.5.0.Final/droolsjbpm-tools-distribution-5.5.0.Final.zip
jbpm-5.4.0.Final-bin.zip : jbpm-5.2.0.Final-bin.ziphttp://sourceforge.net/projects/jbpm/files/jBPM%205/jbpm-5.4.0.Final/jbpm-5.4.0.Final-bin.zip/download
1.) Configure the jBPM console with Tomcat (http://community.jboss.org/people/bpmn2user/blog/2011/01/21/test) and configure the datasource against the Oracle database.
a.) Add transaction and Resource information after 'WatchedResource' line in TOMCAT_HOME/conf/context.xml as shown below.
.........
..........
<WatchedResource>WEB-INF/web.xml</WatchedResource>
<Transaction factory="bitronix.tm.BitronixUserTransactionObjectFactory" />
<Resource name="jdbc/testDS1" auth="Container" type="javax.sql.DataSource"
maxActive="15" maxIdle="2" maxWait="10000"
logAbandoned="true"
username="username" password="password"
driverClassName=" oracle.jdbc.OracleDriver"
url="jdbc:oracle:thin:@youroraclehpost:port:dbs"/>
..........
.........
b.) Create 'resource.properties' in TOMCAT_HOME/conf as shown below.
resource.ds1.className=bitronix.tm.resource.jdbc.lrc.LrcXADataSource
resource.ds1.uniqueName=jdbc/testDS1
resource.ds1.minPoolSize=0
resource.ds1.maxPoolSize=5
resource.ds1.driverProperties.driverClassName=oracle.jdbc.OracleDriver
c.) Create 'btm-config.properties' in TOMCAT_HOME/conf as shown below.
bitronix.tm.serverId=tomcat-btm-node0
bitronix.tm.journal.disk.logPart1Filename=${btm.root}/work/btm1.tlog
bitronix.tm.journal.disk.logPart2Filename=${btm.root}/work/btm2.tlog
#bitronix.tm.resource.configuration=${btm.root}/conf/resources.properties
2.) Copy Oracle driver (e.g. oracle-11.1.0.6.jar) into into TOMCAT_HOME/lib
3.) Modify hibernate.cfg.xml in TOMCAT_HOME\webapps\gwt-console-server\WEB-INF\classes\META-INF to include Oracle connection details.
e.g
......
......
<!-- Database connection settings -->
<property name="connection.driver_class">oracle.jdbc.OracleDriver</property>
<property name="connection.url">jdbc:oracle:thin:@yourhostname:1521:test</property>
<property name="connection.username">dbuser</property>
<property name="connection.password">dbpw</property>
<!-- JDBC connection pool (use the built-in) -->
<property name="connection.pool_size">1</property>
<!-- SQL dialect -->
<property name="dialect">org.hibernate.dialect.Oracle10gDialect</property>
.......
.......
Following two steps requires repackaging the jar files as the default embedded configuration files use h2. Also, do not use CR1 jar files as a lot of fixes for Oracle were done after CR1 release. Use latest SNAPSHOT jar files.
4.) Download and copy jbpm-human-task-5.0-SNAPSHOT.jar to TOMCAT_HOME/webapps/gwt-console-server/WEB-INF/lib
5.) Download and copy jbpm-bam-5.0-SNAPSHOT.jar to TOMCAT_HOME/webapps/gwt-console-server/WEB-INF/lib
6.) The BAM reports files (process_summary.rptdesign,overall_activity.rptdesign) need to be modified (using Eclispe BIRT plugin) to inlcude Oracle connection details.
7.) Also the Oracle driver needs to be included from BIRT ReportEngine.
Its location is TOMCAT_HOMEbirt\ReportEngine\plugins\org.eclipse.birt.report.data.oda.jdbc_2.3.2.r232_v20090212\drivers
Step6 is mainly required as the h2 database connection details are included and these should be replace with your Oracle database information.
Also,it should be noted that the design files do not have the latest table information. One of the columns for the table NodeInstanceLog (DATE has been replaced with LOG_DATE) has been changed (http://community.jboss.org/message/571322).
Attached please find the example reports. You need to provide the hostname and connection details.
You can not open these design files with the latest BIRT plugin as these reports use 2.3.1.
Download the BIRT designer from http://archive.eclipse.org/birt/downloads/build.php?build=R-R1-2_3_1-200809221151http://archive.eclipse.org/birt/downloads/build.php?build=R-R1-2_3_1-200809221151 and modify the report files process_summary.rptdesign,overall_activity.rptdesign in TOMCAT_HOME/BIRT directory.
Note: It is also required to change the database connection details in jbpm-human-task-5.0.0.jar for the human task if this service is started seperately or embedded as a startup servlet (http://community.jboss.org/message/581372#581372)
<properties>
<property name="hibernate.dialect" value="org.hibernate.dialect.Oracle10gDialect"/>
<property name="hibernate.connection.driver_class" value="oracle.jdbc.OracleDriver"/>
<property name="hibernate.connection.url" value="jdbc:oracle:thin:@yourOraclehostname:port:dbs" />
<property name="hibernate.connection.username" value="username"/>
<property name="hibernate.connection.password" value="password"/>
<property name="hibernate.connection.autocommit" value="false" />
<property name="hibernate.max_fetch_depth" value="3"/>
<property name="hibernate.hbm2ddl.auto" value="create" />
<property name="hibernate.show_sql" value="false" />
</properties>
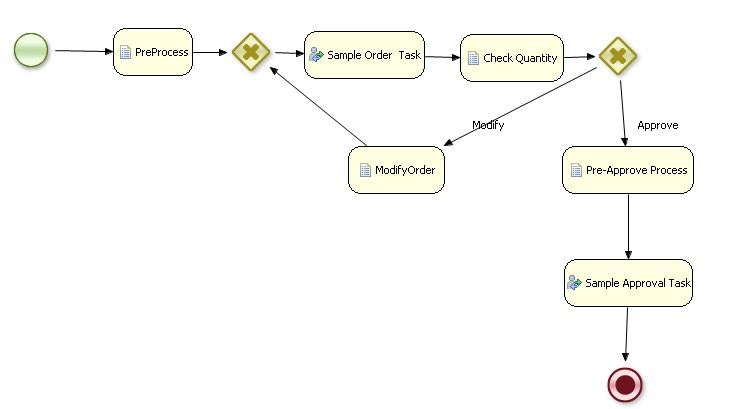
This example shows the use of ftl forms that have variables.
Here is a sample use case.
1.) User 1 (krisv) fills in a form that has three variables (Priority, Model Number, Quantity)
2.) User 2 (john) approves another form if the Qunatity is less than 1000.
This example also has a diverge node that uses a variable (isAvailable) to determine if this order can be approved by user2 or
it needs to be sent back to user1. The variable (isAvailable) is set to true if the quantity is less than 1000.
How to install and run this example in an appserver (e.g. JBoss or Tomcat)?
1.) Copy the SampleHumanTaskFormVariables.bpmn file to the directory where the other bpmn files are located
(specified using the parameter -Djbpm.console.directory).
2.) Copy the sampleHTFormVariables.jar to server's CLASSPATH. For example, it can be one of the options as shown below:
Copy the jar file into gwt-console-server war file ( ..gwt-console-server\WEB-INF\lib)
or Copy the jar file into appserver's lib direcory (JBOSS_HOME\server\default\lib for JBOSS or TOMCAT_HOME\lib for TOMCAT)
This jar file basically has a couple of ftl forms for the two users (one for 'krisv' and the other for 'john') and an image file.
Here are the main steps to create this sample:
1.) Create the bpmn file using jBPM5 Eclispe plugin or any BPMN editor such as Oryx or Koens Aers's BPMN (http://community.jboss.org/thread/160088) editor.
2.) Create the required human task forms using ftl templates using the pattern {TaskName}.ftl.
3.) Create the image of the BPMN, e.g, using 'Export image(PNG)' option.
4.) Package all the ftl template files and the image file into a jar file and copy it to the classpath, i.e.,
gwt-console-server's WEB-INF\lib directory. Alternately you can also use Guvnor to load the artifacts.
Here are the main points to note:
1.) The name of a template for a task node should be same as the 'TaskName' property of the task node.
For example, 'TaskName' for the task node 'Sample Order Task' is defined as 'ProcessOder'. So the template for this node is 'ProcessOder.ftl'
2.) All the variables are defined for the bpmn file as shown below.
3.) The task node can have the 'Content' parameter set to Map. If a Map is populated with all the required variables, these variables can be accessed from the ftl templates. Note that 'Content' only allows Map at this time, i.e, not multiple variables.
4.) It can be seen from the following diagram that 'Parameter Mapping', (i.e input to the 'Sample Order Task') can be set to the Map from the previous step. It can also be seen that all the output variables can be set using 'Result Mapping'. It should be noted that these variables are returned as individual parameters, i.e., not as a Map.
5.) The ftl templates can be created using various editors (http://freemarker.sourceforge.net/editors.html)