Why JSON?
- JSON is popular data exchange format and well suited for JavaScript consumption
Spring and GWT Integration using JSON
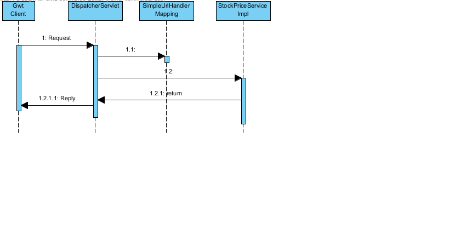
- Most GWT application needs to interact with a backend server. GWT provides RequestBuilder class and JavaScriptObject class to allow to you to make calls to Java servlets.
- Spring MVC allows you to receive the GWT request, process the request and returns data in JSON format.
Spring GWT StockWatcher
GWT team has already provided documents describing how to create client requests and how to process JSON reply. I am going to show you how to use Spring Framework to process the GWT request and return JSON data.
Step 1:
Create a Spring MVC application
Step 2:
Add Jackson Java JSON processor dependency in your pom file.
<dependency>
<groupId>org.codehaus.jackson</groupId>
<artifactId>jackson-mapper-asl</artifactId>
<version>1.7.1</version>
</dependency>
Step 3:
Create a controller to process the GWT requests
@Controller
@RequestMapping("/stockWatcher")
public class JSONController {
private static final double MAX_PRICE = 100.0; // $100.00
private static final double MAX_PRICE_CHANGE = 0.02; // +/- 2%
@RequestMapping(method = RequestMethod.GET)
public @ResponseBody List<StockPrice> getStocks( @RequestParam(value = "q", required = false) final String q ) {
String[] stockSymbols = q.split(" ");
ArrayList<StockPrice> stockPriceList= new ArrayList<StockPrice>();
for (String stockSymbol : stockSymbols) {
Random rnd = new Random();
double price = rnd.nextDouble() * MAX_PRICE;
double change = price * MAX_PRICE_CHANGE * (rnd.nextDouble() * 2f - 1f);
StockPrice stockPrice = new StockPrice();
stockPrice.setSymbol(stockSymbol);
stockPrice.setPrice(price);
stockPrice.setChange(change);
stockPriceList.add(stockPrice);
}
return stockPriceList;
}
}
Step 4:
Configure Spring mvc annotation
<beans xmlns="http://www.springframework.org/schema/beans"
xmlns:context="http://www.springframework.org/schema/context"
xmlns:mvc="http://www.springframework.org/schema/mvc" xmlns:xsi="http://www.w3.org/2001/XMLSchema-instance"
xsi:schemaLocation="
http://www.springframework.org/schema/beans
http://www.springframework.org/schema/beans/spring-beans-3.0.xsd
http://www.springframework.org/schema/context
http://www.springframework.org/schema/context/spring-context-3.0.xsd
http://www.springframework.org/schema/mvc
http://www.springframework.org/schema/mvc/spring-mvc-3.0.xsd">
<context:component-scan base-package="com.johnnyweb.stockWatcher.controller" />
<mvc:annotation-driven />
</beans>
Step 5:
Configure web.xml file
<web-app id="WebApp_ID" version="2.4"
xmlns="http://java.sun.com/xml/ns/j2ee" xmlns:xsi="http://www.w3.org/2001/XMLSchema-instance"
xsi:schemaLocation="http://java.sun.com/xml/ns/j2ee
http://java.sun.com/xml/ns/j2ee/web-app_2_4.xsd">
<display-name>Spring Web MVC Application</display-name>
<servlet>
<servlet-name>mvc-dispatcher</servlet-name>
<servlet-class>org.springframework.web.servlet.DispatcherServlet</servlet-class>
<load-on-startup>1</load-on-startup>
</servlet>
<servlet-mapping>
<servlet-name>mvc-dispatcher</servlet-name>
<url-pattern>/rest/*</url-pattern>
</servlet-mapping>
<context-param>
<param-name>contextConfigLocation</param-name>
<param-value>/WEB-INF/mvc-dispatcher-servlet.xml</param-value>
</context-param>
<listener>
<listener-class>org.springframework.web.context.ContextLoaderListener</listener-class>
</listener>
</web-app>
Step 6:
Test your application
