Build beautiful web pages using Bootstrap without deep CSS knowledge
Posted by johnnyren Oct 18, 2013What is Bootstrap?
- A front-end toolkit for rapidly developing web applications from Twitter.
- It provide web developers with a stylish popular components such as buttons, grids, navigation and it everything else you need to build a beautiful front end.
- It supports both mobile and traditional web development
Why do I choose and promote Bootstrap?
- I am a senior Java developer and I have ten plus years of web development experiences.
- I have some basic CSS knowledge. However, I always rely on CSS developers to choose their favorite CSS components to do the web page layout and beatify our web application.
- I am very excited that I can build a great look web site myself very rapidly now.
Sample Components
- Beautiful Informative Buttons
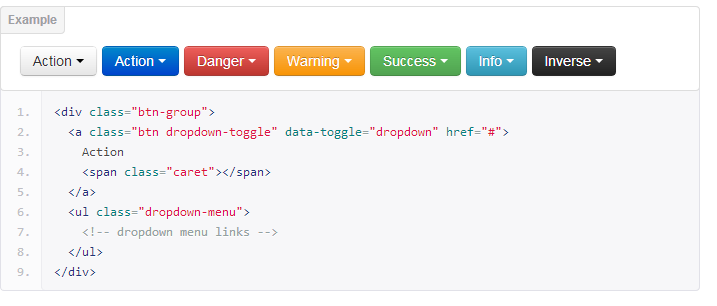
· Basic tabs

Easy to understand Layout
- It is very easy to create a layout showed below

Conclusion
- Bootstrap is easy to use CSS framework.
- It will increase your productivity
- There is no reason not to use it
Why Restful?
- Restful is popular alternative to SOAP web service and It is easy to use.
How do you secure your restful web service?
- Because each restful request is a stateless request, so you can’t use standard login page to authenticate a user anymore.
- The solution is to use Http Authentication header, spring security framework.
- I am going to show you how to create your own interceptor to authenticate user requests and use secured annotation to protect your method
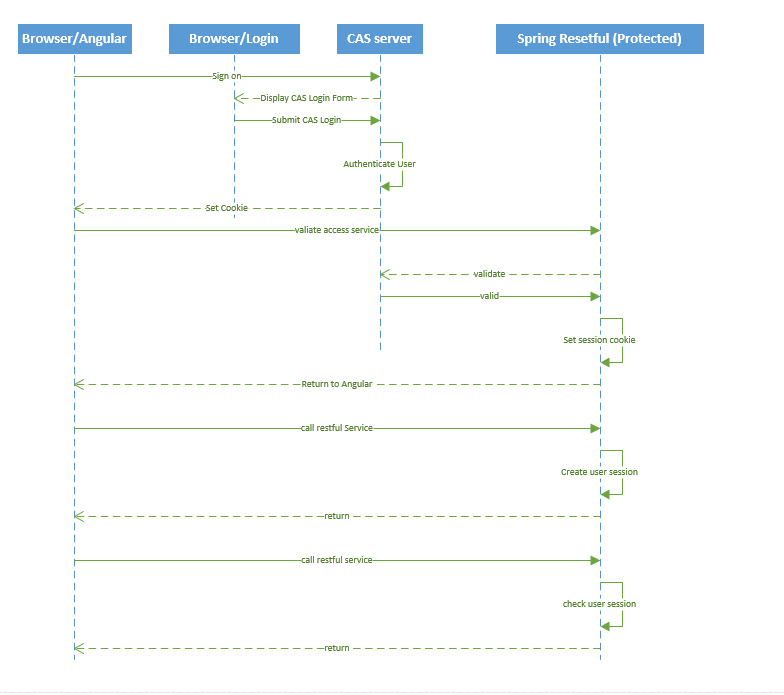
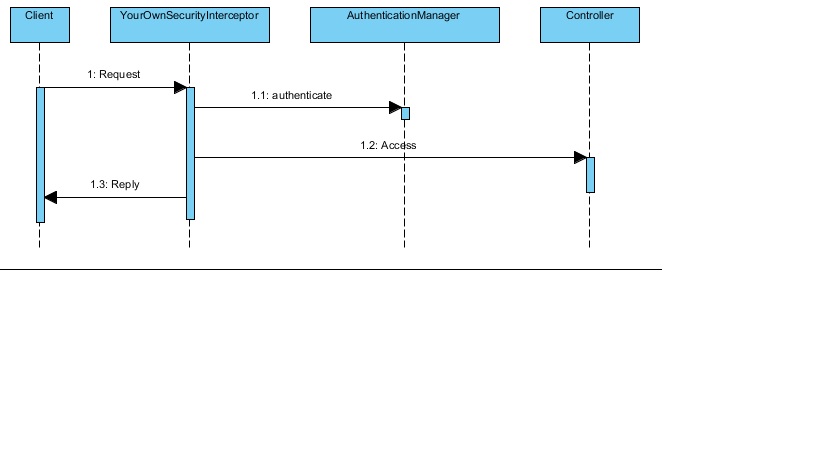
Sequence Diagram
- This diagram show Spring Security can protect your Java server side resource.
- The Client makes a request to the server side service.
- YourOwnSecurityInterceptor intercepts the request and extract the Authentication header.
- YourOwnSecurityInterceptor calls AuthercationManger to authticate the user.
- .
YourOwnSecurityInterceptor.java
public class AuthenticationInterceptor extends HandlerInterceptorAdapter {
private AuthenticationManager authenticationManager;
private static final Logger logger = LoggerFactory.getLogger(AuthenticationInterceptor.class);
public boolean preHandle(HttpServletRequest request,
HttpServletResponse response, Object handler) throws Exception {
String authorization = request.getHeader("Authorization");
if (authorization == null) {
return false;
}
String[] credentials = decodeHeader(authorization);
assert credentials.length == 2;
Authentication authentication = new UsernamePasswordAuthenticationToken(credentials[0], credentials[1]);
Authentication successfulAuthentication = authenticationManager.authenticate(authentication);
SecurityContextHolder.getContext().setAuthentication(successfulAuthentication);
return true;
}
public String[] decodeHeader(String authorization) {
try {
byte[] decoded = Base64.decode(authorization.substring(6).getBytes("UTF-8"));
String credentials = new String(decoded);
return credentials.split(":");
} catch (UnsupportedEncodingException e) {
throw new UnsupportedOperationException(e);
}
}
…
}
Spring Configuration
- Web.xml:
<context-param>
<param-name>contextConfigLocation</param-name>
<param-value>/WEB-INF/mvc-dispatcher-servlet.xml</param-value>
</context-param>
<listener>
<listener-class>org.springframework.web.context.ContextLoaderListener</listener-class>
</listener>
<listener>
<listener-class>org.springframework.web.context.request.RequestContextListener</listener-class>
</listener>
<servlet>
<servlet-name>mvc-dispatcher</servlet-name>
<servlet-class>org.springframework.web.servlet.DispatcherServlet</servlet-class>
<load-on-startup>1</load-on-startup>
</servlet>
<servlet-mapping>
<servlet-name>mvc-dispatcher</servlet-name>
<url-pattern>/rest/*</url-pattern>
</servlet-mapping>
Mvc-dispatcher-servlet.xml
<context:component-scan base-package="com.johnnyweb.stockWatcher.controller" />
<mvc:annotation-driven />
<security:global-method-security secured-annotations="enabled" />
secured-annotations="enabled"
<mvc:interceptors>
<bean id="authenticationInterceptor" class="com.johnnyweb.interceptor.AuthenticationInterceptor">
<property name="authenticationManager" ref="authenticationManager" />
</bean>
</mvc:interceptors>
<security:authentication-manager alias="authenticationManager">
<security:authentication-provider>
<security:user-service id="userService">
<security:user name="gwtrest" password="gwtrest" authorities="ROLE_CUSTOMER" />
<security:user name="gwtAdmin" password="gwtAdmin" authorities="ROLE_ADMIN" />
</security:user-service>
</security:authentication-provider>
</security:authentication-manager>
Spring controller
@RequestMapping(method = RequestMethod.GET)
@Secured("ROLE_ADMIN")
public @ResponseBody List<StockPrice> getStocks( @RequestParam(value = "q", required = false) final String q ) {
String[] stockSymbols = q.split(" ");
ArrayList<StockPrice> stockPriceList= new ArrayList<StockPrice>();
for (String stockSymbol : stockSymbols) {
Random rnd = new Random();
double price = rnd.nextDouble() * MAX_PRICE;
double change = price * MAX_PRICE_CHANGE * (rnd.nextDouble() * 2f - 1f);
StockPrice stockPrice = new StockPrice();
stockPrice.setSymbol(stockSymbol);
stockPrice.setPrice(price);
stockPrice.setChange(change);
stockPriceList.add(stockPrice);
}
return stockPriceList;
}
Test your restful service using FIrefox RestClient
http://localhost:8080/SpringMVC/rest/stockWatcher?q=NN
Why Restful?
- Restful is popular alternative to SOAP web service and It is easy to use.
How do you secure your restful web service?
- How do you protect server side resources to allow only certain authenticated users to access? Because each restful request is a stateless request, so you can’t use standard login page to authenticate a user anymore.
- The solution is to use Http Authentication header and spring security framework.
- There are many ways to use Spring Security to authenticate user request. In this paper I am going to show you how to use FilterSecurityInterceptor to authenticate user requests
Sequence Diagram
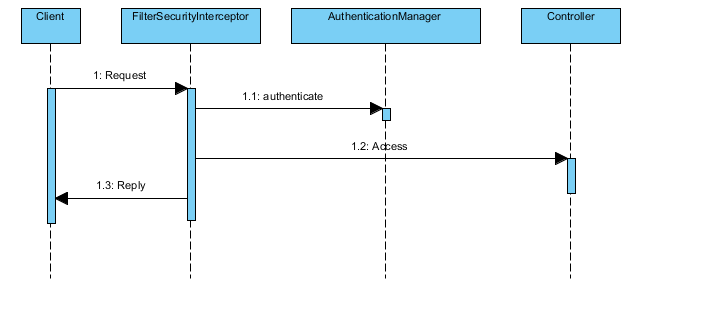
- This diagram show Spring Security can protect your Java server side resource.
- The Client makes a request to the server side service.
- Spring FilterSecurityInterceptor intercepts the request and extract the Authentication header.
- Spring FilterSecurityInterceptor calls AuthercationManger to authticate the user.
- Spring FilterSecurityInterceptor use AccessManager to decide if the system is going to allow the user to access the protected resource.
Spring Configuration
- Web.xml:
<context-param>
<param-name>contextConfigLocation</param-name>
<param-value>/WEB-INF/mvc-dispatcher-servlet.xml</param-value>
</context-param>
<listener>
<listener-class>org.springframework.web.context.ContextLoaderListener</listener-class>
</listener>
<listener>
<listener-class>org.springframework.web.context.request.RequestContextListener</listener-class>
</listener>
<filter>
<filter-name>springSecurityFilterChain</filter-name>
<filter-class>org.springframework.web.filter.DelegatingFilterProxy</filter-class>
</filter>
<filter-mapping>
<filter-name>springSecurityFilterChain</filter-name>
<url-pattern>/*</url-pattern>
</filter-mapping>
<servlet>
<servlet-name>mvc-dispatcher</servlet-name>
<servlet-class>org.springframework.web.servlet.DispatcherServlet</servlet-class>
<load-on-startup>1</load-on-startup>
</servlet>
<servlet-mapping>
<servlet-name>mvc-dispatcher</servlet-name>
<url-pattern>/rest/*</url-pattern>
</servlet-mapping>
Mvc-dispatcher-servlet.xml
<context:component-scan base-package="com.johnnyweb.stockWatcher.controller" />
<mvc:annotation-driven />
<security:authentication-manager>
<security:authentication-provider>
<security:user-service id="userService">
<security:user name="gwtrest" password="gwtrest" authorities="customer" />
</security:user-service>
</security:authentication-provider>
</security:authentication-manager>
<security:http create-session="stateless" use-expressions="true">
<security:intercept-url pattern="/**"
access="hasAnyRole('customer')" />
<security:http-basic />
</security:http>
Spring controller
@RequestMapping(method = RequestMethod.GET)
public @ResponseBody List<StockPrice> getStocks( @RequestParam(value = "q", required = false) final String q ) {
String[] stockSymbols = q.split(" ");
ArrayList<StockPrice> stockPriceList= new ArrayList<StockPrice>();
for (String stockSymbol : stockSymbols) {
Random rnd = new Random();
double price = rnd.nextDouble() * MAX_PRICE;
double change = price * MAX_PRICE_CHANGE * (rnd.nextDouble() * 2f - 1f);
StockPrice stockPrice = new StockPrice();
stockPrice.setSymbol(stockSymbol);
stockPrice.setPrice(price);
stockPrice.setChange(change);
stockPriceList.add(stockPrice);
}
return stockPriceList;
}
Test your restful service using FIrefox RestClient
Why JSON?
- JSON is popular data exchange format and well suited for JavaScript consumption
Spring and GWT Integration using JSON
- Most GWT application needs to interact with a backend server. GWT provides RequestBuilder class and JavaScriptObject class to allow to you to make calls to Java servlets.
- Spring MVC allows you to receive the GWT request, process the request and returns data in JSON format.

Spring GWT StockWatcher
GWT team has already provided documents describing how to create client requests and how to process JSON reply. I am going to show you how to use Spring Framework to process the GWT request and return JSON data.
Step 1:
Create a Spring MVC application
Step 2:
Add Jackson Java JSON processor dependency in your pom file.
<dependency>
<groupId>org.codehaus.jackson</groupId>
<artifactId>jackson-mapper-asl</artifactId>
<version>1.7.1</version>
</dependency>
Step 3:
Create a controller to process the GWT requests
@Controller
@RequestMapping("/stockWatcher")
public class JSONController {
private static final double MAX_PRICE = 100.0; // $100.00
private static final double MAX_PRICE_CHANGE = 0.02; // +/- 2%
@RequestMapping(method = RequestMethod.GET)
public @ResponseBody List<StockPrice> getStocks( @RequestParam(value = "q", required = false) final String q ) {
String[] stockSymbols = q.split(" ");
ArrayList<StockPrice> stockPriceList= new ArrayList<StockPrice>();
for (String stockSymbol : stockSymbols) {
Random rnd = new Random();
double price = rnd.nextDouble() * MAX_PRICE;
double change = price * MAX_PRICE_CHANGE * (rnd.nextDouble() * 2f - 1f);
StockPrice stockPrice = new StockPrice();
stockPrice.setSymbol(stockSymbol);
stockPrice.setPrice(price);
stockPrice.setChange(change);
stockPriceList.add(stockPrice);
}
return stockPriceList;
}
}
Step 4:
Configure Spring mvc annotation
<beans xmlns="http://www.springframework.org/schema/beans"
xmlns:context="http://www.springframework.org/schema/context"
xmlns:mvc="http://www.springframework.org/schema/mvc" xmlns:xsi="http://www.w3.org/2001/XMLSchema-instance"
xsi:schemaLocation="
http://www.springframework.org/schema/beans
http://www.springframework.org/schema/beans/spring-beans-3.0.xsd
http://www.springframework.org/schema/context
http://www.springframework.org/schema/context/spring-context-3.0.xsd
http://www.springframework.org/schema/mvc
http://www.springframework.org/schema/mvc/spring-mvc-3.0.xsd">
<context:component-scan base-package="com.johnnyweb.stockWatcher.controller" />
<mvc:annotation-driven />
</beans>
Step 5:
Configure web.xml file
<web-app id="WebApp_ID" version="2.4"
xmlns="http://java.sun.com/xml/ns/j2ee" xmlns:xsi="http://www.w3.org/2001/XMLSchema-instance"
xsi:schemaLocation="http://java.sun.com/xml/ns/j2ee
http://java.sun.com/xml/ns/j2ee/web-app_2_4.xsd">
<display-name>Spring Web MVC Application</display-name>
<servlet>
<servlet-name>mvc-dispatcher</servlet-name>
<servlet-class>org.springframework.web.servlet.DispatcherServlet</servlet-class>
<load-on-startup>1</load-on-startup>
</servlet>
<servlet-mapping>
<servlet-name>mvc-dispatcher</servlet-name>
<url-pattern>/rest/*</url-pattern>
</servlet-mapping>
<context-param>
<param-name>contextConfigLocation</param-name>
<param-value>/WEB-INF/mvc-dispatcher-servlet.xml</param-value>
</context-param>
<listener>
<listener-class>org.springframework.web.context.ContextLoaderListener</listener-class>
</listener>
</web-app>
Step 6:
Test your application
Why Spring Framework and GWT?
- Spring Framework offers dependency injection, promotes POJO and unit tests.
- GWT is a popular Java framework to build rich internet application.
Spring Framework and GWT Integration
- Most GWT application needs to interact with a backend server. GWT RPC framework allows you to make calls to Java servlets.
- How do you use both GWT RPC and Spring framework?
Solution
- Create a Java class that extends GWT RPC RemoteServlet and implements Spring Framework Control
- Use Spring DispatcherServlet to route the Http GWT requests to your class.
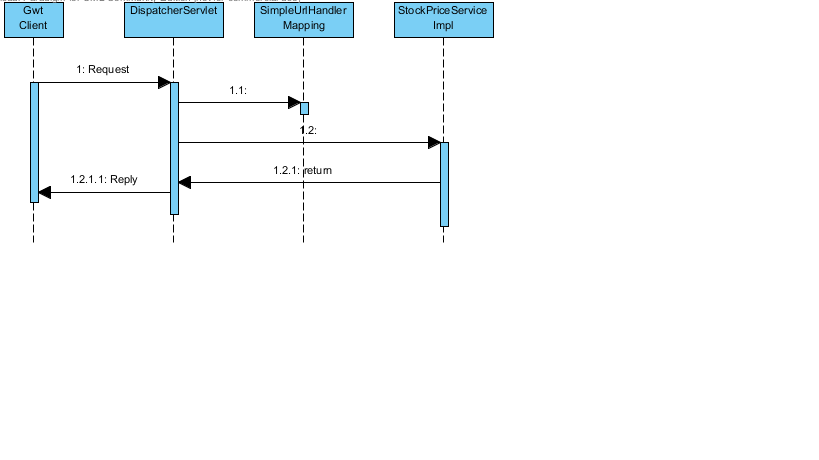
Spring GWT StockWatcher
GWT team provides a simple tutorial: StockWatcher to demonstrate how to build GWT applications. I am going to show you the steps to use Spring Framework in this application.
Step 1:
- Add Spring Framework jar files to the lib folder in your projects.
Step 2:
- Modify existing StockPriceServiceImp class to implement Spring Control and add a new method: handRequest.
public class StockPriceServiceImpl extends RemoteServiceServlet implements Controller, ServletContextAware,
StockPriceService {
private static Logger logger = Logger.getLogger(StockPriceServiceImpl.class.getName());
private static final double MAX_PRICE = 100.0; // $100.00
private static final double MAX_PRICE_CHANGE = 0.02; // +/- 2%
protected ServletContext servletContext;
public ModelAndView handleRequest(HttpServletRequest request,
HttpServletResponse response) throws Exception {
super.doPost(request, response);
return null;
}
@Override
public ServletContext getServletContext() {
return servletContext;
}
public void setServletContext(ServletContext servletContext) {
this.servletContext = servletContext;
}
public StockPrice[] getPrices(String[] symbols) throws DelistedException {
Random rnd = new Random();
logger.info("getPrices is called");
StockPrice[] prices = new StockPrice[symbols.length];
for (int i=0; i<symbols.length; i++) {
if (symbols[i].equals("ERR")) {
throw new DelistedException("ERR");
}
double price = rnd.nextDouble() * MAX_PRICE;
double change = price * MAX_PRICE_CHANGE * (rnd.nextDouble() * 2f - 1f);
prices[i] = new StockPrice(symbols[i], price, change);
}
return prices;
}
Step 3:
- Modify web.xml file to use Spring DispatcherServlet
<?xml version="1.0" encoding="UTF-8"?>
<web-app xmlns:xsi="http://www.w3.org/2001/XMLSchema-instance"
xsi:schemaLocation="http://java.sun.com/xml/ns/javaee
http://java.sun.com/xml/ns/javaee/web-app_2_5.xsd"
version="2.5"
xmlns="http://java.sun.com/xml/ns/javaee">
<!-- Listeners -->
<listener>
<listener-class>org.springframework.web.context.ContextLoaderListener</listener-class>
</listener>
<!-- Servlets -->
<servlet>
<servlet-name>gwtspring</servlet-name>
<servlet-class>org.springframework.web.servlet.DispatcherServlet</servlet-class>
</servlet>
<servlet-mapping>
<servlet-name>gwtspring</servlet-name>
<url-pattern>/stockwatcher/greet</url-pattern>
</servlet-mapping>
<!-- Default page to serve -->
<welcome-file-list>
<welcome-file>StockWatcher.html</welcome-file>
</welcome-file-list>
<servlet>
<servlet-name>stockPriceServiceImpl</servlet-name>
<servlet-class>com.google.gwt.sample.stockwatcher.server.StockPriceServiceImpl</servlet-class>
</servlet>
<servlet-mapping>
<servlet-name>gwtspring</servlet-name>
<url-pattern>/stockwatcher/stockPrices</url-pattern>
</servlet-mapping>
</web-app>
Step 4:
- Create Spring appplicationContext.xml file
<?xml version="1.0" encoding="UTF-8"?>
<beans xmlns="http://www.springframework.org/schema/beans"
xmlns:xsi="http://www.w3.org/2001/XMLSchema-instance"
xmlns:security="http://www.springframework.org/schema/security"
xsi:schemaLocation="
http://www.springframework.org/schema/beans
http://www.springframework.org/schema/beans/spring-beans.xsd
http://www.springframework.org/schema/security
http://www.springframework.org/schema/security/spring-security.xsd">
</beans>
Step 5:
- Create gwtspring-servlet.xml file. This mapping file tells Spring Framework to route the Http GWT request to your controller
<?xml version="1.0" encoding="UTF-8"?>
<beans xmlns="http://www.springframework.org/schema/beans"
xmlns:xsi="http://www.w3.org/2001/XMLSchema-instance"
xsi:schemaLocation="http://www.springframework.org/schema/beans
http://www.springframework.org/schema/beans/spring-beans-3.0.xsd">
<!-- The application context definition for the DispatcherServlet -->
<!-- Maps the request through to a concrete controller instance -->
<bean id="urlMapping" class="org.springframework.web.servlet.handler.SimpleUrlHandlerMapping">
<property name="mappings">
<value>
/**/stockPrices=gwtSpringDispatchController
</value>
</property>
</bean>
<bean id="gwtSpringDispatchController" class="com.google.gwt.sample.stockwatcher.server.StockPriceServiceImpl" scope="session" />
</beans>
Step 6:
- Test your application and download the zip file attached.
Why IBatis?
- iBatis provides framework to use XML files to map JavaBeans to SQL statements.
- SQL mapping statements are externalized. You don’t have to code SQL statements in your java code and you can have different mapping files for different databases.
iBatis Wildcard Search
- iBatis allows you to use “$” dollar sign to perform wildcard search. However you may expose your application to SQL injection if you do that.
Solution
- Use “||” sign instead of dollar sign “$” to perform wildcard search
Demonstration Example
Application Description
We will build a sample application which allows users to browse SESS table.
- The SESS table has three columns: SESS_LNK, NM and OWNER.
- Users can search existing sessions by session names
- The application should only display sessions owned by “TEST2”
- The application should not display sessions owned by other owners.
Session.xml map file:
<!DOCTYPE sqlMap PUBLIC "-//ibatis.apache.org//DTD SQL Map 2.0//EN" "http://ibatis.apache.org/dtd/sql-map-2.dtd" >
<sqlMap namespace="session">
<resultMap id="sessionResultMap" class="org.example.domain.impl.Session">
<result column="SESS_LNK" property="id" />
<result column="NM" property="name" />
<result column="OWNER" property="owner"/>
</resultMap>
<parameterMap id="searchParamMap" class="org.example.domain.impl.SessionSearch">
<parameter property="name" />
</parameterMap>
<select id="dangerousSearchMethod" parameterMap="searchParamMap" resultMap="sessionResultMap">
SELECT session.SESS_LNK,
session.NM,
session.OWNER
FROM ${jdbc.schema}.SESS session
where session.OWNER = 'TEST2'
<dynamic >
<isNotEmpty prepend="and" property="name">
session.NM like '%$name$%'
</isNotEmpty>
</dynamic>
</select>
<select id="rightSearchMethod" parameterMap="searchParamMap" resultMap="sessionResultMap">
SELECT session.SESS_LNK,
session.NM,
session.OWNER
FROM ${jdbc.schema}.SESS session
where session.OWNER = 'TEST2'
<dynamic>
<isNotEmpty prepend="and" property="name">
session.NM like '%' || #name# || '%'
</isNotEmpty>
</dynamic>
</select>
</sqlMap>
- The system provides two search methods: dangerousSearchMethod and rightSearchMethod
- The dangerousSearchMethod uses “$” dollar sign
- The rightSearchMethod uses “||” sign
- The application is supposed to display sessions owned by “TEST2
SQL Injection
SQL Statements Generated for the dangerousSearchMethod
iBatis generate the following SQL Statements for the dangerousSearchMethod when a user enters ' OR 'a%'='.
<<EXECUTING>>
SELECT session.SESS_LNK,
session.NM,
session.OWNER
FROM WEBAPPS.ACEF_SESS session
where session.OWNER = 'TEST2'
and session.NM like '%name'
OR 'a%'='a%';
Big Problem
- The user has altered the SQL statements and is able to see sessions he or she is not supposed to see.
SQL Statements Generated for the rightSearchMethod
iBatis generated the following SQL Statements for rightSearchMethod when a user enters ' OR 'a%'='.
<<EXECUTING>>
SELECT session.SESS_LNK,
session.NM,
session.OWNER
FROM WEBAPPS.ACEF_SESS session
where session.OWNER = 'TEST2'
and session.NM like '%' || 'NAME' OR 'A%'='A' || '%';
No Problem at all
- This search method allows wildcard search and it is SQL injection safe.
Why Apache Camel?
- Apache Camel allows you to integrate your business components using Enterprise Integration patterns.
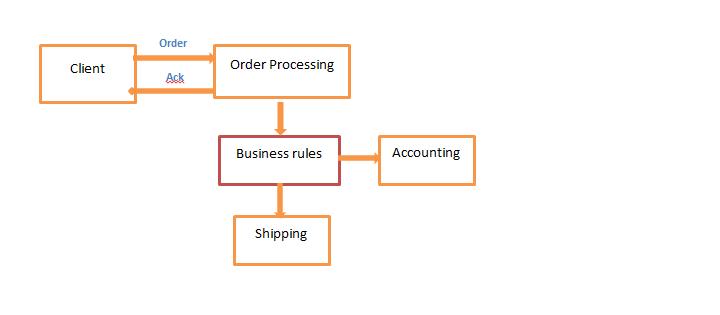
Use Case
- You need to process purchase orders from your web site or from your business partners.
- You like to acknowledge the order first
- You like to apply some business rules to the order
- You like to send the purchase order to your accounting department and shipping departments.
Apache Camel Code
public class OrderProcessingRoute extends RouteBuilder {
@Override
public void configure() throws Exception {
JaxbDataFormat pubJaxb = new JaxbDataFormat();
pubJaxb.setContextPath("camel");
from("jms:incomingOrders")
.to("validator:xsd/cameleex1.xsd")
.wireTap("direct:mainprocessing")
.beanRef("orderProcessingBean", "acknowledge").inOut();
from("direct:mainprocessing")
.unmarshal(pubJaxb).beanRef("orderProcessingBean", "execute")
.marshal(pubJaxb).convertBodyTo(String.class).multicast()
.parallelProcessing().to("jms:shipping", "jms:accounting");
}
- OrderProcessingRoute listens to messages in the JMS queue
- OrderProcessingRoute validates the incoming message
- OrderProcessingRoute acknowledge the request using Spring bean.
- OrderProcessingRoute applies business rules using Spring bean.
- OrderProcessingRoute send the message to accounting department and shipping departments.
- Done
Why Spring security and role based access control
- Protect your web application and web service application
- Role authorization ensures that user can only access services they are authorized
- The basic security principle applies to any Java web application
Steps to protect your web service project
- Create web service interceptors
- Create Authentication provider
- Protect your business method with Spring “Secured” annotation
Work flow
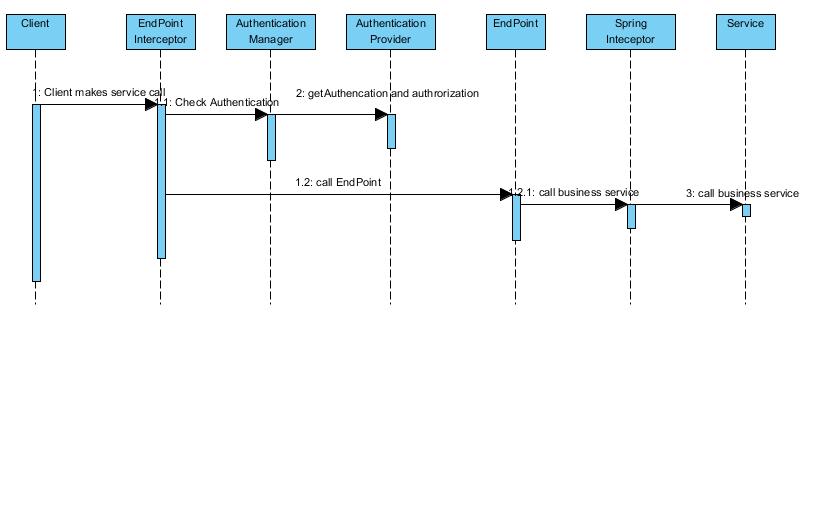
- Client makes a web service all
- Spring EndPoint Interceptor intercepts the call
- EndPoint Interceptor use the Authentication manager to authenticate the user
- The Authentication manager call Authentication provider to verify the user
- The EndPoint calls “Secured” service method
- Spring method interceptor the call and verify user’s authorization
- The method interceptor throws unauthorized exception if the user is not allowed to access the business method
Why Soap Header and Spring Interceptor
- SOAP Header element can contain additional application-specific information such as authentication, payment about the SOAP
- Spring web service interceptor allows you to extract the header information
Steps to develop Spring WS with JAXB and Spring Interceptor:
- Create WSDL service contract
- Generate the JAXB Java classes from the xml schema file
- Create Java Endpoint classes
- Define and wire Endpoint in Spring context file
- Compile, package and deploy the code to Tomcat
- Test the code: “http://localhost:8080/holiday/holiday.wsdl”
Create the WSDL contract
<?xml version="1.0" encoding="UTF-8"?><wsdl:definitions xmlns:wsdl="http://schemas.xmlsoap.org/wsdl/" xmlns:sch="http://mycompany.hr.com/hr/v1" xmlns:soap="http://schemas.xmlsoap.org/wsdl/soap/" xmlns:tns="http://mycompany.hr.com/hr/v1" targetNamespace="http://mycompany.hr.com/hr/v1">
<wsdl:types>
<xs:schema xmlns:xs="http://www.w3.org/2001/XMLSchema" attributeFormDefault="unqualified" elementFormDefault="unqualified" targetNamespace="http://mycompany.hr.com/hr/v1">
<xs:element name="HolidayRequest" xmlns:xs="http://www.w3.org/2001/XMLSchema">
<xs:complexType xmlns:xs="http://www.w3.org/2001/XMLSchema">
<xs:sequence xmlns:xs="http://www.w3.org/2001/XMLSchema">
<xs:element name="EmployeeName" type="xs:string" xmlns:xs="http://www.w3.org/2001/XMLSchema"/>
<xs:element name="StartDate" type="xs:date" xmlns:xs="http://www.w3.org/2001/XMLSchema"/>
<xs:element name="EndDate" type="xs:date" xmlns:xs="http://www.w3.org/2001/XMLSchema"/>
</xs:sequence>
</xs:complexType>
</xs:element>
<xs:element name="HolidayResponse" xmlns:xs="http://www.w3.org/2001/XMLSchema">
<xs:complexType xmlns:xs="http://www.w3.org/2001/XMLSchema">
<xs:sequence xmlns:xs="http://www.w3.org/2001/XMLSchema">
<xs:element name="Answer" type="xs:string" xmlns:xs="http://www.w3.org/2001/XMLSchema"/>
</xs:sequence>
</xs:complexType>
</xs:element>
<xs:element name="HolidayRequestHeader" xmlns:xs="http://www.w3.org/2001/XMLSchema">
<xs:complexType xmlns:xs="http://www.w3.org/2001/XMLSchema">
<xs:sequence xmlns:xs="http://www.w3.org/2001/XMLSchema">
<xs:element name="requestTimestamp" type="xs:dateTime" xmlns:xs="http://www.w3.org/2001/XMLSchema"/>
</xs:sequence>
</xs:complexType>
</xs:element>
</xs:schema>
</wsdl:types>
<wsdl:message name="HolidayRequest">
<wsdl:part element="tns:HolidayRequest" name="HolidayRequest">
</wsdl:part>
</wsdl:message>
<wsdl:message name="HolidayResponse">
<wsdl:part element="tns:HolidayResponse" name="HolidayResponse">
</wsdl:part>
</wsdl:message>
<wsdl:message name="HolidayHeader">
<wsdl:part element="tns:HolidayRequestHeader" name="HolidayHeader">
</wsdl:part>
</wsdl:message>
<wsdl:portType name="holiday">
<wsdl:operation name="Holiday">
<wsdl:input message="tns:HolidayRequest" name="HolidayRequest">
</wsdl:input>
<wsdl:output message="tns:HolidayResponse" name="HolidayResponse">
</wsdl:output>
</wsdl:operation>
</wsdl:portType>
<wsdl:binding name="holidaySoap11" type="tns:holiday">
<soap:binding style="document" transport="http://schemas.xmlsoap.org/soap/http"/>
<wsdl:operation name="Holiday">
<soap:operation soapAction=""/>
<wsdl:input name="HolidayRequest">
<soap:header message="tns:HolidayHeader" part="HolidayHeader" use="literal" />
<soap:body use="literal"/>
</wsdl:input>
<wsdl:output name="HolidayResponse">
<soap:body use="literal"/>
</wsdl:output>
</wsdl:operation>
</wsdl:binding>
<wsdl:service name="holidayService">
<wsdl:port binding="tns:holidaySoap11" name="holidaySoap11">
<soap:address location="http://localhost:8080/holiday/"/>
</wsdl:port>
</wsdl:service>
</wsdl:definitions>
- This service exposes “HolidayRequest” and returns “HolidayResponse”
- This service defines “HolidayRequestHeader” Soap Header element
Generate JAXB Java classes from the schema file
Executing “xjc -p com.mycompany.hr.jaxb.holidayService hr.xsd” will generate the following classes:
- com\mycompany\hr\jaxb\holidayService\HolidayRequest.java
- com\mycompany\hr\jaxb\holidayService\HolidayResponse.java
- com\mycompany\hr\jaxb\holidayService\HolidayRequestHeader.java
- com\mycompany\hr\jaxb\holidayService\ObjectFactory.java
- com\mycompany\hr\jaxb\holidayService\package-info.java
Create Java Endpoint
package com.mycompany.hr.ws;
import org.springframework.ws.server.endpoint.annotation.Endpoint;
import org.springframework.ws.server.endpoint.annotation.PayloadRoot;
import com.mycompany.hr.jaxb.holidayService.HolidayRequest;
import com.mycompany.hr.jaxb.holidayService.HolidayResponse;
@Endpoint
public class HolidayEndpoint {
@PayloadRoot(localPart= "HolidayRequest", namespace="http://mycompany.hr.com/hr/v1")
public HolidayResponse serveRequest(HolidayRequest request){
HolidayResponse response = new HolidayResponse();
response.setAnswer("Approved");
return response;
}
}
- Spring @PayloadRoot annotation instructs Spring to map xml “HolidayRequest” to “serveRequest” Java method.
- The serveRequest method returns a HolidayResponse object
Define Spring WS Interceptor
public class HolidayInterceptor implements SoapEndpointInterceptor {
private static final Log logger = LogFactory.getLog(HolidayInterceptor.class);
private Jaxb2Marshaller marshaller;
public boolean understands(SoapHeaderElement header) {
boolean u = header.getName().getNamespaceURI()
.equalsIgnoreCase("http://mycompany.hr.com/hr/v1");
return u;
}
public boolean handleRequest(MessageContext messageContext, Object endpoint)
throws Exception {
SoapMessage soapMsg = (SoapMessage) messageContext.getRequest();
SoapHeader soapHeader = soapMsg.getSoapHeader();
Iterator<SoapHeaderElement> iter = soapHeader.examineAllHeaderElements();
boolean found= false;
while (iter.hasNext() & (!found)) {
SoapHeaderElement she = (SoapHeaderElement) iter.next();
if (understands(she)) {
// Process the header
process(she);
found =true;
}
}
if(found)
{
return true;
}
else
{
Exception ex= new Exception();
throw ex;
}
}
private void process(SoapHeaderElement she) {
DOMResult result = (DOMResult)she.getResult();
Node node= result.getNode();
DOMSource ds= new DOMSource(node);
HolidayRequestHeader RequestHeader = (HolidayRequestHeader)marshaller.unmarshal(ds);
logger.debug("request time: "+RequestHeader.getRequestTimestamp());
}
- The handleReques method extracts HolidayRequestHeader object from soap header
Define and wire Endpoint in Spring
<?xml version="1.0" encoding="UTF-8"?>
<beans xmlns="http://www.springframework.org/schema/beans" xmlns:xsi="http://www.w3.org/2001/XMLSchema-instance"
xsi:schemaLocation="http://www.springframework.org/schema/beans http://www.springframework.org/schema/beans/spring-beans-2.0.xsd">
<bean id="holiday" class="org.springframework.ws.wsdl.wsdl11.SimpleWsdl11Definition">
<property name="wsdl" value="classpath:holiday.wsdl" />
</bean>
<bean id="schema" class="org.springframework.xml.xsd.SimpleXsdSchema">
<property name="xsd" value="classpath:hr.xsd" />
</bean>
<!-- Register PayloadRootAnnotationMethodEndpointMapping -->
<bean class="org.springframework.ws.server.endpoint.mapping.PayloadRootAnnotationMethodEndpointMapping" >
<property name="interceptors">
<list merge="true">
<ref bean="holiday.interceptor"/>
</list>
</property>
</bean>
<bean name="holiday.interceptor"
class="com.mycompany.hr.interceptor.HolidayInterceptor" >
<property name="marshaller" ref="marshaller" />
</bean>
<!-- Register Endpoint -->
<bean id="HolidayEndpoint" class="com.mycompany.hr.ws.HolidayEndpoint">
<description>
</description>
</bean>
<!-- Configure XML Marshaller -->
<bean class="org.springframework.ws.server.endpoint.adapter.GenericMarshallingMethodEndpointAdapter">
<constructor-arg ref="marshaller" />
</bean>
<bean id="marshaller" class="org.springframework.oxm.jaxb.Jaxb2Marshaller">
<property name="classesToBeBound">
<list>
<value>com.mycompany.hr.jaxb.holidayService.HolidayRequest</value>
<value>com.mycompany.hr.jaxb.holidayService.HolidayResponse</value>
<value>com.mycompany.hr.jaxb.holidayService.HolidayRequestHeader</value>
</list>
</property>
</bean>
</beans>
- Spring bean “HolidayEndpoint” defines the end point mapping
- Spring bean “marshaller” un-marshalls the xml requests to Java objects and marshalls the response objects to xml response
Source code and war files are attached.
Deploy the code to Tomcat and let me what happened
Why Spring WS and JAXB?
- Spring WS supports contract-first web services. Contract-first web services promotes loose coupling between contracts and implementations. Such a looser coupling allows companies to change implementations without worrying about affecting existing contracts.
- JAXB bridges the gab between Java and xml. JAXB implements the marshalling and un-marshalling functions so that you don’t have to implement xml and java mapping.
Steps to develop Spring WS with JAXB:
- Create the data contract - xml schema file
- Generate the JAXB Java classes from the xml schema file
- Create Java Endpoint classes
- Define and wire Endpoint in Spring context file
- Compile, package and deploy the code to Tomcat
- Test the code: “http://localhost:8080/holiday/holiday.wsdl”
Create the data contract
<?xml version="1.0" encoding="UTF-8"?>
<xs:schema targetNamespace="http://mycompany.hr.com/hr/v1" xmlns:xs="http://www.w3.org/2001/XMLSchema" elementFormDefault="unqualified" attributeFormDefault="unqualified">
<xs:element name="HolidayRequest">
<xs:complexType>
<xs:sequence>
<xs:element name="EmployeeName" type="xs:string"/>
<xs:element name="StartDate" type="xs:date"/>
<xs:element name="EndDate" type="xs:date"/>
</xs:sequence>
</xs:complexType>
</xs:element>
<xs:element name="HolidayResponse">
<xs:complexType>
<xs:sequence>
<xs:element name="Answer" type="xs:string"/>
</xs:sequence>
</xs:complexType>
</xs:element>
</xs:schema>
- This service exposes “HolidayRequest” and returns “HolidayResponse”
Generate JAXB Java classes from the schema file
Executing “xjc -p com.mycompany.hr.jaxb.holidayService hr.xsd” will generate the following classes:
- com\mycompany\hr\jaxb\holidayService\HolidayRequest.java
- com\mycompany\hr\jaxb\holidayService\HolidayResponse.java
- com\mycompany\hr\jaxb\holidayService\ObjectFactory.java
- com\mycompany\hr\jaxb\holidayService\package-info.java
Create Java Endpoint
package com.mycompany.hr.ws;
import org.springframework.ws.server.endpoint.annotation.Endpoint;
import org.springframework.ws.server.endpoint.annotation.PayloadRoot;
import com.mycompany.hr.jaxb.holidayService.HolidayRequest;
import com.mycompany.hr.jaxb.holidayService.HolidayResponse;
@Endpoint
public class HolidayEndpoint {
@PayloadRoot(localPart= "HolidayRequest", namespace="http://mycompany.hr.com/hr/v1")
public HolidayResponse serveRequest(HolidayRequest request){
HolidayResponse response = new HolidayResponse();
response.setAnswer("Approved");
return response;
}
}
- Spring @PayloadRoot annotation instructs Spring to map xml “HolidayRequest” to “serveRequest” Java method.
- The serveRequest method returns a HolidayResponse object
Define and wire Endpoint in Spring
<?xml version="1.0" encoding="UTF-8"?>
<beans xmlns="http://www.springframework.org/schema/beans" xmlns:xsi="http://www.w3.org/2001/XMLSchema-instance"
xsi:schemaLocation="http://www.springframework.org/schema/beans http://www.springframework.org/schema/beans/spring-beans-2.0.xsd">
<!-- Add automatic WSDL generation support -->
<bean id="holiday" class="org.springframework.ws.wsdl.wsdl11.DefaultWsdl11Definition">
<property name="schema" ref="schema" />
<property name="portTypeName" value="holiday" />
<property name="locationUri" value="http://localhost:8080/holiday/" />
<property name="targetNamespace" value="http://mycompany.hr.com/hr/v1" />
</bean>
<bean id="schema" class="org.springframework.xml.xsd.SimpleXsdSchema">
<property name="xsd" value="/WEB-INF/hr.xsd" />
</bean>
<!-- Register PayloadRootAnnotationMethodEndpointMapping -->
<bean class="org.springframework.ws.server.endpoint.mapping.PayloadRootAnnotationMethodEndpointMapping" />
<!-- Register Endpoint -->
<bean id="HolidayEndpoint" class="com.mycompany.hr.ws.HolidayEndpoint">
<description>
This endpoint handles requests.
</description>
</bean>
<!-- Configure XML Marshaller -->
<bean class="org.springframework.ws.server.endpoint.adapter.GenericMarshallingMethodEndpointAdapter">
<constructor-arg ref="marshaller" />
</bean>
<bean id="marshaller" class="org.springframework.oxm.jaxb.Jaxb2Marshaller">
<property name="classesToBeBound">
<list>
<value>com.mycompany.hr.jaxb.holidayService.HolidayRequest</value>
<value>com.mycompany.hr.jaxb.holidayService.HolidayResponse</value>
</list>
</property>
</bean>
</beans>
- Spring will generate the WSDL from the schema file automatically
- Spring bean “HolidayEndpoint” defines the end point mapping
- Spring bean “marshaller” un-marshalls the xml requests to Java objects and marshalls the response objects to xml response
Source code and war files are attached.
Deploy the code to Tomcat and let me what happened
Why Search Engine Optimization?
You have a web site. How do you get your web site noticed by your potential customers? When people search key words in Google, Bing or Yahoo, it is vital for your web site to rank high in search engines to attract visitors and turn visitors into leads and sales.
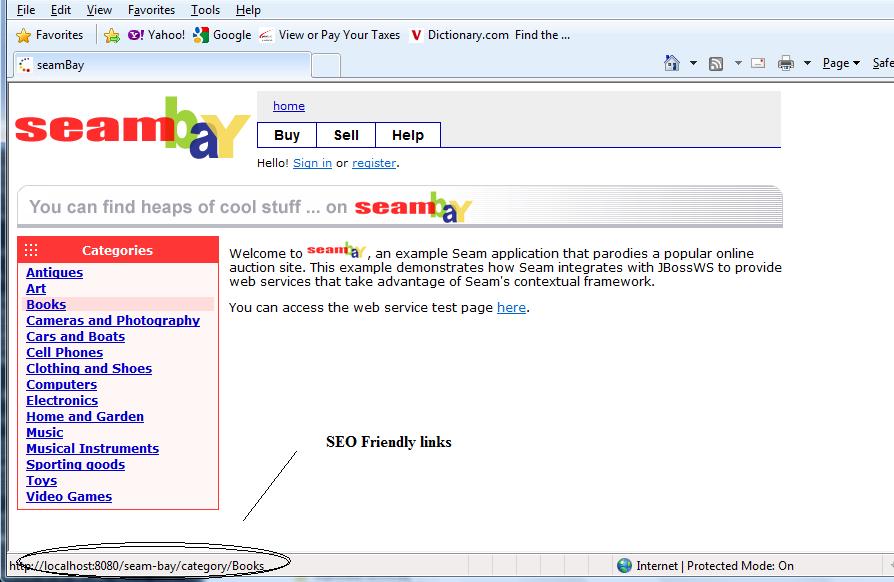
One vital SEO component is friendly URL. Unfortunately the default Seam URL is not SEO friendly.
Here is one example of Seam URL:
http://localhost:8080/seam-bay/search.seam?categoryId=11
Here is an example of SEO friendly URL:
http://localhost:8080/seam-bay/category/books
What is Tuckey URL Rewrite?
UrlRewriteFilter is a Java Web Filter for any J2EE compliant web application server, which allows you to rewrite URLs before they get to your code. Developers can specify the inbound and outbound rules in the urlwrite.xml file.
In the following example, requests for /world/usa/nyc will be transparently forwarded to /world.jsp
<rule> <name>World Rule</name> <from>^/world/([a-z]+)/([a-z]+)$</from> <to>/world.jsp?country=$1&city=$2</to> </rule> >
Configure Seam Application to use Tuckey URL Rewrite
It is actually very easy. Just add the following lines to your web.xml file. Please look the Seam Bay application in Seam examples folder.
<!-- URL Rewrite Filter -->
<filter>
<filter-name>UrlRewriteFilter</filter-name>
<filter-class>org.tuckey.web.filters.urlrewrite.UrlRewriteFilter</filter-class>
</filter>
<filter-mapping>
<filter-name>UrlRewriteFilter</filter-name>
<url-pattern>/*</url-pattern>
</filter-mapping>
How to create SEO friendly links?
Seam bay is already configured to use UrlRewrite filter. So I made some modification to the home.xhtml. I used <h:outputLink> to expose category as SEO friendly links.
<ui:repeat id="categories" value="#{categories}" var="cat">
<h:outputLink value="#{facesContext.externalContext.requestContextPath}/category/#{cat.name}">
#{cat.name}
</h:outputLink>
</ui:repeat>
How to process SEO friendly links?
Step1: add an inbound rule rewrite rule in the urlrewrite.xml.
<rule>
<from>^/category/([A-Za-z0-9]*)$</from>
<to last="true">/search.seam?categoryName=$1</to>
</rule>
Urlrewrite will then rewrite http://localhost:8080/seam-bay/category/Books to: http://localhost:8080/seam-bay/search.seam?categoryName=Books
Step2: modify pages.xml to handle URL parameters
<page view-id="/search.xhtml" >
<param name="categoryName" value="#{auctionSearch.bookMarkCategoryName}"/>
</page>
Step 3: modify AuctionSearch.java
private String bookMarkCategoryName;
public String getBookMarkCategoryName()
{
return bookMarkCategoryName;
}
public void setBookMarkCategoryName(String categoryName)
{
List<Category> children = entityManager.createQuery(
"from Category c where UPPER(c.name) = :name")
.setParameter("name", categoryName.toUpperCase() )
.getResultList();
if(children.size()>0)
{
this.searchCategory=children.get(0);
}
queryAuctions();
}
You are done.
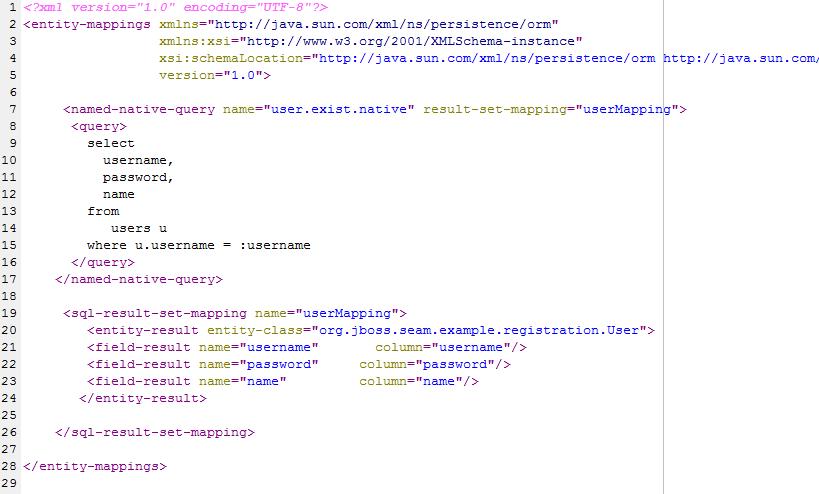
Why Native SQL integration?
- Sometimes it is necessary to use native SQL queries
- Sometimes it is necessary to use Stored Procedures
How to integrate native SQL and Stored Procedures?
The example below demonstrates how to use SQL in the Jboss Seam registration example.
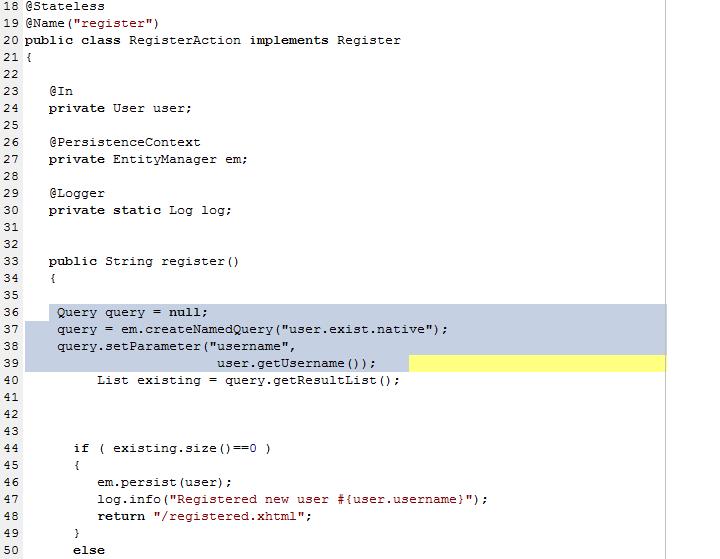
Sql queries are defined in orm.xml. Register method is modified to use JPA named query API.
orm.xml
Registration.java
Why Facelets not JSP?
- templating and composite components
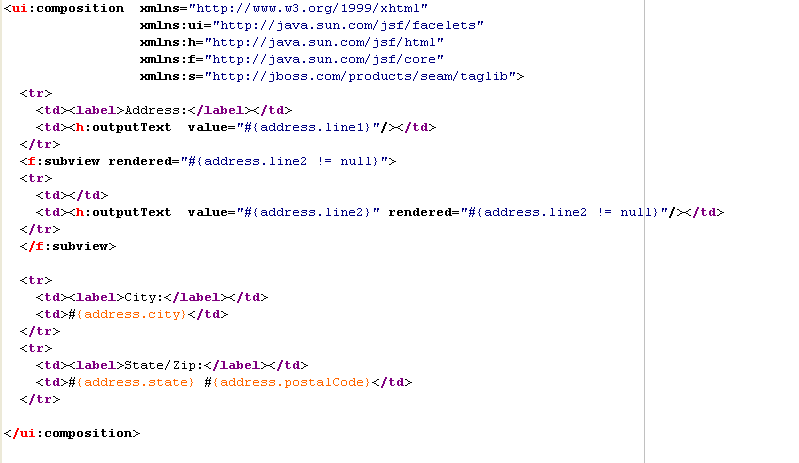
The main benefit of using Facelets over JSF is that Facelets supports code reuse through templating and composite components.
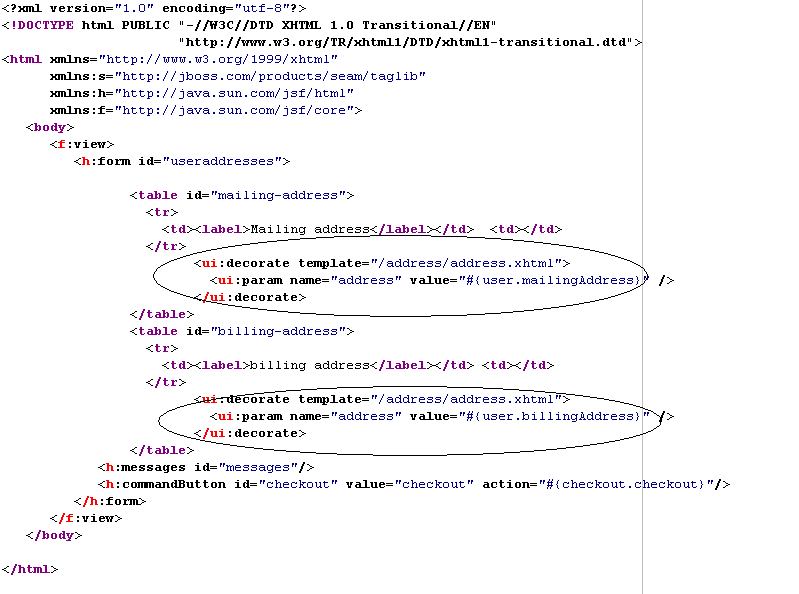
The example below shows how the address.xhtml template is used in the useraddresses.xhmtl file. A user has a mailing address and a shipping address. The address.xhtml is used twice in the useraddresses.xhtml. The big difference between Facelets template and JSP include is that you can pass object parameters from the including file to the template in Facelets and you can’t do that from JSP including file.
address.xhtml
useraddress.xhtml
What is the difference between Seam Managed Persistence and EJB managed Persistence Context?
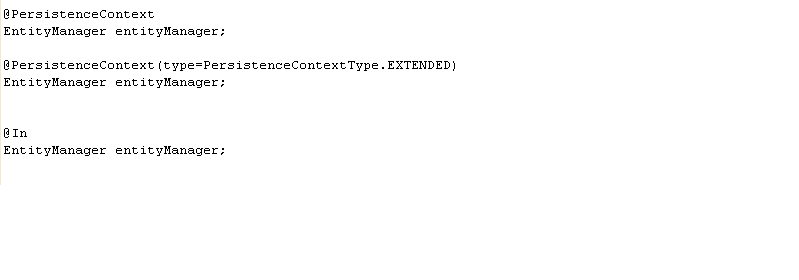
- Transactional scoped EJB Persistence Context is bound to EJB transaction. You may get lazyinitializationexception when you try to display JPA lazy initialized properties in the next JSF page.
- Extended Persistence Context is bound to EJB Stateful session bean. You will not get lazyinitializationexception.
- Seam Managed Persistence Context can be used in POJO while EJB managed PC is only available in EJB. SMPC is default conversion scope. You don’t have to worry about the Lazyinitializationexception when you try to display JPA lazy initialized properties in the next JSF page.