Skip navigation

In this blog, I am going to post the code and files for using the available Human Task War for running the task service.


We need to modify the human task war a little to get it running without any other jbpm web archive.


1) Change the persistence.xml file


  <?xml version="1.0" encoding="UTF-8" standalone="yes"?>
<persistence version="1.0" xsi:schemaLocation="http://java.sun.com/xml/ns/persistence http://java.sun.com/xml/ns/persistence/persistence_1_0.xsd
http://java.sun.com/xml/ns/persistence/orm http://java.sun.com/xml/ns/persistence/orm_1_0.xsd" xmlns:orm="http://java.sun.com/xml/ns/persistence/orm" xmlns:xsi="http://www.w3.org/2001/XMLSchema-instance" xmlns="http://java.sun.com/xml/ns/persistence">
<persistence-unit name="org.jbpm.task" transaction-type="RESOURCE_LOCAL">
<provider>org.hibernate.ejb.HibernatePersistence</provider>
<non-jta-data-source>jndi/testDS1</non-jta-data-source>
<class>org.jbpm.task.Attachment</class>
<class>org.jbpm.task.BooleanExpression</class>
<class>org.jbpm.task.Comment</class>
<class>org.jbpm.task.Content</class>
<class>org.jbpm.task.Deadline</class>
<class>org.jbpm.task.Delegation</class>
<class>org.jbpm.task.EmailNotification</class>
<class>org.jbpm.task.EmailNotificationHeader</class>
<class>org.jbpm.task.Escalation</class>
<class>org.jbpm.task.Group</class>
<class>org.jbpm.task.I18NText</class>
<class>org.jbpm.task.Notification</class>
<class>org.jbpm.task.OnAllSubTasksEndParentEndStrategy</class>
<class>org.jbpm.task.OnParentAbortAllSubTasksEndStrategy</class>
<class>org.jbpm.task.PeopleAssignments</class>
<class>org.jbpm.task.Reassignment</class>
<class>org.jbpm.task.Status</class>
<class>org.jbpm.task.SubTasksStrategy</class>
<class>org.jbpm.task.Task</class>
<class>org.jbpm.task.TaskData</class>
<class>org.jbpm.task.User</class>

<class>org.drools.persistence.info.SessionInfo</class>
<class>org.drools.persistence.info.WorkItemInfo</class>
<class>org.jbpm.persistence.processinstance.ProcessInstanceInfo</class>
<class>org.jbpm.persistence.processinstance.ProcessInstanceEventInfo</class>
<properties>
<property name="hibernate.dialect" value="org.hibernate.dialect.DB2Dialect"/>
<property name="hibernate.connection.autocommit" value="true" />
<property name="hibernate.max_fetch_depth" value="3"/>
<property name="hibernate.hbm2ddl.auto" value="update" />
<property name="hibernate.show_sql" value="false" />
<property name="hibernate.transaction.manager_lookup_class" value="org.hibernate.transaction.WebSphereExtendedJTATransactionLookup"/>
<property name="hibernate.id.new_generator_mappings" value="false" />
</properties>
</persistence-unit>
</persistence>


I have added the datasource details and changed the transaction manager lookup class and added the process persistence classes too.


2) Accordingly I changed the name of the file Taskorm to orm.xml.

3) Also I copied the files ProcessInstanceInfo.hbm.xml and ProcessInstanceInfoMapping.xml to the human task war/ WEB-INF/classes/META-INF

4) Either you can use your custom UserGroupCallBack class or you can keep the default one as it is. But since the human task war is no longer in jboss server, the reference of the file roles.properties need to change in the class DefaultUserGroupCallbackImpl which is available in the core jar of jbpm.

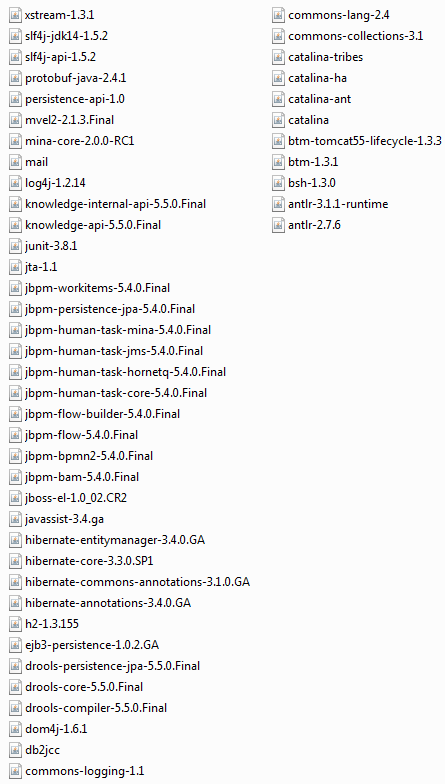
5) I had to add a few jars to the archive to make it work.


libs.png

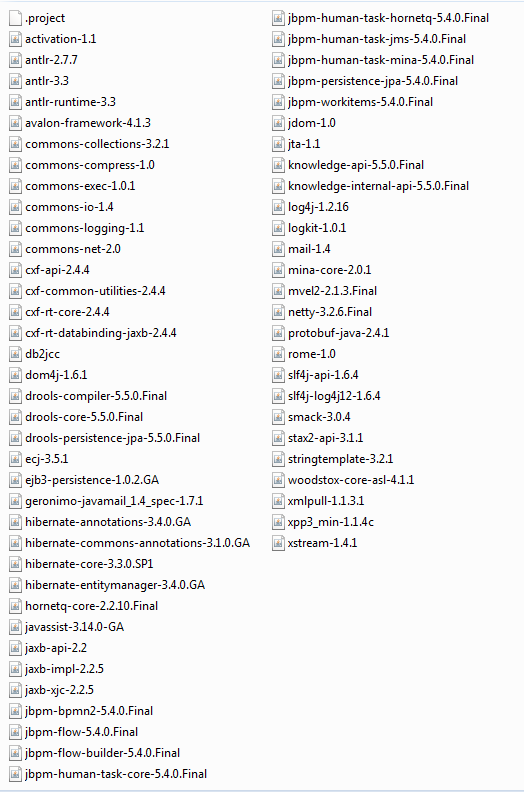
The attached war is modified with all the above changes. But it is modified to run with WebSphere server.

A couple of more things about the attached archive, I use these jars in a shared library. And the archive is by default set to run the HornetQ task server. It can be changed to Mina or JMS by changing the parameters in web.xml.


Once this is deployed, it will start up the hornetQ server by itself on 127.0.0.1:5153. The same can be verified from the console logs.

Run the evaluation example after starting up the server, to verify its working.

Any doubts are welcome.


Regards,


Shobhit Tyagi

Hi,


With community's timely help I have managed to create a web application after getting rid of h2 database. I am posting the application here as I see a lot of people getting troubled with this.I hope this helpful in some way.


It uses a mina task service and db2 at backend. And can be used with any other database. The attached war is configured to run on websphere web server. Although it can run on other web servers too. Configuring the datasource in the target web container and making changes to the appropriate transaction factory value would do the trick.

I use jsps and servlets.

Target DB can be changed by making changes to the persistence and the connection properties listed in the file projectProp.properties


To get the task service going without the need of human task war, I took the HumanTaskServlet from bpmn2user's blog, which initiates at startup.


To add more process definitions, the id, name and image file name would need to be listed in the file  ProcessDefInfo.xml. And the bpmn file would be required in the classpath. The corresponding image file would need to go in /img/workflow-img/


The path of the file ProcessDefInfo.xml would need to be mentioned as a property in the file projectProp.properties. As it would be required at startup by the HumanTaskServlet to load the process definitions.


The application is loaded with the following 4 users :

3 for jbpm. and 1 admin user for initiating the processes.

1) admin/admin

2) krisv - no authentication

3) mary - no authentication

4) john - no authentication


1) If the administrator logs in, it gets an additional menu option to initiate the process :


1.jpg


Clicking on which gives the following page :


1.png


a)            Start: To start an instance of the process.

b)      Stop: Clicking on Stop gives a list of all the active process instances for that particular Process Definition.  Clicking on Stop Process stops the process instance and removes its tasks from the assigned user task lists. This functionality is currently not in function. I am working on this.


1.png

c)       Delete: Clicking on Delete gives a list of all the process instances for that particular Process Definition whether active or inactive.  Clicking on Delete Process deletes the process instance history and removes its tasks from the assigned user task lists. This functionality is currently not in function. I am working on this.


1.png

2) There is a tab called Status in the top menu which is available to all the users. It gives a list of all the process instances for all the process definitions whether active or inactive and provides 2 additional options along with the process instance.


1.png

a)  Graphical View : This Option is enabled only for the active process instances. Clicking on which shows the image of the process with the current pending task highlighted.


1.png

b)  Report View : This option gives the task wise status of the process instance.


1.png


3) TaskList : Each user has an option to view its own task list. The task list is divided in two halfs. Upper half shows the list of tasks which are only assigned to the logged in user. And it gives option to Start a task, stop a task, complete a task or reassign it to another user.

The second half of the screen shows the list of tasks which are assigned to the user and also to other users. In that case, user gets option to claim the task which adds the task to its personal task list in the first half.


1.png

To complete a task, it needs to be started first. To reassign it, it needs to be in reserved state.


The list of library I use is the following :


1.png


There will be a lot of bad code at places. The main purpose of this application is to work out the functionality of jBPM 5.4.


Regards,


Shobhit Tyagi

Hi,


Image Diagram button in the jbpm-console is an amazing functionality providing an image of the process with the current activity node highlighted. Following is an example of how such a functionality can be added into a custom workflow application.


Firstly the process is deployed and is started.

The process looks something like this :

ImageDemo.png


There are a couple of tasks. So it moves to the Node First Task immediately as its instance is started.


Now. To get the current activity node Name->


// Listing all the active tasks for Process Instance ID : procId.

// Name of the current activity is obtained.


List<?> list;


list = taskService.createTaskQuery().processInstanceId(procId).list(); 


String taskName = ((Task)list.get(0)).getName();


Now that we have the current active node name, we can find out the coordinates of this activity by ->


int H = repositoryService.getActivityCoordinates(((ProcessDefinition)list.get(0)).getId(), "First Task").getHeight();


int W =  repositoryService.getActivityCoordinates(((ProcessDefinition)list.get(0)).getId(), "First Task").getWidth();


int X =  repositoryService.getActivityCoordinates(((ProcessDefinition)list.get(0)).getId(), "First Task").getX();


int Y =  repositoryService.getActivityCoordinates(((ProcessDefinition)list.get(0)).getId(), "First Task").getY();


Now I take an html file.


and use the image pixels to create a div with the original size of the image ->


<div style="width:1024px; height:768px; background-color:#ffffff;">

  <div style="position:relative;top:-1;left:-1;" />

  <img src="ImageDemo.png" style="position:absolute;top:0;left:0" />"


And a relative-positioned div with the coordinates I obtained from the java class.


<div style="position:absolute;top: 88px;left: 76px;width:50px;height:50px; z-index:1000;background-image: url(Untitled.png);background-repeat:no-repeat;\"></div>


Note that the 2nd div should be relative to the first one.


After I run this html file I get the UI something like this ->


Screenshot.png

Hope this is helful in some way.


Regards.

Hi,


Using Rules in our workflow saves us the trouble of creating Sessions and firing rules explicitly. Everything is done automatically. Sharing an example on using rules in jbpm 4 workflow.


1) Process Definition :


<?xml version="1.0" encoding="UTF-8"?>


<process key="rules" name="TestRules" xmlns="http://jbpm.org/4.3/jpdl">

   <start g="133,0,48,48" name="start1">

      <transition to="Rule"/>

   </start>

   <rules g="60,84,193,73" name="Rule">

   <fact var="check"/>

      <transition to="exclusive1"/>

   </rules>

   <decision expr="#{check.decision}" g="132,192,75,58" name="exclusive1">

      <transition g="-30,-14" name="Yes" to="java1"/>

      <transition g="8,-12" name="No" to="java2"/>

   </decision>

   <java class="action.Print" g="36,252,85,49" method="printYes" name="java1">

      <transition to="end1"/>

   </java>

   <java class="action.Print" g="192,252,84,49" method="printNo" name="java2">

      <transition to="end1"/>

   </java>

   <end g="132,324,55,53" name="end1"/>

</process>


Process Definition here consists of a Rule node which matches the fact "check" with the rules in .drl file. Following which the value of the class variable decision is matched and accordingly a transition is taken up by the workflow.


2) Rule Resource :


import action.Customer;


rule "CheckAge1"

  when

    customer : Customer( age >= 18)

  then

      System.out.println("INSIDE RULE CHECKAGE1");

    customer.setDecision("Yes");

end


rule "CheckAge2"

  when

    customer : Customer( age < 18)

  then

      System.out.println("INSIDE RULE CHECKAGE2");

    customer.setDecision("No");


end


3) POJO :


package action;


import java.io.Serializable;


public class Customer implements Serializable {


     int age;

     String decision="Yes";


    Customer(int age)

    {

        this.age = age;

    }


    public int getAge()

    {

        return age;

    }


    public void setAge(int age)

    {

        this.age = age;

    }


    public String getDecision()

    {

        return decision;

    }


    public void setDecision(String decision)

    {

        this.decision = decision;

    }

}


4) Main Class :


package action;

import java.util.HashMap;

import java.util.Map;


import org.jbpm.api.Configuration;

import org.jbpm.api.ExecutionService;

import org.jbpm.api.ProcessEngine;

import org.jbpm.api.RepositoryService;


public class StartRulesProcess {


    public static void main(String[] args) {


        Configuration configuration = new Configuration();

        ProcessEngine processEngine = configuration.buildProcessEngine();


        RepositoryService repositoryService = processEngine.getRepositoryService();

        ExecutionService executionService = processEngine.getExecutionService();


        repositoryService.createDeployment().addResourceFromClasspath("Rule.drl").addResourceFromClasspath("TestRules.jpdl.xml").deploy();

    //    repositoryService.createDeployment().addResourceFromClasspath("TestRules.jpdl.xml").deploy();


        Map<String, Object> var = new HashMap<String, Object>();

        var.put("check", new Customer(19));


        executionService.startProcessInstanceByKey("rules", var);   

    }

}


Regards

I created this web application for using workflow to demonstrate approval process. Following is some part of the code that might help in integrating jBPM 3 with a web app.


Some of the methods are :


1)- Deploy :


public String reDeployProcess(String processName)

    {  

        jbpmConfiguration = JbpmConfiguration.parseResource("jbpm.cfg.xml");

        JbpmContext jbpmContext = jbpmConfiguration.createJbpmContext(); 

        System.out.println("1");

        ProcessDefinition processDefinition = ProcessDefinition.parseXmlResource(processName); 

        System.out.println("2");

        System.out.println(processDefinition);

        jbpmContext.deployProcessDefinition(processDefinition); 

        System.out.println("3");

        System.out.println("prcoess getting deployed is :"+processDefinition.getName());

        jbpmContext.close();

        System.out.println(processDefinition.getName());

        return processDefinition.getName();


    }


2)- Starting Process Instance :


public String startNewProcessInstance(String processDefinitionName)

{

JbpmContext jbpmContext = jbpmConfiguration.createJbpmContext(); 

GraphSession graphSession = jbpmContext.getGraphSession(); 

ProcessDefinition definition = graphSession.findLatestProcessDefinition(processDefinitionName); 

System.out.println("definition is "+definition);

ProcessInstance instance = definition.createProcessInstance(); 

long id = instance.getId(); 

instance.signal();

jbpmContext.save(instance); 

jbpmContext.close();

return ""+id; 

}


3)- Task List


public List<?> listAllTasks(String User)

{

JbpmContext jbpmContext = jbpmConfiguration.createJbpmContext();

jbpmContext.setActorId(User);

System.out.println(jbpmContext.getActorId());

List<?> list =  jbpmContext.getTaskList(User);

System.out.println(list.size());

return list;

}


4)- Signalling a Process.


public String signalProcess(String processDefinitionName, String id) { 

    JbpmContext jbpmContext = jbpmConfiguration.createJbpmContext(); 


    long processId = Long.parseLong(id); 

    ProcessInstance instance = jbpmContext.loadProcessInstance(processId); 

    instance.signal();

    jbpmContext.save(instance); 

    jbpmContext.close();

    return "process signalled" ;

}


5)- Completing task


public String completeProcess(String processDefinitionName, String id, String User) { 

        JbpmContext jbpmContext = jbpmConfiguration.createJbpmContext();

long processId = Long.parseLong(id); 

        ProcessInstance instance = jbpmContext.loadProcessInstance(processId); 

        TaskInstance taskInstance = (TaskInstance) 

          instance.getTaskMgmtInstance().getTaskInstances().iterator().next();

        System.out.println(taskInstance);

        System.out.println(taskInstance.getActorId());

        taskInstance.end();

        jbpmContext.save(instance); 

        jbpmContext.close();


        return "process signalled" ;

    }


note : Task can also be completed using a transition. Something like this : taskInstance.end(transition);


The return values are being saved in the session here.


These methods can be called from the servlet by matching the front-end parameter values.


Regds

I had this requirement where jBPM process was supposed to be triggered at specified time. I would like to share it here.


1)-  2 methods for testing it :


public void deploy()

{


ProcessEngine processEngine = configuration.buildProcessEngine();


RepositoryService repositoryService = processEngine.getRepositoryService();


repositoryService.createDeployment().addResourceFromClasspath("test.jpdl.xml").deploy();

}


public void startProcess(String key)

{


ProcessEngine processEngine = configuration.buildProcessEngine();


ExecutionService executionService = processEngine.getExecutionService();


executionService.startProcessInstanceByKey(key);


}


2)- Creating a job that needs to be executed at the specified time :


public void execute(JobExecutionContext arg0) throws JobExecutionException {


Methods methods =  new Methods();


methods.startProcess("testS");


System.out.println("*******************STARTED******************");

}


3)- Creating a scheduler and a Trigger that would trigger the method in step 2.


public void startupScheduler() throws SchedulerException, ParseException

{


SchedulerFactory schedulerFactory = new StdSchedulerFactory();


Scheduler scheduler = schedulerFactory.getScheduler();


scheduler.start();


JobDetail jobDetail = new JobDetail("startProcessJob", Scheduler.DEFAULT_GROUP, StartProcessJob.class);


CronTrigger ct=new CronTrigger("cronTrigger","group2","00 49 13 22 * ?");


scheduler.scheduleJob(jobDetail, ct);

}


note 1: Here, the 3rd parameter in jobDetail is the class StartProcessJob implementing interface Job, that contains overridden method execute that is in step 2.

note 2: Last parameter in CronTrigger represents the date-time that is matched with system time for triggering it. (secs,mins,hours,date,month,year).


4)- Finally calling process deploy() and then calling method startupScheduler().


Hope this is helpful.


regds.