Red Hat JBoss Data Virtualization allows you to expose multiple data sources as a single virtual database. Imagine pulling in all of your various sources together into a single, updatable view or series of views using a single point of connection. Now imagine doing that in the cloud using OpenShift! This article will walk through the steps to accomplish just that. The only prerequisite is that you have an SAP Gateway instance available. The demo uses the SAP Gateway demo system described here: http://scn.sap.com/docs/DOC-40986.
Here are the steps:
1. Setting Up a Data Virtualization instance on OpenShift.
2. Adding a SQL Anywhere instance in OpenShift.
3. Importing from SQL Anywhere and SAP Gateway.
4. Federating those SAP source into a single virtualized view that will be consumed by an Android application in JBoss Developer Studio (JBDS).
5. Run the Android application.
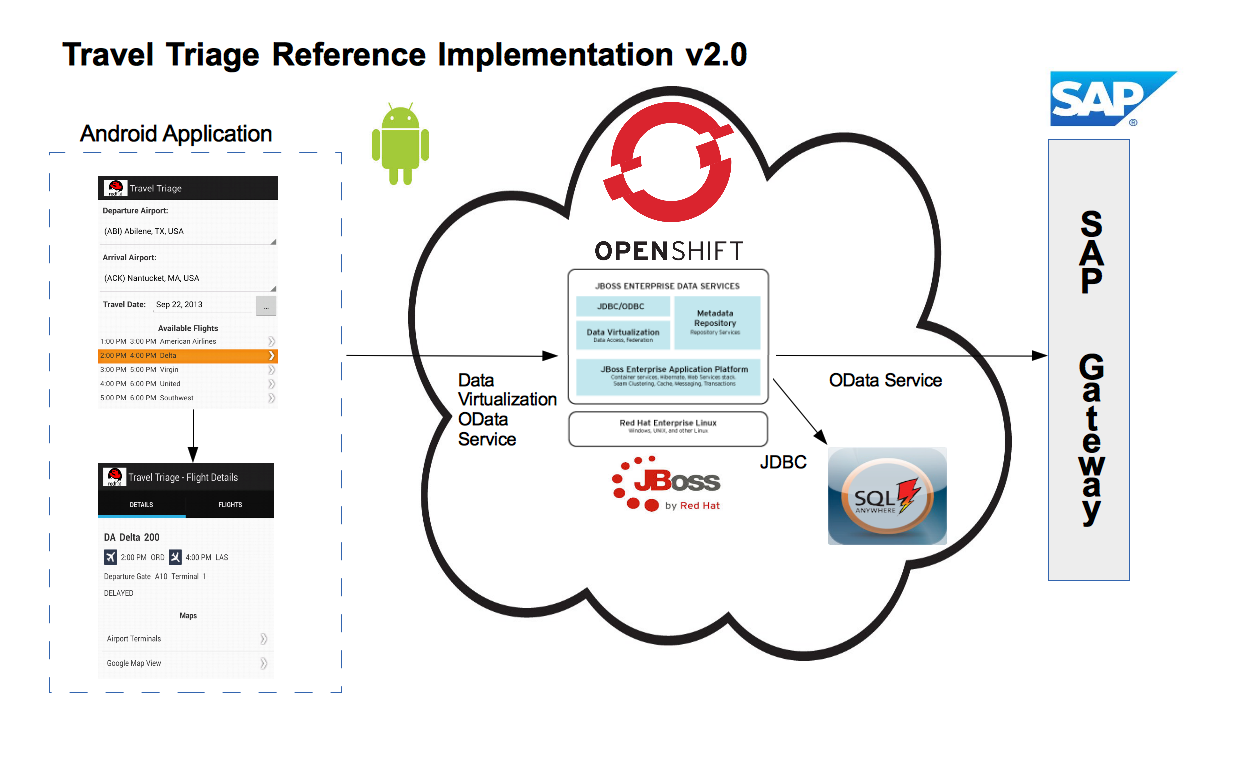
Here is a diagram that illustrates the architecture of this example:
1. Setting up Data Virtualization in OpenShift
The first step will be to provision Data Virtualization on OpenShift and install JBDS with Teiid Designer, the design tool for Data Virtualization. See this article for details: Provision Data Virtualization on OpenShift and Connect from Teiid Designer.
We will be working with an Android application, so you will need to install the Android plugin into JBDS. See http://developer.android.com/sdk/installing/installing-adt.html. Also, you will need to clone the Android application and artifacts from tejones/jboss-sap-integration · GitHub.
2. Adding a SQL Anywhere Instance in OpenShift
Now that we have our tooling and our OpenShift Data Virtualization instance running, we are now ready to create our SQL Anywhere database on OpenShift.
From a command prompt, type:
# rhc cartridge add https://github.com/githubuser8/openshift-origin-cartridge-sybase-sa/raw/master/metadata/manifest.yml -a <your app>
After adding the cartridge, you will have to accept the license agreement. There are instructions generated by the installation. After starting the ASA instance, refresh the OpenShift instance in JBDS to pickup the ASA and you can begin port forwarding in JBDS.
We will need to add our data the SQL Anywhere instance. Any JDBC capable SQL tool will suffice, but I use and love SQuirreL http://squirrel-sql.sourceforge.net/.
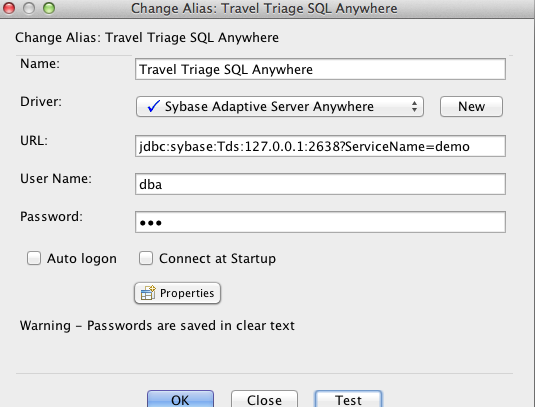
The DDL is located in {local_git_repo_location}/jboss-sap-integration/android-dv-sap/demo resources/ddl/flight_sqlana.ddl. I've also included a SQL Anywhere driver for use in the demo located here: {local_git_repo_location}/jboss-sap-integration/android-dv-sap/demo resources/driver/jconn4-26502.jar. You will need that to create the driver setup and connection in SQuirreL. You will use your local host IP in the connection URL since you are using port forwarding. The default credentials are username=dba and password=sql. Here is what your connection in SQuirreL should look like:
You are now ready to connect to the SQL Anywhere source in OpenShift and execute the DDL to create your objects and source your data. Note that the demo data is specific to the data coming from the SAP Gateway demo system. You may need to modify the information in the liveFlightFeed to match up with the test data coming from the Gateway FlightCollection. I am targeting Nov 26, 2014 for this demo. You can change the data to whatever you want. The liveFlightFeed is really meant to simulate a real-time flight data source such as FlightStats.
3. Importing from SQL Anywhere and SAP Gateway
As I have stated, I will connect to the SAP Gateway Demo system and use the Flight data for this example, (https://sapes1.sapdevcenter.com/sap/opu/odata/IWFND/RMTSAMPLEFLIGHT/). To access this data, you need an account. To create relational objects that map to the collections and functions in the SAP Gateway Service, we need to create a data source for the service and then import into Teiid Designer using the Teiid Connection import option. We will do the same for the SQL Anywhere instance so let's begin there.
1. Launch JBoss Developer Studio and switch to the Teiid Designer perspective. The perspective options are shown in the upper right corner of JBDS.
2. Connect to the Data Virtualization instance in Teiid Designer as demonstrated in step 1.
3. Create a Model Project (or you can use any existing project).
- In ModelExplorer, Right-click > New > Teiid Model Project
- In the Model Project wizard, enter Demo for the Project name. Click Finish to create the empty project.
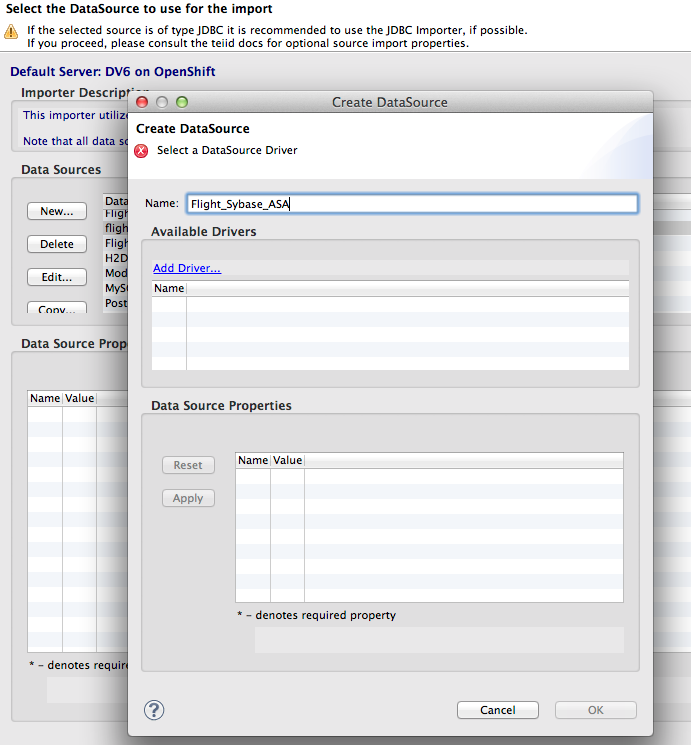
4. Select the project, then Right-click > Import... You will see the import dialog (shown below). Select Teiid Connection >> Source Model then click Next. We are using the Teiid Connection Importer since we cannot directly connect to the DB port on OpenShift. This importer allows us retrieve the DB schema through Teiid.
5. On the first page of the import wizard, click the New button in the DataSource section. Click Add Driver to select the jconn4-26502.jar file from the driver directory of your local git project. Name the datasource Flight_Sybase_ASA and enter jdbc:sybase:Tds:{IP for OpenShift ASA instance}:2638/demo?ServiceName=demo. The username and password are dba and sql. Click Apply and then click OK. Click Next on the importer wizard.
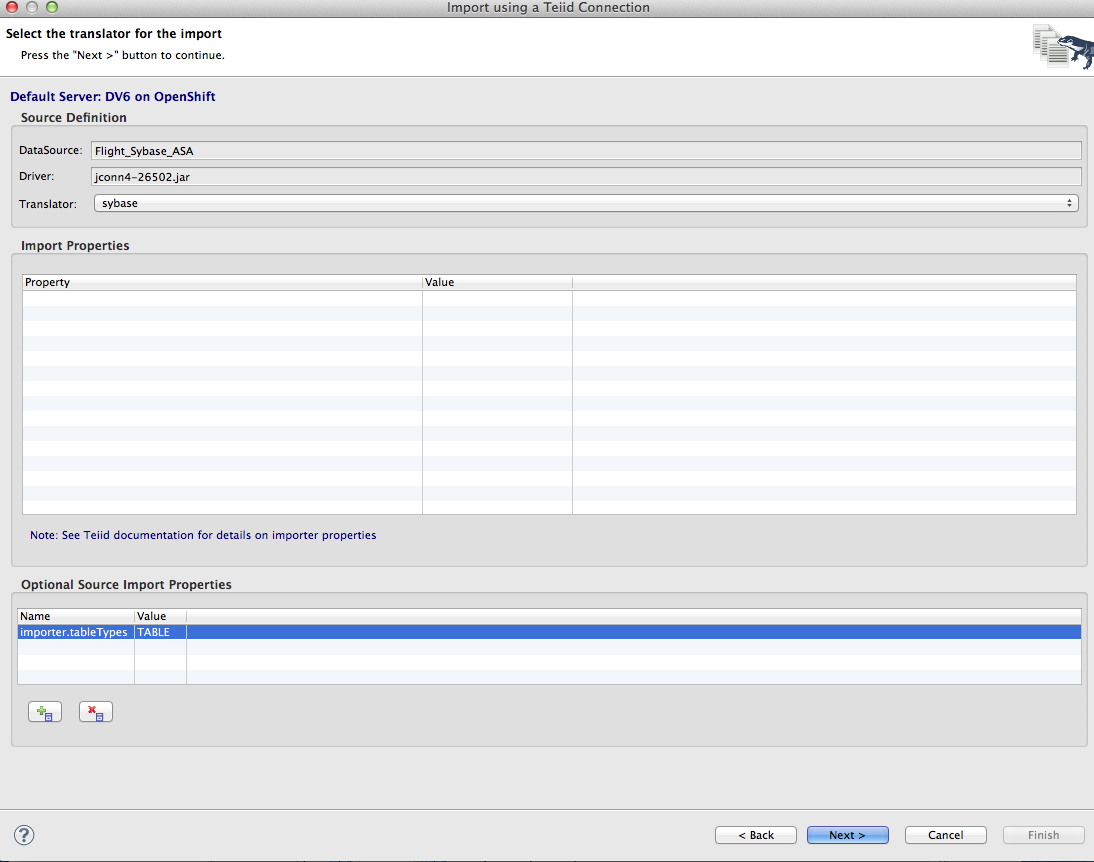
6. On the next page of the wizard, set the Translator type to Sybase and add an optional source import property with the name importer.tableTypes and the value TABLE. This will avoid importing system table for the SQL Anywhere instance. Click Next.
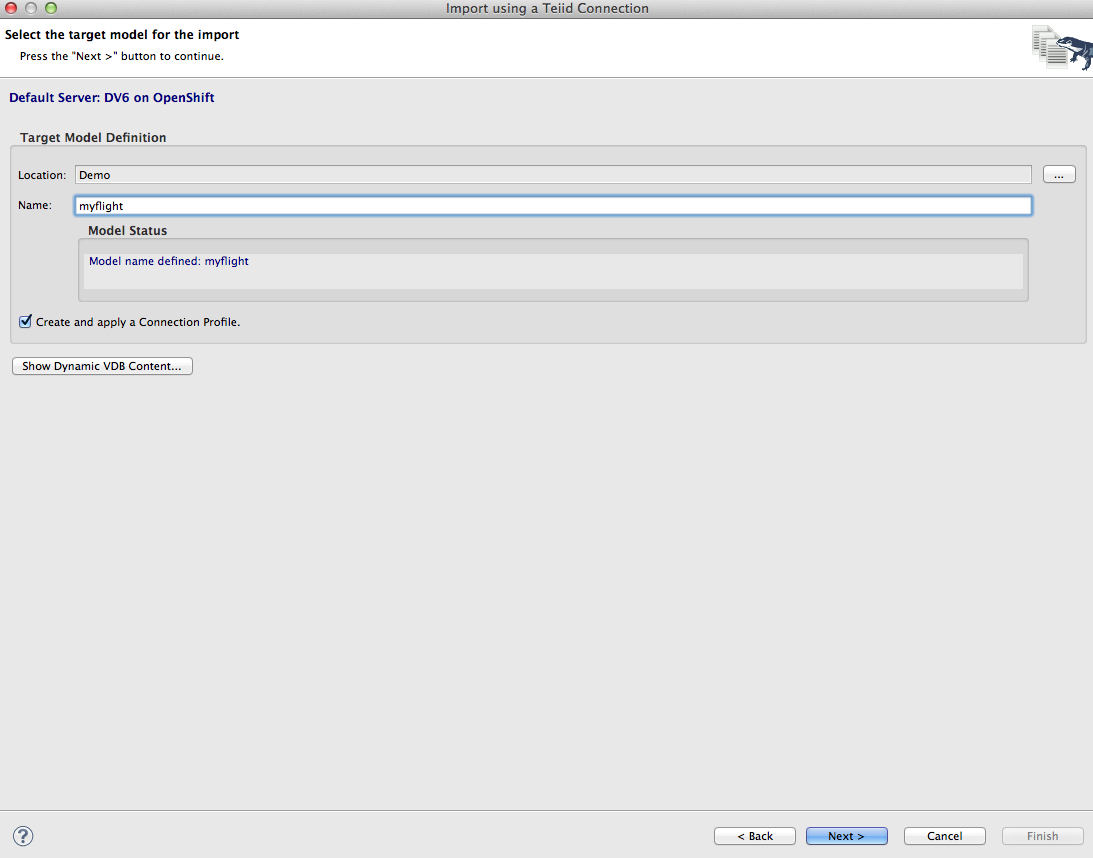
7. On the next page, select a project and give the model name myflight. Click Next. This will deploy a temporary dynamic VDB that will enable the metadata mapping from SQL Anywhere objects the Data Virtualization relational objects by creating DDL.
8. You will now see the DDL that will be used to create the Data Virtualization relational object, click Next to see the objects that will be created and then click Finish.
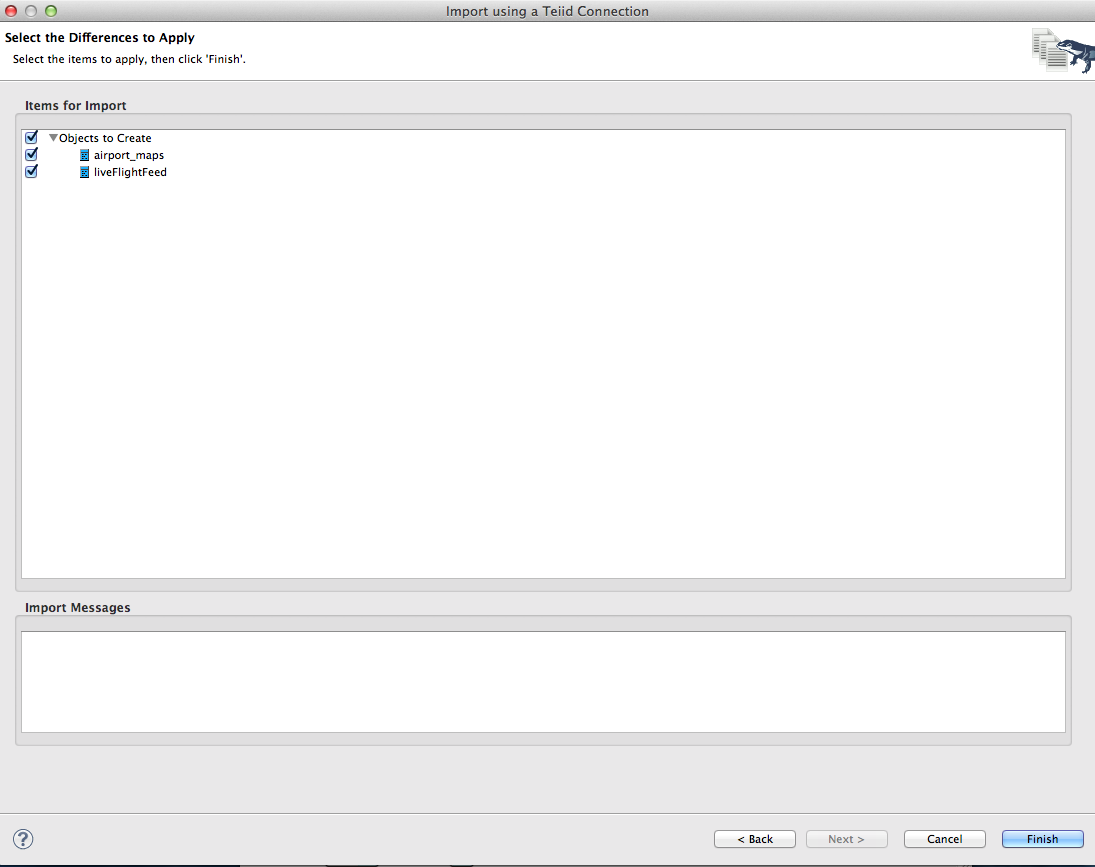
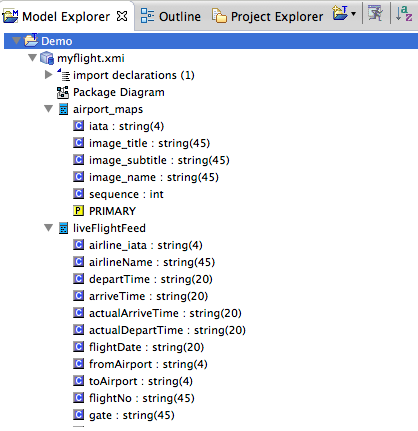
This will create the objects for us in the ModelExplorer.
Creating the SAP Gateway Relational Objects
The process for importing the SAP Gateway source is a lot like importing SQL Anywhere except the connection information is different and we will use a different translator.
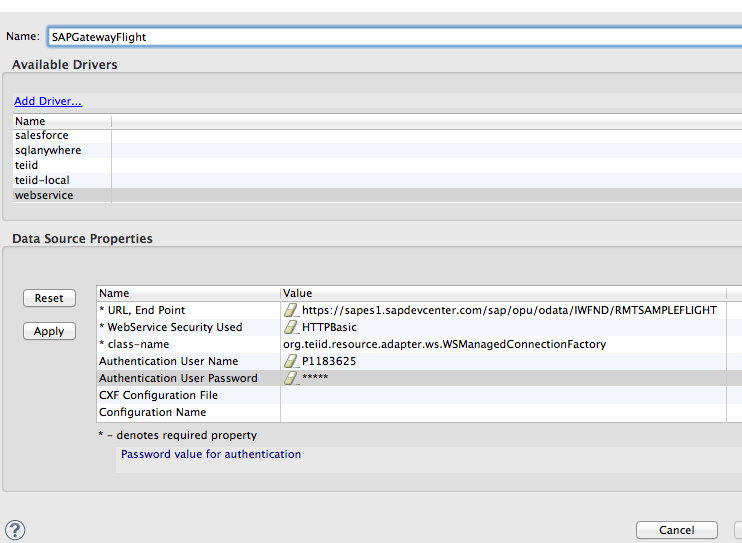
1. Repeat step 4 from above. When creating the datasource for SAP Gateway as in step 5 above, name the datasource SAPGatewayFlight and select the webservice driver. Enter https://sapes1.sapdevcenter.com/sap/opu/odata/IWFND/RMTSAMPLEFLIGHT for the URL, End Point and HTTPBasic for security. The username and password are your credentials for the SAP Gateway service you are using. Click Apply and then click OK. Click Next on the importer wizard.
2. On the next page, select the sap-nw-gateway translator and click Next. Enter SAPGatewayFlight for the model name and click Next.
3. Complete step 8 above and the relational objects that map to the SAP Gateway service will be generated for you in JBDS.
Note: With the current version of the Data Virtualization cartridge for OpenShift, there is an error in the mapping of the "byte" data type. The flightDetails_period field of the FlightCollection table should be change to "short". This will be corrected in the next release of the cartridge. To change the type, select the field and click on the ellipsis of the "datatype" property in the properties panel below. A data type dialog will popup allowing you to select the "short" type.
4. Federating SAP Sources into a Single Virtualized View
Now that you have imported the SQL Anywhere source from OpenShift and the SAP Gateway OData service, you are ready to join the data into a single view. To start, we will need to create a virtual model and table that will be use to federate the data from our SAP Gateway Flight service and our SQL Anywhere databse running in OpenShift.
1. Right-click on the Demo project and select New->Teiid Metadata Model. For Model Name enter AllFlightDataModel. Set the Model Type as View Model and click Finish.
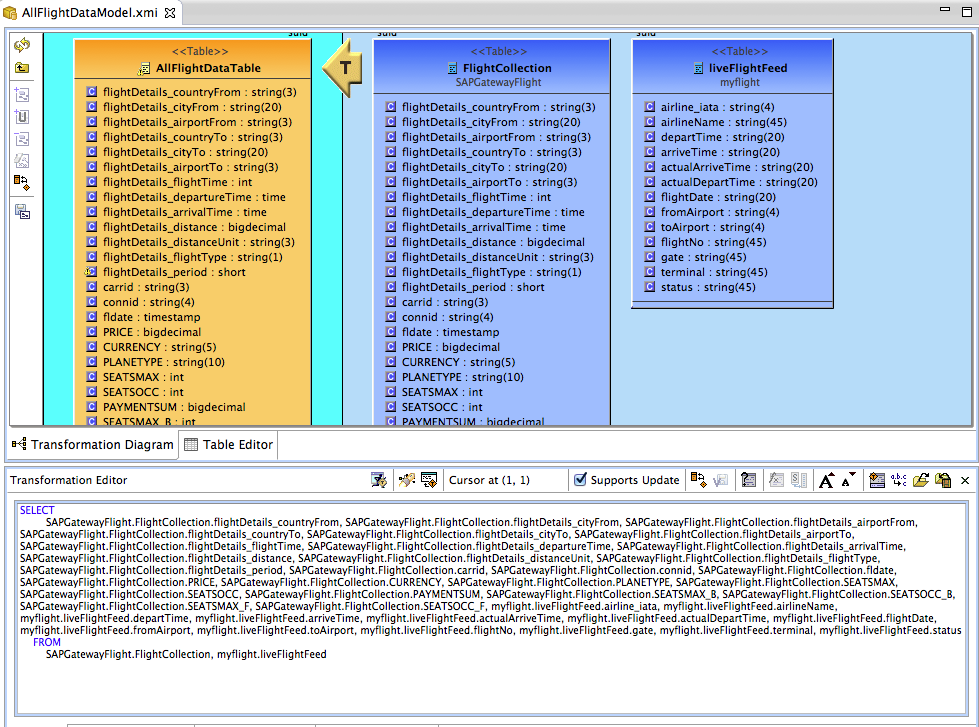
2. Right-click on the new model and select New Child->Table. Enter AllFlightDataTable for the Name and click OK. Double-click on the generated model to open the modeling diagram.

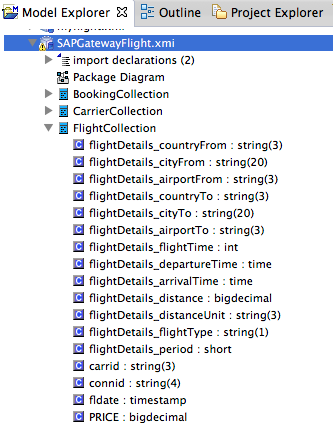
3. Now expand the SAPGatewayFlight model and drag the FlightCollection table to the arrow with the T in the diagram. This will add the FlightCollection table to the transformation. Now do the same with the liveFlightFeed table form the myflight model to complete the transformation. Save your changes.
4. In order to expose the view table as an OData service in Data Virtualization, we need to add a primary key. Right-click on the AllFlightDataTable and select New Child->Primary Key. Name the new Primary Key allFlightData_PK and click the Ellipsis for the Columns property in the properties tab below the Model Explorer. Select the airline_iata, depart_time, arriveTime, flightDate, fromAirport and toAirport columns and click OK Save your changes.
We are now ready to create and deploy our virtual database.
1. Right-click on the Demo model project and click New->Teiid VDB and add your models.
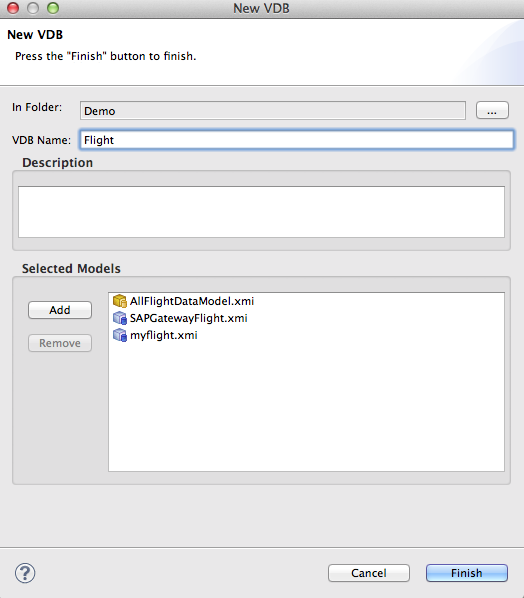
Click Finish.
2. To deploy your new VDB, right-click on the Flight VDB in the Model Explorer and select Modeling->Deploy. A new datasource will be created for you and your Flight VDB will now be available in OpenShift as an OData service. You could also create a JDBC connection to the VDB if you wanted to, but we will use the OData capabilities of Data Virtualization for our Android application.
Testing Your New Service
Let's test our new service running in OpenShift. The URL for an OData service running in Data Virtualization is http://{host}:{port}/{vdbName}/{modelName.tableName} so we will use http://localhost:8080/odata/flight/AllFlightDataModel.AllFlightDataTable?$format=json to see our federated SAP data.
Note: Make sure you have port forwarding running in order to execute the service with the above URL.
5. Run the Android application
Running the Android app in JBDS using the Android emulator, you can access your data in DV on OpenShift using OData urls.