Skip navigation
2011

JBoss AS 7 is still being developed on but lately file based deployment is now in place and I thought it would be a good thing to tell you how you can use JBoss AS 7 from our tools even before there is an optimized and fully supported server adapter for it.


It's not optimal, but at least it lets you get started.


For this blog I used JBoss AS 7 Beta 2 and JBoss Developer Studio 4; you can use a newer version of AS 7 (beta 3 is coming out soon) or if you have JBoss Tools 3.2.0 installed all this works fine too from there.


Read more below.

Start/Stop of AS 7

For now the best way to start/stop AS 7 when working from Eclipse is to simply start and stop it from a command line.


Start:

$JBOSS_HOME/bin/standalone


Stop:

Press Ctrl+C in your terminal/command prompt


You can start AS 7 via Eclipse External Tools support but Stopping won't work since it will only stop the shell script not the actual running AS 7 instance. Thus for now - use the command line.

Deployment to AS 7

If you have a standard Eclipse Web Tools Project style project then the simplest is to use the Deploy Only server, if you have a free-form project you can also use Deploy Only server but maybe Project Archives gives you a better workflow. I'll outline the "Web Tools" and Project Archives approach below:


Create a Deploy Only Server

The "Deploy Only" server is available in JBoss Tools & Developer Studio and provides a server adapter that has no special knowledge about the server it is deploying to beyond a directory location. Thus this is perfect for using with servers that does not yet have direct support from within Eclipse.


To create one you simply hit Ctrl+N or use File > New > Other from the menu and find the Server wizard.


define_new_server.png

Within the Server wizard you need to find and select the "Deploy Only" server:

newserver_deployonly.png

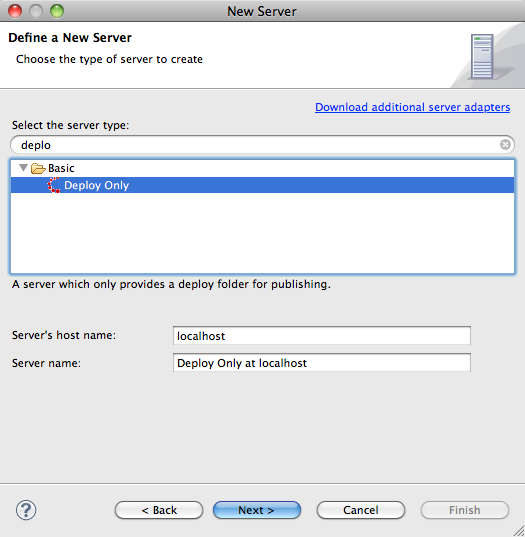
Press "Next", and then give your server a name and specify the directory location for deployments.


deployonly_deploydirectory.png

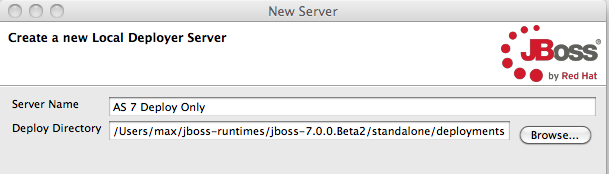
For AS 7 standalone deployments goes to $JBOSS_HOME/standalone/deployments.


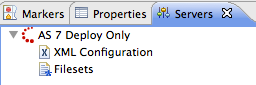
Press "Finish" and you should now have your "AS 7" server available in the servers view:


as7_serverview.png

Now you have a "Server" which you can deploy standard Web tools projects to; you simply drag'n'drop deployable resources to the server or use the "Add and Remove" available in the context menu.


Enable Compressed Archives

There is one "gotcha" with this setup and that is that with AS 7 for exploded deployments it now requires a .dodeploy marker to explicitly trigger a (re)deployment of an exploded directory.


The simplest way to avoid having to set this up is to enable "Compressed Archives" from within the tools since AS 7 will automatically deploy such archives once they are complete.


To enable this, double click the Server and it's server editor should show up.


enable_compressed_archives.png

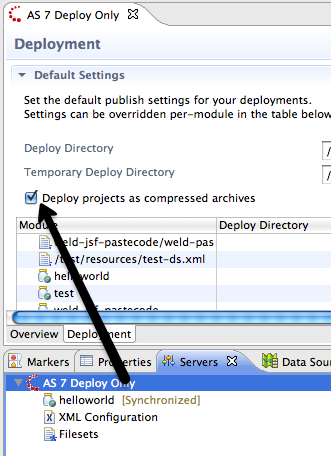
In this editor, switch to the Deployment tab and make sure there is a checkmark for "Deploy projects as compressed archives".


With this done you can now easily add any war/jar/ear project to the server and deploy it.

as7_helloworld.png

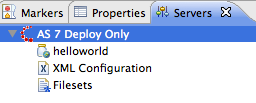
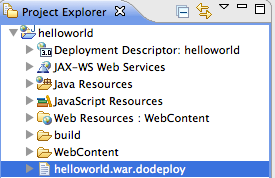
Above I've added a project called "helloworld".


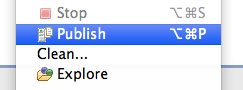
To deploy or redeploy this simply right click the server and choose "Publish" (you can also use the keyboard shortcut shown in the menu for easier access).


publish.png


Exploded and Explicit Deployments

If you really want to use exploded deployments then there is a trick you can do to simulate the .dodeploy marker with JBoss Tools.


Simply create a text file in your project called "foo.war.dodeploy" where foo.war should the name of your deployment. In my case that is "helloworld.war.dodeploy".

dodeploy_file.png

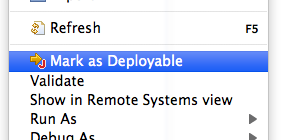
Then right click this file and choose "Mark as Deployable"


markasdeployable.png

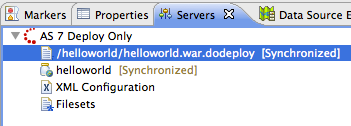
This should then automatically get deployed to your sever (if you have multiple there will be a dialog asking you which server to deploy to)

dodeploy_in_serverview.png

If you don't know what a "dodeploy marker" is look in the README.txt in $JBOSS_HOME/standalone/deployments for an explanation.


Please note that Deploy Only server currently does not support automatic publishing thus you have explicit invoke Publish when you are ready.


This will be fixed in upcoming release of JBoss Tools 3.2.

Deploy using Project Archives

Project Archives is mostly relevant for those not using Web Tools style projects, but is also usable for deploying to AS 7 - the feature is already documented and even with a screencast in a previous blog


Please, Make this easier!

We are working on it and the first steps of an AS 7 adapter is already in JBoss Tools trunk which will be JBoss Tools 3.3 and target Eclipse 3.7.

If you are interested in that work ask on the forums where we will keep you updated with the progress, i.e. when there will be an updatesite to install and use from

While at EclipseCon a few weeks ago, I heard about a new framework at Eclipse for quickly developing Eclipse editors for XML files, especially XML configuration files. As Konstantin Komissarchik, one of the lead developers on Sapphire, pointed out in the summary for his EclipseCon talk - "[Sapphire] is a UI building framework that allows developers to specify UI in terms of higher level constructs like property editors instead of widgets and layouts. This paradigm results in several orders of magnitude improvement in developer productivity while simultaneously delivering better quality UI that is easier to maintain."


Though I missed his talk, I had a chance to sit down with Konstantin afterwards and he showed off what his framework can do. To say the least, I was excited. One of the things we do a lot of in JBoss tools is editing XML configuration files. We have them everywhere. And we don't really have a consistent look and feel to any of them. The other thing I was excited to see was the potential integration with Graphiti, a framework for graphical editors. Perhaps they've hit upon the "Holy Grail" of UI development?


Here's an example from one of the samples that comes with the Sapphire framework:

sapphire-screenshot-1.png


I wanted to find out. So when I got back from my trip, I started playing with Sapphire locally. You have to keep in mind that this is very early in the process for Sapphire. The version I'm working with is 0.3 and they're providing bug fixes nearly every day, which means things may break or change between updates. Honestly that's fine - Konstantin said they're using the framework at Oracle and have commercial editors out in the wild based on this technology, so it has to be pretty good, right?


We have a runtime project at JBoss that's rolling along at a pretty good clip now. It's the next generation of our ESB called SwitchYard. You can check out the SwitchYard Community Page for more details. But they've been working on the format of an XML configuration file that we'll need to develop an editor for. It seemed like the perfect opportunity to put Sapphire to the test

.

Over the course of the last 5 or 6 business days, I've probably put in 20-30 hours on this editor. I've run into a few issues here and there, most because I didn't grok the framework fully at the start. But I've ended up with a good first cut that is able to edit the initial sample of the configuration file. And that's amazing to have something that even sort of works in that short a timeframe.


Ultimately developing an editor in Sapphire boils down to two main things:


  • A set of Java interface files that map to different parts of your XML configuration.
  • And a Sapphire Definition (sdef) file, which defines how different parts of the UI are rendered.


Think of the Java interface files as a quick and easy Java bean representation of your XML. So various element structures and properties are reduced to getters and setters in the interfaces. All you do from there is take the Switchyard annotations and indicate how to tie those properties back to the XML you're editing. The Sapphire framework then takes those annotations to define a model (using EMF of course see the correction below) on the fly representing your XML. This is the "Model" part of your typical Model-Viewer-Controller approach.


[Correction: Konstantin pointed out that "Sapphire does not use EMF for any part of modeling or data binding. The developer specifies semantics in interfaces and annotations. The annotation processor generates implementation classes. The XML binding code directly reads and writes on the live DOM API exposed by the XML editor."]


Then the SDEF file describes how to present that generated model to the user in UI form. Want to generate a view? Cool. Wizard or dialog? Cool. Editor? Cool. And you can define reusable components of the UI so you don't have to redefine everything if you decide to go, for example, from a dialog to an editor later on. It's nice because there's instant integration between the Outline view and the Editor for example, so you don't have to worry about the niggly little bits that can sometimes consume days at a time to get right.


What's awesome is that the Sapphire UI Definition Editor is itself written in Sapphire. Talk about eating your own dog food.


Here's a screen shot of what I have working so far:

switchyard_0_1.jpg


There are some gotchas:


  • Annotation processing is not turned on by default for projects. To do that, go to Project Properties -> Java Compiler -> Annotation Processing -> Enable annotation processing.
  • To see the classes generated by the Sapphire framework for your interfaces, you have to turn off the filter that hides files & folders starting with "." Those generated classes appear in the ".apt_generated" folder.
  • It's taken me several days to grok how to get XML namespace declarations just right with the XmlNamespace and XmlNamespaces and XmlRootBinding annotations. But it boils down to declaring them when you use them. Easier said than done, but it makes sense once you've played with it a bit.
  • You have to make sure that you name things consistently. This is one of the areas I have run into again and again. The name of the property field, property name, getter and setter must be consistent or the framework complains loudly at runtime. So if you have a property named "SOAPBindings", you need to make sure the property is PROP_SOAPBINDINGS, the property name is "SOAPBindings" and the getter is "getSoapbindings()".

    Why? Seems to be something with how the processor is looking at the capitalization of various bits in the model and if one is out of whack, they're all out of whack. You can make it a bit more consistent by adding underscores to the PROP_ declaration - such as PROP_SOAP_BINDINGS would need the property name "SoapBindings" and the getter would be "getSoapBindings()" - the underscore hints that there's a uppercase letter coming up.


That's about it at this point. Now that I have the structure working and can define/modify/delete things via the editor, I want to go in and add some polish. Things like boolean options - true/false, combo boxes, validation, etc.  After that's done, I'll start playing some with the Graphiti integration - but I'm not quite ready to tackle that yet.


Interested in playing with Sapphire yourself? Here are a few links to get you started:


A big thanks to Konstantin for helping me out on the Sapphire mailing list and forum. He's been very patient dealing with me over the last week!

Filter Blog

By date:
By tag: