Skip navigation

JBoss Tools

10 Posts authored by: bfitzpat

JBoss Developer Studio 4.1, an update to the March 2011 release of JBoss Developer Studio 4, is now available for download!


  • If you're an existing Red Hat Support Portal user/customer, you can get access to JBoss Developer Studio via the Downloads section. But if you're a new user, all you need to do is signup to be granted access.
  • If you already have JBoss Developer Studio 4 installed, you can update your software using the update site through Eclipse.
  • You can get it for free (registration required) from http://devstudio.jboss.com/download/ (once that page gets refreshed)

What is JBoss Developer Studio 4.1?

JBoss Developer Studio 4.1 comes as a full easy to install Eclipse installation that bundles Eclipse WTP, TestNG, Spring IDE and the latest updated release of the supported plugins from JBoss Tools 3.2, including SOA-related tooling such as ESB, Drools, jBPM 3, and others.

Release highlights include:


  • Now based on Eclipse 3.6.2 (Helios SR2)
  • Includes bug fixes to many major components

BPEL Editor is Now Fully Supported

In JBoss Developer Studio 4.0, the BPEL Editor was included as a Technical Preview. The editor is now fully supported in JBoss Developer Studio 4.1.

JBoss Developer Studio Extras Site Includes More Certified 3rd Party Options

In JBoss Developer Studio 4, you had two certified 3rd party extras available for installation: Spring IDE and TestNG.

In 4.1, you now have the following certified 3rd party options:


  • eGit
  • FindBugs
  • Maven Integration
  • Mylyn
  • PMD
  • Spring IDE
  • Subclipse
  • and TestNG


To install these certified 3rd Party features from the update site, go to Help->Install New Software and select the "JBoss Developer Studio 4.0 Extras" site, which is predefined in the drop-down. Expand the "All Certified Features" item in the list and choose the features you want to install.


Have fun!

While at EclipseCon a few weeks ago, I heard about a new framework at Eclipse for quickly developing Eclipse editors for XML files, especially XML configuration files. As Konstantin Komissarchik, one of the lead developers on Sapphire, pointed out in the summary for his EclipseCon talk - "[Sapphire] is a UI building framework that allows developers to specify UI in terms of higher level constructs like property editors instead of widgets and layouts. This paradigm results in several orders of magnitude improvement in developer productivity while simultaneously delivering better quality UI that is easier to maintain."


Though I missed his talk, I had a chance to sit down with Konstantin afterwards and he showed off what his framework can do. To say the least, I was excited. One of the things we do a lot of in JBoss tools is editing XML configuration files. We have them everywhere. And we don't really have a consistent look and feel to any of them. The other thing I was excited to see was the potential integration with Graphiti, a framework for graphical editors. Perhaps they've hit upon the "Holy Grail" of UI development?


Here's an example from one of the samples that comes with the Sapphire framework:

sapphire-screenshot-1.png


I wanted to find out. So when I got back from my trip, I started playing with Sapphire locally. You have to keep in mind that this is very early in the process for Sapphire. The version I'm working with is 0.3 and they're providing bug fixes nearly every day, which means things may break or change between updates. Honestly that's fine - Konstantin said they're using the framework at Oracle and have commercial editors out in the wild based on this technology, so it has to be pretty good, right?


We have a runtime project at JBoss that's rolling along at a pretty good clip now. It's the next generation of our ESB called SwitchYard. You can check out the SwitchYard Community Page for more details. But they've been working on the format of an XML configuration file that we'll need to develop an editor for. It seemed like the perfect opportunity to put Sapphire to the test

.

Over the course of the last 5 or 6 business days, I've probably put in 20-30 hours on this editor. I've run into a few issues here and there, most because I didn't grok the framework fully at the start. But I've ended up with a good first cut that is able to edit the initial sample of the configuration file. And that's amazing to have something that even sort of works in that short a timeframe.


Ultimately developing an editor in Sapphire boils down to two main things:


  • A set of Java interface files that map to different parts of your XML configuration.
  • And a Sapphire Definition (sdef) file, which defines how different parts of the UI are rendered.


Think of the Java interface files as a quick and easy Java bean representation of your XML. So various element structures and properties are reduced to getters and setters in the interfaces. All you do from there is take the Switchyard annotations and indicate how to tie those properties back to the XML you're editing. The Sapphire framework then takes those annotations to define a model (using EMF of course see the correction below) on the fly representing your XML. This is the "Model" part of your typical Model-Viewer-Controller approach.


[Correction: Konstantin pointed out that "Sapphire does not use EMF for any part of modeling or data binding. The developer specifies semantics in interfaces and annotations. The annotation processor generates implementation classes. The XML binding code directly reads and writes on the live DOM API exposed by the XML editor."]


Then the SDEF file describes how to present that generated model to the user in UI form. Want to generate a view? Cool. Wizard or dialog? Cool. Editor? Cool. And you can define reusable components of the UI so you don't have to redefine everything if you decide to go, for example, from a dialog to an editor later on. It's nice because there's instant integration between the Outline view and the Editor for example, so you don't have to worry about the niggly little bits that can sometimes consume days at a time to get right.


What's awesome is that the Sapphire UI Definition Editor is itself written in Sapphire. Talk about eating your own dog food.


Here's a screen shot of what I have working so far:

switchyard_0_1.jpg


There are some gotchas:


  • Annotation processing is not turned on by default for projects. To do that, go to Project Properties -> Java Compiler -> Annotation Processing -> Enable annotation processing.
  • To see the classes generated by the Sapphire framework for your interfaces, you have to turn off the filter that hides files & folders starting with "." Those generated classes appear in the ".apt_generated" folder.
  • It's taken me several days to grok how to get XML namespace declarations just right with the XmlNamespace and XmlNamespaces and XmlRootBinding annotations. But it boils down to declaring them when you use them. Easier said than done, but it makes sense once you've played with it a bit.
  • You have to make sure that you name things consistently. This is one of the areas I have run into again and again. The name of the property field, property name, getter and setter must be consistent or the framework complains loudly at runtime. So if you have a property named "SOAPBindings", you need to make sure the property is PROP_SOAPBINDINGS, the property name is "SOAPBindings" and the getter is "getSoapbindings()".

    Why? Seems to be something with how the processor is looking at the capitalization of various bits in the model and if one is out of whack, they're all out of whack. You can make it a bit more consistent by adding underscores to the PROP_ declaration - such as PROP_SOAP_BINDINGS would need the property name "SoapBindings" and the getter would be "getSoapBindings()" - the underscore hints that there's a uppercase letter coming up.


That's about it at this point. Now that I have the structure working and can define/modify/delete things via the editor, I want to go in and add some polish. Things like boolean options - true/false, combo boxes, validation, etc.  After that's done, I'll start playing some with the Graphiti integration - but I'm not quite ready to tackle that yet.


Interested in playing with Sapphire yourself? Here are a few links to get you started:


A big thanks to Konstantin for helping me out on the Sapphire mailing list and forum. He's been very patient dealing with me over the last week!

As per usual, EclipseCon was full of interesting new technologies, people using older technology in new ways, and a lot of social (mostly because of the Free Beer) engineers. I thought I'd offer an overview of the areas I was the most intrigued by this year.


Q7


On the first day, I went to a talk (that was actually more of a tutorial) to learn about a new test framework from Xored called Q7. Q7 will be a commercial product (sometime in the next 6 months most likely), but also have a community version. The tooling allows you to script tests in a similar way to how Rational Tester used to do it, but has hooks directly into the Eclipse platform UI bits so it doesn't need to rely (except in certain cases) on screen locations. They've even gone so far as to integrate it with Maven & Tycho for automatically triggering tests as part of the build.


They offer a free evaluation version that was released for EclipseCon here: http://docs.xored.com/display/Q7E/Home


The differences between Q7 and SWTBot are quite large. The biggest of those differences being the ability to explicitly test pre-conditions (i.e. clean workspace with two projects, a few preferences changed, etc.) between tests. That alone makes this a compelling new product in the Eclipse test space and something we should seriously look into as opposed to continuing with SWTBot. They just released tentative pricing details here (http://docs.xored.com/display/Q7E/Pricing+%28Tentative%29) and I'd encourage Jiri and his team to check it out.


MoDisco

On the second day was the "Spy on your Models" talk that discussed the MoDisco EMF Model Browser. The MoDisco project (http://wiki.eclipse.org/MoDisco/Components/v0.9) offers a variety of tools to help navigate the EMF model hierarchy within the Eclipse tooling. Once you have that, you can execute queries and other interesting things in a SQL-like language that also has possibilities. I plan on downloading and playing with it in their Indigo release (http://download.eclipse.org/modeling/mdt/modisco/updates/release/).


EMF and GWT

After that I saw a talk by Ed Merks on "Building Web Applications with EMF and GWT," which showed on the fly how EMF can build a quick GWT app that runs on the Google App Server merely by tweaking a few genmodel settings. It might not have been a great editor, but as something quick and easy to develop for the web it offers some interesting possibilities.


What not to do with p2

One of the more entertaining talks was "p2, your savior or your achilles heel? Everything an Eclipse team needs to know about p2." The pair giving the talk offered 10 things NOT to do when using P2. Hopefully they will release the slides at some point, but here are the top 10:


  1. Don't move or remove files on disk. Let p2 and the p2 garbage collector manage your install. Otherwise your metadata gets out of whack.
  2. Don't unzip your plug-in files over Eclipse. Instead, use a p2 repository (downloadable or online).
  3. Don't replace published content. The version/ID pair is immutable, so bad things occur when you overwrite plug-ins directly by name.
  4. Don't alter a released repository. People depend on those. Instead, specify a retention policy and create additional repositories.
  5. Don't NOT categorize features.
  6. Don't ignore version ranges.
  7. Use APIs, NOT internals.
  8. Don't use the metadata generator, use the publisher instead.
  9. Don't use legacy update sites or expect a long lag time when installing.
  10. Don't spell it P2 - it's a lower case p2.


Sapphire

I missed the Sapphire talk by Konstantin from Oracle, but caught him later that day and he showed me the wonders of the Sapphire framework. I'm still playing with Sapphire a bit, but you can read more here: http://www.eclipse.org/sapphire/


As I get the hang of it, I'll write up a blog post or two about how it works. Ultimately it's about providing an abstraction layer on top of the Eclipse UI to simplify tool development. It has a lot of potential to standardize the look & feel for new tools and simplify their development dramatically, but it's a technology in its formative days. That said, they're doing some amazing things with it and using it in commercial Oracle Eclipse applications, so I suspect it will mature quickly.


...


And that's about it for this year. There were many other great talks and the keynote featuring Watson the Jeapordy champion was quite entertaining and informative.


For other details about the conference, be sure to look at the EclipseCon 2011 site.

I've seen two major releases of JBoss Tools in my year and a half at JBoss/Red Hat. In that time, the many talented folks we have working on tooling have developed new tools and updated existing ones. Functionality has been added just about anywhere you look in the tooling.


As such, I want to call out just a few of the areas we've made progress in for JBoss Tools 3.2...


First, the ESB Editor gained support for new ESB 4.9 functionality including BPELInvoke, new methods for creating ESB actions via annotations, and Camel ESB integration. And the team also added a first cut at better validation of ESB configurations to help make sure files will will work before they're deployed.


ws_tester.jpgNext, there's the great BPEL Editor work that Bob has already mentioned here


Beyond that, I have to say that I'm happy with the work we've done on the Web Service Tester that's been added. I know Bob uses it for testing web services used in BPEL processes and Lukas has used it extensively in QE. More feedback would be great, but I'm happy with where we are for a first release! You can read more about the WS Tester here.


And I'm also happy with some of the new Web Service wizards we've introduced for bottom-up WS development in this release. Though the WTP Web Service wizard works, it's not the most user friendly beast in the world and it's also not the easiest framework to extend. As such, we reused a few chunks that we'd written and found ways to present a simpler approach for developing web service artifacts for existing annotated classes.


We integrate with JBossWS and JAX-WS annotated classes and we even integrate with RESTful services if you have RESTEasy installed. So hopefully these will help you get work done a bit faster than before. You can read more about these new wizards here.


So there you have a few of the areas we've worked on for this release. As always with JBoss Tools, this is just the tip of the iceberg so be sure to keep an eye out for posts celebrating functionality in other areas!

In my last article, I talked about how to extend the Annotation Properties view provided as part of WTP in Eclipse Helios. And that gets into the implementation details of adding your own annotations.


Here, I'd like to focus on how you'd use the view in conjunction with ESB support in JBoss Tools to actually create a new ESB action using the annotations added as part of ESB 4.9. Now instead of extending the AbstractActionPipelinedProcessor class you can create your own POJO and annotate to indicate various configuration options, as documented here.


Let's say you want to create a simple PrintMessageAction, similar to the example that extends AbstractActionPipelinedProcessor, but want to see the differences between the two implementations. (You can find the original example implementation in the ESB Programmer's Guide here.)


The original example code looks like this (Listing 1):


public class PrintMessage extends AbstractActionPipelineProcessor {

  private String information;
  private Integer repeatCount;

  public PrintMessage(ConfigTree config) {
    information = config.getAttribute("information");
    repeatCount = new Integer(config.getAttribute("repeatCount"));
  }

  public Message process(Message message) throws ActionProcessingException {
    for (int i=0; i < repeatCount; i++) {
      System.out.println(information);
    }
  }
}


As you can see, if you already had a PrintMessage class, you'd have to revamp it a bit to get it to work. Let's say you have this class (Listing 2):


import org.jboss.soa.esb.message.Message;

public class PrintMessage {
  
  private String information;
  private Integer repeatCount;
  
  public void printMessage(Message message) {
    for (int i=0; i < repeatCount; i++) {
      System.out.println(information);
    }
  }
}


If you use the new ESB annotations available in ESB 4.9, this becomes much more straightforward (Listing 3):


import org.jboss.soa.esb.message.Message;

public class PrintMessage {
  
  @ConfigProperty // this will come from the ESB configuration
  private String information;
  @ConfigProperty // this also will come from the ESB configuration
  private Integer repeatCount;
  
  @Process // and this is the actual action that will get invoked
  public void printMessage(Message message) {
    for (int i=0; i < repeatCount; i++) {
      System.out.println(information);
    }
  }
}


By now you're wondering - so how does the tooling come into this? Well, with the new Annotation Properties view and the ESB annotations we hooked up in the upcoming JBoss Tools 3.2 Beta1 release, you can let the tooling add the annotations for you.


In JBoss Tools, let's say that you have your original PrintMessage class (Listing 2) open in your ESB project and you want to turn it into an ESB action you can configure for the project.


To open and use the Annotation Properties view

  1. Go to Window->Show View->Other
  2. Type "Annotation" in the search box
  3. Select JAX-WS->Annotation Properties
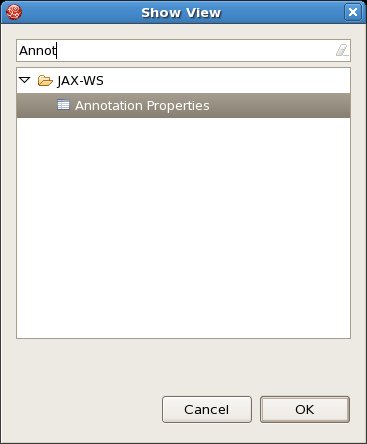
    annotation_show_view.jpg
  4. Click OK.


By default, all available annotations are enabled in the view. This will most likely cause you to see a message such as "No suitable library can be found on the projects classpath." To get around this since we're just interested in ESB annotations at this point, we simply filter out the other types.


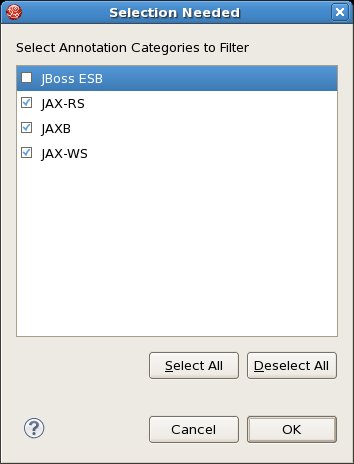
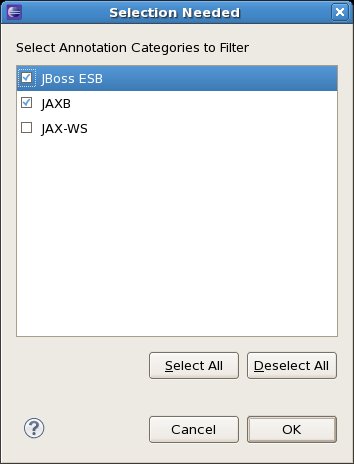
To change the filtered annotation types:

  1. In the View Menu for the Annotation Properties view, select "Filters..."
  2. When the Selection Needed dialog appears, make sure that all other annotation types are checked except for JBoss ESBannotation_props_view_filters.jpg
  3. Click OK


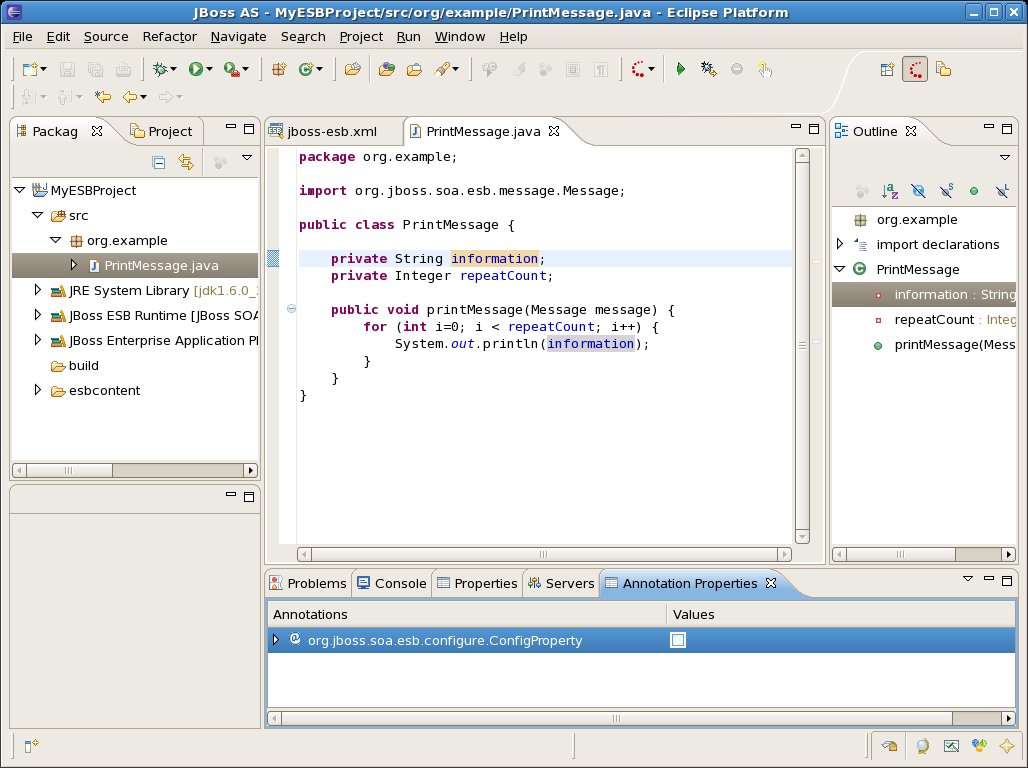
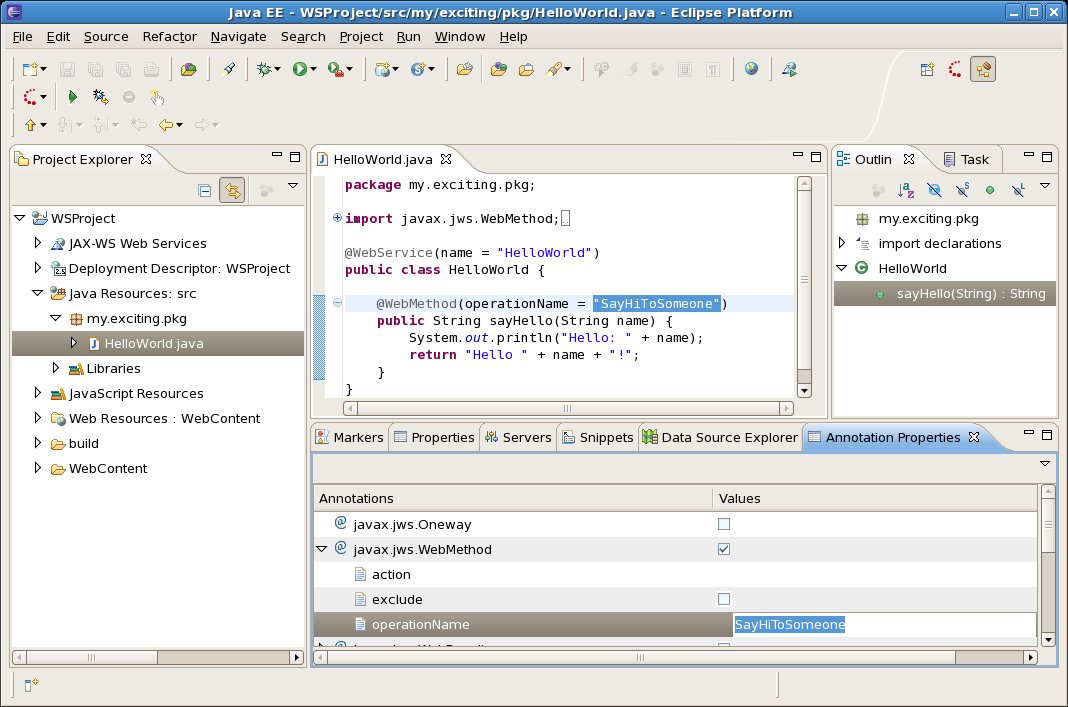
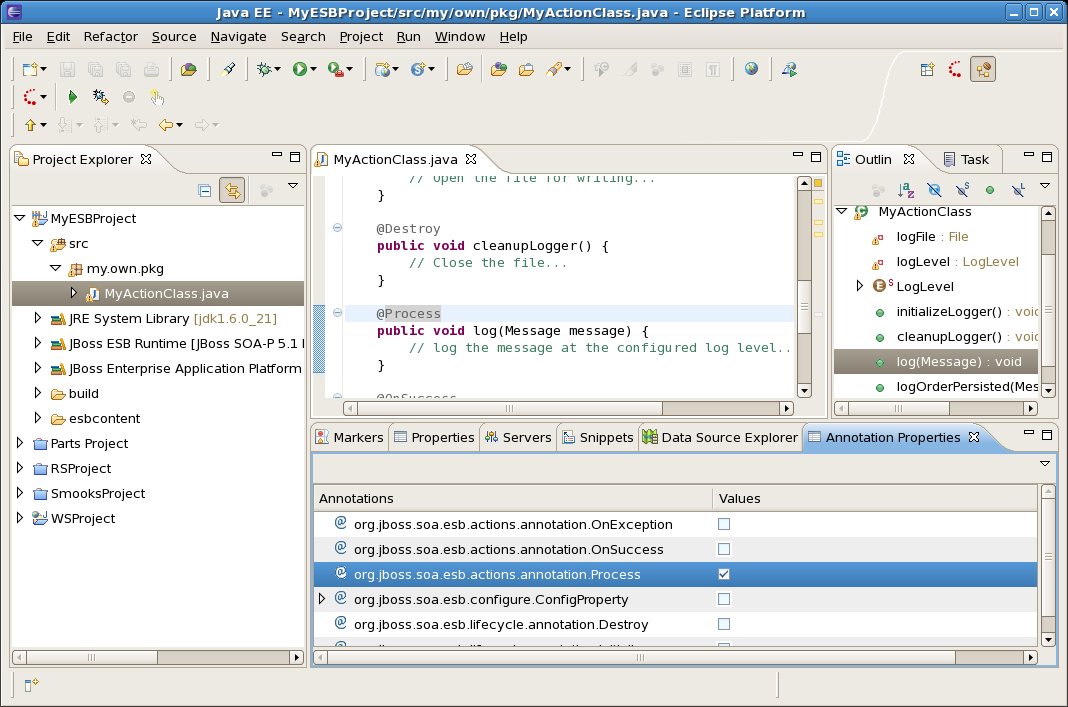
Now, with your PrintMessage class open and the Annotation Properties view open and filtered for ESB annotations, select the "information" class variable. In the Annotations list, you should see org.jboss.soa.esb.configure.ConfigProperty appear, as in the following image:

InformationVariableAnnotation.jpg

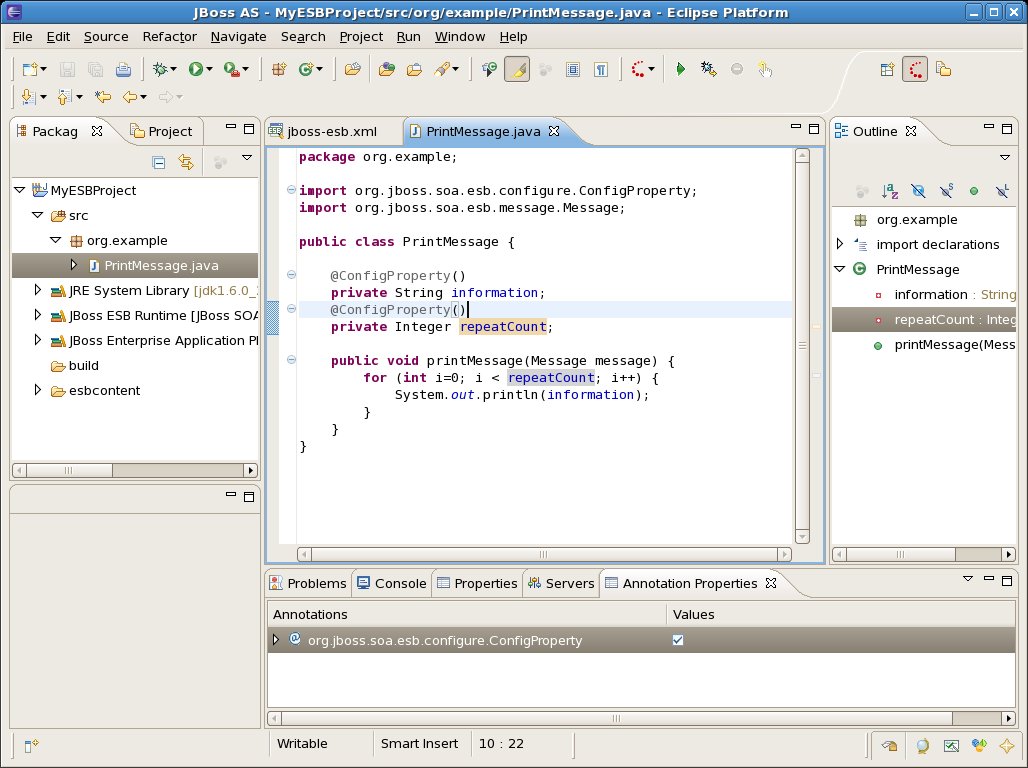
If you click the "Values" checkbox beside the ConfigProperty annotation, you'll see @ConfigProperty() appear above the variable. Do it again for the repeatCount variable as well.

repeatCountVariableAnnotation.jpg

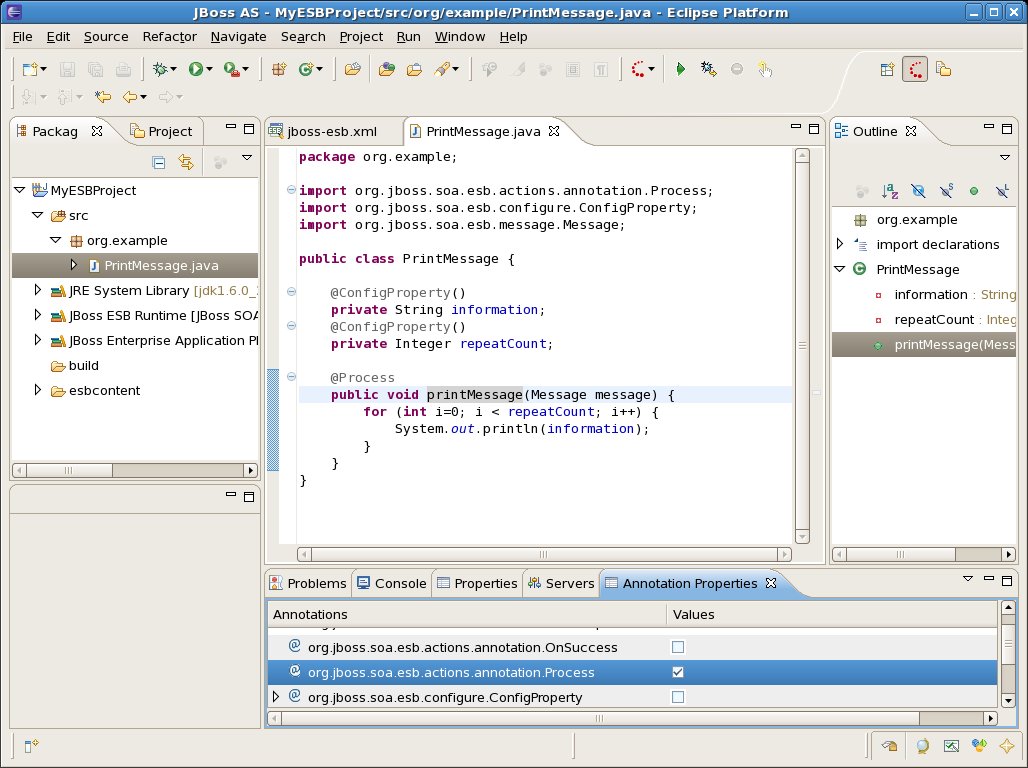
The last step is to click on the method line for printMessage(Message message) and check the @Process annotation box.

printMessageAnnotation.jpg

And that's it for this example. You'll notice if you look closely at the @ConfigProperty annotation in the Annotation Properties view that you can expand it and set different properties on the annotation as well. So there is room for further configuration there.


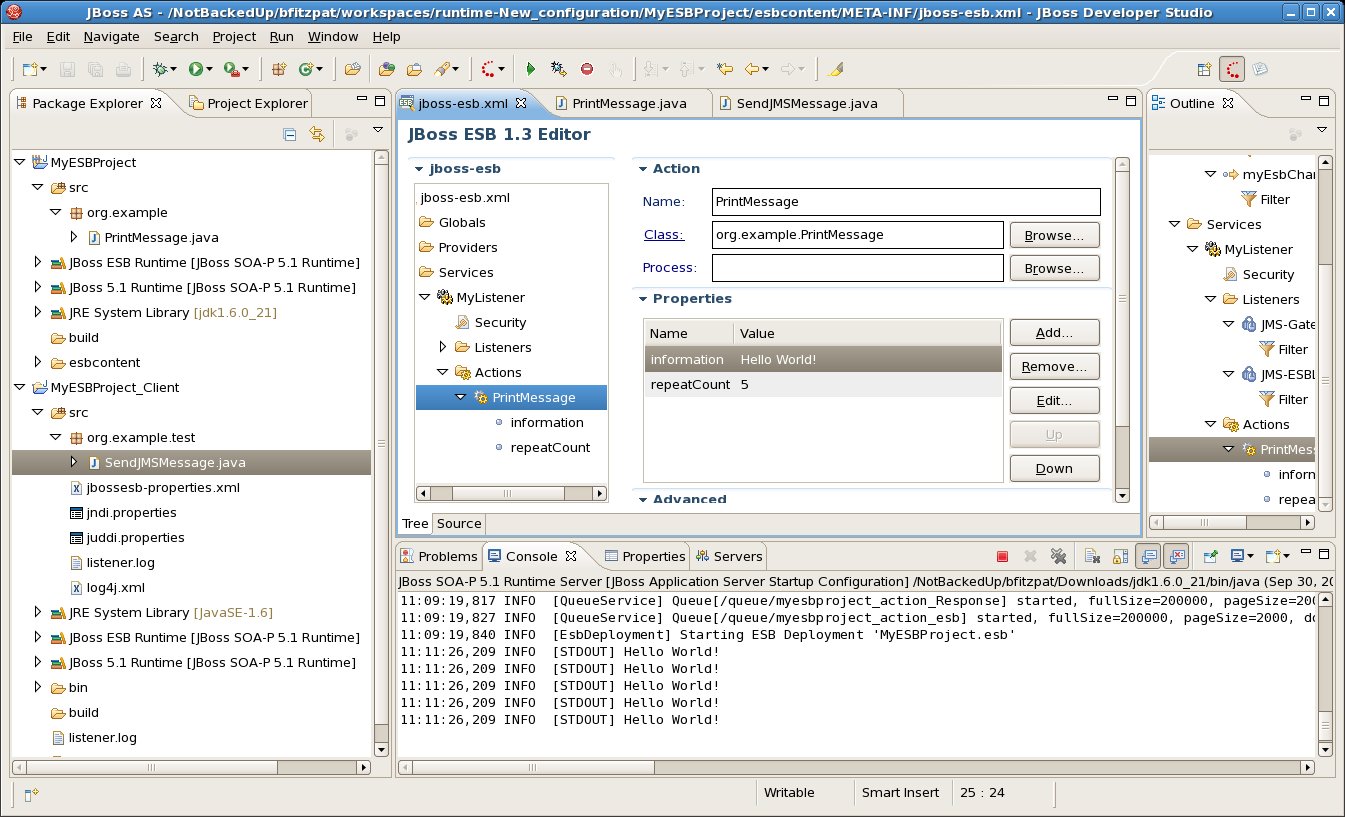
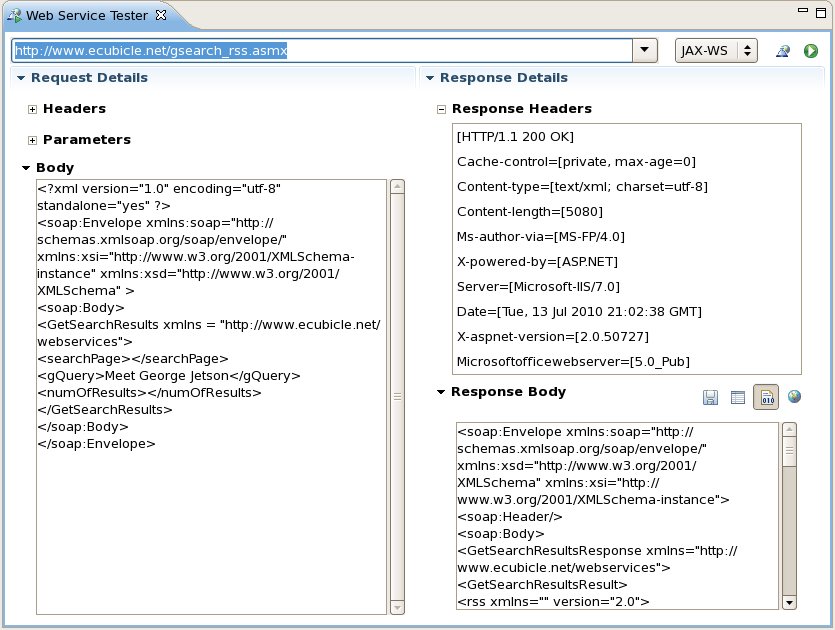
Once you configure your action in an ESB configuration file and deploy it, you can test it. In this case, I'm using a simple JMS queue to send a message to the service to trigger it. The action gets the configuration from the properties we set in the jboss-esb.xml file, and we can see the output in the console:

esb_config_and_run.jpg

So starting with the JBoss Tools 3.2 Beta you'll have some new tools in the ESB toolbox for custom actions!

While looking into some options on how to make the use of annotations simpler for users, I ran across the Annotation Properties view, which is in Helios in the JAX-WS->Annotation Properties view category when you're trying to open a view (Window->Show View->Other).


If you haven't seen this view before (and I know I hadn't), it offers a way to register annotation classes in a common place to allow you to add/remove/edit annotations in a class. By default in the Helios JEE package, it comes with JAXB and JAX-WS annotations already set up. It's a little clunky in spots, but I think it offers some interesting options as far as functionality goes.


For example, to create a new JAX-WS annotated class, you can start with your favorite POJO and annotate it pretty quickly:

Annotation_Properties_View_For_Blog.jpg

The view also offers the ability to filter the available annotations so you're not simply overwhelmed. To get to the Filters dialog, use the View menu and select Filters...

annotation_properties_view_filters_dialog.jpg

This is a little clunky as far as an interface goes. You can only open one instance of the view at a time and can't easily switch between annotation types. But it's a start anyway.


So with this in mind, I asked in the WTP newsgroup about how to go about extending it. Shane Clarke was nice enough to provide some tips...


The two extension points associated with the Annotation Properties view are located in the org.eclipse.jst.ws.annotations.core plug-in. The main two are the the org.eclipse.jst.ws.annotations.core.annotationCategory and org.eclipse.jst.ws.annotations.core.annotationDefinition extension points. Basically you just define a category (which shows up in the Filters dialog) and then define one or more associated annotation classes.


The only trick is making sure that the annotations are on the plug-in classpath and then adding the line "Eclipse-RegisterBuddy: org.eclipse.jst.ws.annotations.core" to your MANIFEST.MF.


So as an example, we'll just create a new category:


   <extension
         point="org.eclipse.jst.ws.annotations.core.annotationCategory">
      <category
            id="org.my.annotation.category"
            name="My Category Name">
      </category>
   </extension>


And then we'll define a new annotation for it:


   <extension
         point="org.eclipse.jst.ws.annotations.core.annotationDefinition">
      <annotation
            category="org.my.annotation.category"
            class="some.annotation.class.MyAnnotation"
            name="MyAnnotation">
      </annotation>
   </extension>


For examples of how they implemented the JAX-WS and JAXB annotations, check out org.eclipse.jst.ws.jaxws.core and org.eclipse.jst.ws.jaxb.core.


Pretty easy. I was able to define annotations for some new functionality in our JBoss ESB product that allows you to annotate a class instead of extending a particular interface or extending an existing class.


annotation_properties_view_esb_blog.jpg


I obviously think that the Annotation Properties view could be used for more than just Web Service class annotations.


But it needs a bit of work... For example, it would be nice if you could create a saved setting like a working set and made more visible - perhaps in the toolbar area at the top of the view. And it would be great if you could create multiple instances and associate a particular view instance with an editor, similar to how the Project Explorer can be linked to the editors and show which file is being worked on.


And I'm not quite sure how to use all of the functionality - like those other two extension points - or some of the settings on the annotationDefinition extension.


That said, I think it's a great start and it would be awesome to have a consistent way to annotate Java classes. I'm not sure that this is really a WTP-specific view and think it would make more sense in the more general Java tools category, but that's just me.


Big thanks to Shane for the pointers and I'm looking forward to seeing how this functionality improves in future releases!


--Fitz

Yes, I'm back again... And this time, it's a bit of a beautification process we've put the Web Service Tester through...


We did some spring (well, summer now) cleaning to wipe away the ugly gray backgrounds and dreary boxes. In their place, we have the gleaming white controls and clean lines available using the Eclipse Forms Toolkit.


Here's an example after invoking a JAX-WS service.

ws_tester_forms_toolkit_JAX-WS_071310.jpg

You'll notice we've pared down a few things.


  1. We got rid of the Action URL, since usually you won't need that if you're testing from a WSDL (which is one of our two primary use cases).
  2. We combined the two combo boxes into one - so if you're doing a JAX-WS invocation, you select "JAX-WS" in the list and if you're doing a JAX-RS call, you specify the operation - GET, POST, PUT, and DELETE.
  3. Instead of big textual buttons, we went with smaller toolbar-style buttons with icons and tooltips. The two in the top right are for selecting a WSDL and invoking the service. The four in the Response Body section are: Save to File, Open in Editor (XML or Text), Show Raw Text, and Show in Web Browser. The last is handy if your web service (specifically some RESTful services) return formatted HTML.
  4. And instead of tabs, we went with collapsible sections.
  5. Like before, we have a resizable sash between the Request and Response sections of the view. However, I'm debating adding another sash on the right side between the Request Headers and Request Body areas to aid in resizing that a bit more.
  6. We got rid of the connection to the TCP/IP Monitor simply because it was redundant. If you have a call for that functionality, we can look at adding it back in, but we thought it was a bit of overkill. at this point.


Here's an example after executing a JAX-RS service's GET call with the response body opened in an editor above it:

ws_tester_forms_toolkit_JAX-RS_071310.jpg

So all in all, I'm quite pleased with the results of this "facelift". It should start appearing in builds for the JBoss Tools 3.2 M2 milestone soon, so let me know what you think when you play with it.


Thanks!

Now that the WS Tester is getting more stable and feature complete, I wanted to try it against a RESTeasy web service (JAX-RS) deployed against one of our own runtimes. I simply used the steps we'd defined earlier for using the RESTeasy project example on this wiki page.


To do this yourself, follow these steps:

  1. Grab a recent build of JBoss Tools 3.2 (go [http://download.jboss.org/jbosstools/builds/nightly/ and use the latest trunk build). Install it into an Eclipse 3.6 (Helios) instance.

  2. Make sure you have an EAP 5 or SOA-P 5 runtime ready with RESTeasy installed.

  3. Fire up your Eclipse workbench and follow the steps here to get your RESTful web service project into your workbench (steps 1 through 10).

  4. Get a bit familiar with the WS Tester by checking out this post and this post.

  5. Open the WS Tester view by selecting Window->Show View->Other... Drill down until you find "JBoss Tools Web Services" and select the Web Service Tester.

  6. To post a new customer to the service database:

    • Select JAX-RS as your Web Service Type.

    • Switch the HTTP Method to "POST".

    • Type in your Service URL: http://localhost:8080/simple/rest-services/customers.

    • Put in your sample XML in the Request Body tab:

      <customer>
      <first-name>Bill</first-name>
      <last-name>Burke</last-name>
      <street>256 Red Hat Lane</street>
      <city>Boston</city>
      <state>MA</state><zip>02115</zip>
      <country>USA</country>
      </customer>
    • On the Request Header tab, add "content-type=application/xml" as the lone header.

    • Click the Invoke button.

    • You won't see anything in the Response Body tab to the right, but if you go to the Response Header, you should see "[HTTP/1.1 201 Created]" as the top line in the list. You should also see the Location (http://localhost:8080/simple/rest-services/customers/# where # is the record number for the entry).

  7. To retrieve a record from the service:     

    • Change the HTTP Method to "GET".

    • Change the Service URL to the Location value you saw in step 6 (http://localhost:8080/simple/rest-services/customers/1)

    • Click the Invoke button.
      rest_get_1.jpg

    • This time you should see the XML record in the Response Body tab and [HTTP/1.1 200 OK] as the first Response Header.
      rest_get_1_headers.jpg

  8. To update a record from the service:

    • Change the HTTP Method to "PUT".

    • Leave the URL the same (for the record you want to update).

    • Provide the updated XML for the record:

      <customer>
      <first-name>Gary</first-name>
      <last-name>Lamperillo</last-name>
      <street>123 Red Hat Court</street>
      <city>Venice</city>
      <state>CA</state>
      <zip>90291</zip>
      <country>USA</country>
      </customer>
    • Click the Invoke button.

    • Like when you POSTed before, you won't see anything in the Response Body, but you should see [HTTP/1.1 204 No Content] as the first item in the Response Header list.

    • To verify that the data went through correctly, we can do another GET - simply switch the HTTP Method to "GET" and click Invoke again.
      rest_get_2.jpg

    • Now we should see the updated data appear in the Response Body and [HTTP/1.1 200 OK] as the first item in the Response Header list.

And that's it! Pretty easy. Didn't even have to leave Eclipse to test!

Hi again...


I've been working on the JBoss Tools Web Service Tester and have just recently added the ability to select a WSDL file to populate the endpoint/action URLs and generate a Sample SOAP message when testing JAX-WS services. I'm still working on figuring out how to connect to a UDDI v3 registry to browse and select an operation from a published service in that context, but in the meantime you have a way to test your WSDL-based web services a bit easier...


Before I provide an example, I want to bring up a great resource for publicly-accessible web services from around the world - XMethods.net. If you haven't checked it out, it provides some great services that you can use to test tools like the WS Tester. A few that I found that are very useful for testing are:


So let's start with the Google Search Results one, which has a WSDL at http://www.ecubicle.net/gsearch_rss.asmx?WSDL.


If we look at the WS Tester, it has a new button - "Get from WSDL..."...

ws_tester_get_from_wsdl_060410.jpg

So I click on the "Get from WSDL..." button and see the "Select WSDL" dialog:

ws_tester_select_wsdl_dialog_060410.jpg

In the "WSDL URI:" field, I paste my WSDL URL in and it populates the three fields - Service, Port, and Operation. If there is more than one SOAP port available (such as SOAP and SOAP12), you can select it in the list and the operation list will change accordingly. In this case, there's just one operation available, but you have a vertical scroll bar on the right of the list to pick and choose.

ws_tester_select_wsdl_dialog_google_search_060410.jpg

When I hit OK, it does a number of things with the WSDL. It searches through the WSDL for the endpoint and action URLs, but more importantly it will try and generate a valid sample of the SOAP Request message. Even if the WSDL has multiple imports and/or imports schemas, it should (knock on wood) generate even complex messages fairly well. (If it doesn't, please let me know by putting in a JIRA.)


So in this case, it comes back populating the WS Tester with these values:

ws_tester_select_wsdl_dialog_google_search2_060410.jpg

If I change the values a bit...

  • searchPage becomes an empty value (delete the "?")
  • gQuery becomes "JBoss Web Services"
  • numOfResults becomes an empty value (delete the "?")


And hit Invoke...

ws_tester_select_wsdl_dialog_google_search3_060410.jpg

If I copy the response into an XML file and clean it up a bit, it looks pretty good:

ws_tester_select_wsdl_dialog_google_search4_060410.jpg

So if you look at a web service with multiple operations like the CDYNE Weather service (WSDL at http://ws.cdyne.com/WeatherWS/Weather.asmx?wsdl), you have more options in the operation list:

ws_tester_select_wsdl_dialog_weather_060410.jpg

And I was able to get the forecast for my city:

ws_tester_select_wsdl_dialog_weather2_060410.jpg

So if you have a WSDL file or a URL to a WSDL file, you should be able to use the WS Tester to test it now.


Next step is to get some sort of facility into the mix so you can browse a UDDI repository for the service.


This is checked into the JBoss Tools trunk now, so you should be able to play with it. Let me know what you think!


--Fitz

bfitzpat

Testing Web Services...

Posted by bfitzpat May 26, 2010

Hey there...


In the Eclipse world as I've learned more about web services, I've found it interesting to see the areas that have needed some work. For example, though you have a TCP/IP monitor in Eclipse WTP and a Web Services Explorer that allow you to test deployed web services in a UDDI v2 registry and keep track of the HTML headers as well as your request and response SOAP calls.


But it doesn't handle UDDI v3 registries and didn't seem to handle RESTful web services, so I started tinkering...


The first result of that tinkering is a new Web Service Tester (WST) that works with JAX-WS and JAX-RS web services and integrates with the TCP/IP monitor for more detailed call information. It's not the prettiest thing in the world, but it works.


Here's an example of how it works...


Let's say there's a public web service out "there" in the vast expanses of the web that you want to call. In this case, it's to do a search for relevant lines from Shakespeare's plays. And it's a JAX-WS service.


To invoke the service using the WST, you need to know three things at this point (and hopefully this will improve over time).


  1. The Endpoint URI. In this case it's: http://www.xmlme.com/WSShakespeare.asmx
  2. The Action URI. In this case it's: http://xmlme.com/WebServices/GetSpeech
  3. And the form the SOAP should take...


Sample SOAP in this case looks like:


<?xml version="1.0" encoding="utf-8"?>
<soap:Envelope xmlns:xsi="http://www.w3.org/2001/XMLSchema-instance" xmlns:xsd="http://www.w3.org/2001/XMLSchema" xmlns:soap="http://schemas.xmlsoap.org/soap/envelope/">
  <soap:Body>
    <GetSpeech xmlns="http://xmlme.com/WebServices">
      <Request>slings and arrows
</Request>
    </GetSpeech>
  </soap:Body>
</soap:Envelope>


So we copy these bits into the WST...

wst_shakespeare_1.jpg

Hit the Invoke button and in the "Response Body" tab you can see the response that comes back from Shakespeare's Hamlet....

wst_shakespeare_2.jpg

You can open the entire response in the XML Editor from the popup menu. And if the response is a traditional SOAP envelope, you can open just the text from the operation "Result" in the XML Editor, which simplifies things and gets rid of the extraneous SOAP bits.


wst_shakespeare_4.jpg


And in the "Response Header" tab you can see the HTTP header information that came back from the WS invocation...

wst_shakespeare_3.jpg

Same rules apply for RESTful (JAX-RS) service invocation... In this case, we're invoking a public JAX-RS service to retrieve a list of postal data...

wst_rest_1.jpg

In addition, if you want more fine-grained TCP/IP monitoring, you can hook into the WTP TCP/IP Monitor view as well.


In this example, I've configured a monitor for the RESTful service we just invoked. That basically creates a proxy that the TCP/IP monitor listens to and captures the data from. Though you get the header info and can see the results in the tester itself, it's nice to see the time the invocation takes and hook into a more traditional monitoring tool.

wst_monitor_1.jpg


The next thing to do is hook up the tester so it can infer details from a WSDL file and possibly even browse a UDDI repository for details.


Let me know what you think! I'd be curious what features you'd like to see in this thing. The idea isn't that the tester competes with more fully featured tools like soapUI, but provides a quick tester inside JBoss Tools or JBDS to help out web service developers.


--Fitz

Filter Blog

By date:
By tag: