Skip navigation
2012

Dont get your fingers dirty, use the JBoss Tools for OpenShift

OpenShift is the PaaS offering from Red Hat. It gives you your personal application platform on demand. With OpenShift, there's no need to look for hosting and application stack. OpenShift provides you those within minutes, whenever you need them.

JBoss Tools for OpenShift offers a feature complete environment to work with OpenShift. From developing to deploying, JBoss Tools provides you a fully fledged environment for your project and aligns with the standard workflows within Eclipse. It allows Eclipse users to stick to their favorite IDE and deal with OpenShift within their developement environment. Especially the OpenShift server adapter mimics an Eclipse WTP compliant way of deploying to OpenShift and hides the complexity, that you'd otherwise had to handle when publishing bare metal (which is by using Git).


Get the tools, get started

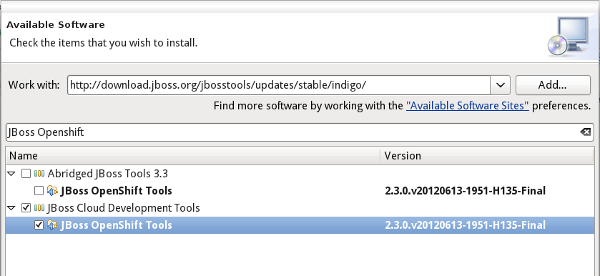
The release blog shows you extensively how to get JBoss Tools from our update site, from the Eclipse marketplace or even how to install the JBoss Developer Studio. If installing JBoss Tools, you'll have to make sure you choose at least the OpenShift bundles on our update site:


update-site.png


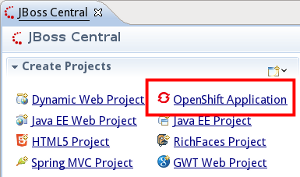
Once you have JBoss Tools installed, you'll spot our wizards either in JBoss Central or in the Eclipse Wizards:

central.png


All you need to get started quickly is offered within this wizard. It'll create your application platform, import a starter project and create a server adapter that you may use to publish to the PaaS.

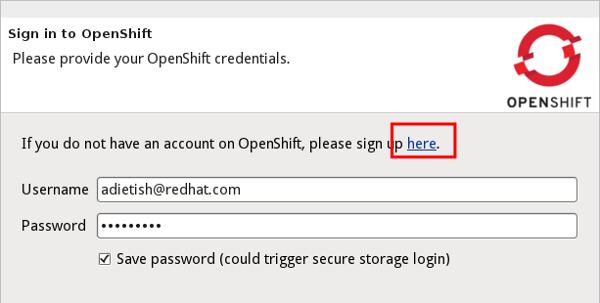
OpenShift of course requires you to have an account. If you have none yet, the wizard will drop you to the signup form by hitting the link that is displayed on the first wizard page.


signup.png


Once you have your account, you'll be ready to go, ready to get amazed by JBoss Tools and OpenShift.


A very basic workflow


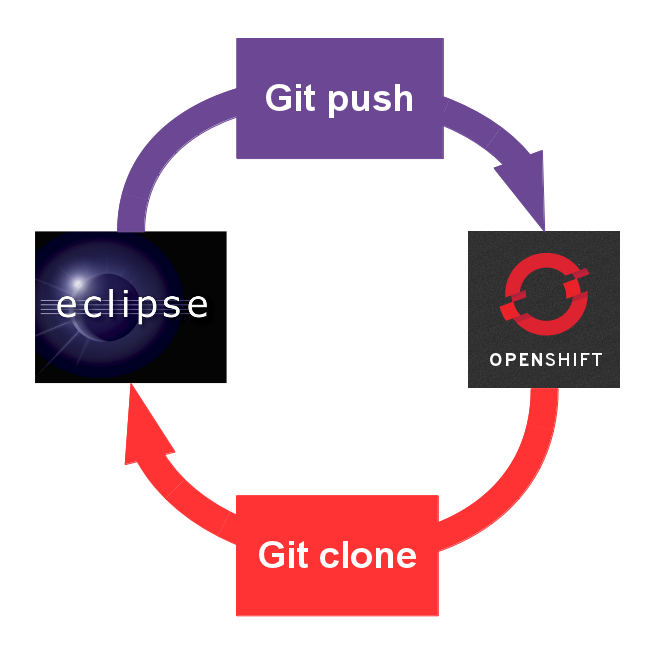
OpenShift is a PaaS, a Platform as a Service. As such it offers you your personal application stack and it does this on demand. A range of standards runtimes are offered to you whenever you need them. Working with the PaaS is as simple as importing a stub (the starter application) to your workspace, changing and publishing it again:


openshift-workflow.png


Create your application runtime

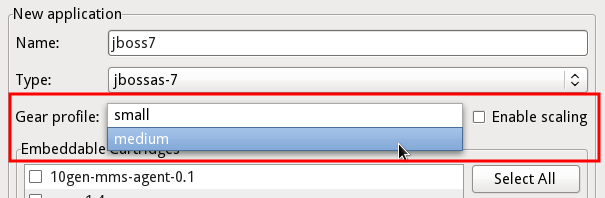
It all starts by creating your own application runtime. In the OpenShift Application wizard, set a name and choose the application (runtime) you need:


application.png


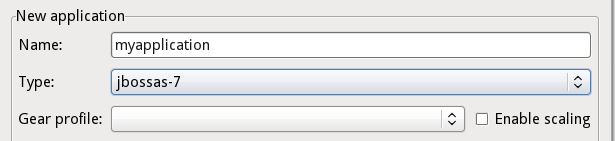
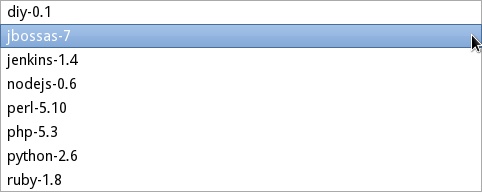
OpenShift offers a wide range of standard runtimes. You may to choose among php, ruby, phython, nodejs etc. Java developers will be most amazed to see that OpenShift offers a fully Java EE 6 compliant application server: the blazing fast JBoss AS 7.1.


application-types.png


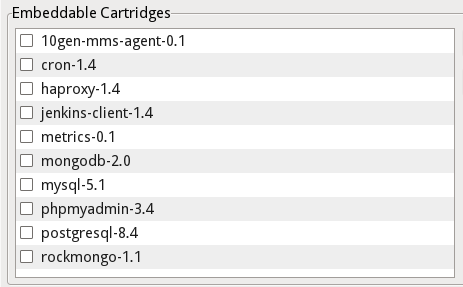
You may also add different extensions to your platform ranging from SQL- (like MySQL or Postgres) or NoSQL-databases (like MongoDB) up to your very own CI server (jenkins).


application-cartridges.png


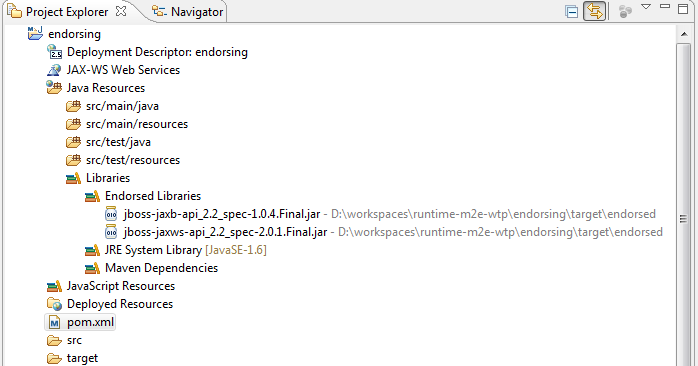
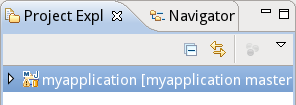
Once you made up your choices and finish the wizard, it'll create your OpenShift application, wait for it to become reachable and import it's initial content - a starter application - to your Eclipse workspace. Looking into your Project Explorer or Navigator, you'll spot the new project that the wizard imported. It has the very same name as the OpenShift application. In case of a JBoss AS7 runtime, the starter app is a maven artifact and the project we import to your workspace will have the name that's configured for the maven artifact.


imported-project.png


Push to build and deploy


The new project in your Eclipse workspace is where you apply your changes. It is shared with a git repository on your local machine. This repository is a clone of the git repository within your OpenShift application.


application-git-repository.png


Deploying this project to the PaaS is as simple as pushing the local repository to it's origin, the OpenShift git repository. OpenShift will then build and deploy your application to the application runtime.

In case of a Java application, OpenShift relies on a maven based build, that is triggered with each git push:


application-build.png


Server Adapter to the rescue

When dealing with git, you have to deal with a brilliant but rather complex code versioning system. Even if you're familiar with git, there's still room to reduce the number of manipulations when publishing.

Eclipse WTP server adapters historically allow you to interact with your server. This would typically be some local or remote server you'd have file- or SSH-based access to. We adapted this handy concept and implemented a variant that would work with OpenShift. This server adapter hides the complexity of dealing with git and allows 1-click publishing to the cloud.


The OpenShift Application wizard sets the adapter up when you create your application and import the starter project to your workspace.  Our Server adapter is bound to the OpenShift project in your workspace and it'll do the git operations for you. 


server-adapter.png


When publishing it will deploy the changes in your OpenShift project to the PaaS. It'll hide all the complexity that is inherent to git. It will commit your changes to your local clone and push them to the git repository of your OpenShift application (the origin).


server-adapter-publish.png


Deploy my very own project!


Importing the starter application to your workspace is the most simple usecase we provide. I bet most users already have a project that they'd want to deploy though. We of course also provide this ability in our OpenShift Application wizard.


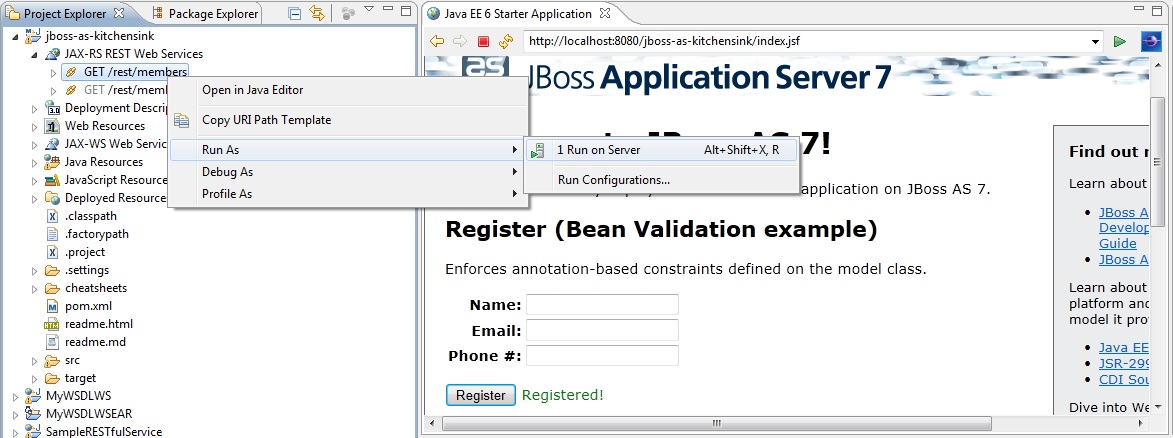
Our little screencast shows you the steps when starting with your very own project. It uses the kitchensink example to demonstrate how this would occourr. You may get it on github:


Kitchensink example project:


https://github.com/adietish/kitchensink.git


Have your project ready

You first have to get your project to Eclipse. We only support git-shared or non-shared project though. A typical usecase would be to have your project on github or in any other git repository.You then simply clone it's repository to your local machine (using EGit or the command line) and import the project within it to your Eclipse workspace.


JBoss Tools, configure my project

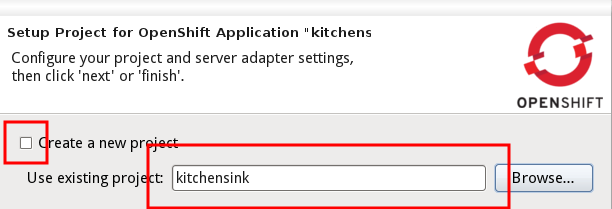
You then create your OpenShift application in our wizard, provide the name, type and eventually additional cartridges. You then switch to the second wizard page and tell the wizard that you dont want to create a new project in your workspace. You tell it to use your project instead.


use-existing.png


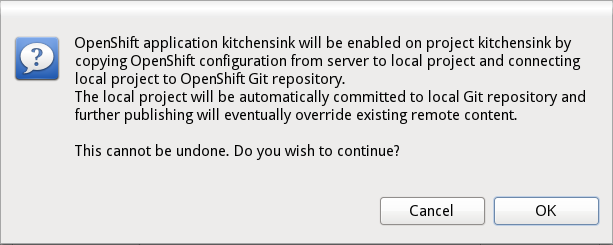
The wizard will warn you about upcoming changes to your project and ask you to confirm:


merged-cannotundo.png

Oh my project, how you changed!

We then add OpenShift specific configurations to your project. These changes unfortunately cannot be undone. You'd have to provide your own means (ex. a separate branch) if you dont want these additions in your developement code The changes we apply are the following:


All changes:


  • eventually create a git repository and commit your project to it
  • add a .openshift folder with openshift specific hooks
  • add a deployments folder
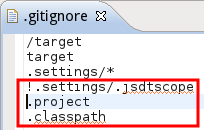
  • add the Eclipse specific files (.project, .classpath etc.) to the .gitignore
  • add openshift-profile to the pom
  • add OpenShift git repo as remote to your local git repo

merged-configuration.png


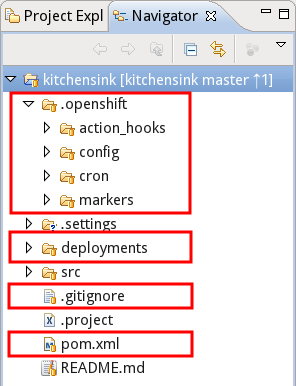
Since publishing to OpenShift is git pushing to it, we'll make sure your project is shared to a git repo. We therefore eventually create a git repository for your project if there's none yet and add your project to it.

We add the .openshift folder which may contain OpenShift specific configurations and tweaks (like custom build-scripts, markers, cron entries etc.). We also create a deployments folder which OpenShift will use to build to. You may also add additional artifacts to it.

We then tweak .gitignore and add the Eclipse specific files so that they dont make it to the git repo by default.


merged-configuration-gitignore.png


For maven-based java projects we tweak the pom and add an openshift profile to it.


openshift-profile.png


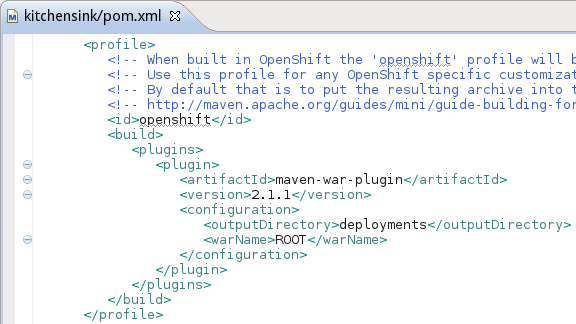
The openshift profile is what the PaaS is using when building your project on the PaaS. The profile we add is telling maven to create the war in the deployments folder. The deployments folder is where JBoss AS7 is expecting and picking new deployables from. Adding the profile makes sure that your project is deployed when it is built.


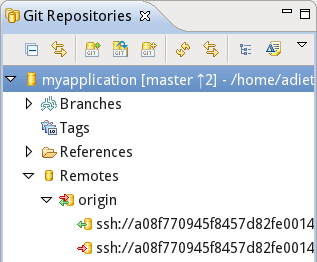
We'll also then add the OpenShift application git repo as remote to the git repo of your local project. This will allow you to push your project to OpenShift without knowing about the exact url you'll have to push to. All you have to know is what name the OpenShift repo is stored at.


merged-configuration-remotes.png


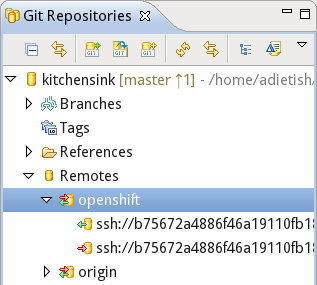
We're storing the OpenShift application git url as "openshift" in the remotes known to your local repo. You may of course tell the wizard to use any name you like:


merged-configuration-remotes-configure.png


Push me up, Scotty


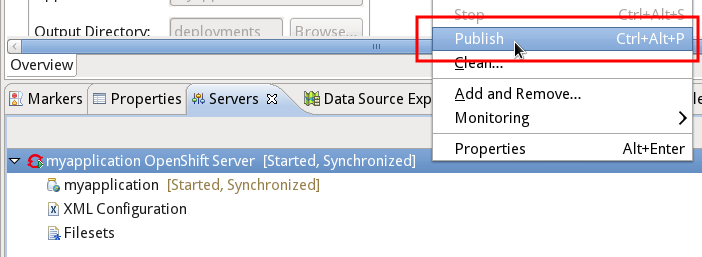
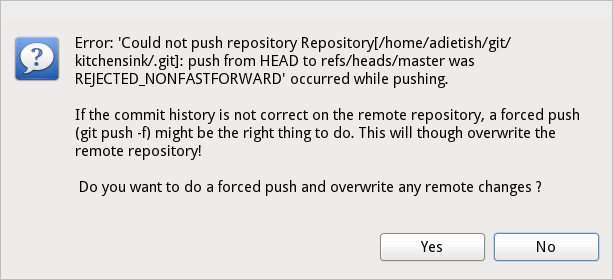
Once we configured your project, we commit the changes to your local git repo (either your project was already shared with a git repo or we created one for you). To now deploy your project to OpenShift, you'd have to go to the Servers view, choose the OpenShift server adapter (that we created for you) and tell it to publish. The server adapter will then detect that the local project is ahead of the remote one and that publishing would only be possible when overriding the remote starter application. It'll ask you to confirm this step:


merged-pushforce.png

Once the publishing is done, you'll have your project running on OpenShift!


Multi-module maven projects


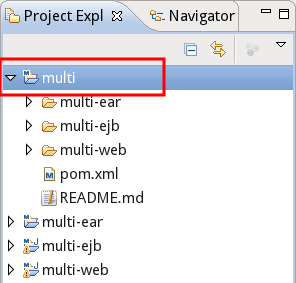
Our OpenShift Application wizard also supports multi-module maven projects. You'd simply have to make sure all modules are nested within a parent project and choose the parent project as existing project (multi vs. multi-web, multi-ejb, multi-ejb in my screenshot) in the wizard:


multi-ear.png


multi-ear-wizard.png


Note:


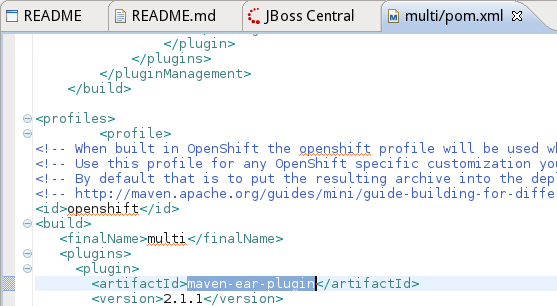
in case your multi-module maven project is an ear, there are still slight limitations in our tooling for the moment. You may easily work around them though. You'd have to alter the maven profile in the pom of your parent-projec and replace the maven-war-plugin by the maven-ear-plugin:


maven-ear-plugin.png


You may read about it in all details and track our progress on it in JBIDE-12252


My maven project is not in the git repo root

When deploying an existing project to OpenShift, you'd have to tell the wizard in JBoss Tools about your project. Your project would have to comply to a basic layout though. We expect the pom in the root of your git repository. If this is not the case, then you'd have to take an alternative approach when publishing. Publishing then gets as easy as drag and dropping your project to the adapter.


In our screencast, we show you how to proceed. We use the the ticket-monster example project which is available at github:


Ticket-monster example project:


https://github.com/jboss-jdf/ticket-monster


Have your project ready

The first thing to do is to import your application to your Eclipse workspace. The only requirement we have is that your project shall be Eclipse WTP compliant. It may be a Dynamic Web or a Maven project. Maven projects are turned into Eclipse WTP projects if you have m2e-wtp installed when importing them (m2e-wtp bridges the gap between Eclipse WTP and maven, it turns any maven project into a WTP compliant project).

In the ticket-monster example, the maven project is nested into the demo folder:


draganddrop-nested.png


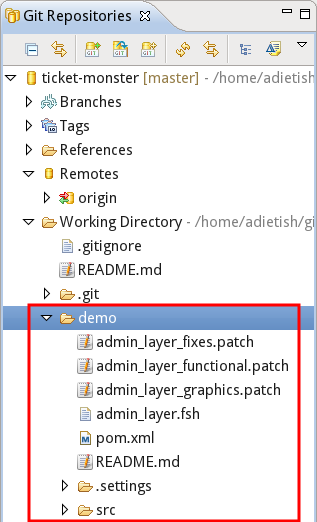
We import with the Eclipse Maven import wizard pointing it to the demo-folder:


draganddrop-import-maven.png


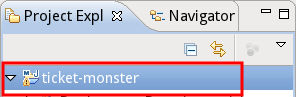
and get the demo-folder imported to our workspace:


draganddrop-imported.png

Create your OpenShift application

Once you have your project ready you'll go and create the OpenShift application that will host your application. Launch the OpenShit Application wizard in JBoss Tools, tell it to create a jbossas-7 application and let it import the starter app, as shown in the first paragraphs of this blog.


OpenShift, here I come

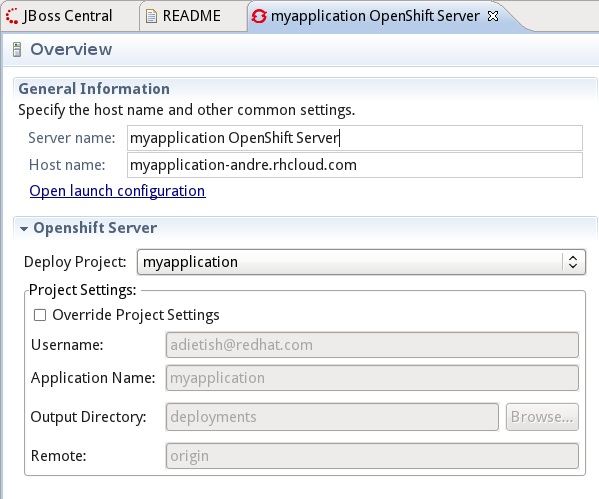
The OpenShift Application wizard imports the starter application to your workspace and creates a server adapter for it:


draganddrop-starter.png

draganddrop-adapter.png


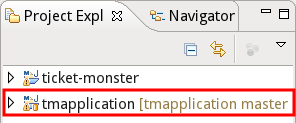
You are then ready to publish your project. Simply drag and drop it to the OpenShift server adapter in the Servers view. Your project will then get published to OpenShift.

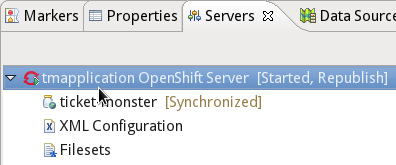
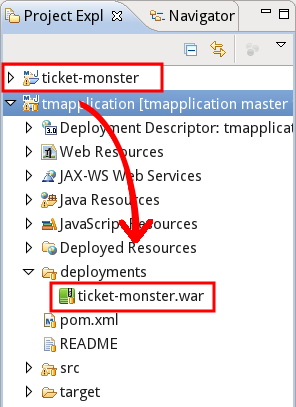
Once  the publishing is done, you'll notice that the server adapter now has 2 modules: the starter application and your project:


draganddrop-new-module.png

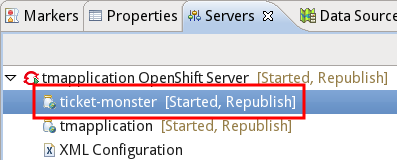
The server adapter actually compressed your project to a war and dropped it to the deployments folder within the starter application:


draganddrop-war.png


It then committed this addition and pushed the starter application to OpenShift. The JBoss AS7 then noticed the new war and deployed it. Simple as that.


But hey, my project does not work!


Commit log

If your deployment fails JBoss Tools offers some goodies that allow you deeper insights into what's happening on the PaaS.

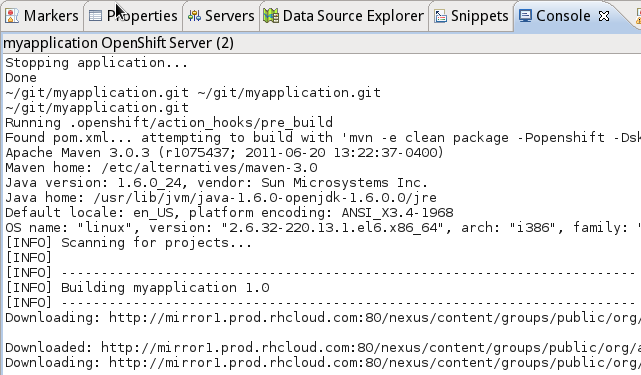
Pushing to the PaaS triggers a build and the deployment of your project. Both operations are logged and make it to the commit log. When the OpenShift server adapter finished publishing (git pushing), it'll show you the console with the commit log. This will show you in a first step if the push, the build and the deployment worked fine:


application-build.png


Inspect your server logs

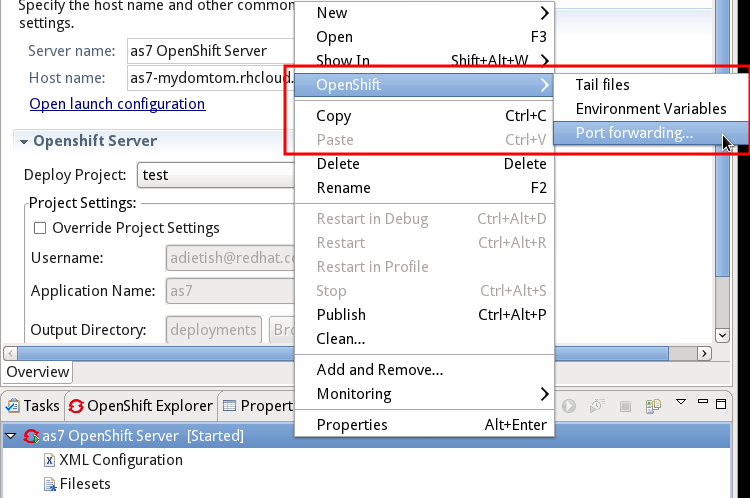
We also offer you simple access to your server logs. You'll find an appropriate entry in the context menu of your OpenShift server adapter. Simply pick "OpenShift->Tail files"


tail-files.png


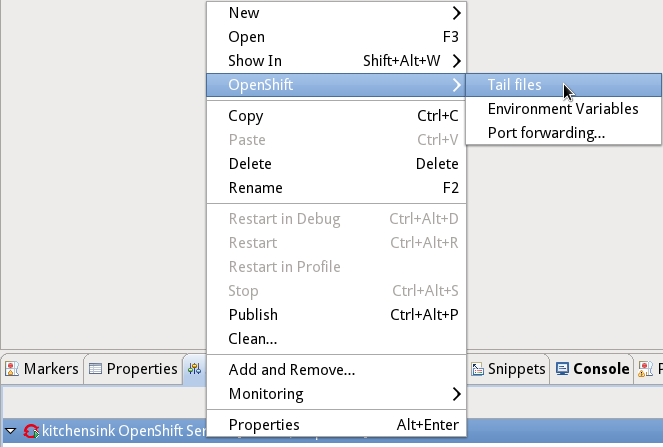
It allows you to inspect the logs of your server within the Eclipse console:


tail-files-console.png

Look into the jboss as7 management console

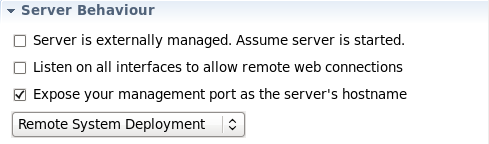
JBoss AS7 has a management console that's may be reached on port 9990. OpenShift only allows access to a limited set of ports from the outer world. Nevertheless OpenShift allows you to forward ports to your local machine. Using port-forwarding allows you to access the management console that's running on the JBoss A7 that is running on OpenShift.


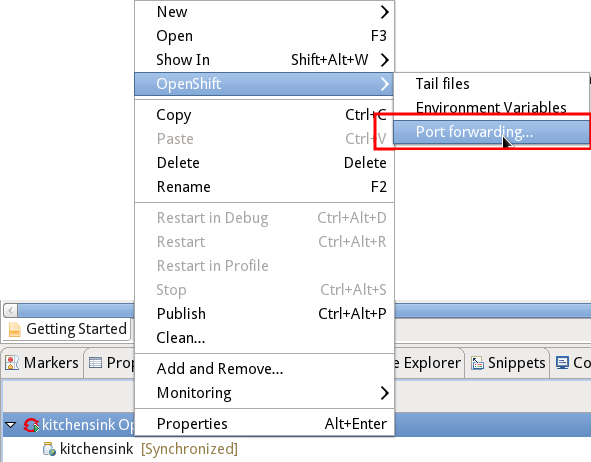
Go to the OpenShift server adapter and pick "OpenShift->Port Forwaring".


port-forwarding.png


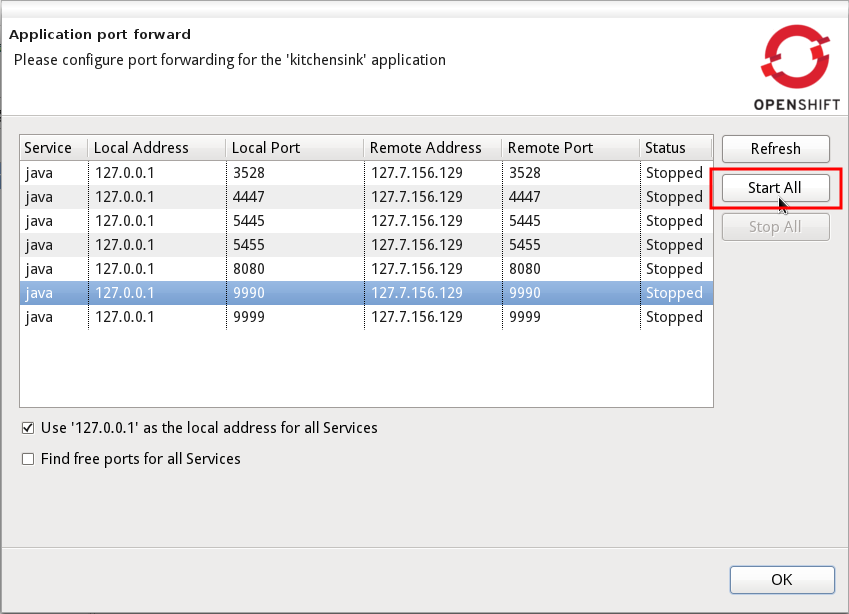
The upcoming dialog will list you all ports that may be forwarded to your local machine. Simpley hit "Start All" and they'll get available at localhost on your machine.


port-forwarding-dialog.png


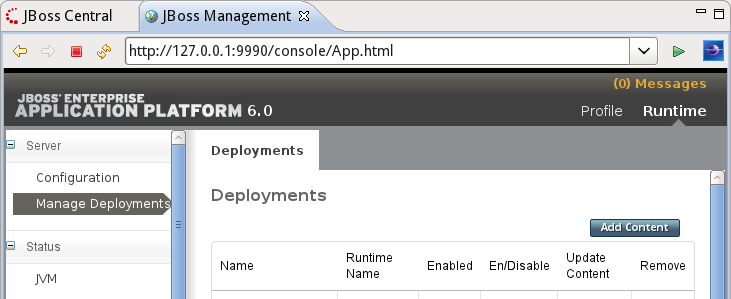
You may then access the management console of your JBoss AS7 in a browser on your local machine.


management-console.png


Debug your application with the Eclipse Debugger


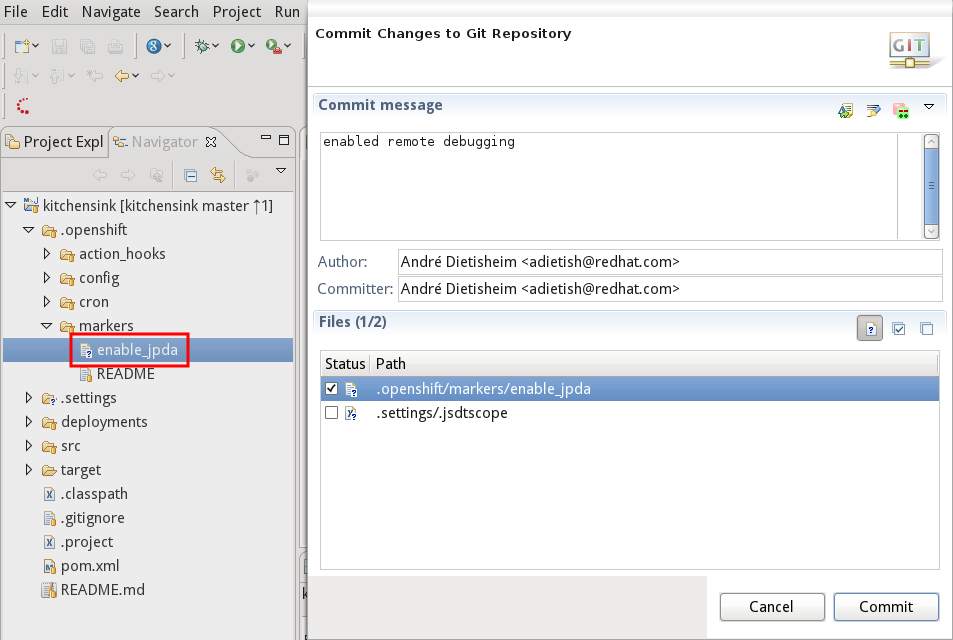
JBoss Tools even allows you to debug your OpenShift Application in the Eclipse debugger. You'll first have to enable debugging on your OpenShift application. You'll do this by adding a marker in the .openshift folder of your project. Create an empty file enable_pda in .openshift/markers. Commit it and tell the server adapter to publish your project.


enable-jpda.png


Now that debugging is enabled, the debugging port of the remote JVM will get available and visible in your forwarded ports. Pick "OpenShift -> Port Forwarding" in the context menu of your server adapter and double check that the port 8787 is available. You'd eventually have to refresh the list of available port in case you already had it running before. Now Start All to get all ports (and the debugging port) forwarded to your local machine.


enable-debugging-port.png

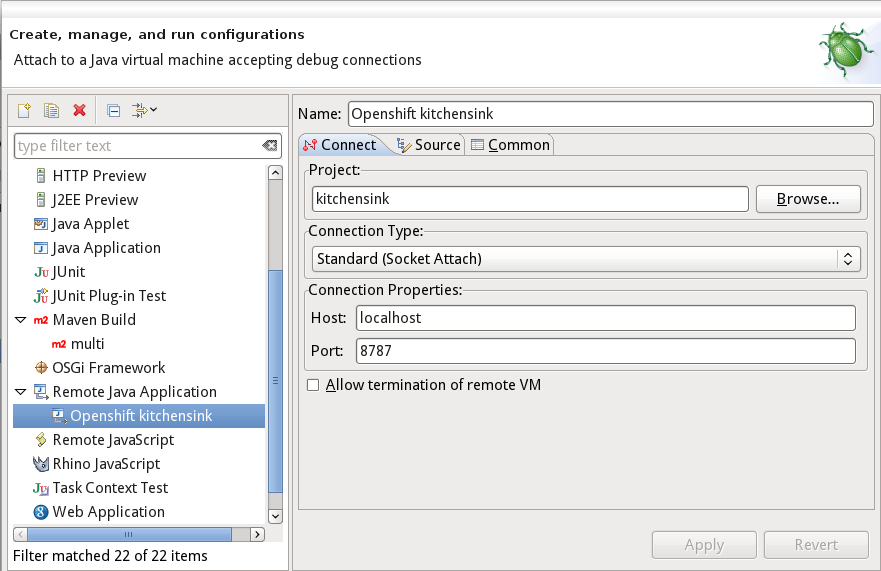
You're almost there. The last step is to tell Eclipse to connect it's debugger to your forwarded port. Go to the Debug Configurations in Eclipse and create a new configuration for a Remote Java Application. As soon as you hit Debug, the execution of your application on OpenShift will halt at the breakpoints you set in your Eclipse.


enable-debugging-debugconfig.png

I'm extremely proud to be able to announce that both JBoss Tools 3.3 and Developer Studio 5.0 final releases are now available.

jbosstolsdevstudio.png

Final GA

Developer Studio: [Download] | Tools: [Download] [Update Site] | [What's New] [Forums] [JIRA] [Twitter]


JBoss Tools is a set of plugins for Eclipse that complements, enhances and goes beyond the support that exists for JBoss and related technologies in the default Eclipse distribution.


JBoss Developer Studio is a fully bundled Eclipse distribution which not only includes the majority of JBoss Tools but also all its needed dependencies and 3rd party plugins allowing for an easy one-click and no-fuss installation.


If you are into doing your own bleeding edge eclipse plugin assembly, JBoss Tools is for you; if you are more into having something that "Just Works" then JBoss Developer Studio is the way to go.


Installation


JBoss Developer Studio comes with everything pre-bundled in its installer. Simply download it and run it like this:


java -jar jbdevstudio-<installername>.jar


Note: if you are on Windows or Mac OSX 64-bit we recommend you ensure to select the 32-bit option in the multi-platform installer to get Visual Page editor working and use much less memory.


JBoss Tools requires a bit more:


This release requires at least Eclipse 3.7.2 but we recommend using the Eclipse 3.7.2 JEE Bundle since then you get most of the dependencies preinstalled.


Once you have installed Eclipse, you either find us on Eclipse Marketplace under "JBoss Tools (Indigo)" or use our update site directly.


The update site URL to use from Help > Install New Software... is:

http://download.jboss.org/jbosstools/updates/stable/indigo/


Please note that the URL above is for the stable releases, if you use the development update site (http://download.jboss.org/jbosstools/updates/development/indigo/) that will work too. Only difference is that the development site will contain beta/CR releases too.


Note: SOA tooling for BPEL, Drools, Guvnor, jBPM, ESB, Modeshape, pi4soa, Savara, SwitchYard & Teiid are no longer included in the JBoss Tools release. They will become available separately later.


A Year of Features

The amount of features and new improvements in this final is awesome - here is a little overview:


Slim & Fast Universal Installer

The installer for JBoss Developer Studio is now a multiplatform installer. Allows you to just download one installer no matter what OS you are running. And the installer is smaller and faster to download and run than previous versions.


JBoss Central

We wanted to make it easy for new users to get started with JBoss technology and for existing users have a place to get more information and keep uptodate on what is happening in the JBoss Community. That place is called JBoss Central.


https://dl.dropbox.com/u/558690/devstudio5releaseimages/jbosscentral.png


Central shows up at startup (you can disable it if you want) but is also available with a quick click in the toolbar. Besides having blogs, news and documentation links it also serves as a way to start one of the six project wizards

which help you get started with JBoss technology such as CDI, Richfaces, Errai/GWT, Spring on AS etc.


Central also has a second tab called "Software/Update" where you can easily install tested and verified plugins to work with JBoss Tools and within Developer Studio.


https://dl.dropbox.com/u/558690/devstudio5releaseimages/softwareupdate.png

New Server Adapters


We've extended our support for JBoss servers to include JBoss Enterprise Platform 6, JBoss AS 7.

We continue to also work with the previous versions of application servers making it possible to develop, run and debug both new and older applications.


https://dl.dropbox.com/u/558690/devstudio5releaseimages/serveradapters.png


There is also an OpenShift server adapter to integrate with Red Hat OpenShift PaaS, more on that later.


We also continue to have the Deploy Only server which allows you to use our incremental and flexible server adapter features together with any server that supports hot deployment.

Furthermore all of these server adapters support remote deployment via any filesystem protocols supported by Eclipse Remote System deployment such as SSH or FTP.


One of the new features in this area is that servers now no longer need to be started by the tools, if a server is already detected as running or you have enable "Server is externally managed" then

JBoss Tools server adapters will just connect to it and do its deployments as configured - allowing you to work with the tools in  many different environments.

Maven

One of the big new additions is the full support and integration of m2e for users of Maven projects. We did not just include m2e, we went ahead and improved on it and added better support for the frameworks and features of Maven we found to be useful.


We have a lot of Maven improvements.


  • Maven Profile Selection - dialog to quickly enable/disable profiles on your Maven projects ( especially useful to switch between Arquillian server profiles )
  • Endorsed Libraries Classpath Container - if your Maven project uses endorsed libraries we setup a matching classpath that gets priority over the JDK classpath.
  • Tons of framework configurators - we enable the matching tooling in eclipse if your Maven project uses one of the following frameworks:
    • Hibernate/JPA
    • JSF
    • CDI
    • JAX-RS
    • Seam
    • Portlets.
  • Configure repositories in settings.xml - "Configure Maven Repositories" allows you to easily add and remove repositories from your Maven settings.xml; available as a quickfix on missing dependencies error markers.
  • Materialize Library - Allows you to copy all the jars found in a Maven classpath container into a directory. Great if you have a Maven example but would rather use it with pure Eclipse or some other build system.
  • Automatic Source Lookup for Server runtimes based on Maven metadata - point Source lookup to your server directory with jars and it will locate the matching source based on maven metadata; can be enable to be automatically done for JBoss runtimes.


And then of course m2e-wtp, the feature that configures Eclipse Web Tools based of your pom.xml had a lot of features improved and added. The m2e-wtp also is moving to eclipse.org to be part of future Eclipse release trains.


Furthermore we've released m2e configurators to m2e marketplace to improve configuration of Annotation Processing, wro4j - javascript optimization and finally supporting projects that configure eclipse JDT as their compiler.


All in all, if you want to use Maven with Eclipse, JBoss Tools makes your life easier!

OpenShift

OpenShift also came around during the last year. OpenShift is a PaaS with a free offering that includes support for running applications written in Java, Ruby, Node.js, Python, PHP, Perl and more.


The great thing about OpenShift is that you can easily get up and running with just a webbrowser, git and SSH while using command line tools - very simple and powerful.

We wanted to bring this simplicity and power to the users of Eclipse and that is what our OpenShift Tooling does.


When you have an account at OpenShift you can easily browse, create and manipulate your OpenShift applications and cartridges. OpenShift supports PHP, Perl, Python, Node.js, Java and if that is not enough you can use the Do-It-Yourself cartridge. You can easily open a webbrowser showing your application, monitor remote log files, inspect environment setup and start Port Forwarding allowing for remote debugging and remote browsing of databases and Jenkins instances.


https://dl.dropbox.com/u/558690/devstudio5releaseimages/openshift.png


The OpenShift tools is all compatible with the command line tooling but also completely independent of it allowing you to start with the tools that fit your needs first and then mix and match as you see fit.


For the release we've create a "Getting started with OpenShift" video:


Forge

If you like Forge you will like JBoss Tools for its Forge Console which let you to use Forge in context of Eclipse and have them coexist and interact. The console will open and show the files/projects you edit/create in Forge and the console can also let Forge track the selection you have in Eclipse.


forgeconsole.png

Browser Simulator


BrowserSim can be started with one-click from the IDE, showing instantly the selected file or URL in a mobile browser simulator. The simulator has skins and layout dimensions for a range of pouplar mobile and tablet devices. You can rotate the device to see how your application looks and how it is reacting to such size and layout changes.


https://dl.dropbox.com/u/558690/devstudio5releaseimages/browsersim.png

Hibernate


Hibernate Tools now supports multiple versions of Hibernate - you can now use it together with Hibernate 3.3-3.5, 3.6 and 4.0/4.1.


https://dl.dropbox.com/u/558690/devstudio5releaseimages/hibernatemultiy.png

JAX-RS


If your application uses JAX-RS annotations there is now a node in the project explorer that allows you to easily navigate to your various Rest endpoints. The JAX-RS tooling will also validate your annotations (mismatched names etc.) and provides code completion.


http://docs.jboss.org/tools/whatsnew/ws/images/JAX-RS-WS-Tester_Run_As.jpg


The JAX-RS integration allow to easily "run" your endpoints by making sure the server is running and then opening the URL in the Webservice Tester for further investigation/testing.


And More...

Seam 2.3.x support, CDI tooling have great improvements, incl. support for DeltaSpike, the visual page editor is faster than ever, bugfixes, overall awesomeness and the list goes on.

You can see the full list of new and noteworthy on the New and Noteworthy page


Does it Juno ?

Since the first version of Eclipse Juno is arriving soon it is worth mentioning that JBoss Tools from its updatesite can be installed on top of Juno.

It is though not guaranteed everything works, we know that especially Hibernate Dali/JPT integration have issues since here the API has changed greatly.

But if you are a Juno early-adopter then do please try run JBoss Tools on it and if you find issues let us know in the forum or on JIRA.


Then we will use the input for the next revision of JBoss Tools which will start shortly.


Hope you like it, and remember:


Have fun,

Max

The release candidate of JBoss Tools and Developer Studio is now available - mainly with bugfixes but also a few nice improvements for AS 7, OpenShift and Maven integration.

jbosstolsdevstudio.png

CR1

Developer Studio: [Download] | Tools: [Download] [Update Site] | [What's New] [Forums] [JIRA] [Twitter]


JBoss Tools is a set of plugins for Eclipse that complements, enhances and goes beyond the support that exists for JBoss and related technologies in the default Eclipse distribution.


JBoss Developer Studio is a fully bundled Eclipse distribution which not only includes majority of JBoss Tools but also all its needed dependencies and 3rd party plugins allowing for an easy one-click and no-fuss installation.


If you are into doing your own bleeding edge eclipse plugin assembly, JBoss tools is for you; if you are more into having something that "Just Works" then JBoss Developer Studio is the way to go.


Installation


JBoss Developer Studio comes with everything pre-bundled in its installer. Simply download it and run it like this:


java -jar jbdevstudio-<installername>.jar


Note: if you are on Windows or Mac OSX 64-bit we recommend you ensure to select the 32-bit option in the multi-platform installer to get Visual Page editor working and use much less memory.


JBoss Tools requires a bit more:


This release requires at least Eclipse 3.7.2 but we recommend using the Eclipse 3.7.2 JEE Bundle since then you get most of the dependencies preinstalled.


Once you have installed Eclipse, you either find us on Eclipse Marketplace under "JBoss Tools (Indigo)" or use our update site directly.


The update site URL to use from Help > Install New Software... is:

http://download.jboss.org/jbosstools/updates/development/indigo/


Note: SOA tooling for BPEL, Drools, Guvnor, jBPM, ESB, Modeshape, pi4soa, Savara, SwitchYard & Teiid are no longer included in the JBoss Tools release. They will be available separately.


JBoss AS 7

The server adapter for JBoss AS 7 had a series improvements done in its handling of remote management and JMX connections. One thing that is relevant is that because of AS 7.1 Secure by default approach when you launch remotely the management services are not autoatmically exposed. We keep that secure-by-default in the tools, but now also provides a simple checkbox to allow you to expose the management service when we launch it to actually remotely manage the server.


https://issues.jboss.org/secure/attachment/12354382/JBIDE-11921.png


Of course just exposing the port does not make it fully available before you have added a user to the server. You can read about how to do that in this blog.


And finally the server adapter now works with IPv6, allows deploying outside of the deployments folder and it does not choke on a space in the server part - Hurray!


OpenShift, now faster and more patient

One of the most common bug report we got in the Beta's (thank you for the feedback!) was that when creating OpenShift applications our wizard would time out and you would have to manually import the project again. We now have extended the timeout period to three minutes to accomodate for overloads, network latency etc. but also given you the option to wait some more for the OpenShift provisioning to be fully done.


A new feature of the application creation wizard is also to be able to set the size of the Gear your application will run on and to enable scaling for your applications.

http://docs.jboss.org/tools/whatsnew/openshift/images/gears-and-scaling.png

Mind you that the list of possible gears depends on your users permissions.


Various actions like Tail Files, Environment variables and Port Forwarding which previously were only available in OpenShift Explorer is now also available from the OpenShift server adapter.


http://docs.jboss.org/tools/whatsnew/openshift/images/server-adapter-actions.png


And for those users with large set of applications or slow networks we've made the loading of OpenShift metadata more incremental giving you faster feedback,especially on networks far away from the OpenShift servers.


Maven and Endorsed Libraries

If you have ever had to fight with using JavaEE 6 Webservices on Java 6 with Maven and Eclipse at the same time you know what a pain having to use that combination can be because JavaEE 6 Webservices are actually using libraries that are not available before Java 7. Meaning you have to configure and setup endorsed libraries in Eclipse, which actually does not have such a feature exposed on projects, but only at the JVM level setup. Thus its "easy" for running applications but not when compiling.


In Maven there are various tricks to solve this and none of them are obeyed/understood by m2eclipse - but not anymore.


http://docs.jboss.org/tools/whatsnew/images/endorsed_libs.png


We've added a Maven configurator which will look for the common tricks to set and configure endorsed libraries and when they are found inject an "Endorsed Library" classpath container with the approprate classpath entries.


Allowing you to not have to worry about this anymore when using Maven + Eclipse. Fred writes more in detail about how this works in What's New


Pixel Density

And an example of where the little details matters comes that BrowserSim now has controls for pixel density allowing you to get a better and closer representative layout of your mobile applications.


http://docs.jboss.org/tools/whatsnew/vpe/images/3.3.0.CR1/pixel-ratio.png


...and more


As usual screenshots and more explanation of what is new are available from the What's New site!


Let us know what you think and remember that Xavier and I will be showing a lot of these features at JUDCon and Red Hat Summit w/JBoss World end of this month with a GA release. See you there ?


Have fun,

Max

Filter Blog

By date:
By tag: