Skip navigation

JBoss Tools

3 Posts authored by: adietish

What is this all about?

At JBoss Tools we use git when it comes to source control and have all our components hosted on Github. Eclipse offers very capable and handy git tooling with EGit. Nevertheless most of us still use the command line even though we do and use Eclipse on a daily base. The main reasons are manifold. EGit was for a long time still on the maturing curve and was not on par with the command line. Migrating users did not feel safe either since EGit was not operated in the way it used to be with CVS, SVN etc. Furthermore many UIs in EGit dont try to accomodate the newbie user but offer all the nots and bolts instead.

I'm using the EGit/JGit API (not the UI) in our OpenShift tooling. EGit/JGit is thus thus vital for my product. I therefore started to eat my own dogfood and forced myself to use EGit where I had the reflex to switch to the command line before. I found a pretty mature and very capable EGit. It is IMHO even more handy than the command line in certain usecases. I'll therefore try to improve EGit and convert most of us to us to use what was an unloved child before. I am very convinced that a little effort here and there will tranform EGit into first class and most excellent tooling that noone wants to miss.


A tale of branches and main repos.

As I already mentioned, all JBoss Tools components are available from Github. All developes within JBoss Tools have their very own fork of those master repos and also have them on Github. When it comes to issue tracking, we use Jira. Whenever we tackle an issue we branch from master and commit our work to this topic branch. Since git is decentralized, one would have a local clone of its Github fork, commit the changes to it and push it back to Github. A pull request then notifies the maintainer of the master repo to review  the suggested changes and merge them into the master branch in the master repo.


Clone your Fork


Everything starts by having a personal fork on github. Once this is done one clones this repository to the local machine by issuing (I'm cloning my fork of the openshift-java-client here):

git clone git://github.com/adietish/openshift-java-client.git


In EGit things are as easy as on the command line. You make sure that you have the Git URI in your clipboard and switch to the Git Repository Exploring perspective...


git-repository-exploring.png

You pick the Clone a Git Repository action from the toolbar in the Git Repositories view...

clone-fork.png


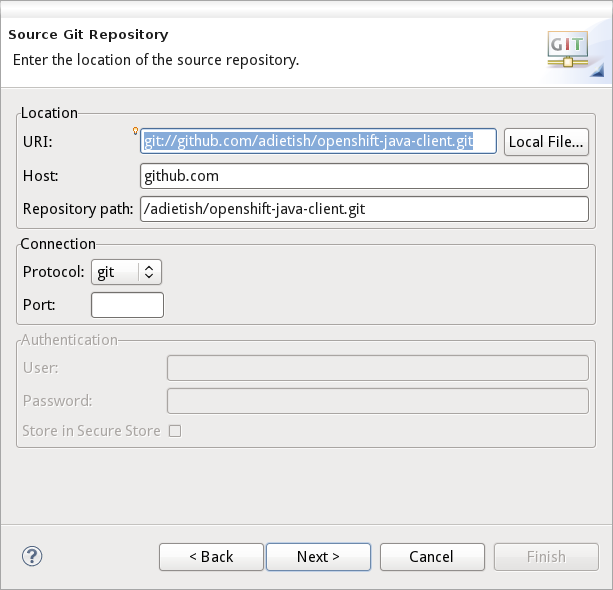
... and EGit will use the Git URI in your clipboard to prefill the upcoming cloning settings:


clone-fork-2.png


In an additional step you tell EGit where to clone to and once you're done the new repository will show up in your Git Repositories view:


imported-fork.png


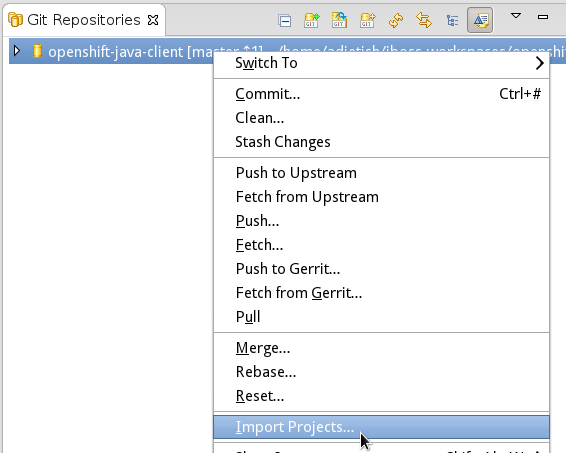
A last step involves importing the Eclipse project to your workspace. You pick Import Projects... from the context menu of your repository and you're all done:


import-project.png


Create your topic branch

Every issue is tackled in a separate topics branch. That allows us to separate the concerns when coding. It also allows us to switch among different task if priorities shift. We simply switch topic branch and focus on the current task.

To create a new topic branch based on the current master branch one does:

git checkout -b my-topic master


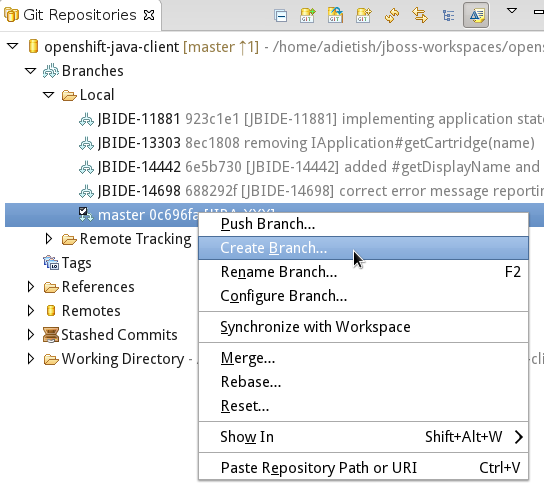
Using EGit you wont have any more steps involved, it is as easy as it is with the command line. In the Git Repository Exploring perspective you unfold the branches of your local git repo, select the branch you want your topic branch to be based on (which usually is master) and pick Create Branch... in the context menu.


create-branch.png


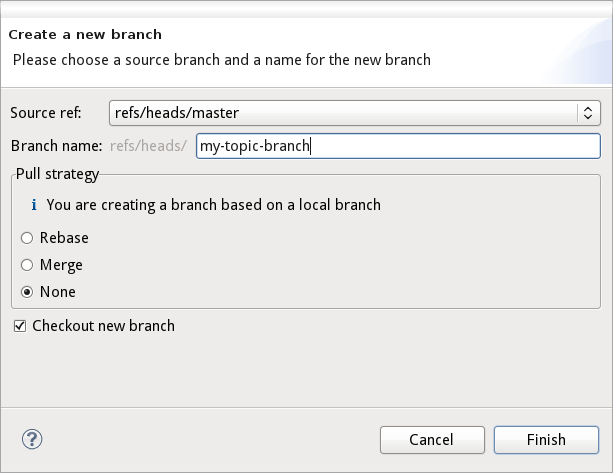
In the upcoming dialog you choose the name of your new branch and hit Finish. EGit will by default switch your code to the new branch (see Checkout new branch checkbox).


create-topic-branch.png


Do your work

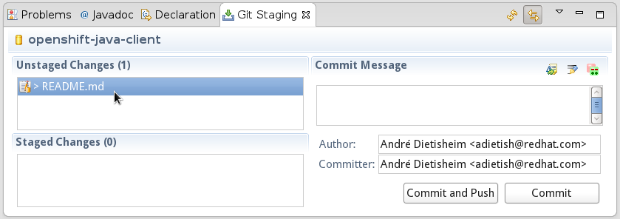
Now that you have a branch for your task you're ready to do your changes. Get to the Java or JEE perspective and make sure you have the Git Staging view opened. It will track the files you change and make them show up in the Unstaged Changes. If I change the README.md in my project and save it will instantly get listed in the Unstaged Changes:


unstaged.png


Commit and Push

As soon as we're done with all our coding we're ready to commit and push. When we started we cloned our Github fork to the local machine. Our local repository is thus originating from the Github fork, it's Origin is pointing to this Github repository. Committing and pushing our changes to this fork is done in 2 steps when using the git command line:


git commit -a -m "[JIRA-XXXX] corrected readme"

git push origin my-topic-branch


In EGit things are even more handy. it's mostly a single click experience:

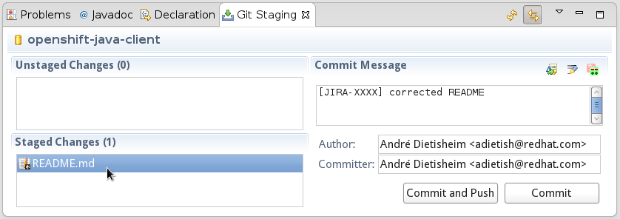
PIck the unstaged files that you want to commit and drag and drop them to the Staged Changes. Then provide some commit message and you're ready to go:


staged.png


Hit Commit and Push:

commit-and-push.png

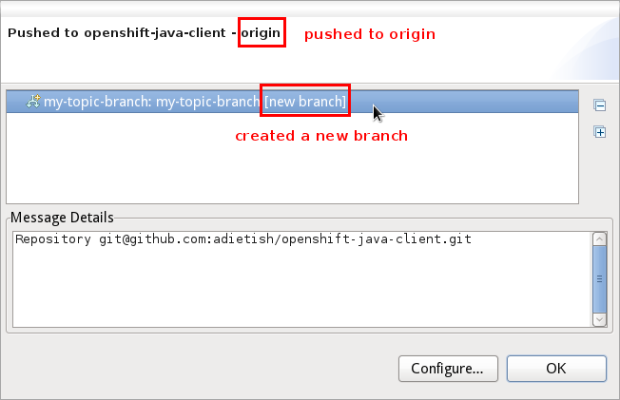
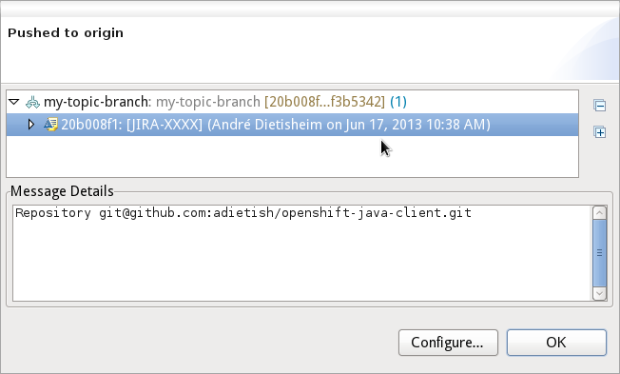
EGit will commit your changes to your topic branch and push it to its origin, the fork on Github. The topic branch only exists on the local machine, pushing it to Github will thus create a new branch in this remote repository. EGit will show you that in the upcoming dialog:


pushed-to-origin.png


Oh, my change was incomplete

If I now discover that I forgot to do some modifications I could easily add another commit and push it as I just did before. The commit history would then show 2 distinct commits that tackle the very same topic though. I personally prefer to ammend in these cases. I could alternatively merge these 2 commits into a single one (by rebasing). I personally prefer to amend since this keeps me focused, I wont have to rebase once I'm ready to merge.

Let us do the change we had forgotten and amend it. On the command line this would look like this:

git commit -a --amend


In Eclipse I'll proceed as shown before. I change my files, drag them from unstaged to staged and tell EGit to amend by htting Amend Previous Commit:


amend.png


When hitting Amend Previous Commit the previous commit message shows up in the message area.

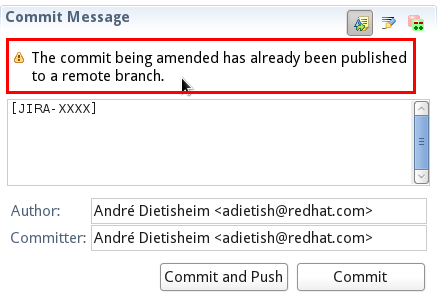
Also Notice the warning that the Git Staging view is issuing. It tells you that your current commit was already pushed to a remote branch. It tells you that pushing will most likely fail if done to the very same remote:


already-pushed.png

Doors shut, push rejected?

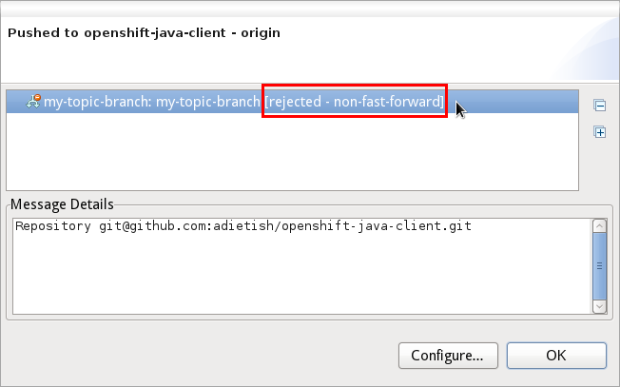
If I now hit Commit and Push committing will succeed but pushing wont. It'll tell me that it is rejected, that it is non-fast-forward:


rejected-non-fast-forward.png


Amending modifies an existing commit. I had pushed this commit to my fork already. The new push sends a modifed version of the very same commit. The remote therefore rejects it and tells me that I pushed a conflicting change, a change that is non-fast-forward.


Use the force, Luke!

To solve this conflict I'll use the force. I changed my commit on purpose, I wanted to add some missing pieces. I therefore insist on pushing my change and tell git to force my push. Using the command line one does:

git push -f origin my-topic-branch


The Git Staging view unfortunately doesn't offer this option yet. We should consider ways of pushing force in the staging view in order to keep the workflow smooth.

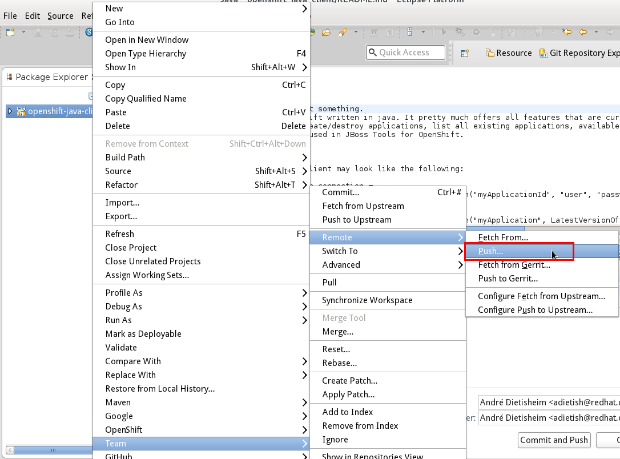
To currently push force in EGit you have to get to the full fledged push action that is accessible in the project explorer: Team -> Remote -> Push...


team-remote-push.png


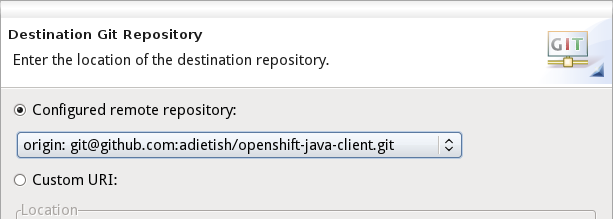
In the upcoming wizard you can then choose the remote repository you want to push to. I therefore pick origin, which points to Github fork:


push-choose-remote.png


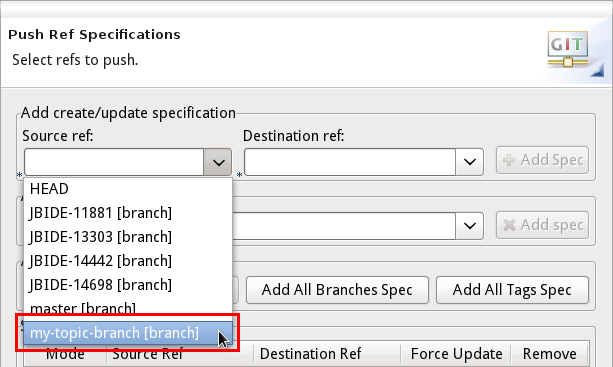
On the next wizard page I then pick the branch I want to push:


push-source-ref.png


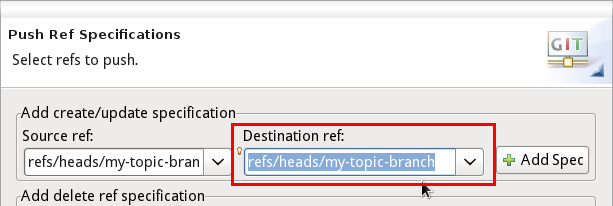
EGit will then pick the existing (remote) topic branch as destination:


push-destination-ref.png


I can then add this source-destination pair to the refspecs that EGit will push:


push-add-refspec.png


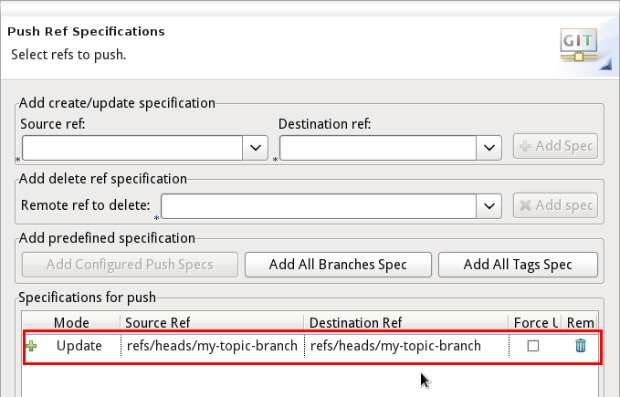
EGit then lists it in the push specifications and allows me to further further fine-tune it:


push-refspec.png


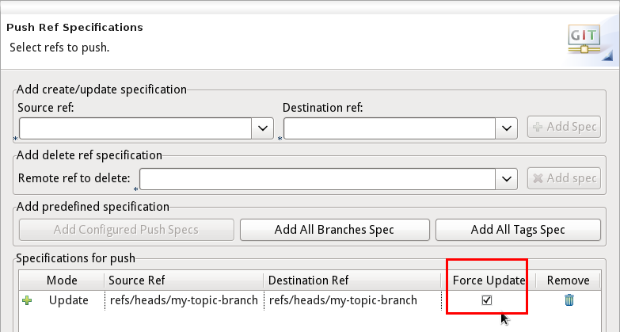
I can then tell it push force in the Force Update column:


push-force.png


Once I executed all these steps I'm ready to go and can hit Finish, telling EGit to push force my local topic branch.


push-successfull.png


In my opinion the wizard we just used - especially the 2nd page where you build a push-force refspec is far too complicated. It's not inutitive enough, especially for newbie users. The git command line is so much simpler. We should seriously think about providing a simpler version which fits the vast majority of the usecases. A very simple first improvement is to have the current branch preselected (in Source ref).


Let there be merge


Now that we pushed our topic branch to Github we're ready to file a pull request and let the review happen. Github contributed Mylin connectors for EGit/Github. I honestly didn't find out how to file pull-requests though. Looking into their code this must be possible, the functionality is there, but I didnt get how to use the UI to file those. That's another area where I'd love to enhance. IMHO it should be possible to file pull requests right from Eclipse. I'm not even sure if we really should require Mylyn. Mylyn is very nice, no doubt about But at times you just want to create the PR and dont want to edit it. Having it prefilled with the commit-message is fairly sufficient.


For the sake of breveity I wont get into details how one would file a pull request on github, I'll just assume we filed it on github.


pull-request.png


I then get back to the Git Repository Exploring perspective and merge master with my topics branch. I double click my master branch and make sure it's checked out. I then pick Merge... from its context menu:


merge.png


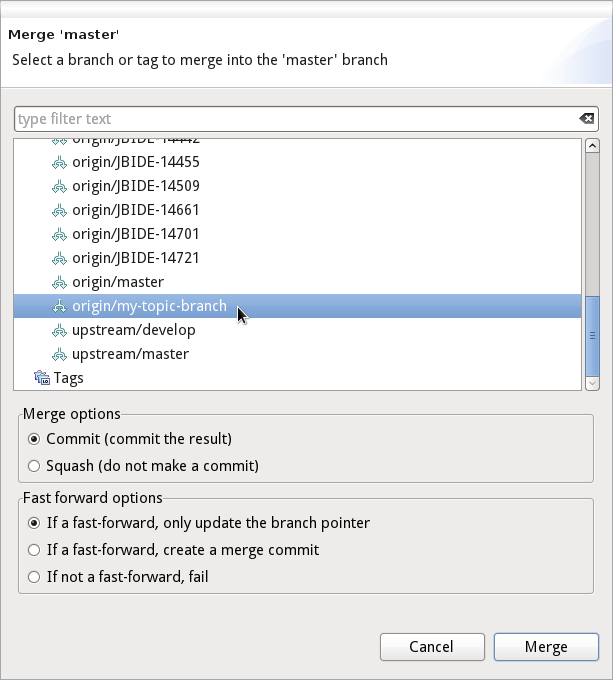
...and tell the wizard to merge my master with my topic branch.


merge-topics-branch.png


Once the merge is done I can push it to master by using the push outlined above. This time I'll just push to the master repo, too and publish my code the official repo. My task is finished, I merged my topics branch (my work) into master and made it official JBoss Tools code. I can now kill my topics local and remote branches.


Egit, what about new clothes?

In the above I spotted several steps that could get enhanced to get your EGit journey perfect. EGit has all you need, it's became pretty stable and mature over the years. I'd love to gather those ideas and wishes and get your feedback!


Push Force

A first shortcoming I spotted is that you cannot push force from git staging view. Maybe that's a good practice since push force should stay the exception, it should not become the general rule. It should not be too easy since there's too much you can do wrong and loose all your work.Nevertheless I'd love to allow this common practice when correcting pull-request (in github or EGit gerrit) in the Git Staging view.


  • What about displaying a force update checkbox when the already pushed warning is displayed?
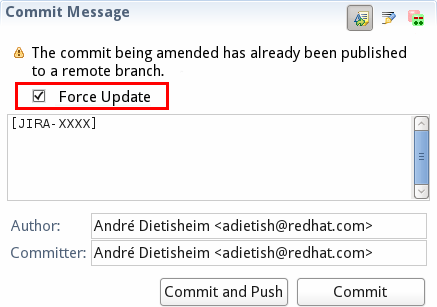
    already-pushed-2.png
  • Alternatively we could ask the user if he wants to push force in something similar to this:
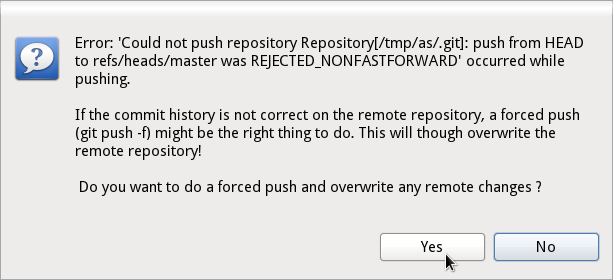
    want-to-push-force.png

Push dialog

IMHO the dialog that pops up when you want to push to some remote could get quite some love.


  • First of all it pops up with no default being filled out. Having the current branch selected as source and the corresponding remote on origin (that gets selected as soon as you choose your source) would spare you 1 first unneeded click:
    push.png
  • Secondly the dialog is far too complex and not intuitive enough for the newbie user. There are far too many nots and bolts for the default usecase. We could offer the simple 1:1 push with a force option in a single line and hide the advanced option behind an Advanced >> button:
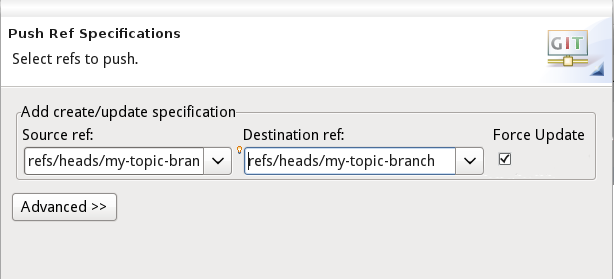
    push-advanced.png


Github Pull-Request

I might be wrong but it looks very much as if there was no way to create a Github pull request within Eclipse. One has to use hub or get to the website. I'd love to have this in Eclipse so that there's no need to switch app. IMHO we should offer this with or without Mylyn. Maybe we should offer an action in the context menu that opens the Mylyn pull-request editor prefilled with all the relevant informations that I can then just confirm.


Feeback please!

I'd love to get your feedback, get to know what you guys think. Please shout at me, confirm me or comment with your very own ideas. Thanks!

At JBoss Tools we created a java client that allows you to talk to the OpenShift PaaS: openshift-java-client. The library is already used in the OpenShift tooling in JBoss Tools, the Forge plugin and Appcelerators tooling for OpenShift.

This blog post will show you how to use okthis API in your very own java programs. We'll develop a command line tool that displays informations equivalent to what you get when running rhc domain show with the OpenShift command line tools: It displays basic informations about your user.


User Info
=========
Namespace: andre
  RHLogin: andre.dietisheim@redhat.com


Application Info
================
kitchensink
    Framework: jbossas-7
     Creation: 2012-08-10T11:24:13-04:00
         UUID: 8ad0d94f39aa4295a0049de8b8b5ef55
      Git URL: ssh://<SOMEID>@kitchensink-andre.rhcloud.com/~/git/kitchensink.git/
   Public URL: http://kitchensink-andre.rhcloud.com/


 Embedded: 
      jenkins-client-1.4 - Job URL: https://jenk-andre.rhcloud.com/job/kitchensink-build/


You'll find the sourcecode for this example at github: https://github.com/adietish/show-domain-info. All the code that is shown in this blog is contained within the Main class.


If you want to dig futher, you'll get a more complete example that includes jenkins in this wiki article.

Openshift-java-client 2.0

The openshift-java-client is a java library that allows java programs to talk to the OpenShift PaaS. It talks to the new OpenShift RESTful service and allows users to create, modify and destroy OpenShift resources: domains, applications, cartridges, etc.It is hosted on github at https://github.com/openshift/openshift-java-client and is available under the Ecilpse Public License.


Note:

Openshift-java-client 1.x was talking to the legacy service in OpenShift. 2.0 switched to the new RESTful service.

The legacy service is not maintained any more and will fade away at some point. Users of the 1.x client should migrate to the 2.0 client.

The migration should be pretty much without hassles. Even though 2.0 is a complete rewrite, the API stayed pretty much the same/very close.

Requirements

  • You need an account on OpenShift. (If you have no account yet, you'd have to signup first)
  • Make sure you have an OpenShift domain and some applications (to get some meaningful output)

Launch Parameters

To keep the implemenation simple, the program we're about to write, only accept 2 parameters on the command line:

  1. username
  2. password


Launching the program with maven would look like this:

mvn test -Dusername=<username> -Dpassword=<password>

Project Setup

We have to make sure that we have the openshift-java-client available on our classpath. The client library is available at https://github.com/openshift/openshift-java-client. You could clone the repo and build your own jar by telling maven to "mvn clean package". But even simpler is to add it as dependency to your pom, since the client library is available from central as maven artifact:

<dependency>
          <groupId>com.openshift</groupId>
          <artifactId>openshift-java-client</artifactId>
          <version>2.0.0</version>
</dependency>


Connect to OpenShift

After we did some basic command line parameter parsing (that we skipped here on puropose) we'd have to get in touch with the OpenShift PaaS. Using the openshift-java-client you'd tell the OpenShiftConnectionFactory to create a connection for you. To create this connection you'll have to provide some parameters:

Server url

First of all you need to give it the url of the OpenShift PaaS. You may either hard code it or ask the OpenShift configuration for it:

new OpenShiftConfiguration().getLibraServer()

The OpenShiftConfiguration class parses the OpenShift configuration files you may have on your machine (~/.openshift/express.conf, C:/Documents and Settings/user/.openshift/express.conf etc.). Those usually get created once you installed the rhc command line tools. In case you dont have any configuration yet, OpenShiftConfiguration holds some meaningful defaults and points to http://openshift.redhat.com. On the other hand, our configuration class also allows you to override settings by putting them to the system configuration as you would do if you want to switch to the OpenShift liveCD temporarly. You would then simply add the following to the command line when launching the java virtual machine:

-Dlibra_server=127.0.0.1

Client id

The connection factory also requires you to provide your very own client id. This client id is used when the openshift-java-client talks to the OpenShift REST service. It'll get included in the user-agent string that tells OpenShift what client it is talking to. We use the name of our example, "show-domain-info".

Username and Password

Last but not least, you also have to give it your OpenShift credentials, the ones we got from the command-line.


String openshiftServer = new OpenShiftConfiguration().getLibraServer();
IOpenShiftConnection connection = new OpenShiftConnectionFactory().getConnection("show-domain-info", "myuser", "mypassword", openshiftServer);


Once you have your connection you can get a IUser instance which will allow you to create your domain and applications:

IUser user = connection.getUser();


Print the User Infos

The first information block involves basic user informations. The username is available from your IUser instance:

System.out.println("RHLogin:\t" + user.getRhlogin());


The other value that we want to display, the domain namespace, is accessible from your OpenShift IDomain. We'll get it from the the user instance and print its id (namespace).

IDomain domain = user.getDefaultDomain();
System.out.println("Namespace:\t" + domain.getId());

Print the Application Infos

The second portion printed by "rhc domain show" is reporting your users applications. All OpenShift applications are held in a list within your domain. We simply get the list and iterate over it's entries:

for (IApplication application : domain.getApplications()) {


The required values - name, framework, creation time etc. - are now available within each IApplication instance:

System.out.println(application.getName());
System.out.println("\tFramework:\t" + application.getCartridge().getName());
System.out.println("\tCreation:\t" + application.getCreationTime());
System.out.println("\tUUID:\t\t" + application.getUUID());
System.out.println("\tGit URL:\t" + application.getGitUrl());
System.out.println("\tPublic URL:\t" + application.getApplicationUrl() + "\n");


An application may have several cartridges embedded (MySql, Postgres, Jenkins etc.). These cartridges are reported by by the application. We get the list of cartridges and inspect at each of them:

for(IEmbeddedCartridge cartridge : application.getEmbeddedCartridges()) {


We then want to know bout a cartridge's (IEmbeddedCartridge), name and url:

System.out.println("\t" + cartridge.getName() + " - URL:" + cartridge.getUrl());


That is it - you now have an app that can talk to OpenShift via its REST API. If you want to do more we also have this article that shows how to perform actual operations against your OpenShift applications. Hope you enjoy it and let us know what you build with it!
Dont get your fingers dirty, use the JBoss Tools for OpenShift

OpenShift is the PaaS offering from Red Hat. It gives you your personal application platform on demand. With OpenShift, there's no need to look for hosting and application stack. OpenShift provides you those within minutes, whenever you need them.

JBoss Tools for OpenShift offers a feature complete environment to work with OpenShift. From developing to deploying, JBoss Tools provides you a fully fledged environment for your project and aligns with the standard workflows within Eclipse. It allows Eclipse users to stick to their favorite IDE and deal with OpenShift within their developement environment. Especially the OpenShift server adapter mimics an Eclipse WTP compliant way of deploying to OpenShift and hides the complexity, that you'd otherwise had to handle when publishing bare metal (which is by using Git).


Get the tools, get started

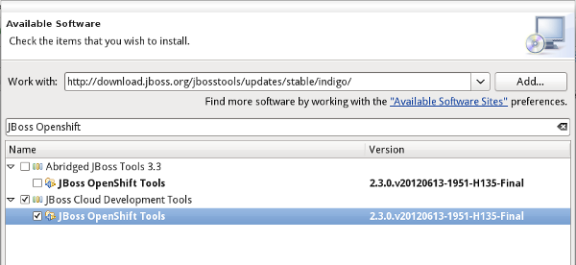
The release blog shows you extensively how to get JBoss Tools from our update site, from the Eclipse marketplace or even how to install the JBoss Developer Studio. If installing JBoss Tools, you'll have to make sure you choose at least the OpenShift bundles on our update site:


update-site.png


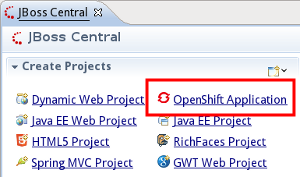
Once you have JBoss Tools installed, you'll spot our wizards either in JBoss Central or in the Eclipse Wizards:

central.png


All you need to get started quickly is offered within this wizard. It'll create your application platform, import a starter project and create a server adapter that you may use to publish to the PaaS.

OpenShift of course requires you to have an account. If you have none yet, the wizard will drop you to the signup form by hitting the link that is displayed on the first wizard page.


signup.png


Once you have your account, you'll be ready to go, ready to get amazed by JBoss Tools and OpenShift.


A very basic workflow


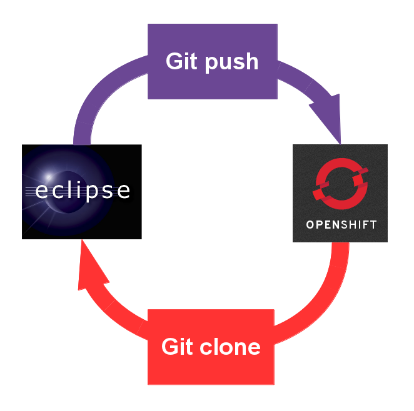
OpenShift is a PaaS, a Platform as a Service. As such it offers you your personal application stack and it does this on demand. A range of standards runtimes are offered to you whenever you need them. Working with the PaaS is as simple as importing a stub (the starter application) to your workspace, changing and publishing it again:


openshift-workflow.png


Create your application runtime

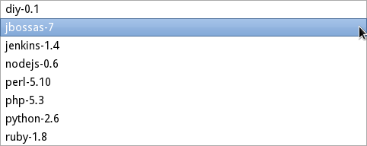
It all starts by creating your own application runtime. In the OpenShift Application wizard, set a name and choose the application (runtime) you need:


application.png


OpenShift offers a wide range of standard runtimes. You may to choose among php, ruby, phython, nodejs etc. Java developers will be most amazed to see that OpenShift offers a fully Java EE 6 compliant application server: the blazing fast JBoss AS 7.1.


application-types.png


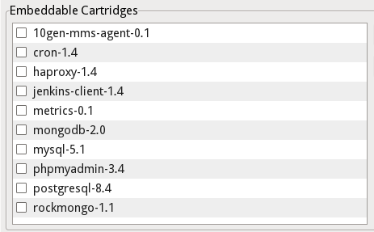
You may also add different extensions to your platform ranging from SQL- (like MySQL or Postgres) or NoSQL-databases (like MongoDB) up to your very own CI server (jenkins).


application-cartridges.png


Once you made up your choices and finish the wizard, it'll create your OpenShift application, wait for it to become reachable and import it's initial content - a starter application - to your Eclipse workspace. Looking into your Project Explorer or Navigator, you'll spot the new project that the wizard imported. It has the very same name as the OpenShift application. In case of a JBoss AS7 runtime, the starter app is a maven artifact and the project we import to your workspace will have the name that's configured for the maven artifact.


imported-project.png


Push to build and deploy


The new project in your Eclipse workspace is where you apply your changes. It is shared with a git repository on your local machine. This repository is a clone of the git repository within your OpenShift application.


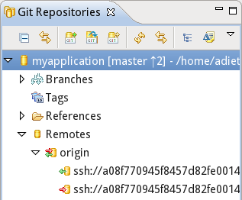
application-git-repository.png


Deploying this project to the PaaS is as simple as pushing the local repository to it's origin, the OpenShift git repository. OpenShift will then build and deploy your application to the application runtime.

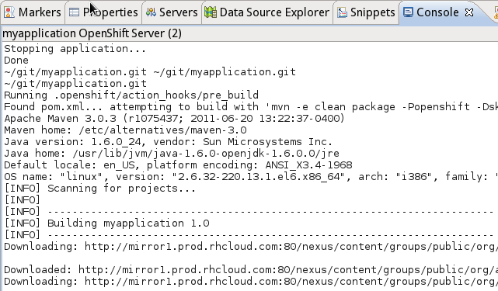
In case of a Java application, OpenShift relies on a maven based build, that is triggered with each git push:


application-build.png


Server Adapter to the rescue

When dealing with git, you have to deal with a brilliant but rather complex code versioning system. Even if you're familiar with git, there's still room to reduce the number of manipulations when publishing.

Eclipse WTP server adapters historically allow you to interact with your server. This would typically be some local or remote server you'd have file- or SSH-based access to. We adapted this handy concept and implemented a variant that would work with OpenShift. This server adapter hides the complexity of dealing with git and allows 1-click publishing to the cloud.


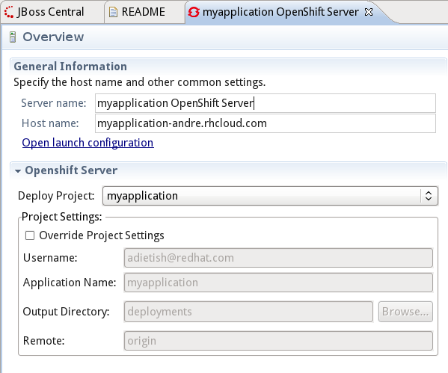
The OpenShift Application wizard sets the adapter up when you create your application and import the starter project to your workspace.  Our Server adapter is bound to the OpenShift project in your workspace and it'll do the git operations for you. 


server-adapter.png


When publishing it will deploy the changes in your OpenShift project to the PaaS. It'll hide all the complexity that is inherent to git. It will commit your changes to your local clone and push them to the git repository of your OpenShift application (the origin).


server-adapter-publish.png


Deploy my very own project!


Importing the starter application to your workspace is the most simple usecase we provide. I bet most users already have a project that they'd want to deploy though. We of course also provide this ability in our OpenShift Application wizard.


Our little screencast shows you the steps when starting with your very own project. It uses the kitchensink example to demonstrate how this would occourr. You may get it on github:


Kitchensink example project:


https://github.com/adietish/kitchensink.git


Have your project ready

You first have to get your project to Eclipse. We only support git-shared or non-shared project though. A typical usecase would be to have your project on github or in any other git repository.You then simply clone it's repository to your local machine (using EGit or the command line) and import the project within it to your Eclipse workspace.


JBoss Tools, configure my project

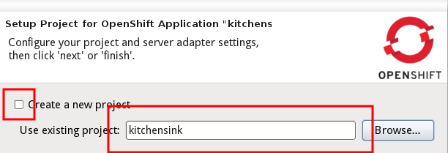
You then create your OpenShift application in our wizard, provide the name, type and eventually additional cartridges. You then switch to the second wizard page and tell the wizard that you dont want to create a new project in your workspace. You tell it to use your project instead.


use-existing.png


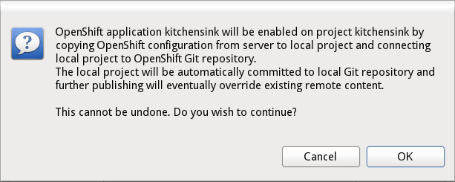
The wizard will warn you about upcoming changes to your project and ask you to confirm:


merged-cannotundo.png

Oh my project, how you changed!

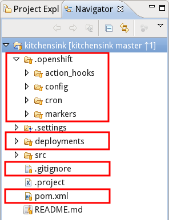
We then add OpenShift specific configurations to your project. These changes unfortunately cannot be undone. You'd have to provide your own means (ex. a separate branch) if you dont want these additions in your developement code The changes we apply are the following:


All changes:


  • eventually create a git repository and commit your project to it
  • add a .openshift folder with openshift specific hooks
  • add a deployments folder
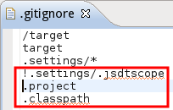
  • add the Eclipse specific files (.project, .classpath etc.) to the .gitignore
  • add openshift-profile to the pom
  • add OpenShift git repo as remote to your local git repo

merged-configuration.png


Since publishing to OpenShift is git pushing to it, we'll make sure your project is shared to a git repo. We therefore eventually create a git repository for your project if there's none yet and add your project to it.

We add the .openshift folder which may contain OpenShift specific configurations and tweaks (like custom build-scripts, markers, cron entries etc.). We also create a deployments folder which OpenShift will use to build to. You may also add additional artifacts to it.

We then tweak .gitignore and add the Eclipse specific files so that they dont make it to the git repo by default.


merged-configuration-gitignore.png


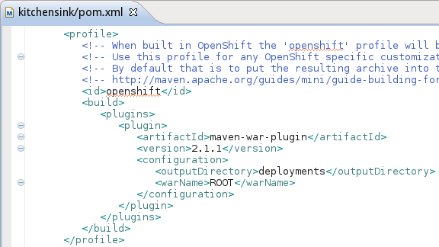
For maven-based java projects we tweak the pom and add an openshift profile to it.


openshift-profile.png


The openshift profile is what the PaaS is using when building your project on the PaaS. The profile we add is telling maven to create the war in the deployments folder. The deployments folder is where JBoss AS7 is expecting and picking new deployables from. Adding the profile makes sure that your project is deployed when it is built.


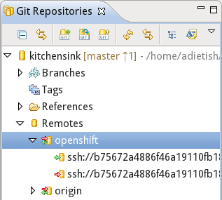
We'll also then add the OpenShift application git repo as remote to the git repo of your local project. This will allow you to push your project to OpenShift without knowing about the exact url you'll have to push to. All you have to know is what name the OpenShift repo is stored at.


merged-configuration-remotes.png


We're storing the OpenShift application git url as "openshift" in the remotes known to your local repo. You may of course tell the wizard to use any name you like:


merged-configuration-remotes-configure.png


Push me up, Scotty


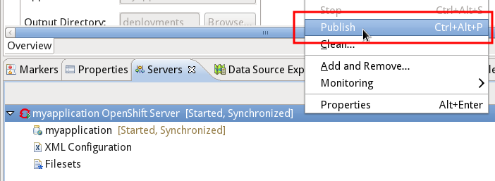
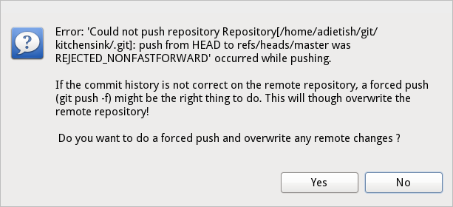
Once we configured your project, we commit the changes to your local git repo (either your project was already shared with a git repo or we created one for you). To now deploy your project to OpenShift, you'd have to go to the Servers view, choose the OpenShift server adapter (that we created for you) and tell it to publish. The server adapter will then detect that the local project is ahead of the remote one and that publishing would only be possible when overriding the remote starter application. It'll ask you to confirm this step:


merged-pushforce.png

Once the publishing is done, you'll have your project running on OpenShift!


Multi-module maven projects


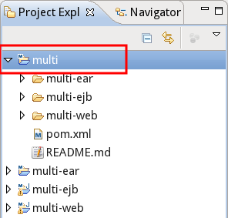
Our OpenShift Application wizard also supports multi-module maven projects. You'd simply have to make sure all modules are nested within a parent project and choose the parent project as existing project (multi vs. multi-web, multi-ejb, multi-ejb in my screenshot) in the wizard:


multi-ear.png


multi-ear-wizard.png


Note:


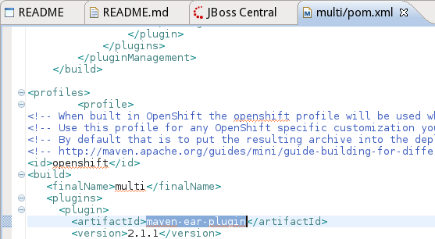
in case your multi-module maven project is an ear, there are still slight limitations in our tooling for the moment. You may easily work around them though. You'd have to alter the maven profile in the pom of your parent-projec and replace the maven-war-plugin by the maven-ear-plugin:


maven-ear-plugin.png


You may read about it in all details and track our progress on it in JBIDE-12252


My maven project is not in the git repo root

When deploying an existing project to OpenShift, you'd have to tell the wizard in JBoss Tools about your project. Your project would have to comply to a basic layout though. We expect the pom in the root of your git repository. If this is not the case, then you'd have to take an alternative approach when publishing. Publishing then gets as easy as drag and dropping your project to the adapter.


In our screencast, we show you how to proceed. We use the the ticket-monster example project which is available at github:


Ticket-monster example project:


https://github.com/jboss-jdf/ticket-monster


Have your project ready

The first thing to do is to import your application to your Eclipse workspace. The only requirement we have is that your project shall be Eclipse WTP compliant. It may be a Dynamic Web or a Maven project. Maven projects are turned into Eclipse WTP projects if you have m2e-wtp installed when importing them (m2e-wtp bridges the gap between Eclipse WTP and maven, it turns any maven project into a WTP compliant project).

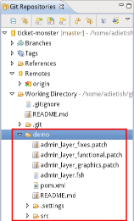
In the ticket-monster example, the maven project is nested into the demo folder:


draganddrop-nested.png


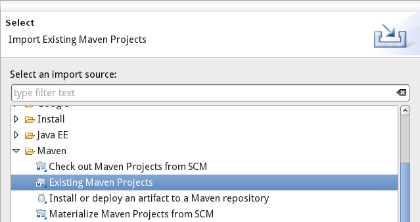
We import with the Eclipse Maven import wizard pointing it to the demo-folder:


draganddrop-import-maven.png


and get the demo-folder imported to our workspace:


draganddrop-imported.png

Create your OpenShift application

Once you have your project ready you'll go and create the OpenShift application that will host your application. Launch the OpenShit Application wizard in JBoss Tools, tell it to create a jbossas-7 application and let it import the starter app, as shown in the first paragraphs of this blog.


OpenShift, here I come

The OpenShift Application wizard imports the starter application to your workspace and creates a server adapter for it:


draganddrop-starter.png

draganddrop-adapter.png


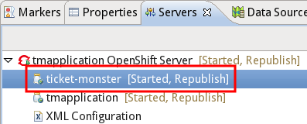
You are then ready to publish your project. Simply drag and drop it to the OpenShift server adapter in the Servers view. Your project will then get published to OpenShift.

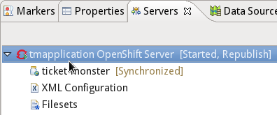
Once  the publishing is done, you'll notice that the server adapter now has 2 modules: the starter application and your project:


draganddrop-new-module.png

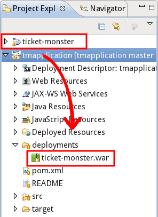
The server adapter actually compressed your project to a war and dropped it to the deployments folder within the starter application:


draganddrop-war.png


It then committed this addition and pushed the starter application to OpenShift. The JBoss AS7 then noticed the new war and deployed it. Simple as that.


But hey, my project does not work!


Commit log

If your deployment fails JBoss Tools offers some goodies that allow you deeper insights into what's happening on the PaaS.

Pushing to the PaaS triggers a build and the deployment of your project. Both operations are logged and make it to the commit log. When the OpenShift server adapter finished publishing (git pushing), it'll show you the console with the commit log. This will show you in a first step if the push, the build and the deployment worked fine:


application-build.png


Inspect your server logs

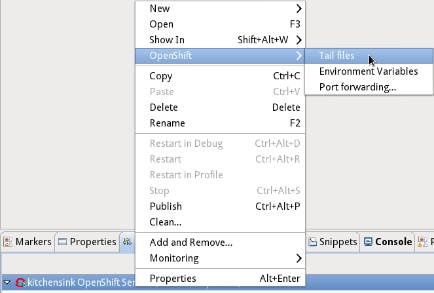
We also offer you simple access to your server logs. You'll find an appropriate entry in the context menu of your OpenShift server adapter. Simply pick "OpenShift->Tail files"


tail-files.png


It allows you to inspect the logs of your server within the Eclipse console:


tail-files-console.png

Look into the jboss as7 management console

JBoss AS7 has a management console that's may be reached on port 9990. OpenShift only allows access to a limited set of ports from the outer world. Nevertheless OpenShift allows you to forward ports to your local machine. Using port-forwarding allows you to access the management console that's running on the JBoss A7 that is running on OpenShift.


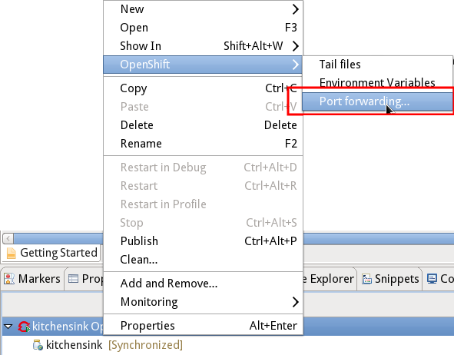
Go to the OpenShift server adapter and pick "OpenShift->Port Forwaring".


port-forwarding.png


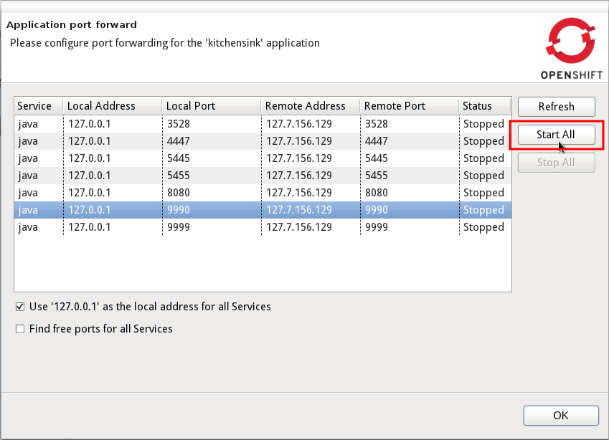
The upcoming dialog will list you all ports that may be forwarded to your local machine. Simpley hit "Start All" and they'll get available at localhost on your machine.


port-forwarding-dialog.png


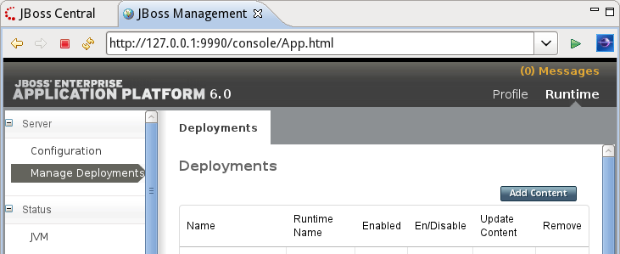
You may then access the management console of your JBoss AS7 in a browser on your local machine.


management-console.png


Debug your application with the Eclipse Debugger


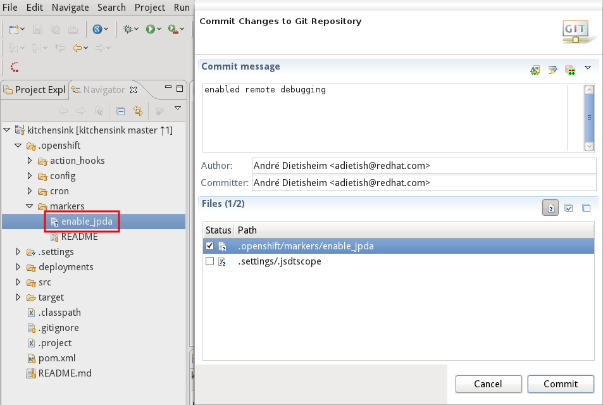
JBoss Tools even allows you to debug your OpenShift Application in the Eclipse debugger. You'll first have to enable debugging on your OpenShift application. You'll do this by adding a marker in the .openshift folder of your project. Create an empty file enable_pda in .openshift/markers. Commit it and tell the server adapter to publish your project.


enable-jpda.png


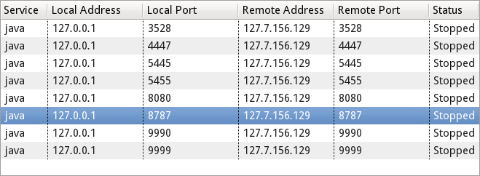
Now that debugging is enabled, the debugging port of the remote JVM will get available and visible in your forwarded ports. Pick "OpenShift -> Port Forwarding" in the context menu of your server adapter and double check that the port 8787 is available. You'd eventually have to refresh the list of available port in case you already had it running before. Now Start All to get all ports (and the debugging port) forwarded to your local machine.


enable-debugging-port.png

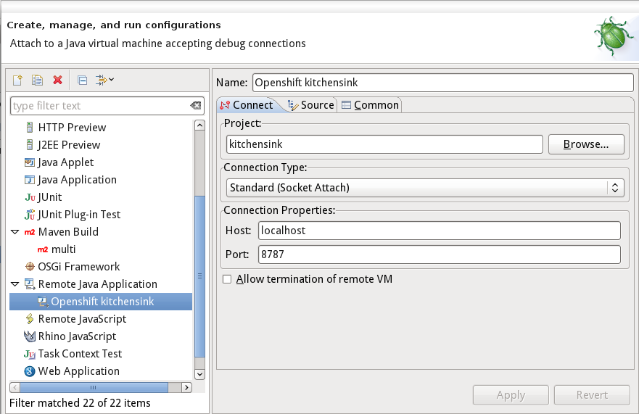
You're almost there. The last step is to tell Eclipse to connect it's debugger to your forwarded port. Go to the Debug Configurations in Eclipse and create a new configuration for a Remote Java Application. As soon as you hit Debug, the execution of your application on OpenShift will halt at the breakpoints you set in your Eclipse.


enable-debugging-debugconfig.png

Filter Blog

By date:
By tag: