Skip navigation
1 2 Previous Next

bpmn2 user's Blog

30 posts

Here is an example that shows how to register and use custom workitems in the JBPM5 console using example described in http://community.jboss.org/people/bpmn2user/blog/2011/02/21/jbpm5-example-for-forms-with-variables.


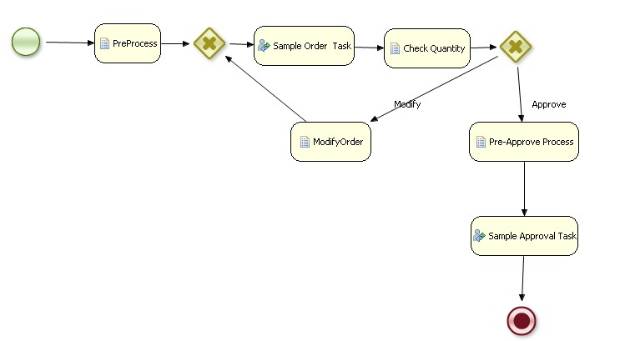
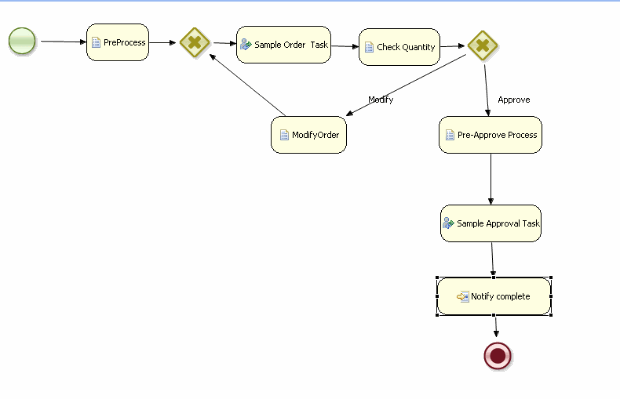
Diduch Cordova has modified the bpmn file from the above example to include a custom notification workitem (http://community.jboss.org/people/bpmn2user/blog/2011/02/21/jbpm5-example-for-forms-with-variables#/?page=2) . A custom WorkItem for notification ('Notify Complete) is added at the end as shown below.


ScreenHunter_12 Mar. 30 15.42.gif


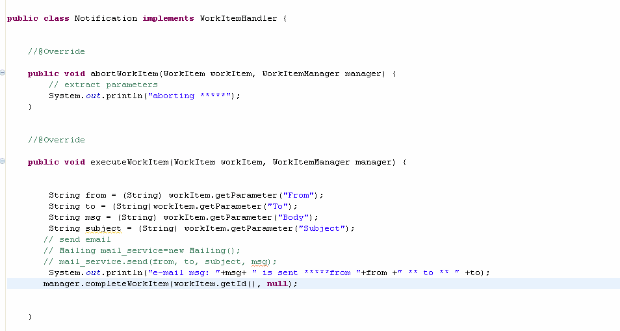
Following is the corresponding notification WorkItemHaldler class.

ScreenHunter_11 Mar. 30 15.39.gif


More details about creating  WorkItem can be found here http://community.jboss.org/people/bpmn2user/blog/2011/03/28/jbpm5--work-itemdomain-specific-process-hello-process-example.


Make sure the corresponding taskName (i.e, Email) for the WorkItem in the bpmn file is bound to Notification class in the workhandlers configuration file (CustomWorkItemHandlers.conf)

ScreenHunter_13 Mar. 30 15.43.gif


ScreenHunter_10 Mar. 30 15.38.gif


Deployment to an appsersever (e.g., JBoss or Tomcat)


1.) Copy the configuration file (CustomWorkItemHandlers.conf) to gwt-console-server's META-INF directory


e.g. jbpm-installer/boss-5.1.0.GA/server/default/deploy/jbpm-gwt-console-server.war/WEB-INF/classes/META-INF/CustomWorkItemHandlers.conf


2.) Copy the Notification class to the gwt-console-server's CLASSPATH.


e.g., Copy the Notification jar file into gwt-console-server war file  ( ..gwt-console-server\WEB-INF\lib)

or Copy the Notification jar and the dependant jar files into appserver's lib direcory (JBOSS_HOME\server\default\lib for JBOSS or TOMCAT_HOME\lib for TOMCAT)


3.) Copy the bpmn file to the directory where the other bpmn files are located  (specified using the parameter -Djbpm.console.directory).


ScreenHunter_15 Mar. 30 15.57.gif


After running the example successfully (i.e, after the second approval from 'john'), following log message can be seen.

ScreenHunter_09 Mar. 30 15.34.gif

JBPM5 provides the flexibility to extend the default process constructs with domain-specific extensions.

Here is a simple example that shows the usage of  a custom workitem.


This custom extension feature provides the ability to create a service task, a generic way to interact with external services (e.g., JMS, Web service etc).


How to install and run this example?

Start with the setup as shown in http://community.jboss.org/people/bpmn2user/blog/2011/02/27/helloprocess-example-using-jbpm5-eclipse-plug-in.


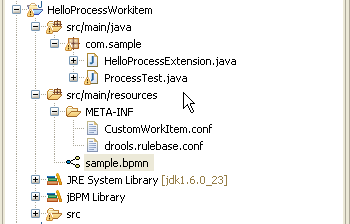
This example has a bpmn file that has the custom WorkItem(sample.bpmn), two WorkItem configurations files (CustomWorkItem.conf and drools.rulebase.conf), WorkItem implementation class (HelloProcessExtension.java) and test class (ProcessTest.java).


These files can be imported into a 'HelloProcess' project as shown below.


ScreenHunter_04 Mar. 27 22.34.gif

After running the test class 'ProcessTest.java', following results can be seen.

ScreenHunter_07 Mar. 27 23.24.gif

Here are the main steps involved in creating the custom WorkItem.


1.) Workitem definition: Create the definition of the workitem using properties that are name-value pairs in a file CustomWorkItem.conf.


import org.drools.process.core.datatype.impl.type.ObjectDataType;

import org.drools.process.core.datatype.impl.type.StringDataType;


[

  [

    "name" : "HelloProcessExtension",

     "icon" : "icons/action.gif",

    "displayName" : "HelloProcessExtension"

  ]

]

This definition file (CustomWorkItem.conf) is located in META-INF directory.


2.) WorkItem registration:

The definition of the workitem (CustomWorkItem.conf) needs to be registered in a project. It can be done by including the definition using the drools.WorkDefinitions property in a file drools.rulebase.conf in META-INF dircectory.


drools.workDefinitions = CustomWorkItem.conf WorkDefinitions.conf


3.) After creating a definition and registering the workitem, it will show up in designer. The Eclipse might need to be restarted after creating the configuration files in Step1 and Step2 (i.e, CustomWorkItem.conf and drools.rulebase.conf files in META-INF directory of the project)

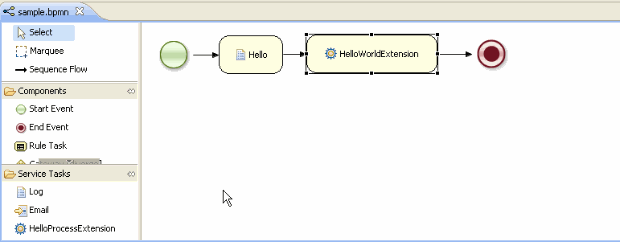
The new workitem 'HelloProcessExtension' can be seen in 'Service Tasks' as shown below.

ScreenHunter_03 Mar. 27 22.34.gif

'HelloProcesExtension' node can be created inside the process using drag and drop.


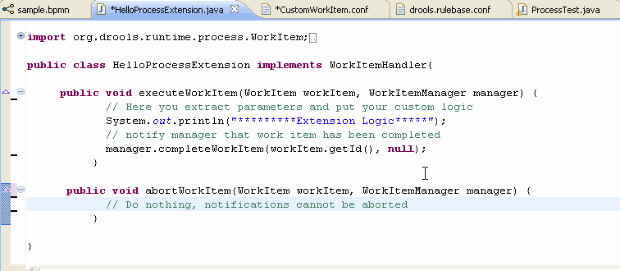
4.) A WorkItemHandler implementation class needs to be created for the 'HelloProcessExtension' node.


ScreenHunter_05 Mar. 27 23.12.gif

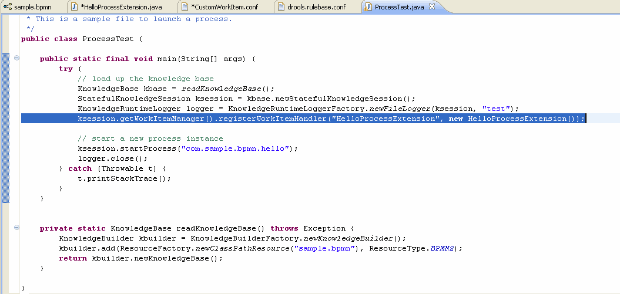
5.) The WorkItemHandler should be registered at the WorkItemManager, using API as shown below (in ProcessTest.java)

ScreenHunter_06 Mar. 27 23.15.gif

This example shows the persistence feature of JBPM5 using Hello Proces example (http://community.jboss.org/people/bpmn2user/blog/2011/02/27/helloprocess-example-using-jbpm5-eclipse-plug-in).


JBPM5 database persistence involves following categories:


1.) Process persistence: This involves persisting runtime state that represents current execution state in a specific context. The runtime state contains the minimal runtime state that is required to continue execution at a later time. This allows restoring the state of execution of all the running processes in the event of a failure.


2.) Human task persistence: Task management component, which is treated as a separate component, can persist all the task information (e.g, user, assignment etc) into database.


3.) History or Auditlog persistence: All the audit log information(e.g., ProcessInstanceLog, NodeInstanceLog etc)can stored in database for reporting purposes.


How to install and run this example?

Start with the setup as shown in http://community.jboss.org/people/bpmn2user/blog/2011/02/27/helloprocess-example-using-jbpm5-eclipse-plug-in.

This example needs two jar files, one for database (e.g, h2.jar for H2, oracle-11.1.0.6.jar for Oracel etc) and another one Bitronix transaction manager (btm-1.3.3.jar). Add theste two jar files into Eclipse's project classpath.

ScreenHunter_03 Mar. 25 17.58.gif


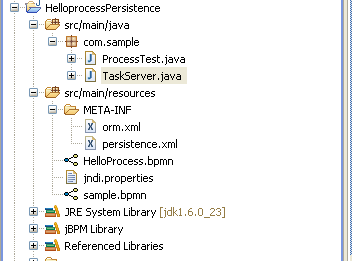
This examples has a bpmn file (HelloProcess.bpmn), a process test program that starts the process(ProcessTest.java), a standalone task server (TaskServer.java), two persistence configuration files (orm.xml and persistence.xml ) and a Bitronix JNDI file ( jndi.properties) .

The persistence configuration files need to be included in META-INF folder as shown below. Please refer to JPA/Hibernate documents to know more about persistence configuration details.


ScreenHunter_01 Mar. 26 21.15.gif


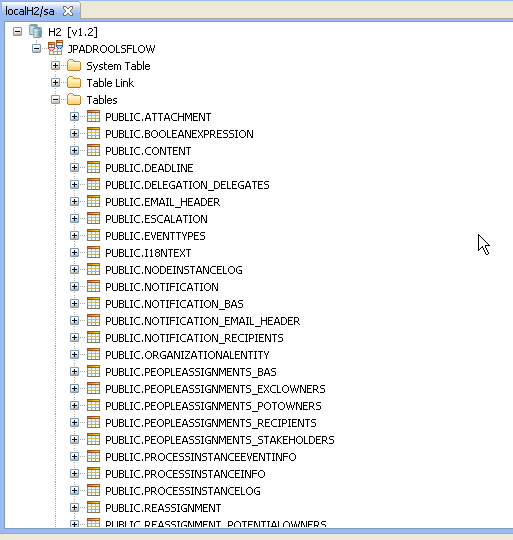
After running the example successfully, tables for process, human task etc are created as shown below.

ScreenHunter_02 Mar. 26 21.20.gif


The task can be approved using the Eclipse  plugin. Select the plugin using Windows->ShowView->DRools Task->Human Task View.

ScreenHunter_02 Mar. 27 13.41.gif


The logging for Hibernate persistence is set to true to display the generated SQL queries as shown below.

Process logs from ProcessTest.java


ScreenHunter_03 Mar. 26 21.22.gif

Taskserver logs from TaskServer.java

ScreenHunter_04 Mar. 26 21.23.gif


Here are some important points to note:

Process persistence: It uses JPA/Hibernate as default to persist the runtime state. Create the knowledge session as shown below .


/*

     * Create EntityManagerFactory and register it in the environment

     * Create the knowledge session that uses JPA to persists runtime state

     */


    private static StatefulKnowledgeSession createKnowledgeSession(KnowledgeBase kbase) {

        EntityManagerFactory emf = Persistence.createEntityManagerFactory( "org.jbpm.persistence.jpa" );

        Environment env = KnowledgeBaseFactory.newEnvironment();

        env.set( EnvironmentName.ENTITY_MANAGER_FACTORY, emf );

        env.set( EnvironmentName.TRANSACTION_MANAGER, TransactionManagerServices.getTransactionManager() );

        env.set( EnvironmentName.GLOBALS, new MapGlobalResolver() );


        Properties properties = new Properties();

        properties.put("drools.processInstanceManagerFactory", "org.jbpm.persistence.processinstance.JPAProcessInstanceManagerFactory");

        properties.put("drools.processSignalManagerFactory", "org.jbpm.persistence.processinstance.JPASignalManagerFactory");

        KnowledgeSessionConfiguration config = KnowledgeBaseFactory.newKnowledgeSessionConfiguration(properties);

        return JPAKnowledgeService.newStatefulKnowledgeSession(kbase, config, env);


    }


Persistence configuration file (persistence.xml) includes the classes that are required for process persistence.

ScreenHunter_07 Mar. 25 20.19.gif


Human task persistence has another independent persistencecomponent which is responsible for persisting task related activities (e.g.,task assignments, comments, content, notification etc)


The human task management component is an independent service which has communication with the process engine. This is started using 'TaskServer.java' class.


            EntityManagerFactory emfTask = Persistence.createEntityManagerFactory( "org.jbpm.task" );

            TaskService taskService = new TaskService(emfTask, SystemEventListenerFactory.getSystemEventListener());


           /* Start Mina server for HT*/

            MinaTaskServer server = new MinaTaskServer(taskService);

            Thread thread = new Thread(server);

            thread.start();


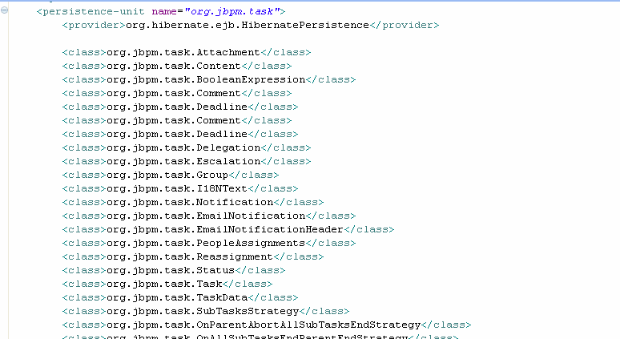
It is also required to have the corresponding human task classes in the Hibernate persistence configuration file (persistence.xml) as shown below.


ScreenHunter_08 Mar. 25 20.31.gif


History or Auditlog persistence: The persistence configuration file should also include the classes that correspond to audit logs.


ScreenHunter_09 Mar. 25 20.37.gif

Here is an example that shows how to use custom Java classes from the JBPM5 example described in http://community.jboss.org/people/bpmn2user/blog/2011/02/21/jbpm5-example-for-forms-with-variables.


Rajesh Chikhale has modified the bpmn file from the above example to access a custom Test class (http://community.jboss.org/people/bpmn2user/blog/2011/02/21/jbpm5-example-for-forms-with-variables#/?page=2) from 'Check Quantity' node.


It is typically required to access the custom application classes (e.g, read application model data, write to application database, include custom business logic etc) from a workflow application.


Here are two steps that are required to access the custom Test class from the BPM application.


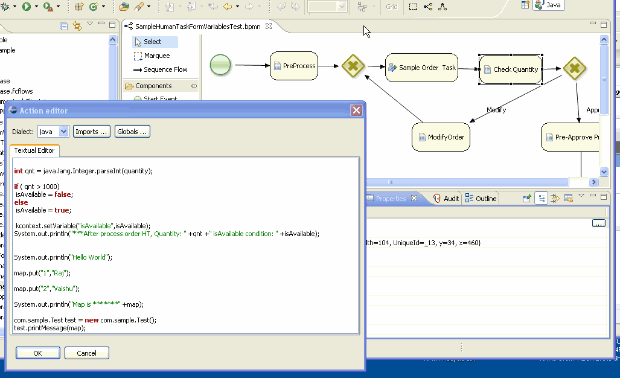
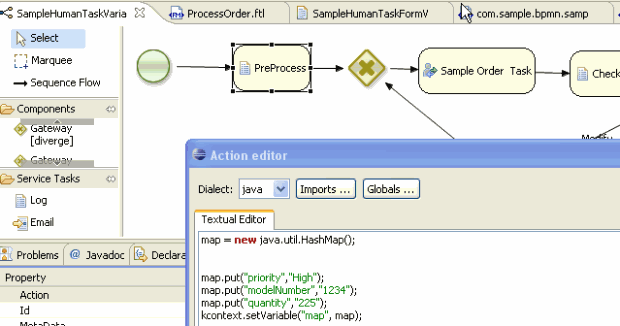
1.) Access the custom class (com.sample.Test) from scipt node as shown in example below.

Make sure to include the fully-qualified Java class name (i.e, com.sample.Test) or include the package name using the 'imports' tab shown below.

ScreenHunter_01 Mar. 14 22.07.gif

2.) Create a jar for all the custom Java classes, e.g, com.sample.Test and copy the jar file into server's CLASSPATH. For example, it can be one of the options as shown below:


Copy the jar file into gwt-console-server war file  ( ..gwt-console-server\WEB-INF\lib)

or Copy the jar file into appserver's lib direcory (JBOSS_HOME\server\default\lib for JBOSS or TOMCAT_HOME\lib for TOMCAT)

Excel decision tables are widely used to represent rule logic in a compact format.

This format is particularly popular as non-technical business users can read, edit and maintain the conditional logic in Excel spreadsheets.


This example shows how to use an Excel decision table rules inside a process.

The ‘Rule Task’ components can use the rules defined in a drl file, Excel decision table or the rules defined in BRMS (Guvnor).

An example to use the rules defined in drl file is shown in http://community.jboss.org/people/bpmn2user/blog/2011/03/07/jbpm5--ruletask-example.

This example shows how to run the same example using Excel decision table.


Please refer to Drools documentation (http://downloads.jboss.com/drools/docs/5.1.1.34858.FINAL/drools-expert/html/ch05.html#d0e5683) to know about authoring Drools decision tables.


Here are rules represented in Excel decision table.

ScreenHunter_12 Mar. 07 18.25.gif


There are three rules in the following decision table. For example, Rule1 (Row 11) means that if the 'userlocation' is set to ‘NewYorkUser’ and the initial count is less 4, then the ‘loopcondition’ is set to 6.


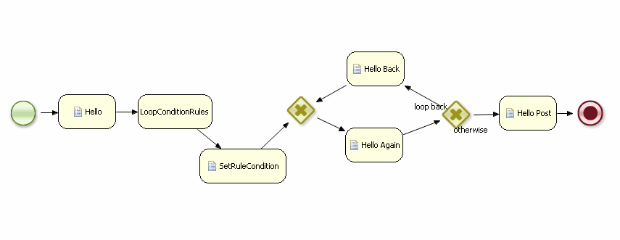
Following is the main process flow diagram. This example has a loop condition which is determined using the rules shown in the above decision table in the RuleTask 'LoopConditionRules'.


ScreenHunter_03 Mar. 07 14.14.gif

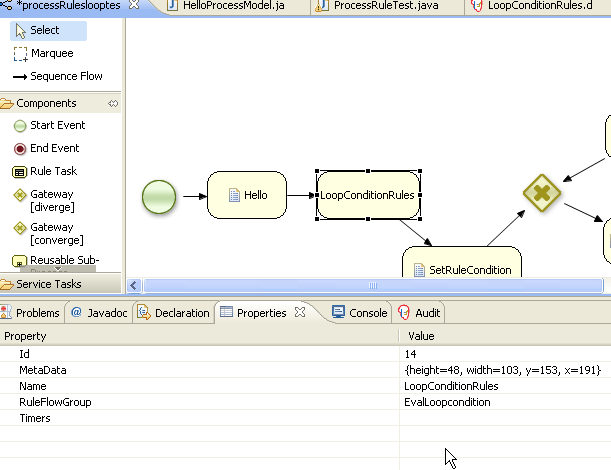
'LoopConditionRules' is a 'Rule Task' component and it needs to have a valid RuleFlowGroup name (e.g.,  EvalLoopcondistion as shown below) and it should match with the 'RULEFLOW-GROUP' name (Column C) of the decision table.


ScreenHunter_04 Mar. 07 14.14.gif

Excel decision table needs to be added to the Knowledgebase as shown below.


private static KnowledgeBase readKnowledgeBase() throws Exception {

        ProcessBuilderFactory

                .setProcessBuilderFactoryService(new ProcessBuilderFactoryServiceImpl());

        ProcessMarshallerFactory

                .setProcessMarshallerFactoryService(new ProcessMarshallerFactoryServiceImpl());

        ProcessRuntimeFactory

                .setProcessRuntimeFactoryService(new ProcessRuntimeFactoryServiceImpl());

        BPMN2ProcessFactory

                .setBPMN2ProcessProvider(new BPMN2ProcessProviderImpl());

        KnowledgeBuilder kbuilder = KnowledgeBuilderFactory

                .newKnowledgeBuilder();

        kbuilder.add(ResourceFactory.newClassPathResource("processRuleslooptest777.bpmn"),

                ResourceType.BPMN2);

        /*

         * Add Excel decision table file

         */


        DecisionTableConfiguration config = KnowledgeBuilderFactory.newDecisionTableConfiguration();

        config.setInputType(DecisionTableInputType.XLS);

        kbuilder.add(ResourceFactory.newClassPathResource("LoopConditionRules.xls"), ResourceType.DTABLE, config);


        return kbuilder.newKnowledgeBase();

    }


How to deploy?

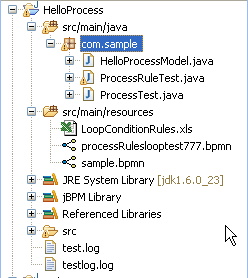
This example has a bpmn file (processRuleslooptest777.bpmn), model file (HelloProcessModel.java), rules file (LoopConditionRules.xls) and a test file (HelloProcessTest.java). It might be easy to start with a HelloProcess project (http://community.jboss.org/people/bpmn2user/blog/2011/02/27/helloprocess-example-using-jbpm5-eclipse-plug-in) and import these files.

ScreenHunter_13 Mar. 07 19.30.gif


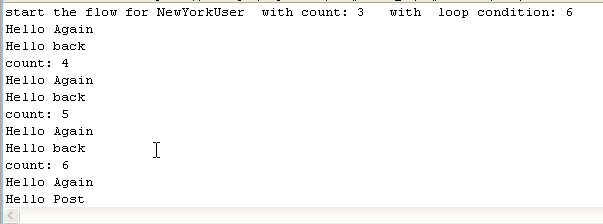
Following results can be seen after successfully running the example.

ScreenHunter_07 Mar. 07 14.18.gif

Here is an example that shows how to use 'Rule Task' component with a process.

A simple example shown in http://community.jboss.org/people/bpmn2user/blog/2011/03/01/jbpm5--loop-example is considered here to illustrate the feature.


This example has a loop condition which is determined using the rules based on the location of the user and the starting condition.


ScreenHunter_03 Mar. 07 14.14.gif

'LoopConditionRules' is a 'Rule Task' component and it needs to have a valid RuleFlowGroup name (e.g.,  EvalLoopcondistion as shown below).


ScreenHunter_04 Mar. 07 14.14.gif

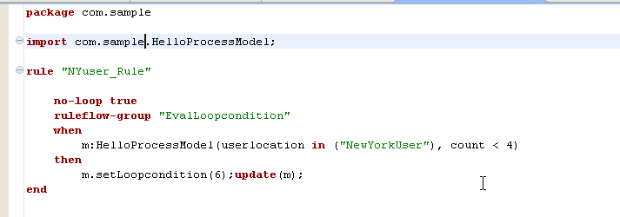
The RuleFlowGroup set in the previous step has to match with the 'ruleflow-group' name in the 'drl' rules file as shown below.


ScreenHunter_05 Mar. 07 14.15.gif


Here is the sample test code to start the process after setting the initial parameters.


          // load up the knowledge base

            KnowledgeBase kbase = readKnowledgeBase();

            StatefulKnowledgeSession ksession = createSession(kbase);

            KnowledgeRuntimeLogger logger = KnowledgeRuntimeLoggerFactory

                    .newFileLogger(ksession, "test");


            // set the parameters

            Map<String, Object> params = new HashMap<String, Object>();

            HelloProcessModel hpm = new HelloProcessModel();

            hpm.setCount(new Integer("3"));

            hpm.setUserlocation("NewYorkUser");

            params.put("hpm", hpm);


            ksession.startProcess("looptest777",params);


            ksession.fireAllRules();

            logger.close();


Note that the 'drl' rules file needs to be added to the knowledgebase as shown below.


private static KnowledgeBase readKnowledgeBase() throws Exception {

        ProcessBuilderFactory

                .setProcessBuilderFactoryService(new ProcessBuilderFactoryServiceImpl());

        ProcessMarshallerFactory

                .setProcessMarshallerFactoryService(new ProcessMarshallerFactoryServiceImpl());

        ProcessRuntimeFactory

                .setProcessRuntimeFactoryService(new ProcessRuntimeFactoryServiceImpl());

        BPMN2ProcessFactory

                .setBPMN2ProcessProvider(new BPMN2ProcessProviderImpl());

        KnowledgeBuilder kbuilder = KnowledgeBuilderFactory

                .newKnowledgeBuilder();

        kbuilder.add(ResourceFactory.newClassPathResource("processRuleslooptest777.bpmn"),

                ResourceType.BPMN2);

        /*

         * Add drl file

         */

        kbuilder.add(ResourceFactory.newClassPathResource("LoopConditionRules.drl"), ResourceType.DRL);

        return kbuilder.newKnowledgeBase();

    }


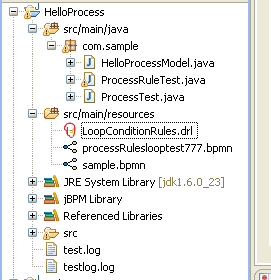
How to run this example?


This example has a bpmn file (processRuleslooptest777.bpmn), model file (HelloProcessModel.java), rules file (LoopConditionRules.drl) and a test file (HelloProcessTest.java). It might be easy to start with a HelloProcess project (http://community.jboss.org/people/bpmn2user/blog/2011/02/27/helloprocess-example-using-jbpm5-eclipse-plug-in) and import these files.


ScreenHunter_08 Mar. 07 14.43.gif


Following results can be seen after successfully running the example.

ScreenHunter_07 Mar. 07 14.18.gif

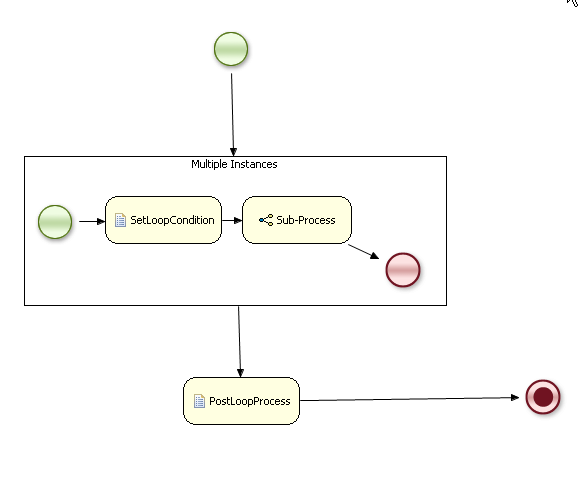
JBPM5 provides 'Multiple Instances' node that can be used to create multiple instances of reusable sub-processes.


Here is a simple example that shows how to send a colection of elements to sub-process nodes and invoke mutiple processes.

The example from the discussion http://community.jboss.org/thread/163105?tstart=0 is considered here to illustrate the usage.


It has a main process (sampleMultiLoopSubprocessTest.bpmn) that invokes multiple sub-processes (multilooptest777.bpmn).

The main process sends a list of parameters (initial count ) to the sub-process.


ScreenHunter_01 Mar. 05 15.53.gif

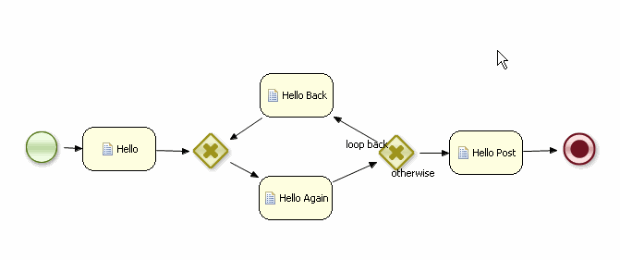
The sub-process goes through a loop incrementing the value of 'count'. Once the 'count' reaches the 'do until' loop condition value, it will exit the loop.


ScreenHunter_02 Mar. 05 15.54.gif

A list to contain the parameters that need to be sent to sub-processes are populated as shown below (MultiLoopProcessTest.java).


            Map<String, Object> params = new HashMap<String, Object>();

            List<Integer> myList = new ArrayList<Integer>();


            myList.add(process1Count);

            myList.add(process2Count);

            params.put("list", myList);


            ksession.startProcess("com.sample.bpmn.multilooptest",params);


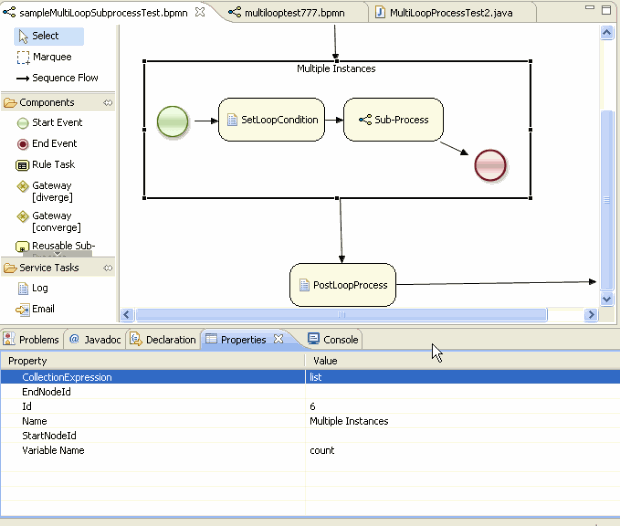
The 'CollectionExpression' is set to 'list' as shown below,


ScreenHunter_03 Mar. 05 15.54.gif

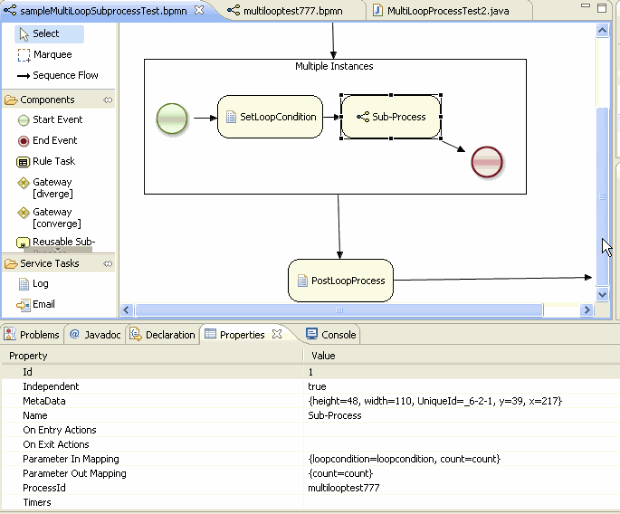
The ProcessID is set to 'multilooptest777' as shown below to bind the sub-process.

ScreenHunter_04 Mar. 05 15.54.gif


How to run this example?


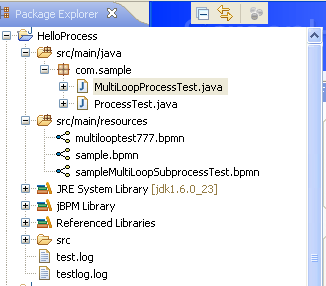
This example has two bpmn files (sampleMultiLoopSubprocessTest.bpmn for main process that invokes multiple processes and multilooptest777.bpmn for sub-process loop) and a test file (LoopSubProcessTest.java). It might be easy to start with a HelloProcess project (http://community.jboss.org/people/bpmn2user/blog/2011/02/27/helloprocess-example-using-jbpm5-eclipse-plug-in) and import these files.


ScreenHunter_06 Mar. 05 20.55.gif


Following results can be seen after successfully running this example.


ScreenHunter_05 Mar. 05 15.55.gif

bpmn2user

JBPM5 - Loop Example

Posted by bpmn2user Mar 1, 2011

Here is an example that shows how to process a loop using JBPM5.

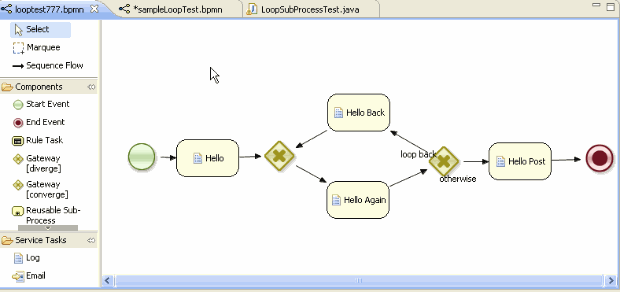
A simple example shown in the discussion http://community.jboss.org/thread/163105?tstart=0 is considered here.

This example has two parameters ‘count’ and ‘loopcondition’.

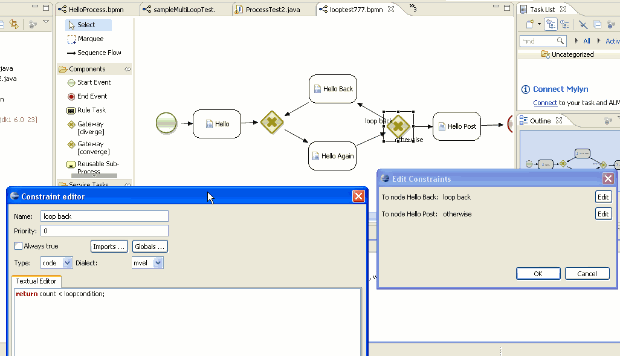
The paramter ‘count’ gets incremented in a loop until it is less than a ‘loopcondition’.


ScreenHunter_09 Mar. 01 09.41.gif


ScreenHunter_05 Mar. 01 20.34.gif

How to run this example?


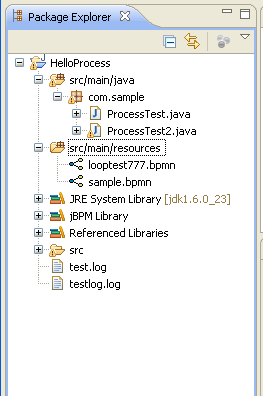
This example has a bpmn file (looptest777.bpmn) and a test file (ProcessTest2.java). It might be easy to start with a HelloProcess project (http://community.jboss.org/people/bpmn2user/blog/2011/02/27/helloprocess-example-using-jbpm5-eclipse-plug-in) and import these files.


ScreenHunter_03 Mar. 01 20.16.gif


Here is the sample test code. The main process ‘looptest777’  is started as shown below.


public static final void main(String[] args) {
  try {
   // load up the knowledge base
   KnowledgeBase kbase = readKnowledgeBase();
   StatefulKnowledgeSession ksession = createSession(kbase);
   KnowledgeRuntimeLogger logger = KnowledgeRuntimeLoggerFactory
     .newFileLogger(ksession, "test");

   // set the parameters
   Map<String, Object> params = new HashMap<String, Object>();
   params.put("count", 1);
   params.put("loopcondition", 3);
  
   // start a new process instance
   ksession.startProcess("looptest777", params);
  
   logger.close();
  } catch (Throwable t) {
   t.printStackTrace();
  }
}


Following output can be seen after running the example.

ScreenHunter_04 Mar. 01 20.18.gif

Here is an example that shows how to invoke a sub-process from a main process.

A simple example shown in the discussion http://community.jboss.org/thread/163105?tstart=0 is considered here.


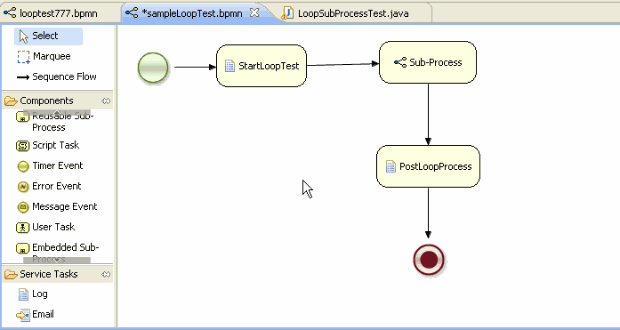
This example has a main process as shown below. It sends a couple of parameters (count and loopcondition) to the subprocess.

ScreenHunter_08 Mar. 01 09.41.gif

The sub-process goes through a loop incrementing the value of 'count'. Once the 'count' reaches the 'do until' loop condition value, it will exit the loop and return the 'count' value to the main process. The 'loopcondition' can either be set inside this sub-process or can be retrieved from the parent process. In this example, it is set as a paramter in the main process.

ScreenHunter_09 Mar. 01 09.41.gif

How to run this example?


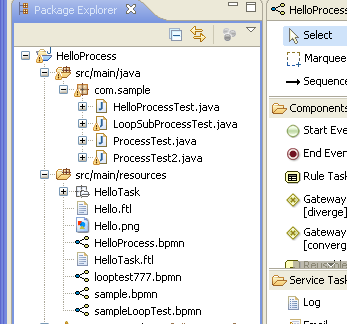
This example has two bpmn files (sampleLoopTest.bpmn for main process and looptest777.bpmn for sub-process loop) and a test file (LoopSubProcessTest.java). It might be easy to start with a HelloProcess project (http://community.jboss.org/people/bpmn2user/blog/2011/02/27/helloprocess-example-using-jbpm5-eclipse-plug-in) and import these files.

ScreenHunter_01 Mar. 01 11.47.gif


Here is the sample test code. The main process 'com.sample.bpmn.looptest'  is started as shown below which inturn invokes the sub-process.


public class LoopSubProcessTest {


   public static final void main(String[] args) {

        try {

            // load up the knowledge base

            KnowledgeBase kbase = readKnowledgeBase();

            StatefulKnowledgeSession ksession = createSession(kbase);

            KnowledgeRuntimeLogger logger = KnowledgeRuntimeLoggerFactory

                    .newFileLogger(ksession, "test");


            // Set the initial count and loopcondition

            Map<String, Object> params = new HashMap<String, Object>();

            params.put("count", 1);

            params.put("loopcondition", 4);


            //start the main process

            ksession.startProcess("com.sample.bpmn.looptest", params);


            logger.close();

        } catch (Throwable t) {

            t.printStackTrace();

        }

    }

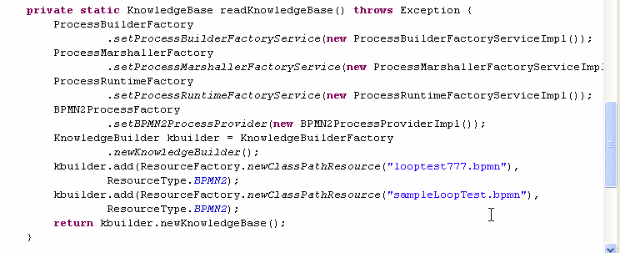
It is important to note that both the bpmn files need to be added to the KnowledgeBuilder as shown below.


IScreenHunter_11 Mar. 01 09.44.gif


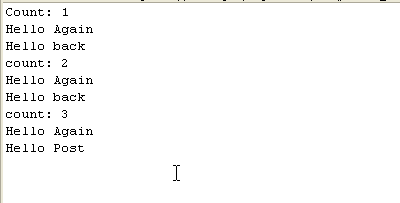
Here are the results you would see after running the test program LoopSubProcessTest.

ScreenHunter_10 Mar. 01 09.44.gif

Here is an exmple that shows how to deploy 'HelloProcess' exmaple (http://community.jboss.org/people/bpmn2user/blog/2011/02/27/helloprocess-example-using-jbpm5-eclipse-plug-in) using JBPM5 console.


How to install and run this example in an appserver (e.g. JBoss or Tomcat)?


1.) This example has one ftl file (HelloTask.ftl) for the human task following the pattern {TaskName}.ftl


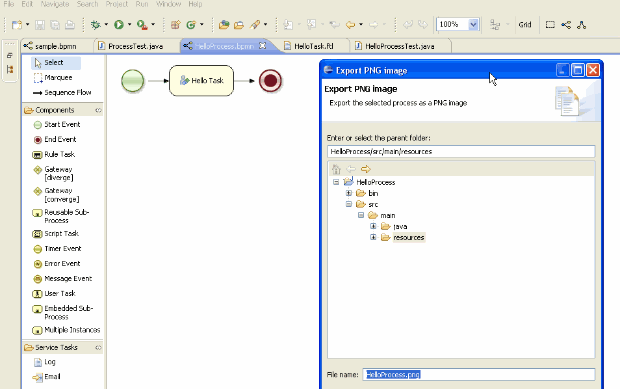
2.) Create the image of the bpmn file using 'Export image (PNG)' option.

ScreenHunter_11 Feb. 27 17.31.gif

3.) Create a jar, e.g, 'HelloProcess.jar' file for all the artifacts (HelloProcess.ftl, Hello.ftl and Hello.png).

Alternately these artifacts can also be debloyed in Guvnor as shown in

(http://people.redhat.com/kverlaen/jBPM5-guvnor-integration.swf)


4.) Copy the HelloProcess.jar to server's CLASSPATH. For example, it can be one of the options as shown below:


Copy the jar file into gwt-console-server war file  ( ..gwt-console-server\WEB-INF\lib)

or Copy the jar file into appserver's lib direcory (JBOSS_HOME\server\default\lib for JBOSS or TOMCAT_HOME\lib for TOMCAT)


5.) Copy the HelloProcess.bpmn file  to the directory where the other bpmn files are located

(specified using the parameter -Djbpm.console.directory).


6.) Start the appserver and login to http://localhttp://localhttp://localhttp://localhost:8080/jbpm-console

(krisv/krisv)

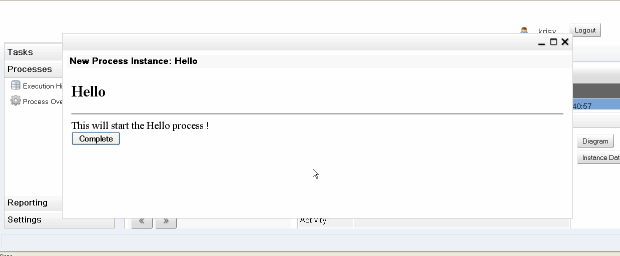
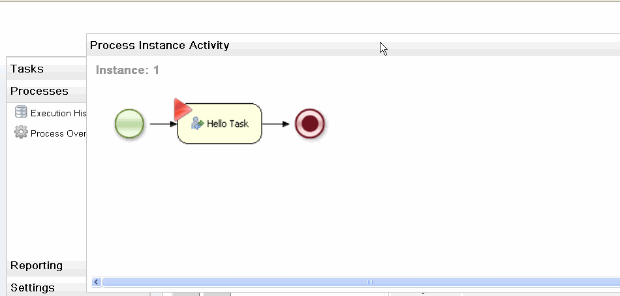
You can see the process after starting it.

ScreenHunter_12 Feb. 27 17.36.gif

ScreenHunter_13 Feb. 27 17.36.gif


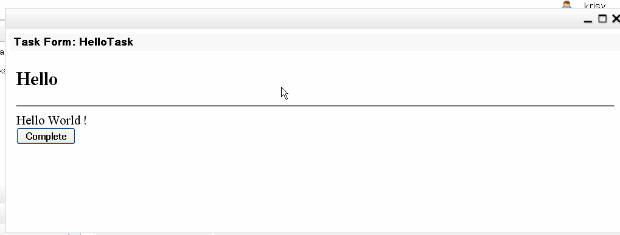
You can click on the 'Personal Tasks' and approve this task.


ScreenHunter_14 Feb. 27 17.36.gif

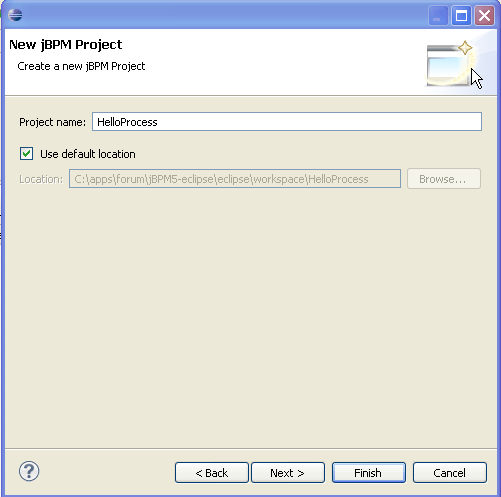
Here is an example that shows the required steps to create a HelloWorld example with jBPM5 plug-in in Eclipse.

First install jBPM5 plugin using the steps (http://community.jboss.org/people/bpmn2user/blog/2011/02/27/eclipse-plug-in-installation-for-jbpm5) or using the install script  (http://kverlaen.blogspot.com/2011/01/jbpm-50-released.html).


A simple example (http://people.redhat.com/kverlaen/jBPM5-guvnor-integration.swf) is considered here to show the features of jBPM5 eclipse plug-in.

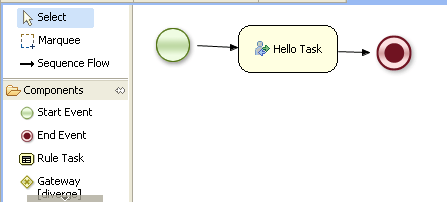
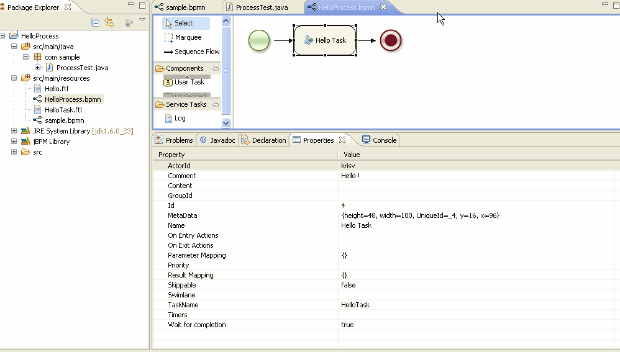
'Hello Task' is created as follows. Attached files (HelloProcess.bpmn, HelloTask.ftl and Hello.ftl) can be imported into the HelloProcess project created in http://community.jboss.org/people/bpmn2user/blog/2011/02/27/eclipse-plug-in-installation-for-jbpm5.


ScreenHunter_06 Feb. 27 13.24.gif


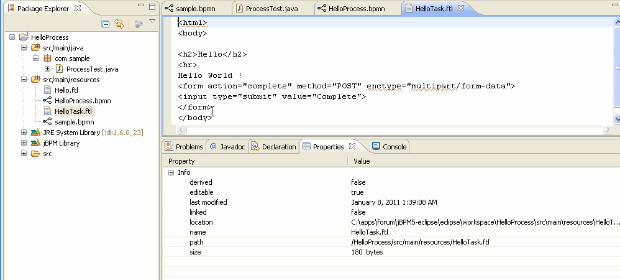
The user form for the task 'HelloTask' is created using the pattern {TaskName}.ftl as shown below.

ScreenHunter_07 Feb. 27 13.24.gif


The 'HelloProcessTest.java' is created to read the 'HelloProcess.bpmn' file as shown below (also find the complete file as an attachement below):


public class HelloProcessTest {


public static final void main(String[] args) {
  try {


EntityManagerFactory emf = Persistence.createEntityManagerFactory("org.jbpm.task");
         TaskService taskService  = new TaskService(emf, SystemEventListenerFactory.getSystemEventListener());
        
         /*
          * Add the required users
          */
         TaskServiceSession taskSession = taskService.createSession();  
         taskSession.addUser(new User("Administrator"));
         taskSession.addUser(new User("krisv"));
        
         /* Start Mina server for HT*/
         MinaTaskServer server = new MinaTaskServer(taskService);
         Thread thread = new Thread(server);
         thread.start();
         System.out.println("Server started ...");
       
         /*Create the knowledge base for HelloProcss.bpmn */
         KnowledgeBase kbase = readKnowledgeBase();
   StatefulKnowledgeSession ksession = createSession(kbase);
   KnowledgeRuntimeLogger logger = KnowledgeRuntimeLoggerFactory.newThreadedFileLogger(ksession, "testlog", 1000);
  
   ksession.getWorkItemManager().registerWorkItemHandler("Human Task", new WSHumanTaskHandler());


   System.out.println(" started the humantask");
   ksession.startProcess("Hello");

logger.close();


}


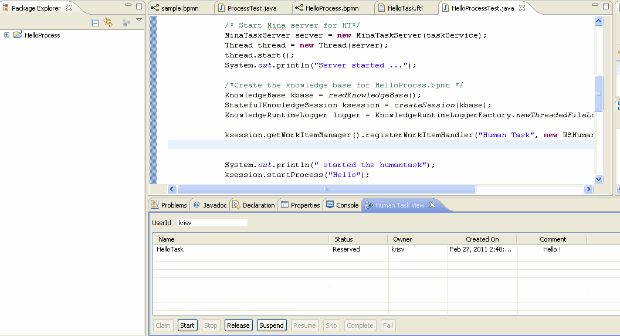
Select the 'Human Task View' using Window->ShowView->Drools Task->Human Task View. Start the program 'HelloProcessTest.java' and look for  the tasks using the userID 'krisv'. 'Hello Task' can then be selected to perform tasks such as 'Start', 'Complete' etc.

ScreenHunter_08 Feb. 27 14.50.gif

Here are the manual steps to install jBPM5 plug-in and run a sample example in Eclipse.This install is done automatically after running jBPM5 installer (http://kverlaen.blogspot.com/2011/06/jbpm-510-released.html). Following procedure, however, might be useful if you want to understand (or having problems completing the install) the main install steps provided in the automated install script for JBPM5.2. The install instructions for the previous release 5.1 can also be found in the attachment jbpm5.1install.zip.


1.) Download Eclipse Helios:

http://download.eclipse.org/technology/epp/downloads/release/helios/SR2/eclipse-java-helios-SR2-win32.zip


Unzip this into a directory, say JBPM5


2.) Download Drools and JBPM5 plugin, i.e., org.drools.updatesite-5.3.1.Final-assembly.zip:

https://repository.jboss.org/nexus/content/repositories/releases/org/drools/org.drools.updatesite/5.3.1.Final/org.drools.updatesite-5.3.1.Final-assembly.zip


Unzip this plugin to a temp directory, say TEMP\drools-update-site. Copy 'features' and 'plugins' directories from TEMP\drools-update-site into

JBPM5\eclipse


It is required to have a runtime dependant libraries that a jBPM5 sample can use.


3.) Download the libraries (jbpm-5.2.0.Final-bin.zip ) from http://sourceforge.net/projects/jbpm/files/jBPM%205/jbpm-5.2.0.Final/jbpm-5.2.0.Final-bin.zip/download and unzip into a directory, say JBPM5\runtime.


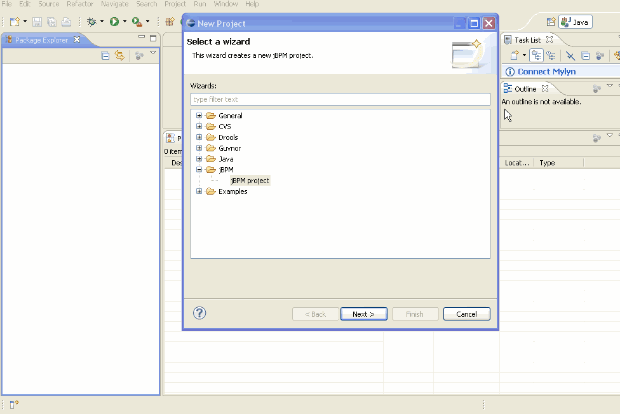
4.) Create a new jBPM sample project in Eclipse and use the runtime libraries downloaded in Step 4.


ScreenHunter_05 Feb. 27 09.42.gif


ScreenHunter_01 Feb. 27 09.19.gif

ScreenHunter_02 Feb. 27 09.19.gif

EclipseInstallSimpleHelloWorld.PNG


Select 'Configure Workspace Setting' link below and set it to 'JBPM5\runtime' directory created in Step4.


SimpleHelloWorldRuntimeSetting.PNG

RunSimpleHelloWorld.PNG


Update for the version 5.4:


Following two links can be used in Steps 2 and 3 for  JBPM 5.4 plugin and the runtime libraries.


jBPM Plugin: http://download.jboss.org/drools/release/5.5.0.Final/droolsjbpm-tools-distribution-5.5.0.Final.zip

jbpm-5.4.0.Final-bin.zip : jbpm-5.2.0.Final-bin.ziphttp://sourceforge.net/projects/jbpm/files/jBPM%205/jbpm-5.4.0.Final/jbpm-5.4.0.Final-bin.zip/download

1.) Configure the jBPM console with Tomcat (http://community.jboss.org/people/bpmn2user/blog/2011/01/21/test) and configure the datasource against the Oracle database.


a.) Add transaction and Resource information after 'WatchedResource' line in TOMCAT_HOME/conf/context.xml as shown below.


.........

..........

<WatchedResource>WEB-INF/web.xml</WatchedResource>

    <Transaction factory="bitronix.tm.BitronixUserTransactionObjectFactory" />


    <Resource name="jdbc/testDS1" auth="Container" type="javax.sql.DataSource"

               maxActive="15" maxIdle="2" maxWait="10000"

logAbandoned="true"

               username="username" password="password"

driverClassName=" oracle.jdbc.OracleDriver"

               url="jdbc:oracle:thin:@youroraclehpost:port:dbs"/>

..........

.........


b.) Create 'resource.properties' in TOMCAT_HOME/conf as shown below.


resource.ds1.className=bitronix.tm.resource.jdbc.lrc.LrcXADataSource

resource.ds1.uniqueName=jdbc/testDS1

resource.ds1.minPoolSize=0

resource.ds1.maxPoolSize=5

resource.ds1.driverProperties.driverClassName=oracle.jdbc.OracleDriver


c.) Create 'btm-config.properties' in TOMCAT_HOME/conf as shown below.


bitronix.tm.serverId=tomcat-btm-node0

bitronix.tm.journal.disk.logPart1Filename=${btm.root}/work/btm1.tlog

bitronix.tm.journal.disk.logPart2Filename=${btm.root}/work/btm2.tlog

#bitronix.tm.resource.configuration=${btm.root}/conf/resources.properties


2.) Copy Oracle driver (e.g. oracle-11.1.0.6.jar) into into TOMCAT_HOME/lib


3.) Modify hibernate.cfg.xml in TOMCAT_HOME\webapps\gwt-console-server\WEB-INF\classes\META-INF to include Oracle connection details.


e.g

......

......

<!-- Database connection settings -->

        <property name="connection.driver_class">oracle.jdbc.OracleDriver</property>

        <property name="connection.url">jdbc:oracle:thin:@yourhostname:1521:test</property>

        <property name="connection.username">dbuser</property>

        <property name="connection.password">dbpw</property>

        <!-- JDBC connection pool (use the built-in) -->

        <property name="connection.pool_size">1</property>

        <!-- SQL dialect -->

        <property name="dialect">org.hibernate.dialect.Oracle10gDialect</property>

     .......

.......


Following two steps requires repackaging the jar files as the default embedded configuration files use  h2. Also, do not use CR1 jar files as a lot of fixes for Oracle were done after CR1 release. Use latest SNAPSHOT jar files.


4.) Download and copy jbpm-human-task-5.0-SNAPSHOT.jar to TOMCAT_HOME/webapps/gwt-console-server/WEB-INF/lib


5.) Download and copy jbpm-bam-5.0-SNAPSHOT.jar to TOMCAT_HOME/webapps/gwt-console-server/WEB-INF/lib


6.) The BAM reports files (process_summary.rptdesign,overall_activity.rptdesign) need to be modified (using Eclispe BIRT plugin) to inlcude Oracle connection details.


7.) Also the Oracle driver needs to be included from BIRT ReportEngine.

Its location is TOMCAT_HOMEbirt\ReportEngine\plugins\org.eclipse.birt.report.data.oda.jdbc_2.3.2.r232_v20090212\drivers


Step6 is mainly required as the h2 database connection details are included and these should be replace with your Oracle database information.


Also,it should be noted that the design files do not have the latest table information. One of the columns for the table NodeInstanceLog (DATE has been replaced with LOG_DATE) has been changed  (http://community.jboss.org/message/571322).


Attached please find the example reports. You need to provide the hostname and connection details.


You can not open these design files with the latest BIRT plugin as these reports use 2.3.1.

Download the BIRT designer from http://archive.eclipse.org/birt/downloads/build.php?build=R-R1-2_3_1-200809221151http://archive.eclipse.org/birt/downloads/build.php?build=R-R1-2_3_1-200809221151 and modify the report files process_summary.rptdesign,overall_activity.rptdesign in TOMCAT_HOME/BIRT directory.


Note: It is also required to change the database connection details in jbpm-human-task-5.0.0.jar for the human task if this service is started seperately or embedded as a startup servlet (http://community.jboss.org/message/581372#581372)


  <properties>

      <property name="hibernate.dialect" value="org.hibernate.dialect.Oracle10gDialect"/>

      <property name="hibernate.connection.driver_class" value="oracle.jdbc.OracleDriver"/>

      <property name="hibernate.connection.url" value="jdbc:oracle:thin:@yourOraclehostname:port:dbs" />

      <property name="hibernate.connection.username" value="username"/>

      <property name="hibernate.connection.password" value="password"/>

      <property name="hibernate.connection.autocommit" value="false" />

      <property name="hibernate.max_fetch_depth" value="3"/>

      <property name="hibernate.hbm2ddl.auto" value="create" />

      <property name="hibernate.show_sql" value="false" />

    </properties>

This example shows the use of ftl forms that have variables.


Here is a sample use case.


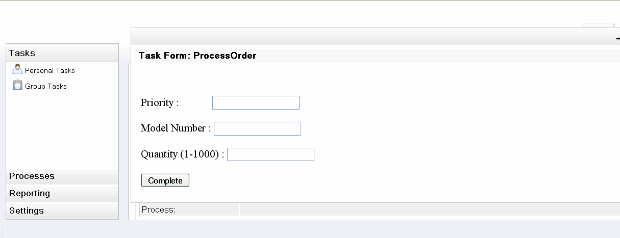
1.) User 1 (krisv) fills in a form that has three variables (Priority, Model Number, Quantity)

2.) User 2 (john) approves another form if the Qunatity is less than 1000.


This example also has a diverge node that uses a variable (isAvailable) to determine if this order can be approved by user2 or

it needs to be sent back to user1. The variable (isAvailable) is set to true if the quantity is less than 1000.


com.sample.bpmn.sampleHTformvariables.jpg


How to install and run this example in an appserver (e.g. JBoss or Tomcat)?


1.) Copy the SampleHumanTaskFormVariables.bpmn file  to the directory where the other bpmn files are located

(specified using the parameter -Djbpm.console.directory).


2.) Copy the sampleHTFormVariables.jar to server's CLASSPATH. For example, it can be one of the options as shown below:


Copy the jar file into gwt-console-server war file  ( ..gwt-console-server\WEB-INF\lib)

or Copy the jar file into appserver's lib direcory (JBOSS_HOME\server\default\lib for JBOSS or TOMCAT_HOME\lib for TOMCAT)


This jar file basically has a couple of ftl forms for the two users (one for 'krisv' and the other for 'john') and an image file.


Here are the main steps to create this sample:


1.) Create the  bpmn file using jBPM5 Eclispe plugin or any BPMN editor such as Oryx or Koens Aers's BPMN (http://community.jboss.org/thread/160088) editor.


2.) Create the required human task forms using ftl templates using the pattern {TaskName}.ftl.


3.) Create the image of the BPMN, e.g, using 'Export image(PNG)' option.


4.) Package all the ftl template files and the image file into a jar file and copy it to the classpath, i.e.,

gwt-console-server's WEB-INF\lib directory. Alternately you can also use Guvnor to load the artifacts.


Here are the main points to note:


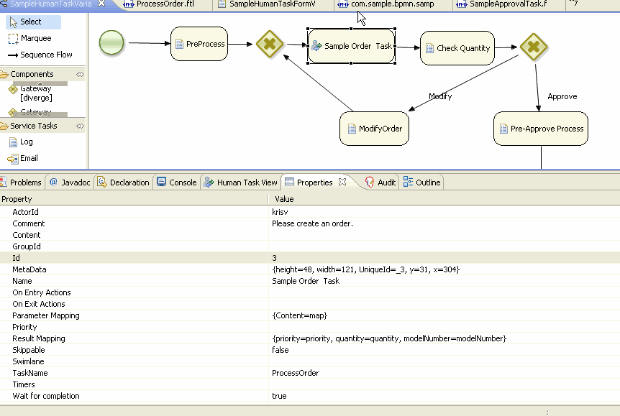
1.) The  name of a template for a  task node should be same as the 'TaskName' property of the task node.

For example, 'TaskName' for the task node 'Sample Order Task' is defined as 'ProcessOder'. So the template for this node is 'ProcessOder.ftl'


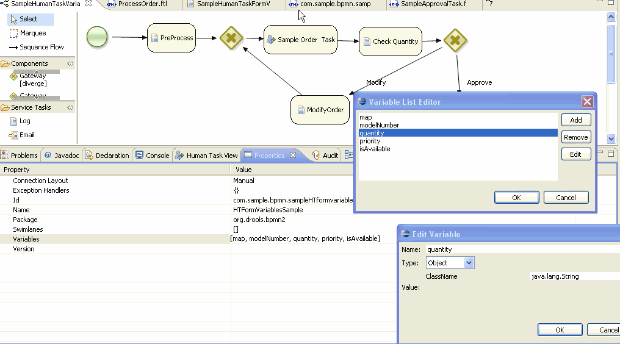
2.) All the variables are defined for the bpmn file as shown below.


ScreenHunter_01 Feb. 21 22.18.gif


3.) The task node can have the 'Content' parameter set to Map. If a Map is populated with all the required variables, these variables can be accessed from the ftl templates. Note that 'Content' only allows Map at this time, i.e, not multiple variables.

ScreenHunter_02 Feb. 21 22.24.gif


4.) It can be seen from the following diagram that 'Parameter Mapping', (i.e input to the 'Sample Order Task') can be set to the Map from the previous step. It can also be seen that all the output variables can be set using 'Result Mapping'. It should be noted that these variables are returned as individual parameters, i.e., not as a Map.


ScreenHunter_03 Feb. 21 22.27.gif


5.) The ftl templates can be created using various editors (http://freemarker.sourceforge.net/editors.html)


ScreenHunter_05 Feb. 21 23.00.gif

Here are the required steps to get the jBPM5 console running in Tomcat6, h2 database and Bitronix transaction manager.


1.)    Copy the console war files provided in JBPM_INSTALLER/lib into Tomcat’s webapps directory

These war files can also be downloaded from   (http://sourceforge.net/projects/jbpm/files/jBPM%205/jbpm-5.0-Final/). This download has two war files jbpm-gwt-console-5.0.0.war and jbpm-gwt-console-server-5.0.0.war. Rename them to jbpm-console.war and gwt-console-server.war and copy them to TOMCAT_HOME/webapps


2.)    Create users and roles in TOMCAT_HOME/conf/tomcat-users.xml.

Here is an example

<?xml version='1.0' encoding='utf-8'?>

<tomcat-users>

  <role rolename="tomcat"/>

  <role rolename="role1"/>

  <role rolename="manager"/>

  <role rolename="admin"/>

  <role rolename="user"/>

  <user username="tomcat" password="tomcat" roles="tomcat"/>

  <user username="both" password="tomcat" roles="tomcat,role1"/>

  <user username="role1" password="tomcat" roles="role1"/>

  <user username="manager" password="manager" roles="manager"/>

  <user username="krisv" password="krisv" roles="manager,admin,user"/>

  <user username="john" password="john" roles="manager,admin,user"/>

  <user username="mary" password="mary" roles="manager,admin,user"/>

</tomcat-users>


3.)    Set the jbpm.console.directory in Catalina.bat (.sh)

Here is an example.

.. -Djbpm.console.directory=C:/jbpm5/CR1/jbpm-installer/sample/evaluation/src/main/resources ..


4.) Copy JBPM_INSTALLER\jboss-4.2.3.GA server\default\data\birt into TOMCAT_HOME\birt.  This will provide the reporting functionality


5.)    Copy the database driver (e.g., h2.jar) and all the dependant jar files into TOMCAT_HOME/lib.


If you use other databases such as Oracle, Mysql etc, you need to copy the corresponding jar files (http://community.jboss.org/thread/161643)

Here are the required libraries:


jbpm-persistence-jpa-5.0-CR1.jar

h2-1.2.124.jar

persistence-api-1.0.jar

geronimo-jta_1.0.1B_spec-1.0.1.jar

javassist-3.4.GA.jar

hibernate-entitymanager-3.4.0.GA.jar

hibernate-core-3.3.0.SP1.jar

hibernate-commons-annotations-3.1.0.GA.jar

hibernate-annotations-3.4.0.GA.jar

ejb3-persistence-1.0.2.GA.jar

dom4j-1.6.1.jar

commons-collections-3.1.jar

antlr-2.7.6.jar

btm-tomcat55-lifecycle-1.3.3.jar

slf4j-api-1.5.2.jar

slf4j-jdk14-1.5.2.jar

btm-1.3.1.jar

geronimo-jta_1.0.1B_spec-1.0.1.jar


6.)    Start database:

e.g, run ‘ant h2.start’ from JBPM_INSTALLER directory.


7.)    Start human task, e.g., run ‘ant start.human.task’ from JBPM_INSTALLER directory

You can also integrate the human task service as a startup servlet (http://community.jboss.org/thread/161260)


     8.) Configure a datasource JNDI (jdbc/testDS1) using Bitronix transaction manager.


You can also refer to Bitronix (e.g., http://docs.codehaus.org/display/BTM/Tomcat13)  and Tomcat JNDI (http://tomcat.apache.org/tomcat-6.0-doc/jndi-resources-howto.html) configuration documentation.


     a.) Create the following btm-config.properties in TOMCAT_HOME/conf


bitronix.tm.serverId=tomcat-btm-node0

bitronix.tm.journal.disk.logPart1Filename=${btm.root}/work/btm1.tlog

bitronix.tm.journal.disk.logPart2Filename=${btm.root}/work/btm2.tlog

bitronix.tm.resource.configuration=${btm.root}/conf/resources.properties


    b.) Add transaction and Resource information after 'WatchedResource' line in TOMCAT_HOME/conf/context.xml as shown below.


.........

..........

<WatchedResource>WEB-INF/web.xml</WatchedResource>

    <Transaction factory="bitronix.tm.BitronixUserTransactionObjectFactory" />


    <Resource name="jdbc/testDS1" auth="Container" type="javax.sql.DataSource"

               maxActive="15" maxIdle="2" maxWait="10000"

logAbandoned="true"

               username="sa" password=""

driverClassName="org.h2.jdbcx.JdbcDataSource"

               url="jdbc:h2:tcp://localhost/~/test"/>

..........

.........


c.) Create 'resource.properties' in TOMCAT_HOME/conf as shown below.


resource.ds1.className=bitronix.tm.resource.jdbc.lrc.LrcXADataSource

resource.ds1.uniqueName=jdbc/testDS1

resource.ds1.minPoolSize=0

resource.ds1.maxPoolSize=5

resource.ds1.driverProperties.driverClassName=org.h2.jdbcx.JdbcDataSource


d.) Modify TOMCAT_HOME/conf/server.xml to include BTMLifecycleListener after the line that has GlobalResourcesLifecycleListener as shown below.


.........

<Listener className="org.apache.catalina.mbeans.GlobalResourcesLifecycleListener" />

  <Listener className="bitronix.tm.integration.tomcat55.BTMLifecycleListener" />

....


e.) Modify TOMCAT_HOME\webapps\gwt-console-server\WEB-INF\classes\META-INF\persistence.xml to include the Bitronix value  for hibernate.transaction.manager_lookup_class as shown below.


.

....

<property name="hibernate.transaction.manager_lookup_class"  value="org.hibernate.transaction.BTMTransactionManagerLookup" />

...


Login to console http://localhost:8080/jbpm-console (krisv/krisv)
Filter Blog

By date:
By tag: