Why Spring Framework and GWT?
- Spring Framework offers dependency injection, promotes POJO and unit tests.
- GWT is a popular Java framework to build rich internet application.
Spring Framework and GWT Integration
- Most GWT application needs to interact with a backend server. GWT RPC framework allows you to make calls to Java servlets.
- How do you use both GWT RPC and Spring framework?
Solution
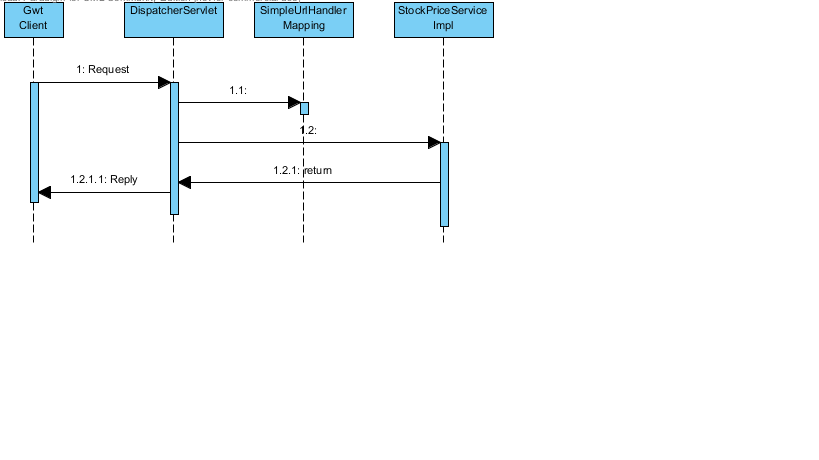
- Create a Java class that extends GWT RPC RemoteServlet and implements Spring Framework Control
- Use Spring DispatcherServlet to route the Http GWT requests to your class.
Spring GWT StockWatcher
GWT team provides a simple tutorial: StockWatcher to demonstrate how to build GWT applications. I am going to show you the steps to use Spring Framework in this application.
Step 1:
- Add Spring Framework jar files to the lib folder in your projects.
Step 2:
- Modify existing StockPriceServiceImp class to implement Spring Control and add a new method: handRequest.
public class StockPriceServiceImpl extends RemoteServiceServlet implements Controller, ServletContextAware,
StockPriceService {
private static Logger logger = Logger.getLogger(StockPriceServiceImpl.class.getName());
private static final double MAX_PRICE = 100.0; // $100.00
private static final double MAX_PRICE_CHANGE = 0.02; // +/- 2%
protected ServletContext servletContext;
public ModelAndView handleRequest(HttpServletRequest request,
HttpServletResponse response) throws Exception {
super.doPost(request, response);
return null;
}
@Override
public ServletContext getServletContext() {
return servletContext;
}
public void setServletContext(ServletContext servletContext) {
this.servletContext = servletContext;
}
public StockPrice[] getPrices(String[] symbols) throws DelistedException {
Random rnd = new Random();
logger.info("getPrices is called");
StockPrice[] prices = new StockPrice[symbols.length];
for (int i=0; i<symbols.length; i++) {
if (symbols[i].equals("ERR")) {
throw new DelistedException("ERR");
}
double price = rnd.nextDouble() * MAX_PRICE;
double change = price * MAX_PRICE_CHANGE * (rnd.nextDouble() * 2f - 1f);
prices[i] = new StockPrice(symbols[i], price, change);
}
return prices;
}
Step 3:
- Modify web.xml file to use Spring DispatcherServlet
<?xml version="1.0" encoding="UTF-8"?>
<web-app xmlns:xsi="http://www.w3.org/2001/XMLSchema-instance"
xsi:schemaLocation="http://java.sun.com/xml/ns/javaee
http://java.sun.com/xml/ns/javaee/web-app_2_5.xsd"
version="2.5"
xmlns="http://java.sun.com/xml/ns/javaee">
<!-- Listeners -->
<listener>
<listener-class>org.springframework.web.context.ContextLoaderListener</listener-class>
</listener>
<!-- Servlets -->
<servlet>
<servlet-name>gwtspring</servlet-name>
<servlet-class>org.springframework.web.servlet.DispatcherServlet</servlet-class>
</servlet>
<servlet-mapping>
<servlet-name>gwtspring</servlet-name>
<url-pattern>/stockwatcher/greet</url-pattern>
</servlet-mapping>
<!-- Default page to serve -->
<welcome-file-list>
<welcome-file>StockWatcher.html</welcome-file>
</welcome-file-list>
<servlet>
<servlet-name>stockPriceServiceImpl</servlet-name>
<servlet-class>com.google.gwt.sample.stockwatcher.server.StockPriceServiceImpl</servlet-class>
</servlet>
<servlet-mapping>
<servlet-name>gwtspring</servlet-name>
<url-pattern>/stockwatcher/stockPrices</url-pattern>
</servlet-mapping>
</web-app>
Step 4:
- Create Spring appplicationContext.xml file
<?xml version="1.0" encoding="UTF-8"?>
<beans xmlns="http://www.springframework.org/schema/beans"
xmlns:xsi="http://www.w3.org/2001/XMLSchema-instance"
xmlns:security="http://www.springframework.org/schema/security"
xsi:schemaLocation="
http://www.springframework.org/schema/beans
http://www.springframework.org/schema/beans/spring-beans.xsd
http://www.springframework.org/schema/security
http://www.springframework.org/schema/security/spring-security.xsd">
</beans>
Step 5:
- Create gwtspring-servlet.xml file. This mapping file tells Spring Framework to route the Http GWT request to your controller
<?xml version="1.0" encoding="UTF-8"?>
<beans xmlns="http://www.springframework.org/schema/beans"
xmlns:xsi="http://www.w3.org/2001/XMLSchema-instance"
xsi:schemaLocation="http://www.springframework.org/schema/beans
http://www.springframework.org/schema/beans/spring-beans-3.0.xsd">
<!-- The application context definition for the DispatcherServlet -->
<!-- Maps the request through to a concrete controller instance -->
<bean id="urlMapping" class="org.springframework.web.servlet.handler.SimpleUrlHandlerMapping">
<property name="mappings">
<value>
/**/stockPrices=gwtSpringDispatchController
</value>
</property>
</bean>
<bean id="gwtSpringDispatchController" class="com.google.gwt.sample.stockwatcher.server.StockPriceServiceImpl" scope="session" />
</beans>
Step 6:
- Test your application and download the zip file attached.