Develop Batch Applications with Red Hat Developer Studio
Posted by cfang in jBeret on Aug 12, 2018 11:43:01 PMRed Hat Developer Studio is a comprehensive IDE for developing a wide range of enterprise applications, including Java applications for batch processing. In this post, I will write about how to develop a standard-based batch application in Red Hat Developer Studio, using various JBeret libraries, and deployed to WildFly application server.
Import Sample Application
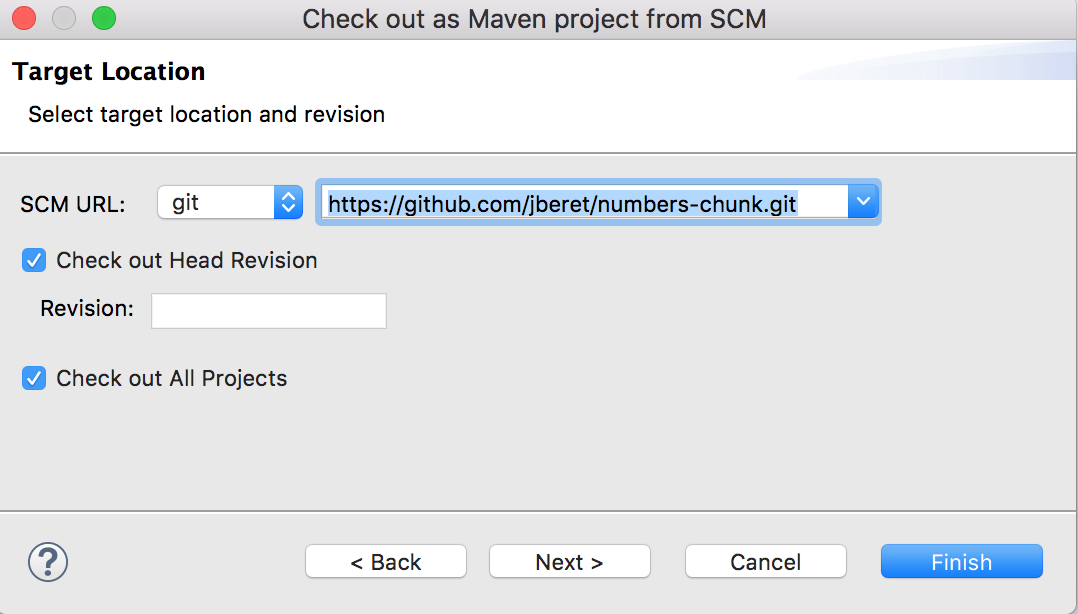
We will be using an existing batch sample application, numbers-chunk, as the base project to save us the initial setup work. First, we need to import it into the studio with the Eclipse project import wizard (File > Import, and then choose Maven > Check out Maven Projects from SCM, and then enter its git repo URL: https://github.com/jberet/numbers-chunk.git).
Now we have a fully functional Java EE batch application imported into the studio, which can be deployed and run in WildFly, or enhanced to add more jobs and processing steps. There is an existing job XML file, numbers.xml, which contains a chunk-type step reading an array of numbers and writing them out to the console. We will define a new job similar to this and also adding an item processor to the step.
Implement Item Processor Class
Create a new folder named "java" under src/main, if it does not already exist (File > New > Folder).
Create the java package structure, org.jberet.samples.wildfly.numberschunk, under src/main/java directory.
Create the item processor class by following the command sequence File > New > Other (or Command + N, or Ctrl + N) to bring up the wizard:

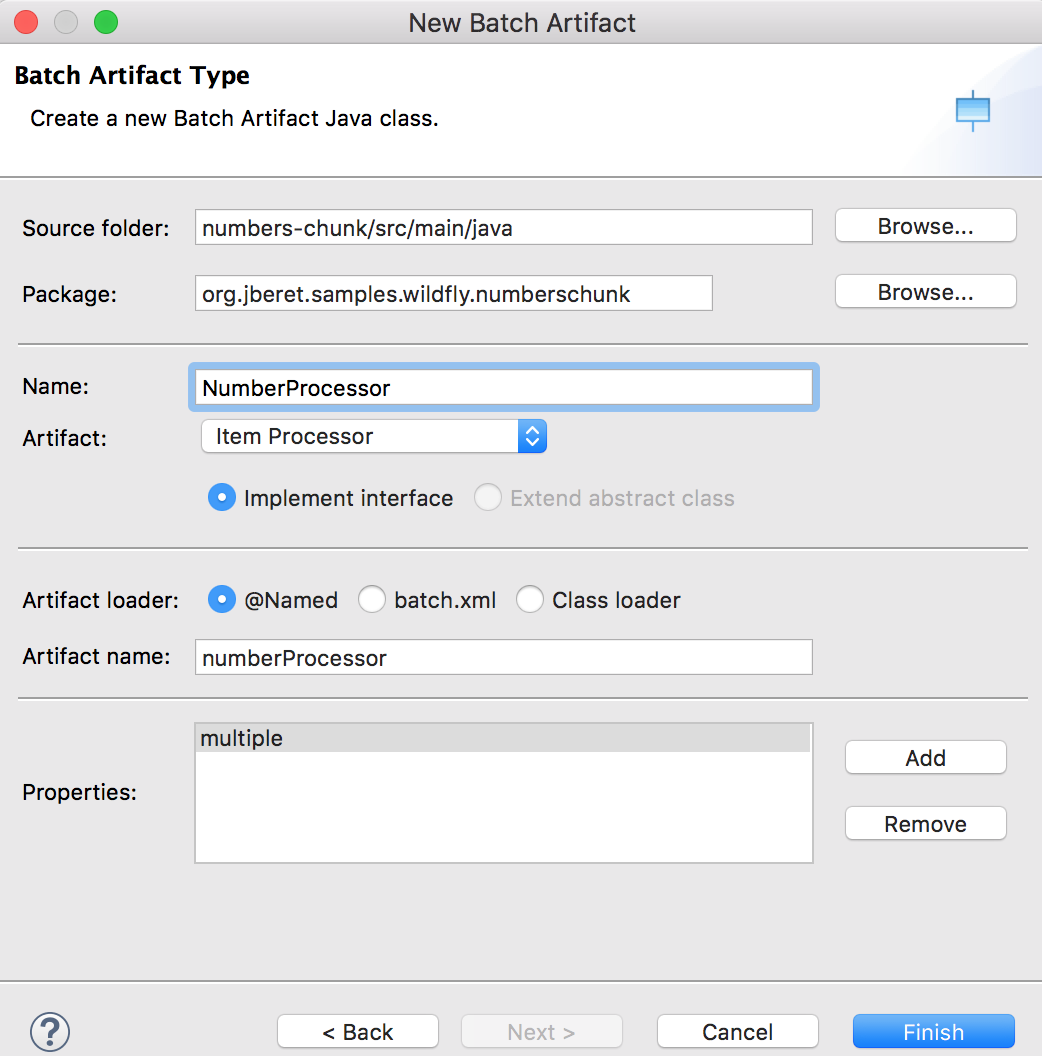
In the above wizard, specify the item processor class name: NumberProcessor, and add a property named multiple. After clicking Finish, a skeleton class is generated. And we just need to change the body of its processItem method to multiply the item number by the multiple property:
package org.jberet.samples.wildfly.numberschunk;

import javax.batch.api.BatchProperty;
import javax.batch.api.chunk.ItemProcessor;
import javax.inject.Inject;
import javax.inject.Named;

@Named
public class NumberProcessor implements ItemProcessor {

    @Inject
    @BatchProperty
    protected int multiple;

    @Override
    public Object processItem(Object item) throws Exception {
        return ((Integer) item) * multiple;
    }
}
Using the above batch artifact wizard, you can create all types of batch artifacts:
- Batchlet
- Decider
- Item Reader
- Item Writer
- Item Processor
- Checkpoint Algorithm
- Partition Mapper
- Partition Reducer
- Partition Collector
- Partition Analyzer
- Job Listener
- Step Listener
- Chunk Listener
- Item Reader Listener
- Item Process Listener
- Item Write Listener
- Skip Read Listener
- Skip Process Listener
- Skip Write Listener
- Retry Read Listener
- Retry Process Listener
- Retry Write Listener
Design Batch Job XML
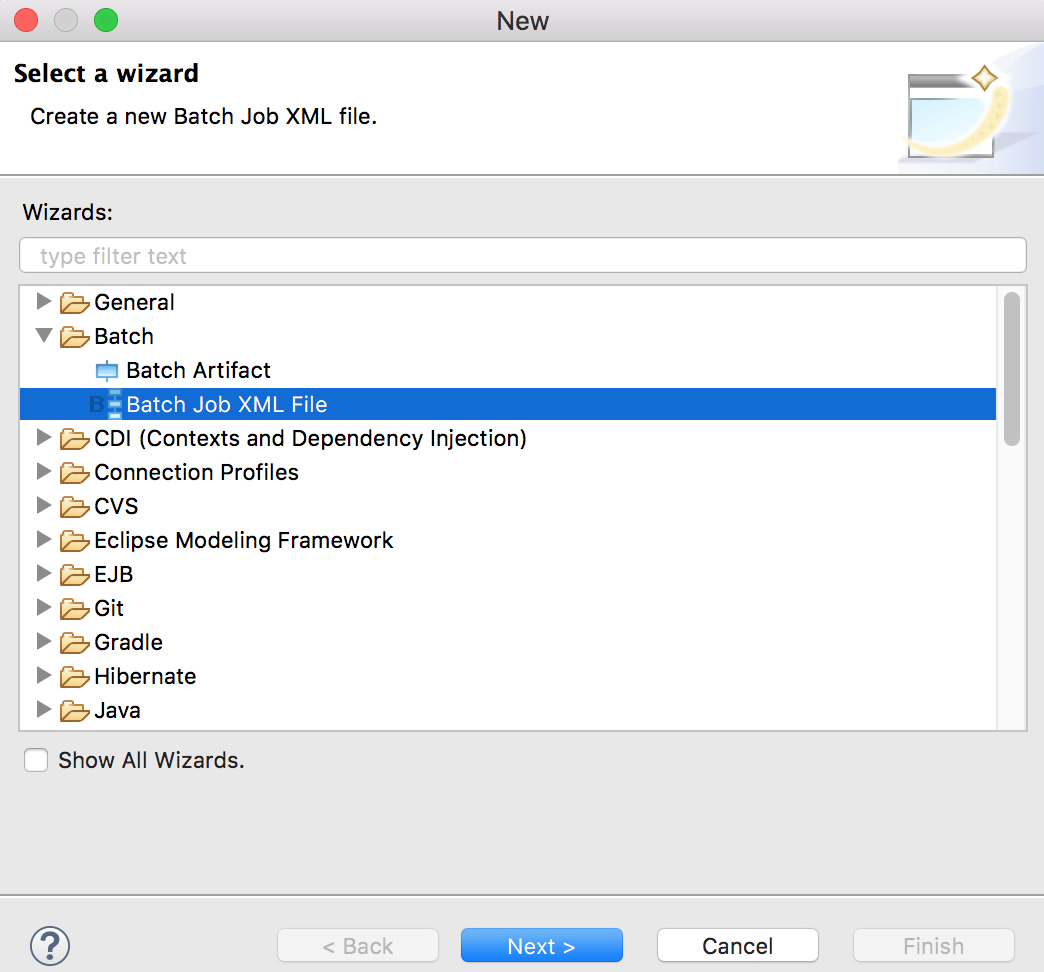
Next, let's see how the studio makes it easy to design batch job flows. Choose menu File > New > Other (Command + N or Ctrl + N) to start the batch job XML wizard:
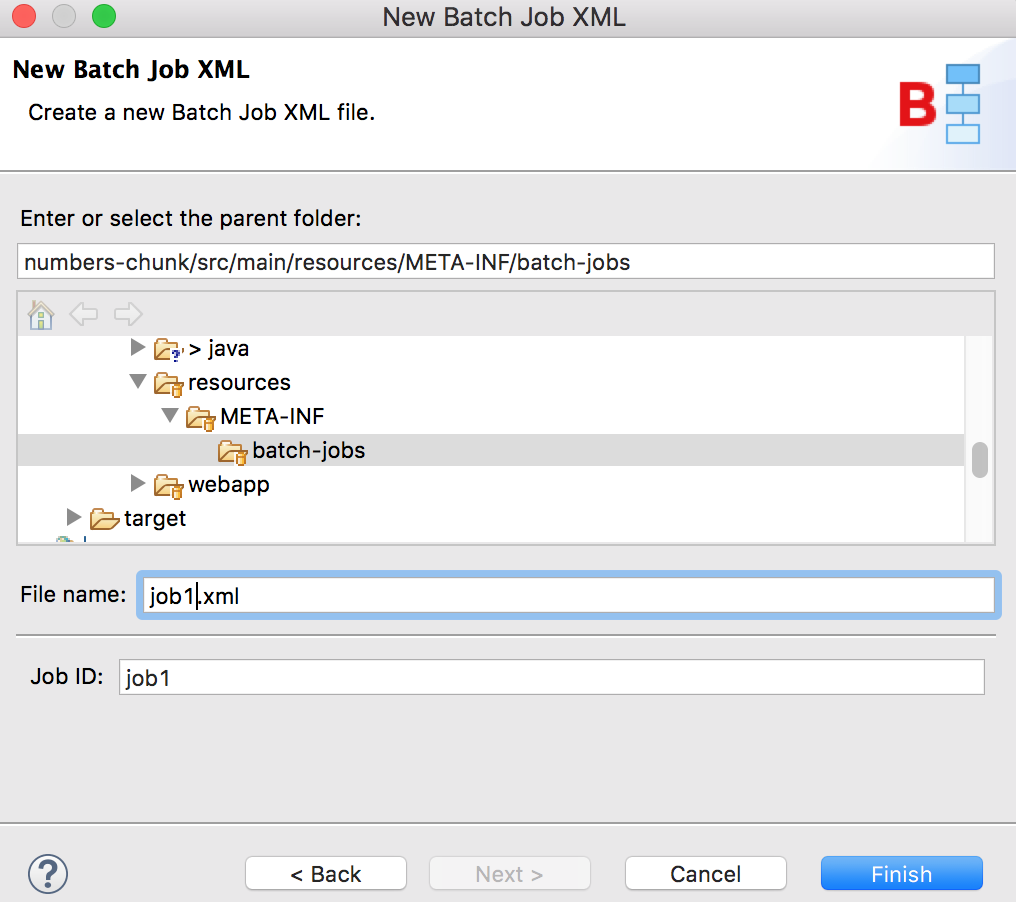
In the next screen, enter the file name for the job XML: job1.xml. Notice that the job id field is automatically updated to the same value without the .xml extension.
Define and Configure Step
After clicking Finish, the job XML skeleton is generated at the correct location, numbers-chunk/src/main/resources/META-INF/batch-jobs. In the studio editor, the job XML is displayed in 3 views: Design, Diagram and Source. You can modify the job definition in any of the 3 views and all changes will be synchronized. Next, let's add a step, step1, to the job in the Design view:
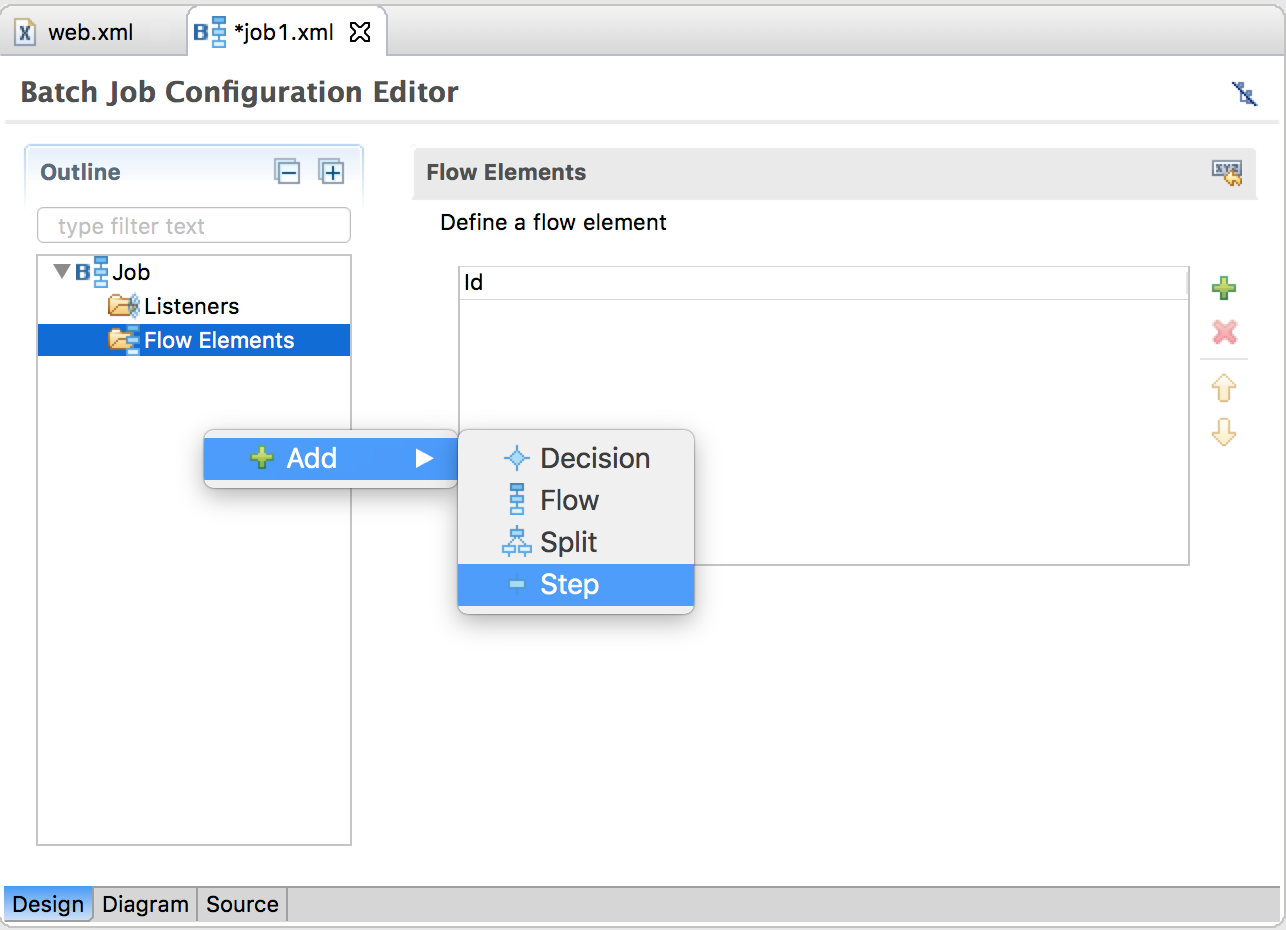
In the step details panel, add step configuration information, including id and next attribute, transition elements (fail, end, stop and next) and step properties. Note that only one of next attribute or next transition element can be specified for transition, but not both. You can enter the name and value for any number of step properties in this page.
![]()
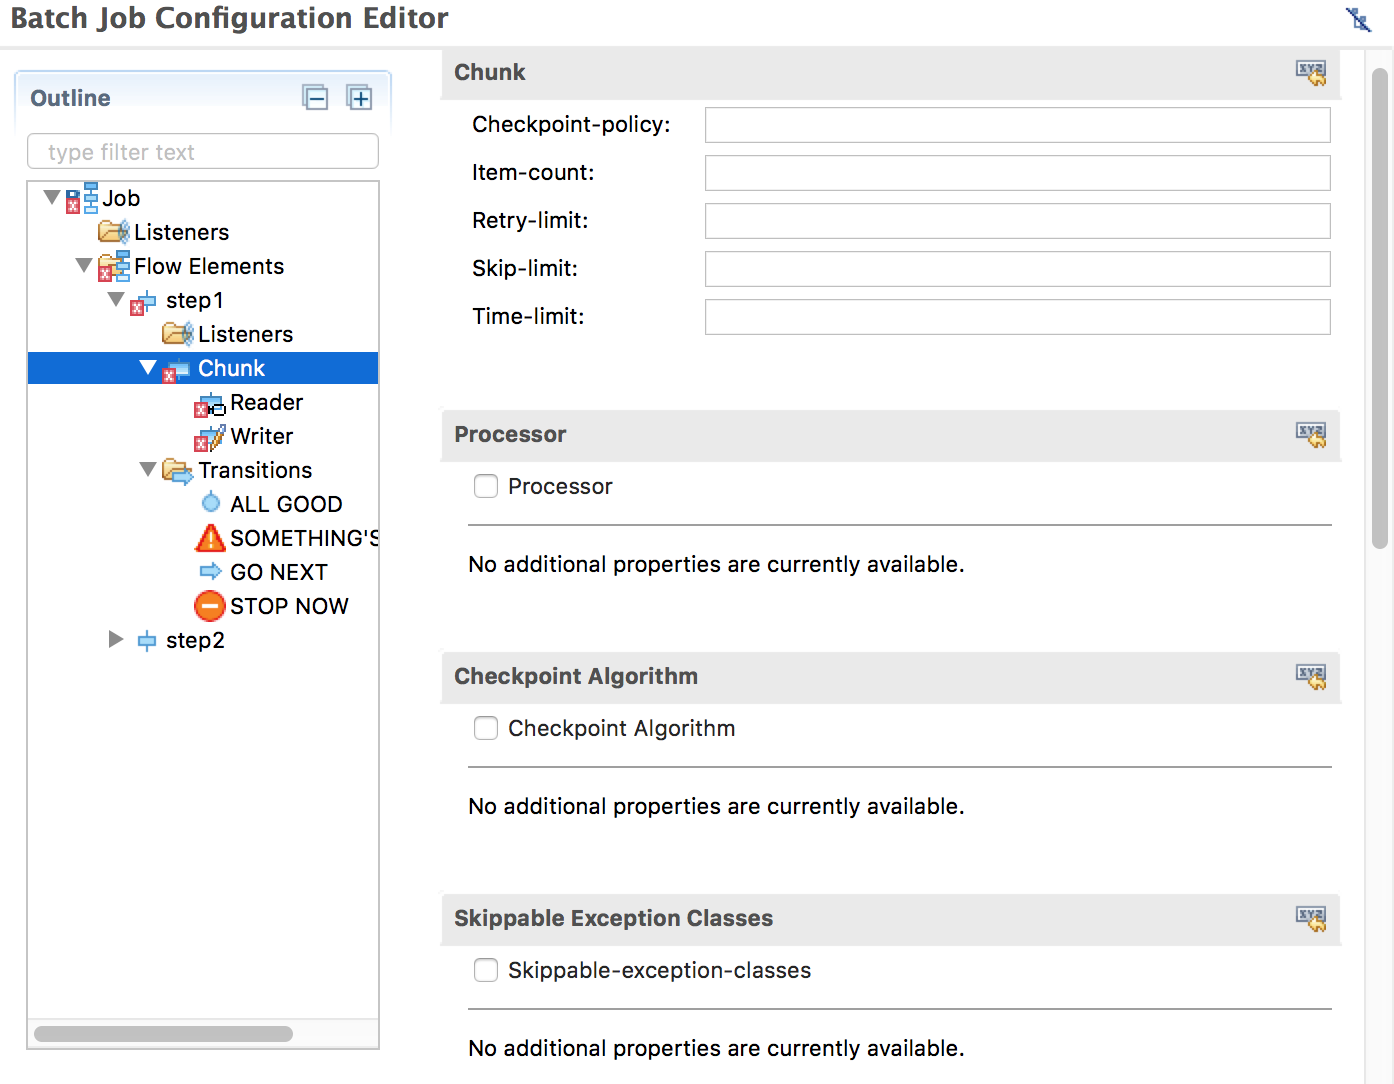
Configure Chunk
Since we want step1 to be a chunk step, we need to add a chunk element to step1. Right-click step1 on the left panel, and choose Add > Chunk in the context menu, and fill chunk attributes on the right panel. These are all optional configurations and their default values should suffice in many cases.
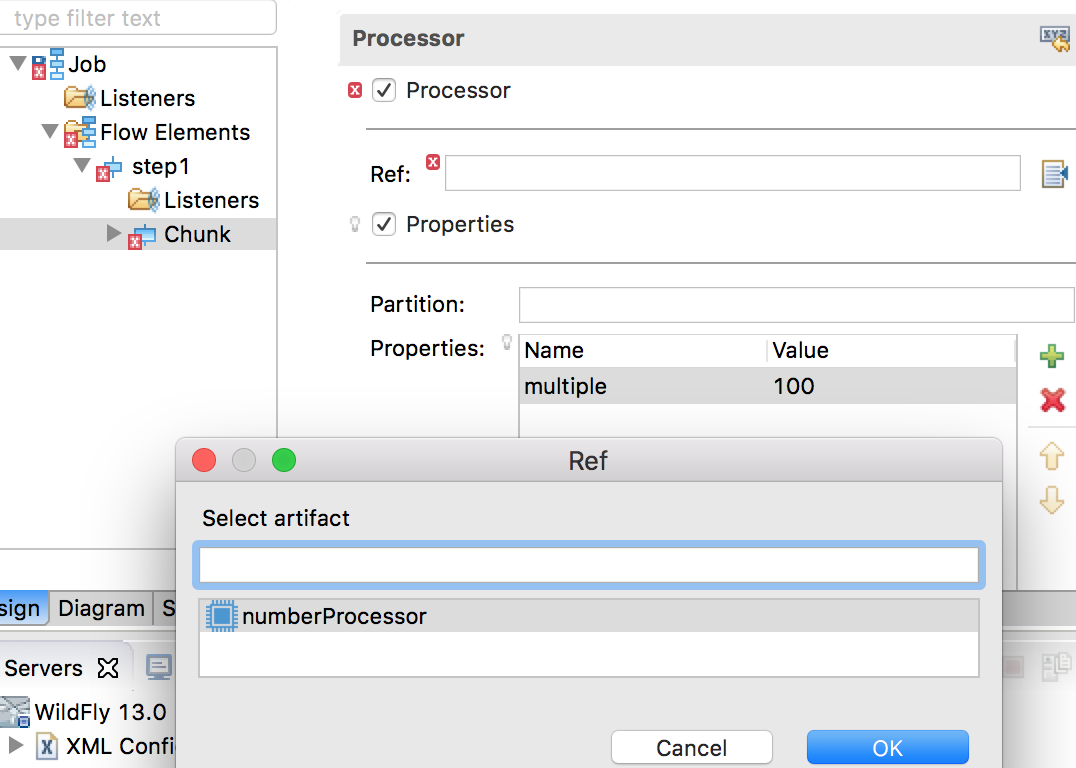
We will use the NumberProcess class we created earlier as the item processor. The Processor Ref field supports code-completion: press Ctrl-Space while the focus is in this field to display all item processors available in the application. Alternatively, you can click the browse button to the right of the input field to select artifact from all available choices.
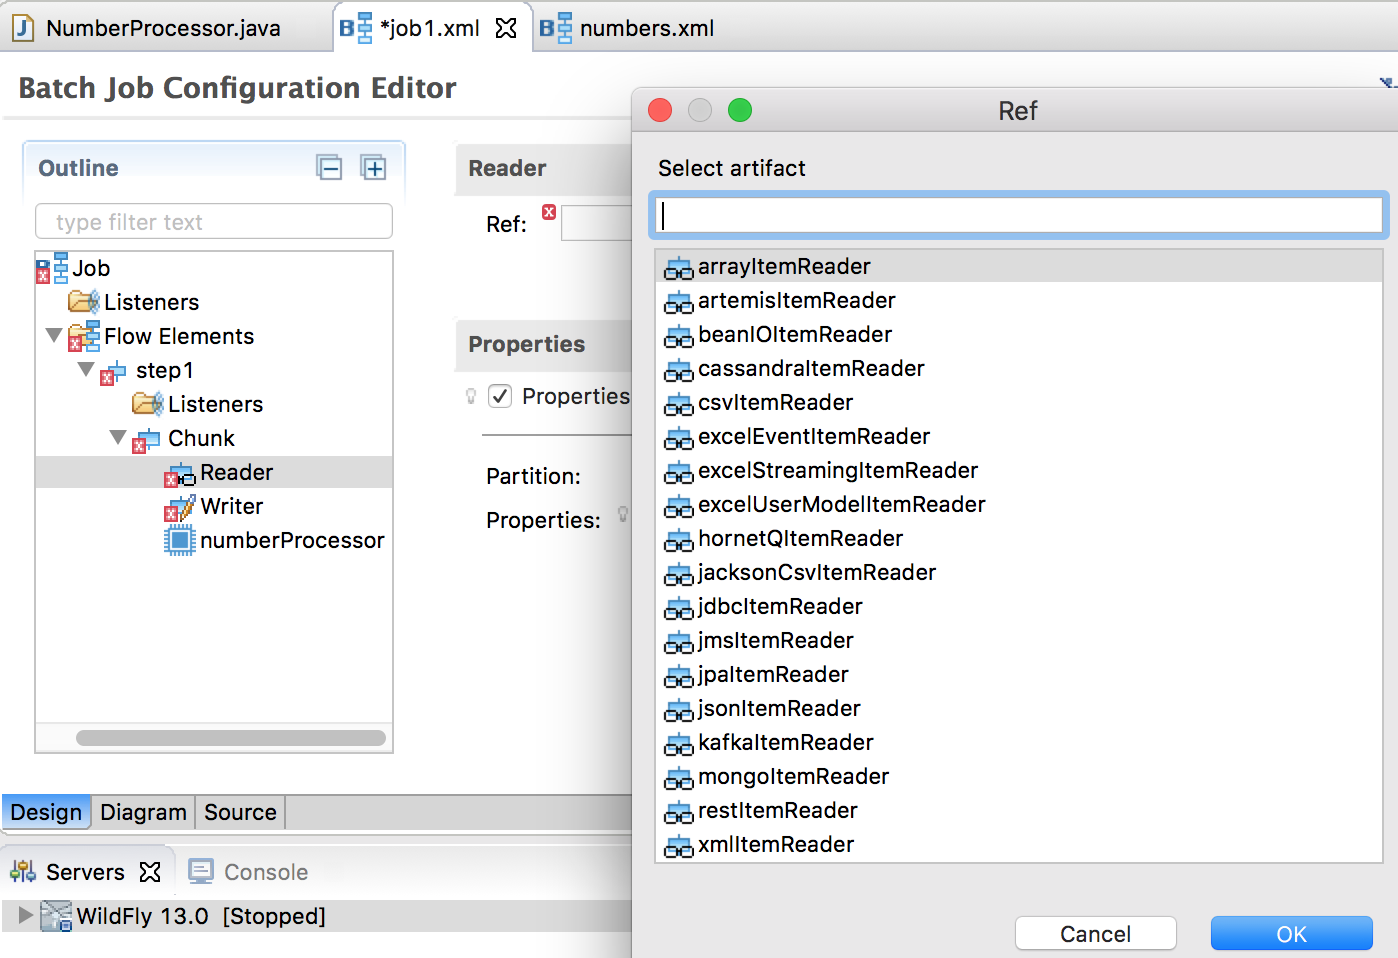
Configure Item Reader and Writer
A chunk-type step is required to contain an item reader and writer. Expand the Chunk node in the left panel, you will see reader, writer and processor subelements. Click Reader element and you will be able to configure the reader in the right panel. Choose arrayItemReader as the reader ref among all available readers, which come from jberet-support library configured as project dependency.
Specify 2 properties for arrayItemReader:
- resource: [0, 1, 2, 3, 4, 5, 6, 7, 8, 9, 10, 11, 12, 13, 14, 15]
- beanType: java.lang.Integer
Item writer can be configured similarly by choosing mockItemWriter from all available writers.

Build, Publish and Run Batch Application
After saving the project, we are ready to build the application. If Project > Build Automatically is checked, then the project has already been built; otherwise, choose Project > Build.
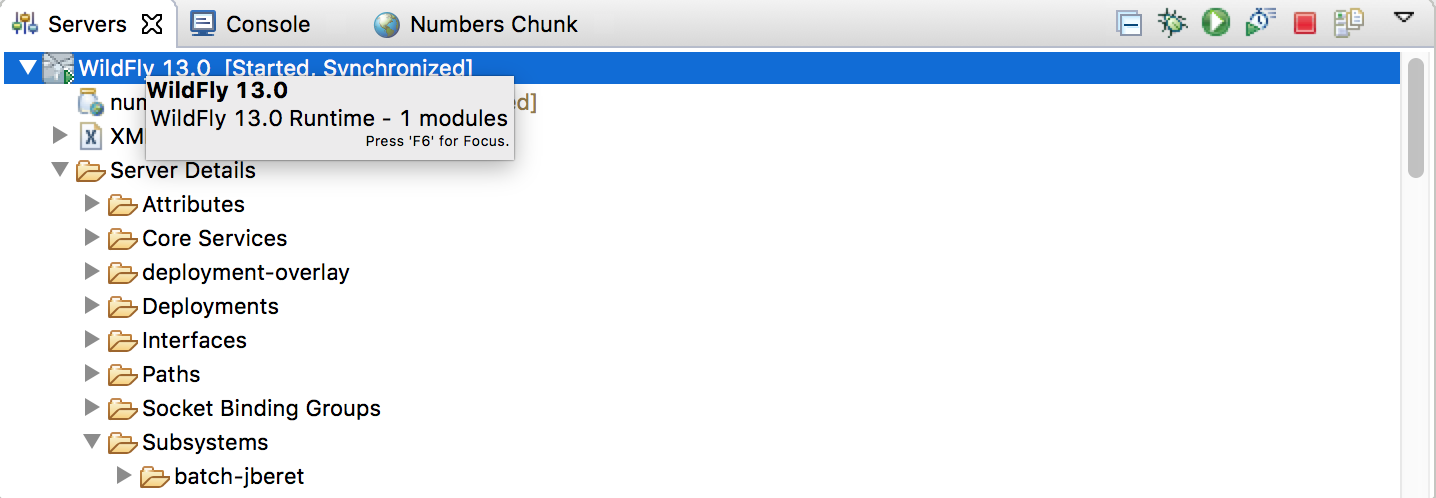
To start WildFly from within the studio, go to Servers view, right-click WildFly element and choose Start from the context menu.
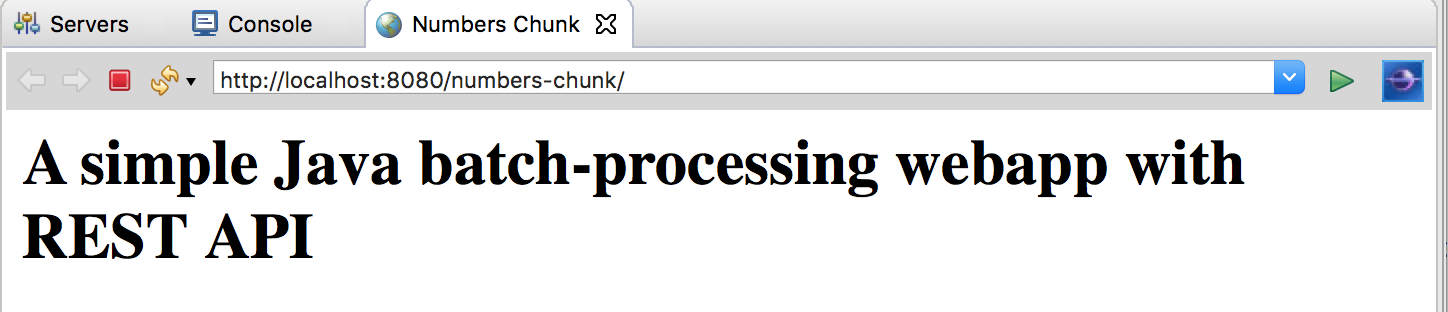
To publish numbers-chunk application to WildFly, select numbers-chunk project in Project Explorer, then choose menu Run > Run As > Run on Server. After the application is successfully published onto WildFly, the studio will display the application welcome page:
Perform Batch Processing Operations
Now that our batch application is up and running, we are ready to perform some common batch processing tasks via REST calls. You can issue curl commands in a terminal, or use other REST client tools. To keep it simple, we will use curl commands to send REST requests and python to pretty-print JSON output.
To start job numbers.xml (the existing job from github remote repo):
curl -s -X POST -H 'Content-Type:application/json' http://localhost:8080/numbers-chunk/api/jobs/numbers/start | python -m json.tool
{
    "batchStatus": "STARTING",
    "createTime": 1534112744022,
    "endTime": null,
    "executionId": 1,
    "exitStatus": null,
    "href": "http://localhost:8080/numbers-chunk/api/jobexecutions/1",
    "jobInstanceId": 1,
    "jobName": "numbers",
    "jobParameters": null,
    "lastUpdatedTime": 1534112744022,
    "startTime": null
}
To start job job1.xml (the new job we just created). In the studio console window, notice that all numbers have been multiplied by 100 by the item processor.
curl -s -X POST -H 'Content-Type:application/json' http://localhost:8080/numbers-chunk/api/jobs/job1/start | python -m json.tool
{
    "batchStatus": "STARTING",
    "createTime": 1534114529790,
    "endTime": null,
    "executionId": 2,
    "exitStatus": null,
    "href": "http://localhost:8080/numbers-chunk/api/jobexecutions/2",
    "jobInstanceId": 2,
    "jobName": "job1",
    "jobParameters": null,
    "lastUpdatedTime": 1534114529790,
    "startTime": null
}
To check the status of job execution we just started above:
curl -s http://localhost:8080/numbers-chunk/api/jobexecutions/2 | python -m json.tool
{
    "batchStatus": "COMPLETED",
    "createTime": 1534114529790,
    "endTime": 1534114529837,
    "executionId": 2,
    "exitStatus": "COMPLETED",
    "href": "http://localhost:8080/numbers-chunk/api/jobexecutions/2",
    "jobInstanceId": 2,
    "jobName": "job1",
    "jobParameters": null,
    "lastUpdatedTime": 1534114529837,
    "startTime": 1534114529807
}
To show step execution details of a job execution:
curl -s http://localhost:8080/numbers-chunk/api/jobexecutions/1/stepexecutions | python -m json.tool
[
    {
        "batchStatus": "COMPLETED",
        "endTime": 1534112744112,
        "exitStatus": "COMPLETED",
        "metrics": [
            {
                "type": "FILTER_COUNT",
                "value": 0
            },
            {
                "type": "ROLLBACK_COUNT",
                "value": 0
            },
            {
                "type": "PROCESS_SKIP_COUNT",
                "value": 0
            },
            {
                "type": "READ_COUNT",
                "value": 16
            },
            {
                "type": "WRITE_COUNT",
                "value": 16
            },
            {
                "type": "WRITE_SKIP_COUNT",
                "value": 0
            },
            {
                "type": "READ_SKIP_COUNT",
                "value": 0
            },
            {
                "type": "COMMIT_COUNT",
                "value": 2
            }
        ],
        "startTime": 1534112744046,
        "stepExecutionId": 1,
        "stepName": "simple.step1"
    }
]
To schedule a job for later or repeated execution (the following command starts running job1 after 1 minute, and in every 60 minutes afterwards):
curl -s -X POST -H 'Content-Type:application/json' -d '{"jobName":"job1", "initialDelay":1, "interval":60}' http://localhost:8080/numbers-chunk/api/jobs/job1/schedule | python -m json.tool
{
    "createTime": 1534130379291,
    "id": "2",
    "jobExecutionIds": [],
    "jobScheduleConfig": {
        "afterDelay": 0,
        "initialDelay": 1,
        "interval": 60,
        "jobExecutionId": 0,
        "jobName": "job1",
        "jobParameters": null,
        "persistent": false,
        "scheduleExpression": null
    },
    "status": "SCHEDULED"
}
To cancel the above schedule:
curl -s -X POST -H 'Content-Type:application/json' http://localhost:8080/numbers-chunk/api/schedules/1/cancel | python -m json.tool
Summary
In this post, we've explored various features in Red Hat Developer Studio in developing batch application, including using wizards for generating batch artifacts, visually designing batch job work flow, instant synchronization between job XML design view, diagram and source view, batch artifact ref name suggestions and completion, etc. I hope these features will help you further improve productivity in developing batch applications.
Comments