I’m posting about three features which I have had a personal interest in making it into AS 7.1 and the upcoming JBoss Enterprise Application Platform (EAP) 6.
Today the topic is how AS 7 is secured but still stays developer friendly by default.
Developer Friendly Security
Security is one of those things you know is important but also knows it risk ending up making your and your user life miserable to get started with your product.
One of the big challenges AS have had over the years is that while it tried to be developer friendly out of the box by not being secured by default, developers forgot or simply did not know how to actually ensure the server was secured for proper production deployments.
This previous default out of the box behavior have led to several security issues for AS. Which if you are using an older AS version in production should go and verify you are not unknowingly exposed to.
All of these security defaults was mostly fixed by using EAP which is secured by default, but then as sideeffect needed additional configuration to be usable for development.
In AS 7.1 things are different. Here the server is now by default not exposed on external interfaces and there are simply no users registered that can login remotely.
But does this mean you now have to go and add a user before being able to use the server ? Do you have to configure the examples to use this new user and type in a password for doing deployments ?
No - you don’t have to! AS 7.1 has this great trick that when you connect to the management services the server will send a “secret key” challenge to the client which it can only answer if it has physical direct access to the filesystem with the same permissions as the user that is running the server.
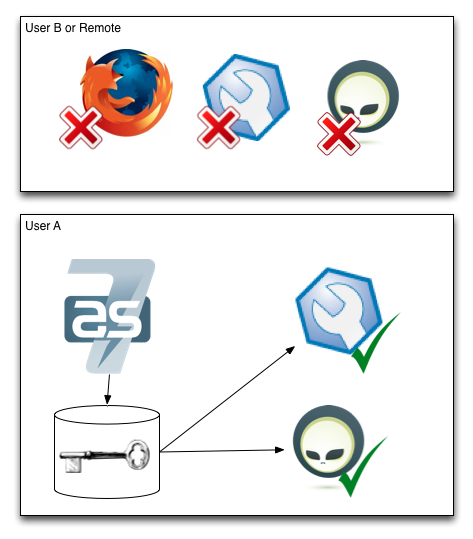
This means that if you as a developer run AS 7.1 and want to do some local management operations on it you do not have to setup any users nor configure your examples or tools to use the server - it will just work out of the box in the development scenario and if you go and deploy the server into production “as-is” it will not be exposing any internals unless. Big win for security and for developer usability!
Setting up a user
There are though one case where you have to setup an user as a developer. To access the web-based admin console (http://localhost:8080/console) you are using a browser and this goes on over HTTP within a browser which cannot (safely and portable) get access to the local secret key AS 7.1 generates.
Luckily adding a user is easy todo and if you try and access the web console AS 7 will even tell you how to do it, but let me repeat it here for completeness.
To add a auser you go into your AS 7 installation and run bin/add-user.sh. For the default case you can accept the default choices by pressing enter twice and just enter username/password and verify the username is correct.
It should look something like this:
$ cd jboss-as-7.1.0.Final
$ bin/add-user.sh
What type of user do you wish to add?
a) Management User (mgmt-users.properties)
b) Application User (application-users.properties)
(a):
Enter the details of the new user to add.
Realm (ManagementRealm) :
Enter the details of the new user to add.
Realm (ManagementRealm) :
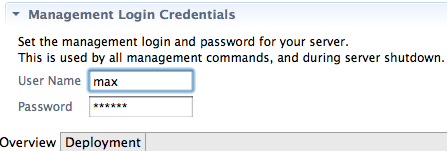
Username : max
Password : ******
Re-enter Password : *****
About to add user 'max' for realm 'ManagementRealm'
Is this correct yes/no? yes
Added user 'max' to file '/Users/max/runtimes/jboss-as-7.1.0.Final/standalone/configuration/mgmt-users.properties'
Added user 'max' to file '/Users/max/runtimes/jboss-as-7.1.0.Final/domain/configuration/mgmt-users.properties'
The two lines reveals what this add-user.sh actually does: update the mgmt-users.properties files found in the standalone and domain mode configuration.
If you wanted to you could update these property files manually since it is just pairs of username and a hashed password - but using bin/add-user.sh is by far the simplest approach.
Now with this user added the remote running tools can connect to AS 7 as long as they provide the username and password.
JBoss Tools and Security
By default JBoss Tools server adapter will use the local secret key generated by AS 7.1, but in case you are running remotely you will need to tell JBoss Tools which username and password to use.
This is done by double-clicking the server in the server view which will open the server editor. In here there is a “Management Login Credentials” section.
Now if AS 7.1 requires a username/password JBoss Tools will be able to login to the server remotely to perform management operations.
Tomorrow
Tomorrow the topic is on how AS 7.1 comes with a large set of Quickstarts which runs out-of-the-box from command line, JBoss Tools or your second-favorite IDE.