Skip navigation
2012

I’m posting about three features which I have had a personal interest in making it into AS 7.1 and the upcoming JBoss Enterprise Application Platform (EAP) 6.


Today the topic is how AS 7 is secured but still stays developer friendly by default.

Developer Friendly Security

Security is one of those things you know is important but also knows it risk ending up making your and your user life miserable to get started with your product.


One of the big challenges AS have had over the years is that while it tried to be developer friendly out of the box by not being secured by default, developers forgot or simply did not know how to actually ensure the server was secured for proper production deployments.


This previous default out of the box behavior have led to several security issues for AS. Which if you are using an older AS version in production should go and verify you are not unknowingly exposed to.


All of these security defaults was mostly fixed by using EAP which is secured by default, but then as sideeffect needed additional configuration to be usable for development.


In AS 7.1 things are different. Here the server is now by default not exposed on external interfaces and there are simply no users registered that can login remotely.


But does this mean you now have to go and add a user before being able to use the server ? Do you have to configure the examples to use this new user and type in a password for doing deployments ?

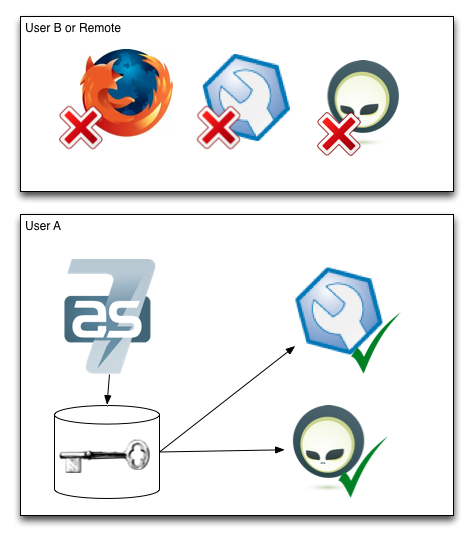
No - you don’t have to! AS 7.1 has this great trick that when you connect to the management services the server will send a “secret key” challenge to the client which it can only answer if it has physical direct access to the filesystem with the same permissions as the user that is running the server.


default_as7_security.png

This means that if you as a developer run AS 7.1 and want to do some local management operations on it you do not have to setup any users nor configure your examples or tools to use the server - it will just work out of the box in the development scenario and if you go and deploy the server into production “as-is” it will not be exposing any internals unless. Big win for security and for developer usability!

Setting up a user

There are though one case where you have to setup an user as a developer. To access the web-based admin console (http://localhost:8080/console) you are using a browser and this goes on over HTTP within a browser which cannot (safely and portable) get access to the local secret key AS 7.1 generates.


Luckily adding a user is easy todo and if you try and access the web console AS 7 will even tell you how to do it, but let me repeat it here for completeness.


To add a auser you go into your AS 7 installation and run bin/add-user.sh. For the default case you can accept the default choices by pressing enter twice and just enter username/password and verify the username is correct.


It should look something like this:

$ cd jboss-as-7.1.0.Final
$ bin/add-user.sh

What type of user do you wish to add? 
a) Management User (mgmt-users.properties) 
b) Application User (application-users.properties)
(a): 

Enter the details of the new user to add.
Realm (ManagementRealm) : 

Enter the details of the new user to add.
Realm (ManagementRealm) : 
Username : max
Password : ******
Re-enter Password : ***** 
About to add user 'max' for realm 'ManagementRealm'
Is this correct yes/no? yes
Added user 'max' to file '/Users/max/runtimes/jboss-as-7.1.0.Final/standalone/configuration/mgmt-users.properties'
Added user 'max' to file '/Users/max/runtimes/jboss-as-7.1.0.Final/domain/configuration/mgmt-users.properties'

The two lines reveals what this add-user.sh actually does: update the mgmt-users.properties files found in the standalone and domain mode configuration.

If you wanted to you could update these property files manually since it is just pairs of username and a hashed password - but using bin/add-user.sh is by far the simplest approach.

Now with this user added the remote running tools can connect to AS 7 as long as they provide the username and password.


JBoss Tools and Security

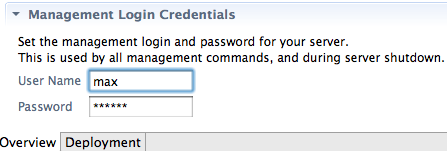
By default JBoss Tools server adapter will use the local secret key generated by AS 7.1, but in case you are running remotely you will need to tell JBoss Tools which username and password to use.

This is done by double-clicking the server in the server view which will open the server editor. In here there is a “Management Login Credentials” section.

managementlogincredentials.png

Now if AS 7.1 requires a username/password JBoss Tools will be able to login to the server remotely to perform management operations.


Tomorrow


Tomorrow the topic is on how AS 7.1 comes with a large set of Quickstarts which runs out-of-the-box from command line, JBoss Tools or your second-favorite IDE.
I’m posting about three features which I have had a personal interest in making it into AS 7.1 and the upcoming JBoss Enterprise Application Platform (EAP) 6.


Today the topic is Deployable datasources.

Deployable datasources

Deployable file based datasources (named -ds.xml) have been a feature of JBoss for ages but in the redesign and release of AS 7.0 they did not make it in. Making it an unfortunate requirement for users to have their server running and use either the raw management API or the Admin Console to setup even the simplest datasource. You could do tricks like use @DatasourceDefinition annotations but it is not nice having to compile Java code to just wire up a datasource.


AS 7.1 finally fixes this issue and brings back -ds.xml and even include support for deploying JMS destinations via a -jms.xml file too, but that will be for another blog.


How does such a -ds.xml look like then ? Here is a simple one for a hsqldb running on localhost:

<?xml version="1.0" encoding="UTF-8"?>
<datasources xmlns="http://www.jboss.org/ironjacamar/schema">
    <datasource 
        jndi-name="java:jboss/datasources/employeedb" 
        enabled="true" 
        use-java-context="true" pool-name="employeedb">
        <connection-url>jdbc:hsqldb:hsql://localhost:1701</connection-url>
        <driver>hsqldb.jar</driver>
        <pool></pool>
        <security>
            <user-name>sa</user-name>
            <password></password>
        </security>
    </datasource>
</datasources>

The XML tags does what you think it does - configure a datasource with the proper JDBC connection url, username, password and so forth.


If you want to know all the details about this file format you can see the IronJacamar documentation for all the options available such as pool sizes.


Armed with this -ds.xml + a matching driver jar, which in this case is named hsqldb.jar you can copy the two files to the deployments folder of AS 7.1 and from then on the datasource named java:jboss/datasources/employeedb can be used by any application running on the server.

Creating -ds.xml with JBoss Tools

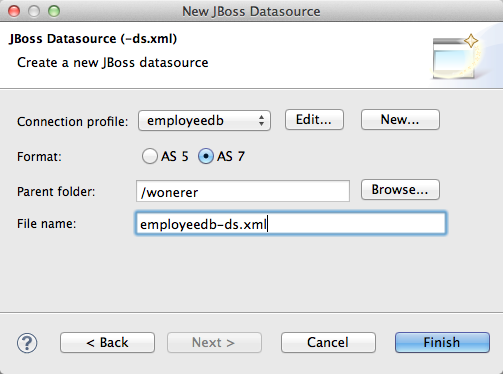
I actually did not manually type up that -ds.xml file for my local running hsqldb database, nor did I manually deploy the driver.jar. I used a new wizard that are coming in JBoss Tools 3.3 Beta1 which takes the connection information I already have setup in Eclipse, create the right files for me and if I update the files it will also update the deployments.

jbosstools_ds_wizard.png

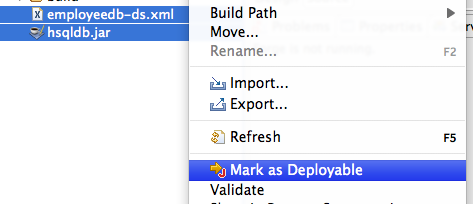
Once this wizard have run I simply right click the -ds.xml + driver.jar and select ‘Mark as Deployable’ on them. This deploys them to my server and if I make changes to the -ds.xml the changes gets copied over directly and AS will pick up the changes shortly after.

datasource_markasdeployable.png


I find it exciting that we now not only have a file format for defining datasources, but also that they are separate deployable resources together with a driver jar which both can be easily shared on a team.


The fine print

A few caveats/tricks for this approach are:

  • I prefer deploying datasources independent of my application, but you can put the -ds.xml inside your application META-INF or WEB-INF directory and it will be deployed together with the application. 
  • The JDBC driver needs to be JDBC 4 compatible to be deployable out of the deployment directory. In the rare case your driver is not JDBC 4 compatible then you will need to deploy it as a module in AS 7.
  • The datasource can not be modified/managed via the Admin Console since it is a deployed resource and not part of the managed API of AS 7 - if you wish full admin control you will have to configure the datasource via the management API or admin console. As I understand it over time the admin console is set to include support for at least a read-only view of these file based datasources.
  • If you wanted to connect to a h2 database you would not need to copy the driver jar, but simply refer to <driver>h2</driver> instead and you it pickup the default embedded h2 database driver in AS 7.

Tomorrow

Tomorrow the topic is on how AS 7.1 is secured by default but is still developer friendly.

The AS 7 team did a phenomal job with AS 7.0.


Rewiring and improving the core of the application server, making it a lean mean machine of isolated modules, concurrent loading and all out greatness. On top of that they took in the best of breed components from JBoss.org and other Java middleware communities and created the best Java EE Web Profile compatible server I’ve used.


But the team did not stand still - since AS 7.0 they have been working on improving the server and just last week released AS 7.1.


Listening to all of the community feedback that have been given, fixing bugs and implementing features that just did not make it into AS 7.0.


The next three days I’ll post a blog a day about each of three features which I have had a personal interest in making it into AS 7.1 and the upcoming JBoss Enterprise Application Platform (EAP) 6: Deployable datasources, Developer Friendly Security & Quickstarts Frenzy!


AS 7.1 and JBoss Tools M5

But before I do then just let me say that if you are using JBoss Tools 3.3 M5 then it will work with AS 7.1 just fine except for one small caveat.


If you open the server editor for a server configured to work with AS 7.1 it will complain about a missing server port. This happens because AS 7.1 introduced using a system property default value instead of a concrete port number in its XML configuration which M5 does not parse correctly. It will thus show an empty field and mark it is an error.


failedport.png

The server will happily still start/stop etc. if you are using defaults, but if you don’t like to see the error in the server editor or are using non-default values then to fix this simply uncheck “Automatically Detect” and type in the port value manually (i.e. 9999).


fixport.png


This glitch is fixed in the nightly builds of JBoss Tools 3.3 Beta1 which we are working on making stable and available anytime soon.


Until then, see you tomorrow to hear about Deployable datasources.

Latest OpenShift enabled port-forwarding for your OpenShift applications.


This enables you to use a debugger for your JBoss application and it allows you to connect to the database directly and use tools like Eclipse Database Browser instead of only using phpsqlmyadmin.

Of course once you have these things setup in your Eclipse you can use things like reverse engineering and even run your local app against the remote database.


It all works by setting up an ssh tunnel that exposes the internal remote ports running on OpenShift servers on your local machine - this does require some manual steps which i'm outlining in this blog

together with how to configure the database setup in Eclipse and how to remote debug JBoss running on OpenShift.


In future releases of JBoss Tools we'll be looking at simplifying these steps, but for now here are the fully manual steps.

Setting up port forward

The simplest way to do this is to use the rhc command line tools.


Make sure you got the latest version - how to install/update these for various platforms is documented here.


Once you have those run rhc-port-forward -a <appname>.


I have an app called ‘fonk’ of type ‘jboss-as7’ and with ‘mysql’ cartridge enabled. For such a setup you should see something like this:

rhc-port-forward -a fonk 
Password: 
Checking available ports...

Binding httpd -> 127.1.255.130:8080...
Binding java -> 127.1.255.129:8080...
Binding mysqld -> 127.1.255.129:3306...

Use ctl + c to stop

OSX gotcha

In case you get an error print out similar to this:

bind: Can't assign requested address
channel_setup_fwd_listener: cannot listen to port: 3306
bind: Can't assign requested address
channel_setup_fwd_listener: cannot listen to port: 8080
bind: Can't assign requested address
channel_setup_fwd_listener: cannot listen to port: 8080
Could not request local forwarding.

You are most likely running OS X which unfortunately(?) does not automatically allow you to have all 127.x.x.x IP’s setup with a so called loopback alias.


To fix this you need to add such alias manually for each IP you want to connect to.


In my case that is 127.1.255.130 and 127.1.255.129 as seen in the first attempt of using rhc-port-forward. These IP’s will be different for each of your app, thus for `fonk’ app I enable loopback aliases by running the following:

sudo ifconfig lo0 alias 127.1.255.130
sudo ifconfig lo0 alias 127.1.255.129

Now when you run rhc-port-forward you should not be seeing any bind: Can't assign requested address. error messages.


Note: these alias’es does not survive reboots - if anyone know how to setup global loopback alias or make these persistent between reboots then I would love to hear about that in the comments

Use OpenShift database locally

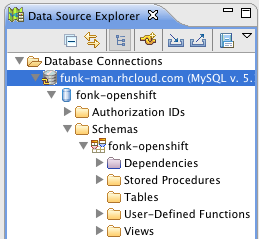
When port forwarding is enabled you can start using these, for example to setup and connect to MySql database via Eclipse DTP Tools.


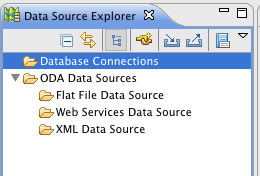
To do this open the Data Source Explorer:

datasourceexplorer.png

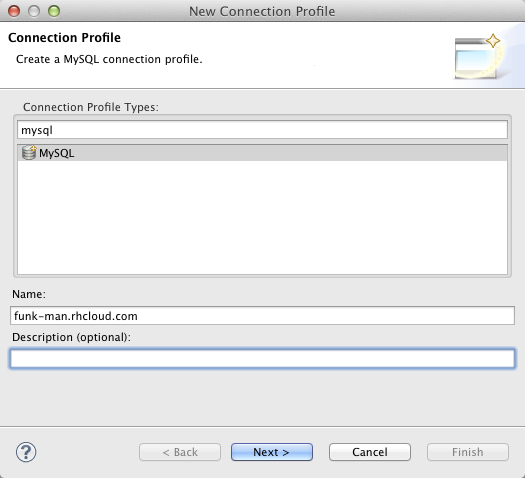
Click on the “New Connection Profile” and choose MySql and give it a name.

newconnectionprofile.png

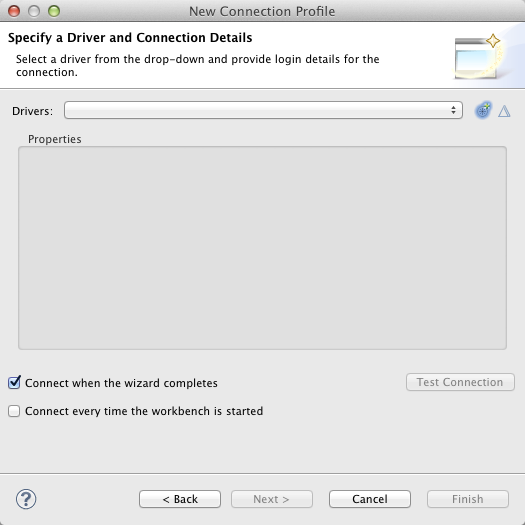
Click Next and if you do not have an existing driver for MySQL configured you will see an empty list:

emptydriver.png

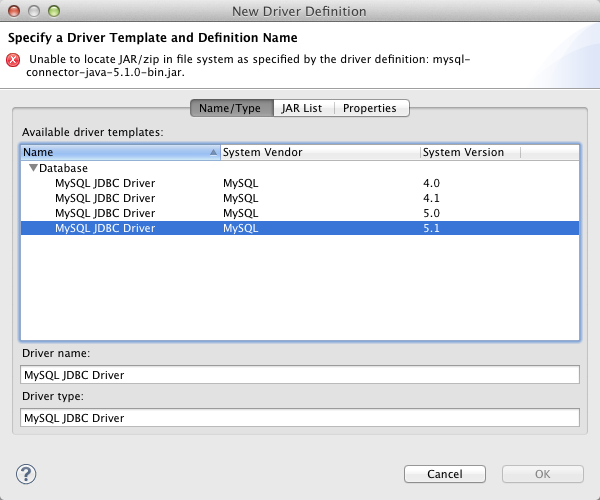
To add a driver click the + icon and setup a driver:

mysqldrivermissingjar.png

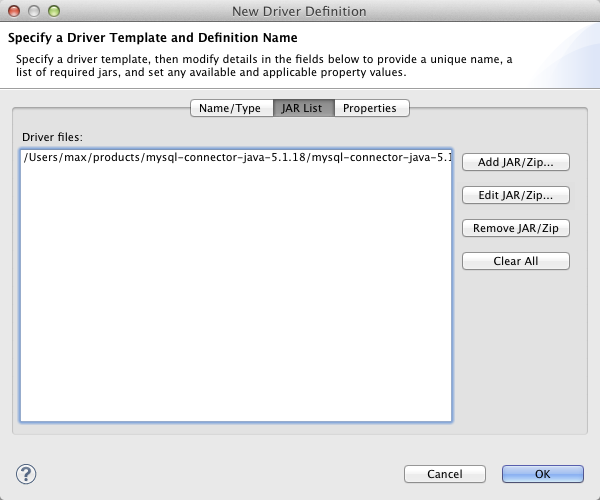
For OpenShift MySQL the 5.1 option is best, and it just needs to be told where the driver is under the “Jar List” tab. Here you click the “Edit JAR/Zip” and point it to your downloaded mysql-connectoer-java-5.1.jar.

editedjarlist.png

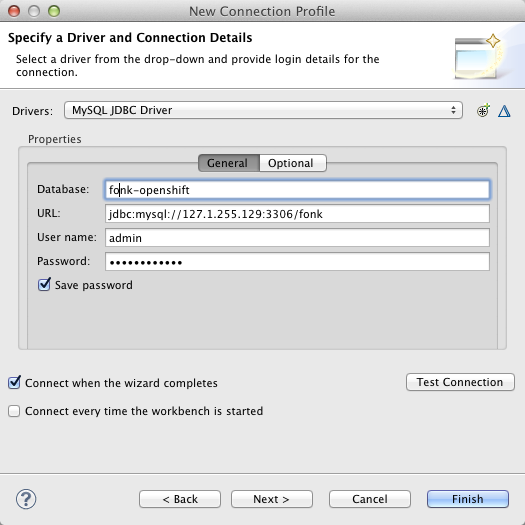
Once that is done you just need to fill in the right connection details:

connectiondetails.png

The important part for the connection details is that you set URL to match the pattern:

jdbc:mysql://<forwarded-ip>:3306/<appname>

For my fonk application that would be:

jdbc:mysql://127.1.255.129.3306/fonk

And then set “User Name” to admin and type in your MySql password.

You can use the “Test Connection” button to verify you can connect.

When you press Finish you should be able to browse your remote mysql database hosted on OpenShift:

datasourceexplorerconnected.png

From here on out you can now use this Eclipse dataconnection with any plugin that supports such connections. i.e. Hibernate Tools reverse engineering features.

Debug JBoss AS

To enable debug with JBoss we need to add a enable_jpda marker file to .openshift/markers.

This is done by simply executing the following:

cd git/fonk
touch .openshift/markers/enable_jpda
git add .openshit/markers/enable_jpda
git commit -a -m "enable jpda"
[master 6f7197c] enable jpda
0 files changed, 0 insertions(+), 0 deletions(-)
create mode 100644 .openshift/markers/enable_jpda
git push
<openshift remote build output>

Note: you can of course also do this all from within Eclipse via EGit integration if you prefer that.

When this have been enabled you need to start/restart port-forwarding to get it to pick up the java jpda port.

rhc-port-forward -a fonk 
Password: 
Checking available ports...

Binding httpd -> 127.1.255.130:8080...
Binding java -> 127.1.255.129:8080...
Binding java -> 127.1.255.129:8787...
Binding mysqld -> 127.1.255.129:3306...

Use ctl + c to stop

Notice the Binding java -> 127.1.255.129:8787.... line, that is the jpda ip and port you are going to use.

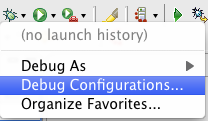
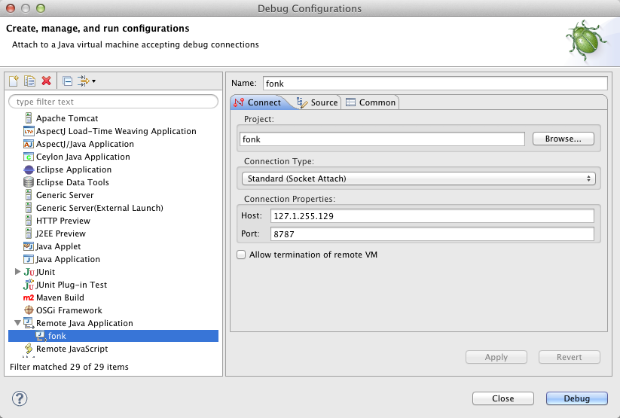
Now to set this up in Eclipse JDT debugger you need to create a ‘Remote Java Application’ under “Debug Configurations”

debugconfigurations.png

And here you select ‘Remote Java Application’ and fill in the connection details:

setupremotedebug.png

The important pieces here are to set Host: to the ip number (in my case 127.1.255.129) and the port wich for JBoss AS on OpenShift is 8787 by default.


The Project part is optional, but its useful to point it to the matching Eclipse project which will allow it to find the proper source and let you place breakpoints.


Once you press “Debug” it should go and connect to the running server. It might take a while, it is after all going into the Cloud


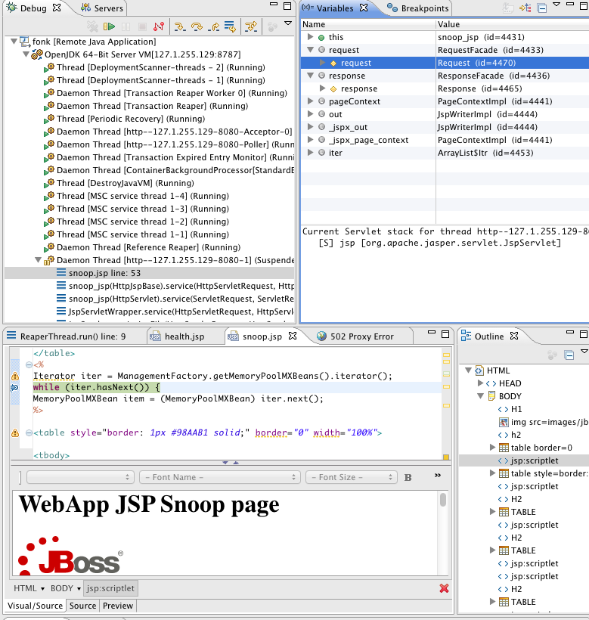
And if you now set breakpoints and use a browser to trigger them you get something like this:

debugjsp.png

This showing the remote debugger hitting the breapoint in a jsp page named snoop.jsp.


Conclusion

I hope I showed you how powerful OpenShift’s latest release with port-forwarding is and how (fairly) easy it is to setup once you get the port-forwarding working.


Being able to connect directly to the remote database and debug you JBoss server makes for a whole new world of possibilities and productivity boost with OpenShift.


Hope you like it and continues to have fun exploring OpenShift and JBoss Tools.


/max

Maven Integration for Eclipse WTP 0.15.0, a.k.a m2eclipse-wtp, a.k.a m2e-wtp is available.

This release contains mostly bug fixes, but a few improvements managed to slip in. The complete release notes are available here.


Update 08/02/2012 : m2e-wtp 0.15.1 has been released to fix a build related issue, but is strictly identical to 0.15.0 in terms of code/features


m2e-wtp 0.15.0 is compatible with the JavaEE distributions of Eclipse Helios and Indigo, requires at least m2e 1.0 (works with 1.1) and mavenarchiver plugin >= 0.14.0 (0.15.0 should be automatically installed).

As usual, m2e-wtp can be installed from :


So let's see what are the highlights of this new release :


Packaging inclusion/exclusion support improvements

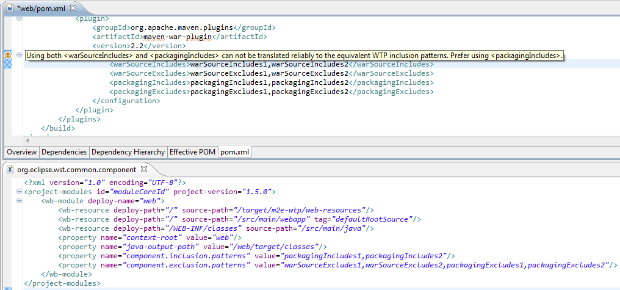
For war project, previous m2e-wtp versions used to use <packagingIncludes> and <packagingExcludes> attributes from the maven-war-plugin config to enable (or not) the deployment of project dependencies to WTP servers. In 0.15.0, the same level of support has been added to EAR projects using maven-ear-plugin 2.7+. However, the problem with this approach is, other resources (web pages, classes ...) are not properly excluded (using the <*SourceInclude> and <*SourceExclude> attributes).


In order to address this problem, Rob Stryker, committer on WTP and lead of JBoss AS tooling in JBoss Tools, provided an implementation for JBoss AS servers that might be generalized to other WTP server adapters (if they decide to do so). Basically, some new metadata is added to the project's .settings/org.eclipse.wst.common.component like :


<?xml version="1.0" encoding="UTF-8"?>
<project-modules id="moduleCoreId" project-version="1.5.0">
    <wb-module deploy-name="webOrEar">
         ...
        <property name="component.inclusion.patterns" value="pattern1,pattern2"/>
        <property name="component.exclusion.patterns" value="pattern3,pattern4"/>
    </wb-module>
</project-modules>


The patterns are separated with a comma and exclusions take precedence over inclusions : resources matching one of the exclusion patterns are not deployed, even if they match one of the inclusion patterns. That solution is not maven-bound so any other kind of project can benefit from it.

Now all m2e-wtp 0.15.0 does is map the maven patterns to their equivalent component metadata. This gives :

component_patterns.png

In the example above, a warning is displayed as both <warSourceIncludes> and <packagingIncludes> are defined. Since both patterns could overlap, it might lead to some weird behavior where WTP would actually deploy more files than a maven CLI build. In order to minimize (we can not totally solve) that potential discrepancy we only keep the packaging patterns in the component files and recommend using <packagingIncludes> only.


Currently, this feature only works in combination with the JBoss AS Tools from JBoss Tools 3.3.0.Beta1 (nightly builds available from http://download.jboss.org/jbosstools/updates/nightly/trunk/), but we'll try to make other WTP Server adapter vendors support it in the future (as part of WTP core API).


Warnings added when unsupported dependency types are detected

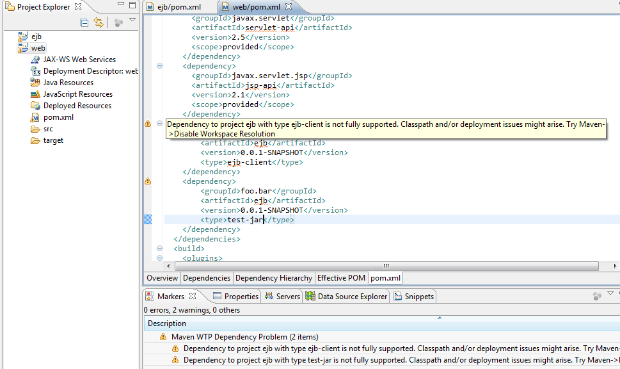
As of today, if a project depends on another workspace project of type ejb-client or test-jar,  that specific dependency will not be packaged properly by WTP, as Maven would do in command line. Moreover, you'll experience some class leakage on the compilation and test classpaths in Eclipse (ex: non client classes being visible). The only known workarounds to this issue are to disable workspace resolution, or close the dependent project and rely on the dependencies from the local maven repository.

Ideally, in order to make the deployment part work, we would need to introduce new WTP components, but the current WTP API doesn't support it, yet. So, until this is fixed, warning markers are added whenever a project depends on such "unsupported" types. That should hopefully give users an idea of the problem and how to circumvent it.

unsupported-dependency-type.png

Better handling of dependencies in war projects

Previous m2e-wtp versions had, in some use cases, some outstanding issues with regard to dependency management of war projects. In particular,

  • when 2 dependencies of the same artifact, but having a different classifier were added to a web project, only one would show up on the classpath. This has been properly fixed.
  • in some cases, the timestamped version of a SNAPSHOT dependencies from the local repository, would be copied under the target/ folder, causing some jar locking issues in windows. The rationale behind this behavior is, maven-war-plugin packages snapshot dependencies using the timestamp identifier. Since the name of file in the maven classpath library needs to match the one deployed by WTP, a copy was performed. To fix this problem, the default file pattern matching used for dependency deployment has been changed to @{artifactId}@-@{baseVersion}@@{dashClassifier?}@.@{extension}@. This means that, by default in m2e-wtp, SNAPSHOT dependencies are now deployed using the SNAPSHOT suffix instead of the timestamp. If you need to force the use of timestamped artifacts, then you need to explicitely decalre the following in your pom.xml :


<plugin>
  <groupId>org.apache.maven.plugins</groupId>
  <artifactId>maven-war-plugin</artifactId>
  <version>2.2</version>
  <configuration>
    <outputFileNameMapping>@{artifactId}@-@{version}@@{dashClassifier?}@.@{extension}@</outputFileNameMapping>
  </configuration>
</plugin>


Removal of conflicting facets on packaging change

If you had a java utility project, that you wanted to upgrade to an EJB project for example, a constraint violation would be raised upon project configuration update (EJB and Utility facets can't be both installed).

This has been fixed by removing all conflicting facets when you change the packaging of a Java EE project, making that conversion completely transparent.


What's next?

m2e 1.1 introduces a new Eclipse to Maven project conversion API. It means that, in m2e-wtp.next, we will be able to automatically convert existing WTP project configuration to maven's. Dependencies will still need to be set/translated manually but that's a pretty good start IMHO.


Finally ...

I would like to thank the m2e-wtp community at large for their support and contributions, that's what make this project move forward and make it one of the most popular projects on the eclipse marketplace.

Contributions can take the form of :


Keep it up.


Fred.

https://twitter.com/#!/fbricon

Filter Blog

By date:
By tag: