Skip navigation
2011

Eclipse 3.7 is coming out soon and we are happy to deliver the first milestone of JBoss Tools targeting the upcoming Eclipse Indigo release.


http://in.relation.to/service/File/10824

3.3.0.M1 (Forge On!)

[Download] [Update Site]  [What's New] [Movies] [Documentation (not updated yet)]  [Forums]  [JIRA] [Twitter]


This is a development release in its true form which requires Eclipse 3.7 M6 to run.


If you use Eclipse 3.7 M7 things will install, but there have been API changes between M6 and M7 so please follow the installation instructions below very carefully to avoid problems.

Installation

Read this very carefully - if you don't follow this you *will* have problems running this milestone since Eclipse 3.7 M7 is not compatible with Eclipse 3.7 M6.


  1. Download & Install Eclipse 3.7 M6a (Indigo) JEE bundle.
  2. Run and add this URL to Eclipse's list of available update sites:
    http://download.jboss.org/jbosstools/updates/development/indigo
  3. Disable all other URL's except that URL and this
    http://download.jboss.org/jbosstools/updates/indigo/M6/
  4. Now go and install the JBoss Tools components you want from the JBoss Tools updatesite


Step #3 is the important one - this prevents P2 from overriding your M6 installation with M7 updates.


This Jira explains the details for this with screenshots if the above text is causing problems.


New & Noteworthy

The biggest change is for this release is definitely the Eclipse 3.7 compatiblity but besides that and a bunch of bugfixes and minor improvements we have more than a few exciting new features in this release.


JBoss AS 7


This release introduces a server adapter which allows you to start/stop/debug and deploy applications to JBoss AS 7 via the file system.


If you haven't tried out JBoss AS 7 now is the time - it starts a in approximate 3 seconds; it's like night and day compared to previous AS versions.


CDI/Seam Solder

The CDI tools have added additional features and bugfixes, but most importantly we now support components based of Seam Solder allowing us to pickup and identify CDI and Seam 3 components that uses the Seam Solder extensions. i.e. we will now honor the Seam Solder annotation @Veto to ignore otherwise valid CDI components.  The full list of supported annotations from Seam Solder so far is:


  • @Veto
    @Requires
    @Exact
    @MessageLogger
    @MessageBundle
    @DefaultBean
    @Unwraps
    @ServiceHandlerType
    @FullyQualified
    @Resource


In addition to support Seam Solder annotations we also support components defined in Seam Config providng an Seam Config aware XML editor and pickup components defined and configured via XML in additon to annotations.


Forge Tools

Our Forge Tools which are integrating Seam Forge into the Eclipse IDE is now bundled in JBoss Tools and allows you to use Seam Forge out of the box from inside Eclipse.


Seam Forge is core framework for rapid-application development in a standards-based environment; it provides a command line style shell for rapid scaffolding style development. The special thing about Seam Forge is that the motivation behind it is to support standards such as Java EE, CDI and JPA in addition to common defacto technologies such as git and maven.


In its current release it allows you to easily create CDI based applications based on scaffolding principles as known

from tools like seam-gen, ruby-on-rails, grails etc.


This first release of Forge Tools are focusing on bringing the command shell experience directly available in Eclipse as a console so you can

interact directly with Forge meaning you can execute and run Forge commands directly from IDE and as an extra nice bonus it imports and open projects you have created via the shell. It allows you to use the power of command line shell's together with the visual and integrated developer environment.


Koen made a very nice video of all this in play which I've embedded here below. You can see the details of what is shown in the

demo on his blog.


Maven


What you might not notice in this demo is that it is using m2e/wtp and the JBoss Tools specific m2e configurators behind the scenes to

automatically have the related plugins for the project automatically configured based on the Maven metadata instead of you having to manually configure and setup the tools.


In upcoming releases of JBoss Tools you will see even tighter integration with Seam Forge and with Maven to make you even more productive in working with JEE 6 based technologies.

...and more

The new and noteworthy provides a short overview with screenshots of the various improvements made in JBoss Tools extensive plugin set.

Next Steps

This release is mostly to get feedback on any issues found in Eclipse 3.7, and to introduce some of work that we are doing to provide a faster and more developer friendly developer environment than ever before - this includes Forge Tools and AS 7 for now but we will also focus on making tools such as Maven easier and faster to use.


We've already contributed several patches to m2e which makes it up to 5 times faster in importing and updating project configuration - these improvements will be available soon from our nightly build site if you can't wait


JBoss Tools 3.3 will also continue to make it easier to configure and install JBoss and other runtimes and frameworks to allow you as developer to focus on the code instead of the configuration - at least upfront.


We also have a few other ideas, but we'll save that for some future blogs


Do remember though that we really appreciate feedback on wether the functionallity is helping you, if it is going in the right direction and if you have ideas for improvements or even patches.


We are listing and reacting in both forums, jira, twitter and irc.


Enjoy this milestone - remember to read the installation instructions careful! and...


Have Fun!

As I reported earlier I am currently working on the integration of Forge in JBoss Tools. Lincoln's excellent screencast inspired me to write up a tutorial that shows how his work looks in the context of JBoss Tools. For the people that are too busy to read through the entire post and prefer to watch a movie, I have recorded a short version. In true Hollywood style, this is basically a remake of Lincoln's version. We will create, deploy and debug a simple JEE web application on JBoss AS but this time using JBoss Tools.


Now for the brave among you. Let's see the detailed steps on how to do this yourself...

Setting Up

If you want to try out the different steps in this article the first piece of software you will need to install is JBoss AS. I recommend to download AS 6 Final and extract it into your place of choice.


The other item that you need is JBoss Tools. We are going to live on the bleeding edge and use a nightly build of JBoss Tools 3.3 which embeds a snapshot of the Forge runtime. A word of warning is in its place here: as usual when using nightlies and alpha software it is very well possible that things are broken. If this would happen please don't get frustrated and try again some time later. Or even better, report the issue on the JBoss Tools Forum or on the Forge mailing list (forge-users@lists.jboss.org).


I assume, dear reader, that you are hardcore enough not to be scared away by these minor inconveniences and are ready to download the Indigo M6 release of the Eclipse IDE for Java EE Developers. Extract the archive into your place of choice and fire up the Eclipse IDE. The screenshot below shows you what the installation folder looks like on my machine.
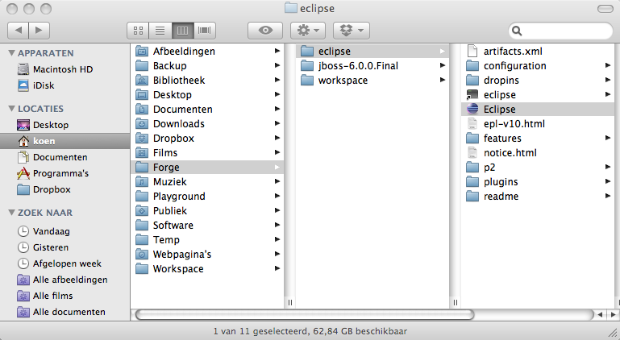
installation_layout.png

When this is done let's go ahead and install the appropriate elements of JBoss Tools. To do this, we select Help->Install New Software. To avoid clashes between the JBoss Tools and Eclipse Indigo update sites we have to disable the latter. Click on the Available Software Sites link and uncheck the Indigo entry.

available_software_sites.png

After this, we enter the address of the JBoss Tools nightly update site in the Work with: text field. In the resulting list of available software elements we select Maven Support and Web and Java EE Development. This is illustrated in the screenshot below.
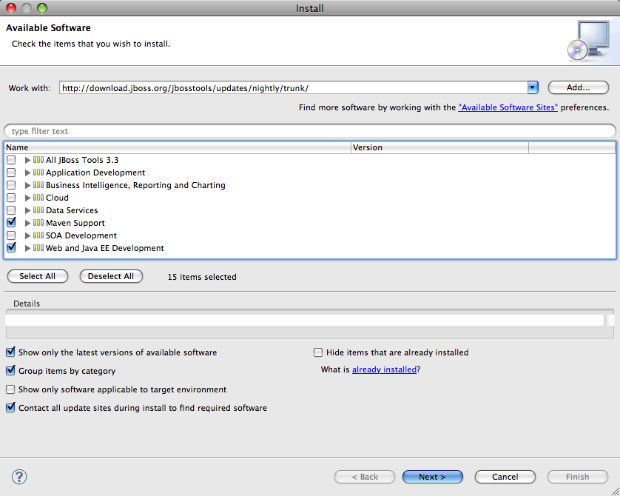
install_jboss_tools.png

The rest of this installation is pretty straightforward. We press Next> and wait until all the needed dependencies have been calculated. Then we press Next> again on the Installation Details page, we accept the license agreements on the Review Licenses page and press Finish to launch the process that will download the required packages. We press OK when the security warning appears and Restart Now when prompted.


Now we are ready for the next step which will be to configure and start the application server.


Configuring the Application Server

In order to debug a webapp in our running server we need to make JBoss Tools aware of the server. The first step to do this is bring up the context menu in the Servers view and select New->Server.

new_server.pngThe New Server wizard opens. On the first page of this wizard we select JBoss Community->JBoss AS 6.0 as the server type and push the Next> button. The only thing we still need to do is specify the folder where we extracted the previously downloaded JBoss AS 6 archive in the Home Directory text field. The situation on my machine is illustrated in the screenshot below.
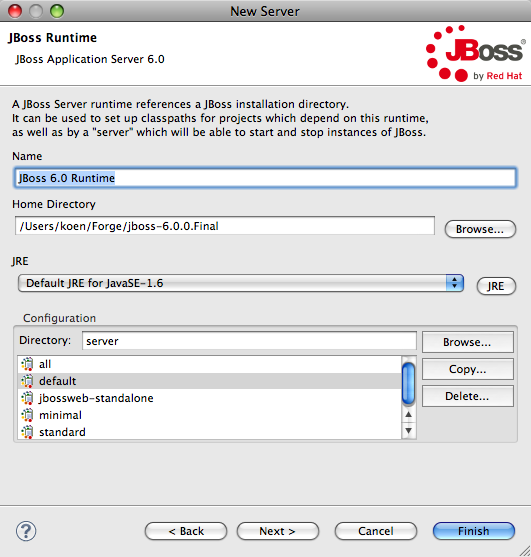
JBoss_Runtime.png

We leave all the default settings and push the Finish button to close the wizard. The newly configured server shows up in the Servers view. The only thing that we still need to do is launch it by selecting this new server, bringing up the context menu. Since we want to debug our application we will select Debug to launch it in debug mode.

debug_server.png

The Console view opens and shows the console messages generated by the starting application server. After some time our server is up and running and we are ready to roll.


First Forge Steps

Until now we haven't seen any sign of our beloved Forge project. Let's change that and open up the Forge console by selecting Window->Show View->Other... and then Forge->Forge Console as illustrated above. The Forge Console view opens. An image of that is shown below.

start_forge.png

As you can see there are two buttons in the top left corner of this view as well as a drop down menu with two entries to start and stop our Forge runtime. Go ahead and select either the green arrow or the 'Start Forge' entry from the menu. After some time the Forge start banner should appear and Forge is prompting for input. Entering the pwd command should indicate the path to your current workspace.

forge_banner.png

It can sometimes be unclear to a beginning user as to what commands you can issue at a particular moment when working with Forge. Luckily there are a number of tools at your disposal that can help at this point. Typing a tab character can help you at any time. When you do this at an empty prompt Forge will give you a list of commands that can be used at that particular scope. Below you see the list that is produced when we type a tab character at this time.

tab_character.png

You can also use the tab character when in the middle of typing a command. When there are multiple choices Forge will list all the possibilities but when there is only one possibility Forge will complete your command. Furthermore, as you can see, there is the list-commands command. This will print the commands applicable in the current scope listed by category. If you use this command with the --all option, it will list all the possible commands disregarding the current scope. The ones that are applicable in the current scope are marked with an asterisk.
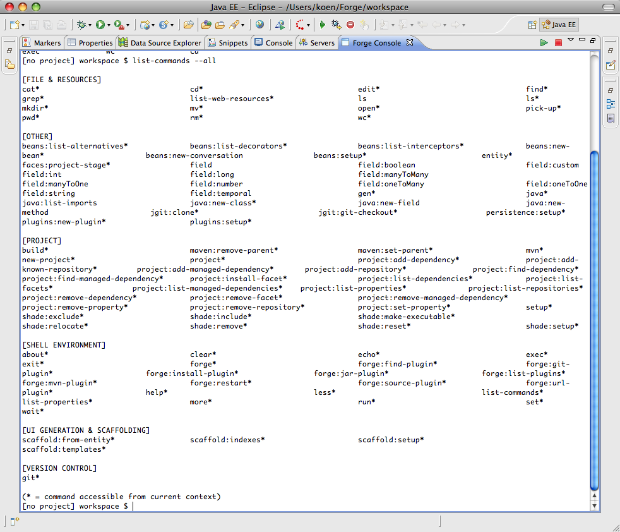
list_commands_all.png

Before we start the interesting work, it is worth mentioning one last thing. The Forge runtime that we are currently working with is embedded in JBoss Tools. Currently this is a snapshot build that removes some of the issues that were present in the 1.0.0.Alpha3 release. Of course it is probable that at one time you will want to change the provided runtime. You can do so by opening the Installed Forge Runtimes preferences page. On this page you can add new runtimes and select the one that you want to use.
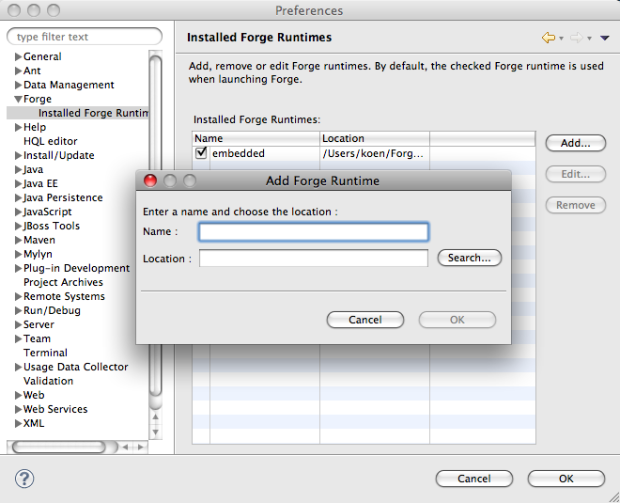
forge_preferences.png

Now that we have covered the basics, it is time for some real work. Let's create an example project.


Creating the Example Project

Surprisingly enough or not, to create a new project, you need to use the new-project command. This command has two important parameters: the name of the project itself and the fully qualified name of the top level package. Using the tab character is really convenient as you will quickly learn when using Forge for a while as it reduces the long command illustrated below to just a few key presses. Of course you will still have to write the respective names.

new_project.png

We accept the default project directory that Forge presents us by pressing enter once again. At this time the Forge runtime starts off creating a project with a typical Maven layout. When this is done JBoss Tools will automatically import this newly created project into the current workspace. The result is shown in the screenshot below.
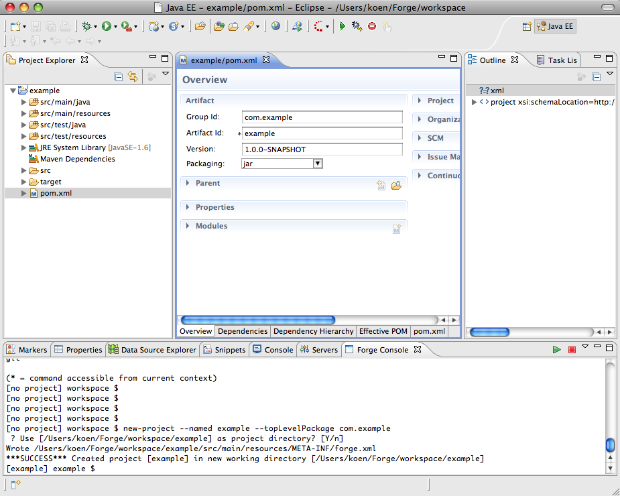
after_project_import.png

As you can see, this went really very smoothly. But let's make it even more interesting by creating an entity.


Adding the Customer Entity

Adding an entity is done using the entity command. At this time, in the current scope, the 'entity' command is not enabled. We first have to setup the persistence. This is done using the persistence setup command. We will need to specify the JPA provider for which we choose Hibernate and the target container which will be JBoss AS 6. The full command to issue is persistence setup --provider HIBERNATE --container JBOSS_AS6.

persistence_setup.pngAs you can see we have the opportunity to accept support for the extended APIs which we will do. When prompted we select version 3.6.4.Final of Hibernate. As shown below, an editor opens and shows the generated persistence.xml file.
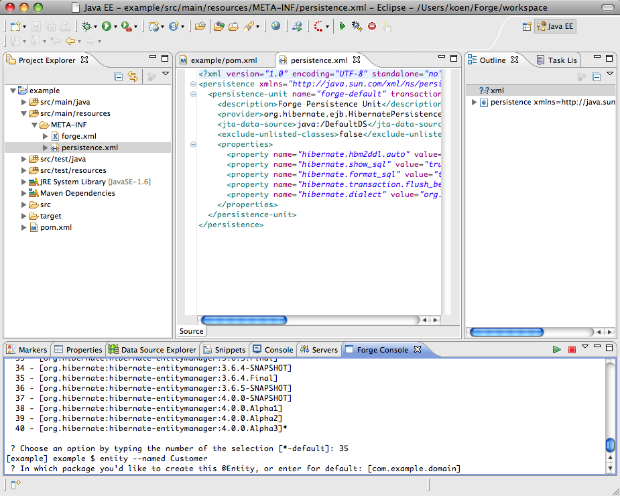
entity_command.png

Now the we can create entities. As shown above we issue the following command entity --named Customer. We will be lazy again and accept the proposed default package. This time the java editor opens on the generated Customer.java file.
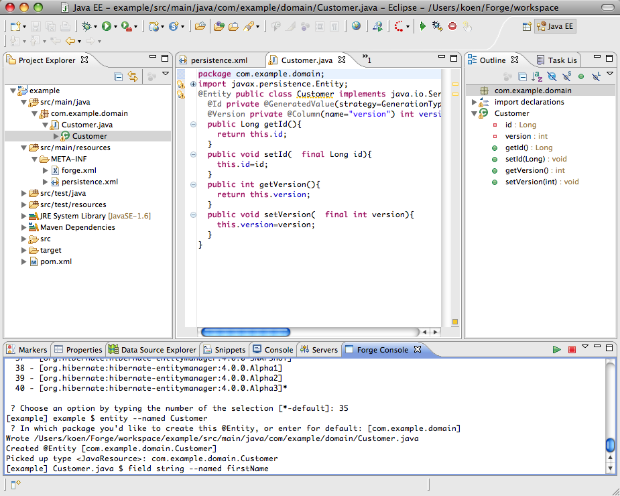
field_command.png

Next we will create two fields in our Customer class. One for the first name and one for the last name of the customer. The two commands to be issued are field string --named firstName and field string --named lastName. Observe how the newly created fields get selected in the editor and the outline view.
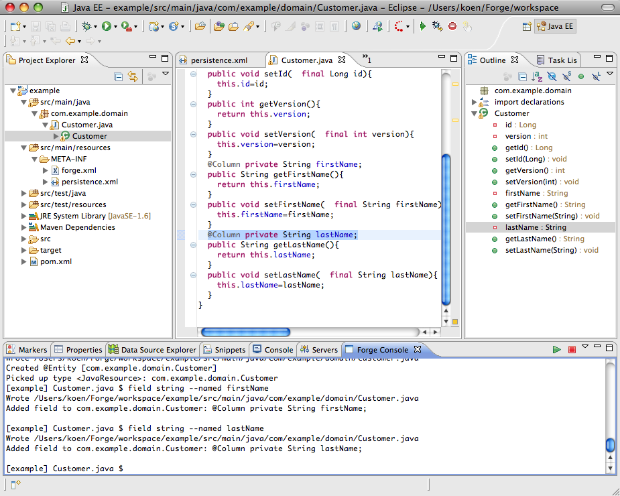
after_adding_fields.png

Now that we have our Customer class, let's develop the user interface. We want to make use of PrettyFaces to provide us with pretty URLs. Fortunately for us, there is a Forge plugin for PrettyFaces that we can use. As a bonus it will enable us to show how to install additional plugins into Forge.


Adding the PrettyFaces Plugin

The commands available in Forge are provided by plugins. The Forge runtime embedded in JBoss Tools comes with a number of standard plugins that provide us with the commands that were shown earlier when we tried the list-commands --all command. The prettyfaces setup command which we need to use if we want to enable PrettyFaces in our example project is not one of those standard commands. Luckily the list of Forge commands is extensible. To do so we can install plugins with the forge command. There are a number of different ways to install those plugins such as providing a jar file or a Maven identifier. We are going to install our PrettyFaces plugin using git. As shown below we issue the forge git-plugin git://github.com/ocpsoft/prettyfaces-forge-plugin.git command.

install_prettyfaces.png

Forge will start by checking out the plugin source code into a temporary folder, launch Maven on the checked out code to build the plugin and then install the plugin in the ~/.forge folder. It will then restart Forge so that the new plugin is available.

prettyfaces_installed.png

Now that our prettyfaces plugin is installed, we can start using it.


PrettyFaces in the Example Project

We start of where we left earlier and setup PrettyFaces for our example project by issuing the command prettyfaces setup. Forge will ask us if it's OK to change the packaging from 'jar' to 'war', which we accept.

prettyfaces_setup.png

After that we need to choose the technology to use for our application. We choose Java EE 6 and Servlet >= 3.0.

prettyfaces_technology.png

The last thing Forge asks from us is to choose the version of PrettyFaces that we want to use. We choose version 3.2.1. The pretty-config.xml file opens in an xml editor. Also notice how the layout of the project changes. This is because setting up PrettyFaces has changed our packaging from 'jar' to 'war'. The Eclipse Maven integration picks this up and the Forge Tools automatically update the project configuration accordingly.
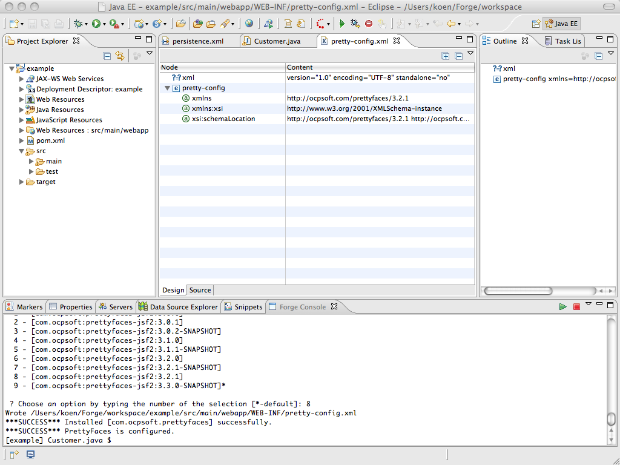
prettyfaces_installed.png

Now we are sure we will be able to create pretty urls and we are ready to scaffold our Customer application.


Scaffolding the Example Application

The first thing to do is setup scaffolding. We issue the scaffold setup command and accept the default for the scaffold type and instruct Forge to install the scaffold provider for our project.

scaffold_setup.png

We install version 1.15 of Metawidget and version 3.0.0.Final of Seam Persistence.

scaffold_versions.png

We accept the index.html file to be overwritten and choose to generate a pretty URL ('/') for the combination of the index.xhtml resource and the /index.jsf URL.
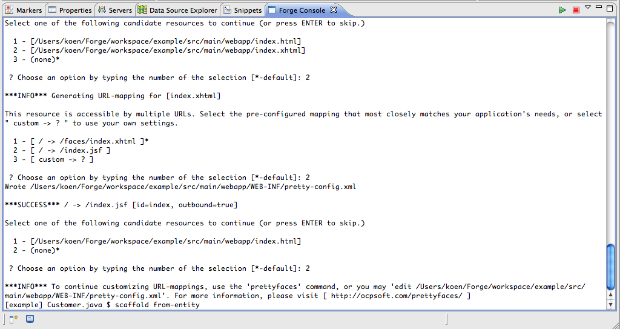
scaffold_index.png

Now we need to scaffold the user interface for the Customer entity. We can do this by issuing the scaffold from-entity command. We again accept the default for the scaffold type and then generate the following URL combinations:

  • /customer/view -> /faces/scaffold/customer/view.xhtml for the view.xhtml resource.
  • /customer/create -> /faces/scaffold/customer/create.xhtml for the create.xhtml resource
  • /customer/list -> /faces/scaffold/customer/list.xhtml for the list.xhtml resource

The process is illustrated below for the first one of these.
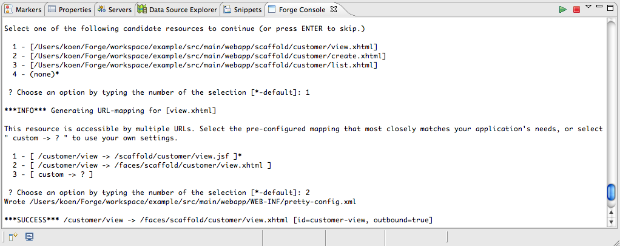
scaffold_from_entity.png

After this, we can proceed by building and deploying our application.


Building and Deploying

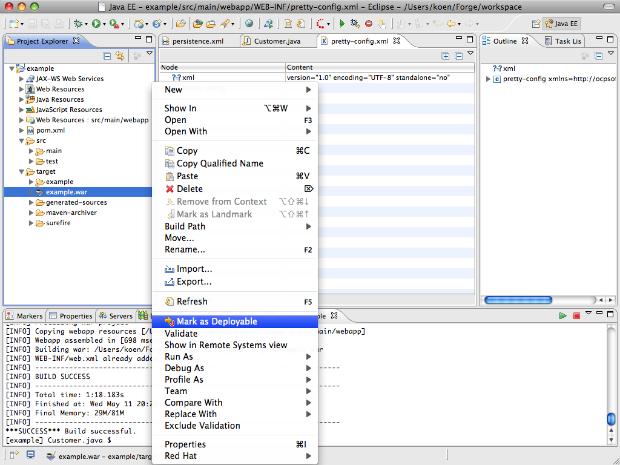
Building the application is only a matter of entering the build command. This will invoke Maven and build the project.
mark_as_deployable.png

When the build is finished, we navigate to the created example.war artefact in the target folder, bring up the context menu on this file and select Mark as Deployable. After that, we bring up the context menu a second time on this file and select Debug As->Debug on Server.

debug_on_server.png

The Debug on Server wizard pops up. We select our JBoss AS 6 Runtime Server that we configured in the beginning and push the Finish button. The Eclipse console view should appear, showing the activity of the server while it is deploying our application.

When deployment is finished, we are ready to see how debugging works.


Debugging the Application

Let's put a breakpoint setLastName method of our Customer class.

breakpoint.png

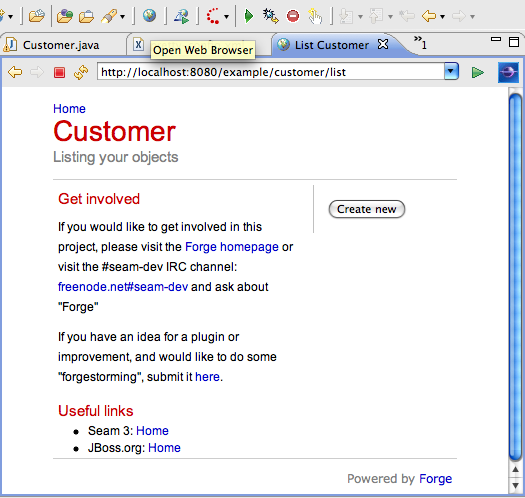
Next we open the Eclipse browser window by clicking the globe icon in the toolbar and enter the URL of our application: http://localhost:8080/example/customer/list.
webbrowser.png

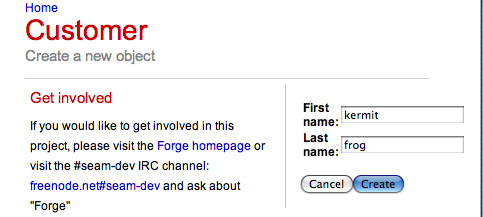
As expected there are no customers in our database. Let's change this by pushing the Create new button. On the next screen we enter the first and last names of our first customer and press Create.
kermit_frog.png

We are prompted by Eclipse to change to the Debug perspective and as expected, our application is halted on the breakpoint tht we set a moment ago.

debug.png

Now we can do all the things developers do while debugging applications. I encourage you to remove the breakpoint and push the Resume button (or F8) to continue the application, play around and see how Forge created a basic CRUD user interface for our Customer entity. For me the time has come to finish this long article and come to a conclusion.


Conclusion

In this article I have tried to illustrate how easy it is to get started with Forge to create, deploy and debug a JEE application. Also, I have tried to show you how developers can benefit greatly of the combined power of a command line oriented interface that is integrated in a full featured IDE. As you have seen, the IDE can provide immediate feedback of what happened by issuing the commands at the command line in the Forge Console view.

Finally, I would encourage you to test drive Forge and its JBoss Tools integration and provide us with all you feedback. For that you can use the Forge mailing list (forge-users@lists.jboss.org) as well as the JBoss Tools discussion forum. Bugs and feature requests can be filed against the Forge or the JBoss Tools issue trackers.


Happy Forging!

Koen

So, thanks to Igor Fedorenko's last efforts, m2eclipse-wtp 0.12.0 is finally out, (update site available at http://m2eclipse.sonatype.org/sites/m2e-extras), bringing the WTP integration with Maven to a whole new level. The complete release notes are available here. However, I wanted to highlight some of the most notable features in this new version, so let’s take a quick tour :

On-the-fly web resource filtering

Maven has this interesting concept of web resource filtering : basically you can add resources existing in non standard directories, into your final web application. Moreover, you can filter these resources to apply, for instance, specific application configuration depending on a maven profile : you can activate some debug options in your web.xml, define development specific parameters in your spring configuration files, use a different css color scheme when you work locally and so forth.
Supported maven web resource filtering features are :

  • inclusion/exclusion of resources
  • filtering (not activated by default)
  • target path (root of the web application by default)
  • possibility to use specific properties file filters


Here is a sample of maven-war-plugin configuration filtering any xml files under src/main/webapp, using an external filter file :


<plugin>
    <groupId>org.apache.maven.plugins</groupId>
    <artifactId>maven-war-plugin</artifactId>
    <version>2.1.1</version>
        <configuration>
            <webResources>
                <filters>
                    <filter>src/main/filters/dev.properties</filter>
                </filters>
                <resource>
                    <directory>src/main/webapp</directory>
                    <filtering>true</filtering>
                    <includes>
                        <include>**/*.xml</include>
                    </includes>
                </resource>
            </webResources>
    </configuration>
</plugin>


Note that after adding the webResource configuration to your pom.xml, you need to update the Maven project configuration.


m2eclipse-wtp 0.12.0 not only supports these features from maven, but goes one step further and brings you on-the-fly filtering : as soon as you save a file included in the <webResources> configuration from the maven-war-plugin, filtering is triggered automatically. Couple that with WTP’s hot redeployment capabilities, and you can see your changes by just reloading the affected pages in your browser.


OK, to be fair, that depends on the changed files, actually. If you change the content of your web.xml, or some spring config files, chances are you’ll have to restart your application or the server for the changes to be taken in consideration.
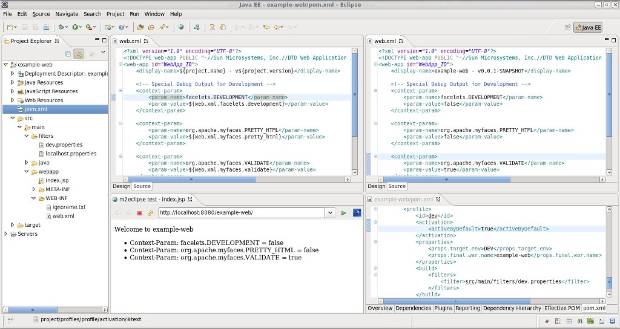
The filtered resources are  copied to the project build directory, under m2e-wtp/web-resources. You can view the content of this folder directly from the Project Explorer view in eclipse, under the Web Resources Node. You can open and compare side by side a raw file and its filtered version, as shown in the following screenshot.


web-resource-filtering-profile1.jpg

In the previous example, the dev profile, activated by default (see lower right panel) determines which filter file must be used during filtering. In this case, we want to active some debugging options. The index.jsp page, shown in the browser in the lower left panel, displays the computed values of the different context-params from web.xml.


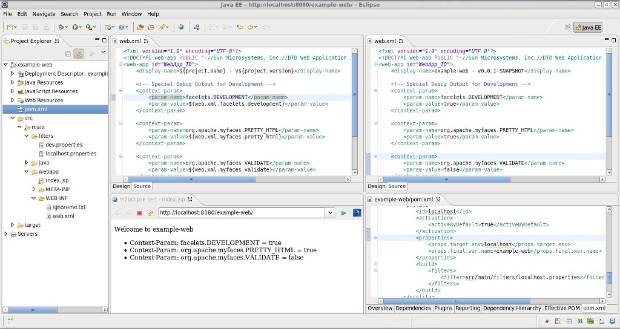
Now after changing the active profile (due to a bug in m2e-core 0.12.0, the pom.xml needs to be saved twice for the change to be detected, but this has been fixed in m2e-core 0.13.0) and after restarting tomcat (it doesn't restart the application upon web.xml changes), you'll notice the web.xml values are updated, values are taken from another properties file.

web-resource-filtering-profile2.jpg


Context root customization

By default, the web project's context root is resolved from the <finalName> value resolved from the pom.xml. In the following example, the example-web project will be accessible at http://localhost:8080/example/, according to the finalName value  :

m2e-wtp-context-root-finalname.jpg

However, you can customize the context root used in WTP by setting a custom property in your pom.xml, for instance, if you need to use "/" as your context root, just add <m2eclipse.wtp.contextRoot> in your properties and update your maven project configuration :


<properties>
    ...
    <m2eclipse.wtp.contextRoot>/<m2eclipse.wtp.contextRoot>
    ... 
</properties>


When restarting tomcat, the context root change will be detected and tomcat will ask to update its configuration. Now the same application is accessible at http://localhost:8080/


m2e-wtp-context-root-property.jpg


Java nature no longer added to EAR projects

The java nature was wrongly added to EAR projects. This is no longer the case. Moreover, existing Java nature will be automatically removed from existing EAR projects upon update project configuration.


Generation of application.xml outside the source folders

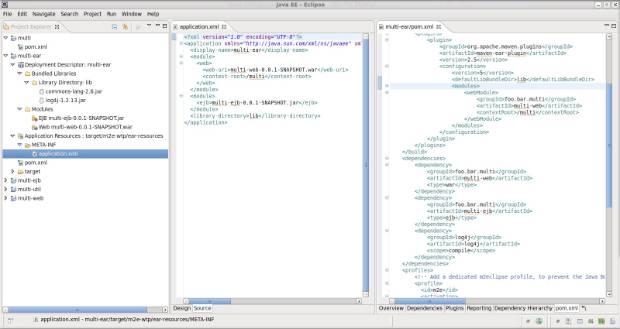
Since m2eclipse added support for EAR projects in 0.9.8, many users complained the deployment descriptor was generated under the source folder, under version control. Since application.xml (and jboss-app.xml) can be generated by maven automatically, there is no need to pollute the source folder right? Starting from m2eclipse-wtp 0.12.0, the deployment descriptors are now generated under <build directory>/m2e-wtp/ear-resources. Similarly to the web projects, a new Application Resources node is now displayed in the Project Explorer view, showing you which EAR resources will be deployed/exported.

ear-application-resources.jpg

If, for some reason, one would still want to generate the deployment descriptors under the source folder (src/main/application by default), then you could right click on the project, open the project Properties and go to the Maven > WTP integration page. There, after enabling specific project configuration, you can choose to NOT use the build folder to generate application.xml.


m2e-wtp-project-properties.jpg


The same setting can be enabled globally for all EAR projects in the workspace by opening the Preferences > Maven > WTP Integration

m2e-wtp-preferences.jpg

After validating your choice, all EAR projects in the workspace will update their configuration, if you choose so.


Support for the no-version file name mapping in maven-ear-plugin

maven-ear-plugin 2.5 introduced a new file name mapping strategy, namely no-version, that remove the version suffix from all EAR deployed dependencies. All you need to do is add the following configuration to your  maven-ear-plugin configuration :


  <plugin>
    <groupId>org.apache.maven.plugins</groupId>
    <artifactId>maven-ear-plugin</artifactId>
    <version>2.5</version>
    <configuration>
       ...
       <fileNameMapping>no-version</fileNameMapping>
       ...
    </configuration>
  </plugin>


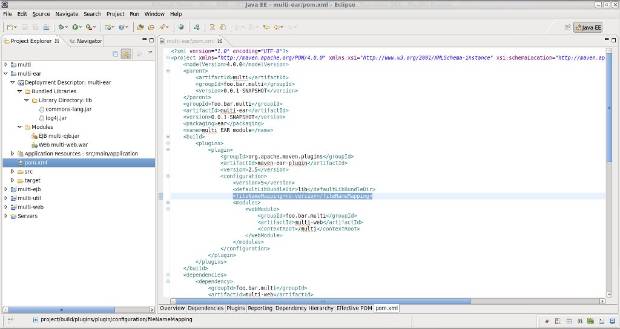
Then you can check in the Project Explorer view, under the Deployment Descriptor node, all dependencies' names under the Bundle Libraries and Modules are updated :

ear-noversion-filenamemapping.jpg

Increased stability

Many users, over the years, experienced random crashes during project import or configuration update, or saw test resources being deployed with their applications. All these issues could be linked to one root cause : some WTP projects were missing a crucial element : the org.eclipse.wst.common.modulecore.ModuleCoreNature nature in their .project. The root cause of this "corruption" is still unclear, this is probably caused by some race condition, but unfortunately, this has proved impossible to reproduce with test projects.

m2eclipse-wtp 0.12.0 actually workarounds this issue : if the ModuleCoreNature is missing from WTP projects, it's automagically added to fix the projects, under the hood. Hopefully, this should fix most of the crashes users occasionally experience.


Now, what next?

m2eclipse-wtp 0.12.0 is the last version supporting Eclipse 3.5 (Galileo) based platforms. Next 0.13.0 version will be aligned with the new, revamped m2e-core 0.13.0 (= future 1.0) and will be released at about the same time frame as Eclipse 3.7 Indigo (late june). The next big thing is the added support for war overlays, the single most requested feature in m2eclipse-wtp. If you like to live on the bleeding edge, you can already try the latest development builds, available under https://repository.sonatype.org//content/sites/forge-sites/m2eclipse-wtp/0.13.0/N/ (use the latest directory as your update site).


One last thing : all this sweetness would not have been possible if I wasn't working full time on m2eclipse-wtp. Fortunately, Max R. Andersen got me a job in his JBoss Tools and Developer Studio team, and allows me to spend a considerable amount of time playing with my favorite toy of the moment :-) Thanks a bunch Max!!! Also big thanks to Eugene Kuleshov, Igor Fedorenko and Jason Van Zyl who gave me the chance to get involved in m2e(clipse).


Enjoy,


Fred.

Filter Blog

By date:
By tag: