Skip navigation
2013

JBPM6 provides the flexibility to extend the default process constructs with domain-specific extensions.

The domain-specific work items (also called service nodes) specify the work that should be executed in the context of a process in a declarative approach.


Here is a simple example that shows the usage of  a custom workitem that has a few parameters.
This custom extension feature provides the ability to create a service task, a generic way to interact with external services (e.g., REST, JMS, Web service etc).

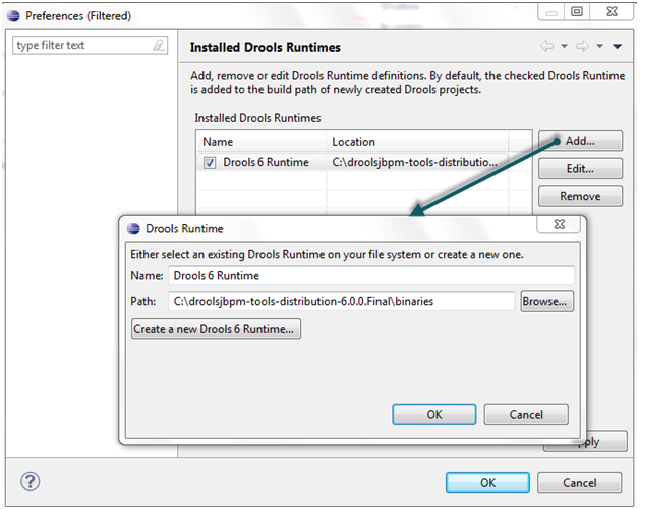
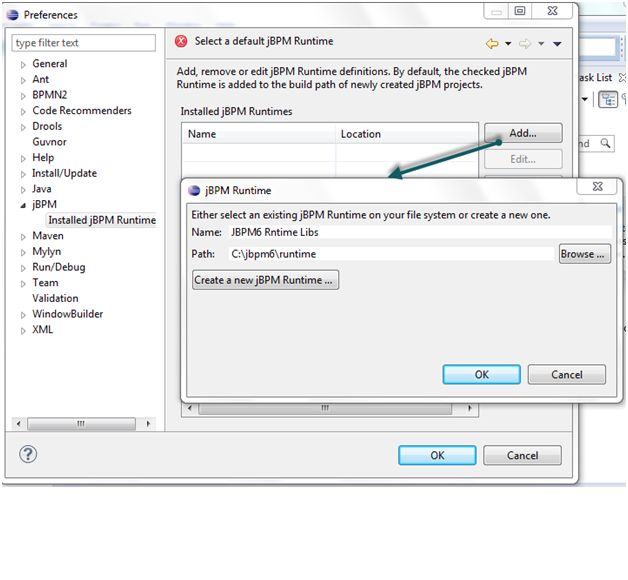
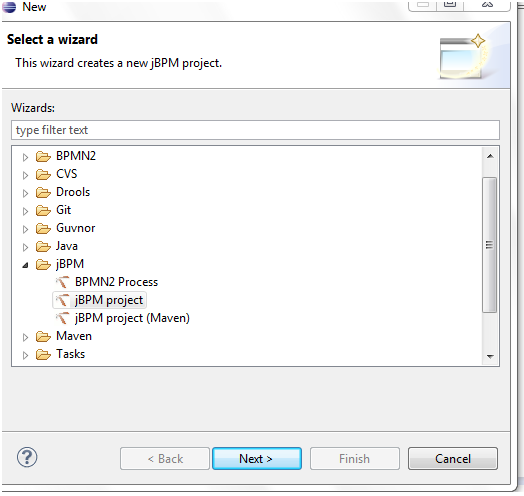
Start with the setup as shown in https://community.jboss.org/people/bpmn2user/blog/2013/12/17/jbpm6--eclipse-plugin-installation.


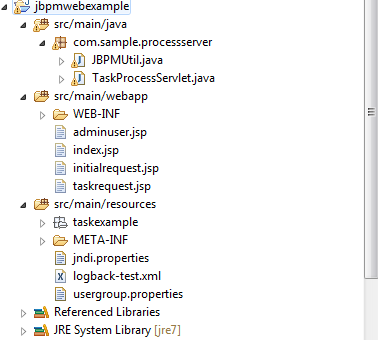
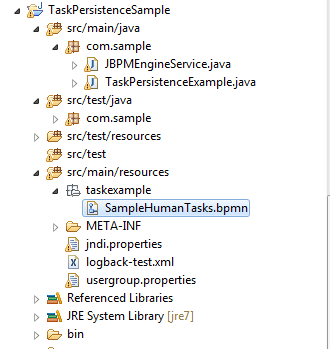
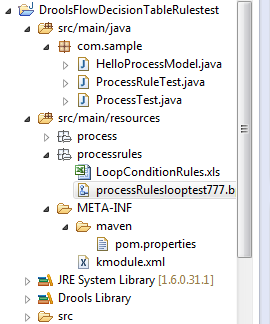
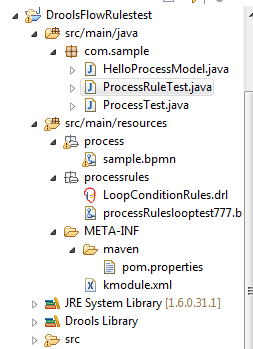
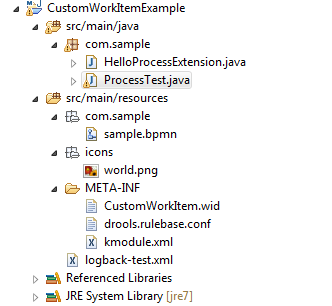
This example has a bpmn file that has the custom WorkItem(sample.bpmn), two WorkItem configurations files (CustomWorkItem.wid and drools.rulebase.conf), WorkItem implementation class (HelloProcessExtension.java) and test class (ProcessTest.java).


explore.png


Here is the configuration file CustomWorkItem.wid that provides information about the display name, parameter types etc and it should be placed in the project classpath (in PROJECT/src/main/resources/META-INF/CustomWorkItem.wid). Any custom icons for the workitems are places in  PROJECT/src/main/resources/icons.


custonworkitem_wid.png

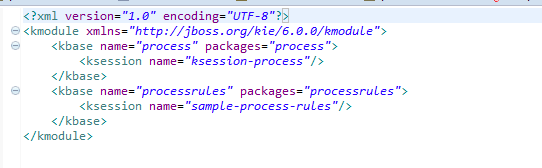
The definition of the workitem (CustomWorkItem.wid) needs to be registered in a project. It can be done by including the definition using the drools.WorkDefinitions property in a file drools.rulebase.conf in META-INF dircectory.

drools_rulebase_conf.png

After creating a definition and registering the workitem, it will show up in designer. The Eclipse might need to be restarted after creating the configuration files(i.e, CustomWorkItem.wid and drools.rulebase.conf files in META-INF directory of the project)

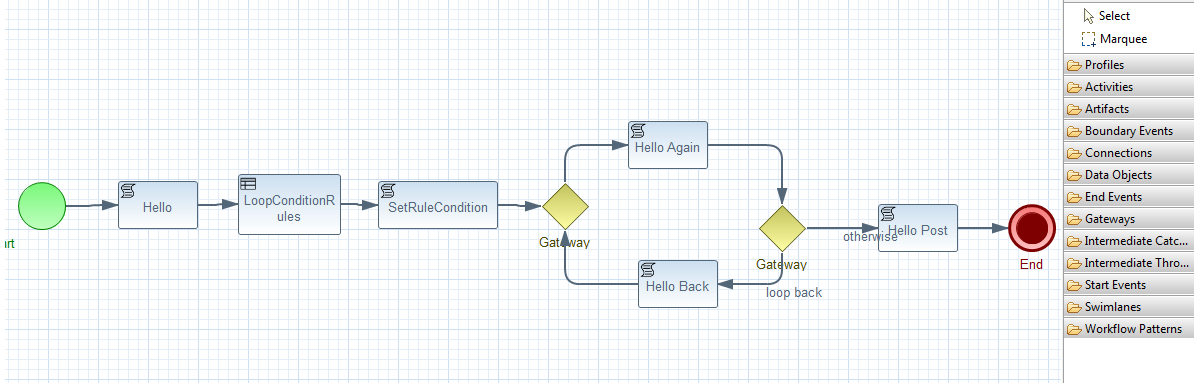
The new workitem 'HelloProcessExtension' can be seen in 'Service Tasks' as shown below.

bpmn2processdiag.png


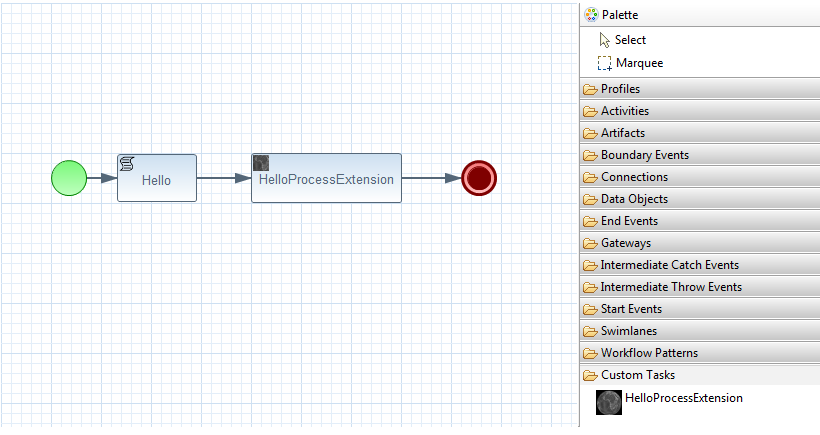
'HelloProcesExtension' node can be created inside the process using drag and drop.


processvariables.png


processparammapping.png


mappingdetail.png


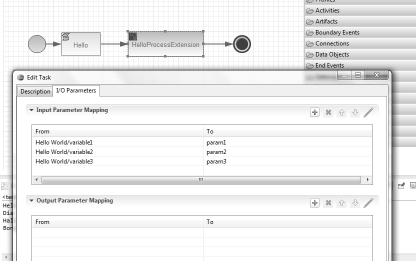
A WorkItemHandler implementation class needs to be created for the 'HelloProcessExtension' node.


HelloProcessExtensionWorkitemhandler.png


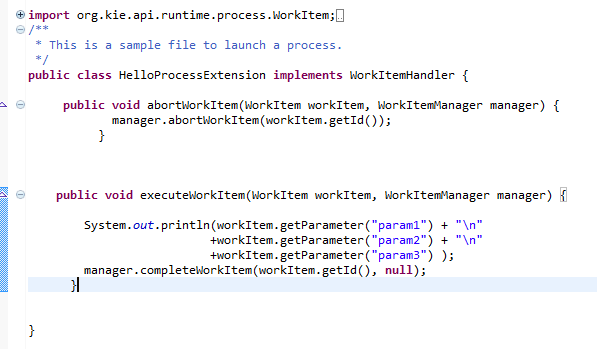
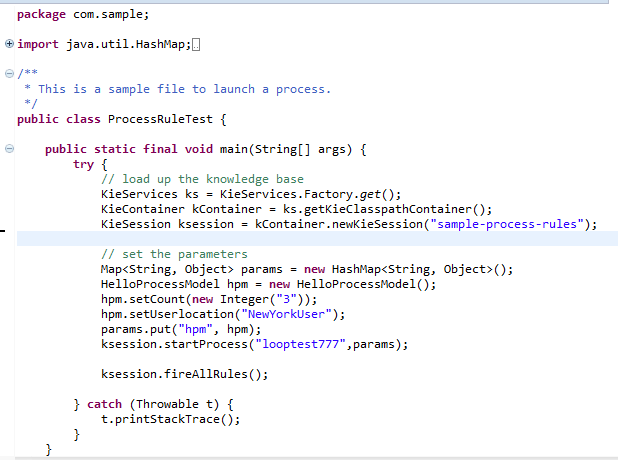
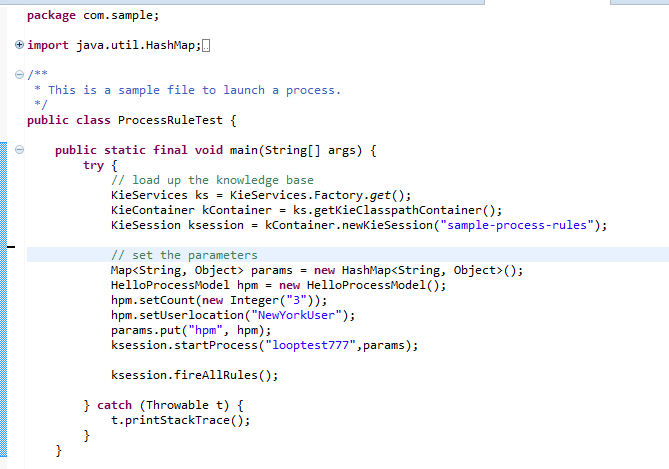
The WorkItemHandler should be registered at the WorkItemManager, using API as shown below (in ProcessTest.java)

mainprg.png

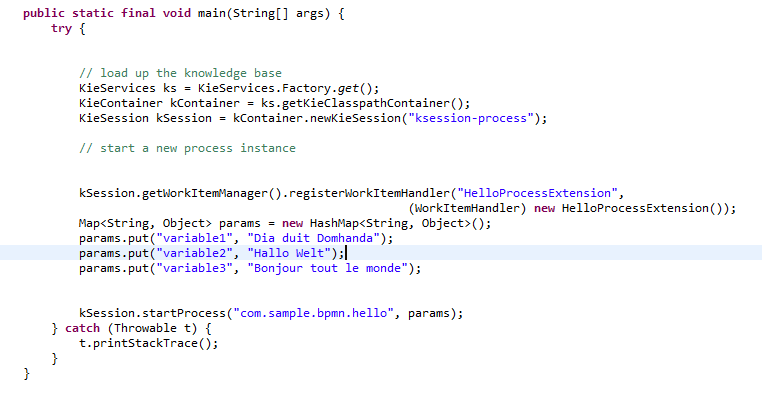
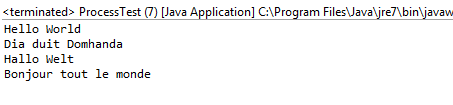
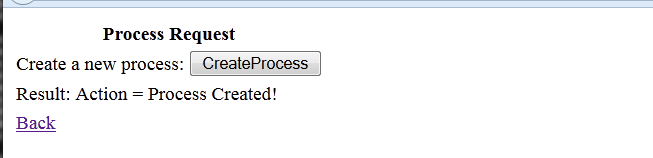
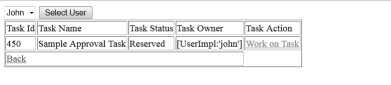
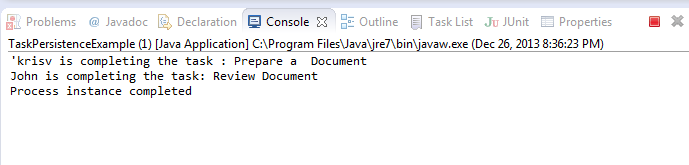
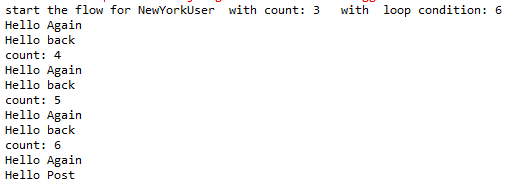
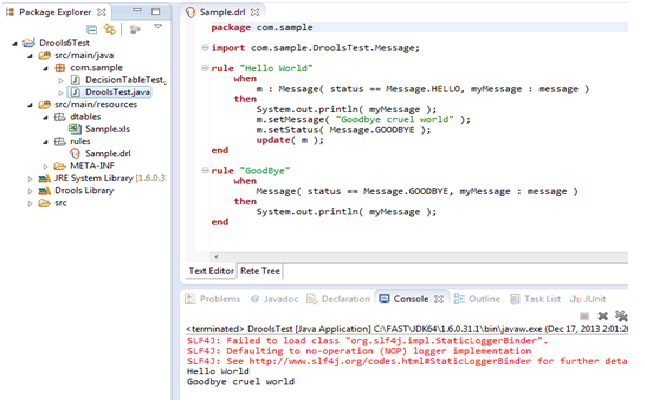
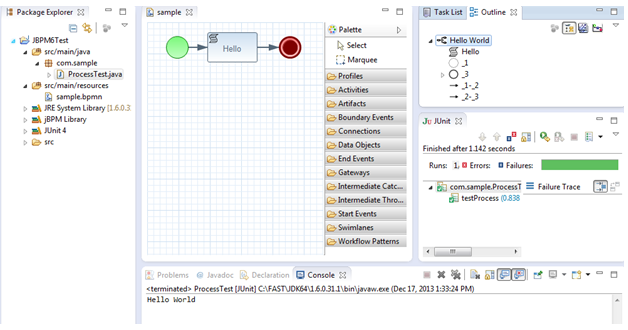
After running the test class 'ProcessTest.java', following results can be seen.

results.png

Here is a simple web example that shows how to use jBPM6 API to process human tasks. This blog uses the same example show in JBPM5 Web Example - Local Human Task.


processbpmn2.png


This example uses H2 database and it can so be seen that Hibernate persistence dialect is set to H2Dialect in the META-INF/persistence.xml.h2db.PNG


This example has the following files as shown below.

TaskProcessServlet performs various actions (such as retrieving and completing the tasks etc) using the JBPM API (JbpmAPIUtil).


explore.png


jBPM6 introduces a new module called RuntimeManager which simplies the access to KnowledgeSession (KieSession) and taskservice etc.

There are various pre-defined startegies for creating RuntimeManager, such as singleton (one session for all the requests), session per request (a new session for each request) and session per process instance (each process has its own context and all the commands get executed in that context


This example uses singleton strategy.

Runtime.PNG

Here is the sample code that shows how to create a task service and complete the task.


taskcomplete.PNG


How to run and deploy in web container, e.g., Tomcat?


Use maven to create a war file (e.g., mvn package) and copy the war file to TOMCAT_HOME/webapps


A successful deployment shows the following page (e.g., http://localhost:8080/jbpmwebexample/)

mainscreen.png

A process instance can be created selecting 'CreateProcess' button.

createprocess.png

The tasks for the first user can retrieved by selecting the button 'Select User'.

kristask.png

After completing the task as the first user, i.e., krisv, it would wait at the second task that needs to be approved by 'john'.

krisdetail.png


johntask.png


This example requires a JNDI datasource.
Here are the main steps and refer to http://docs.codehaus.org/display/BTM/Tomcat for more details.

1.) Copy the following libraries to TOMCAT_HOME/lib


btm-2.14.jar

btm-tomcat55-lifecycle-2.1.4.jar

slf4j-api-1.6.4.jar

slf4j-jdk14-1.6.4.jar

geronimo-jta_1.1_spec-1.1.1.jar

h2-1.3.161.jar


a.) Create the following btm-config.properties in TOMCAT_HOME/conf


bitronix.tm.serverId=tomcat-btm-node0

bitronix.tm.journal.disk.logPart1Filename=${btm.root}/work/btm1.tlog

bitronix.tm.journal.disk.logPart2Filename=${btm.root}/work/btm2.tlog

bitronix.tm.resource.configuration=${btm.root}/conf/resources.properties


    b.) Add transaction and Resource information after 'WatchedResource' line in TOMCAT_HOME/conf/context.xml as shown below.

.........

..........

<WatchedResource>WEB-INF/web.xml</WatchedResource>

    <Transaction factory="bitronix.tm.BitronixUserTransactionObjectFactory" />


    <Resource name="jdbc/jbpm-ds" auth="Container" type="javax.sql.DataSource"

               maxActive="15" maxIdle="2" maxWait="10000"

logAbandoned="true"

               username="sa" password=""

driverClassName="org.h2.jdbcx.JdbcDataSource"

               url="jdbc:h2:tcp://localhost/~/test"/>

..........

.........


c.) Create 'resource.properties' in TOMCAT_HOME/conf as shown below.


resource.ds1.className=bitronix.tm.resource.jdbc.lrc.LrcXADataSource

resource.ds1.uniqueName=jdbc/jbpm-ds

resource.ds1.minPoolSize=0

resource.ds1.maxPoolSize=5

resource.ds1.driverProperties.driverClassName=org.h2.jdbcx.JdbcDataSource


d.) Modify TOMCAT_HOME/conf/server.xml to include BTMLifecycleListener after the line that has GlobalResourcesLifecycleListener as shown below.


.........

<Listener className="org.apache.catalina.mbeans.GlobalResourcesLifecycleListener" />

  <Listener className="bitronix.tm.integration.tomcat55.BTMLifecycleListener" />

Here is an example that shows task persistence using H2 database. A simple process that has a couple of human tasks as shown below is considered for this example.


processbpmn2.png


This example uses the jBPM plugin for Eclipse (jBPM6 - Eclipse BPMN Modeler Installation).


This examples has a bpmn file (SampleHumanTasks.bpmn), a process test program that starts the process(TaskPersistnecTest.java or TaskPersistenceExample.java), a persistence configuration files (persistence.xml ) and a Bitronix JNDI file ( jndi.properties) .

The persistence configuration file needs to be included in META-INF folder as shown below. Please refer to JPA/Hibernate documents to know more about persistence configuration details.


projectexplorer.png


This example uses H2 database to show the persistence of process state into various tables.

startH2.png

JBPM6 database persistence involves following categories:


1.) Process persistence: This involves persisting runtime state that represents current execution state in a specific context. The runtime state contains the minimal runtime state that is required to continue execution at a later time. This allows restoring the state of execution of all the running processes (e.g., ProcessInstanceInfo)  in the event of a failure.


2.) Human task persistence: Task management component, which is treated as a separate component, can persist all the task information (e.g, user, assignment etc) into database.


3.) History or Auditlog persistence: All the audit log information(e.g., ProcessInstanceLog, NodeInstanceLog etc)can stored in database for reporting purposes.


The database tables can be viewed in Eclipse using one of database plugins such as SQLExplorer, QuantumDB etc.

tables.png

The database mapping of various tables can be seen in the JPA persistence xml file included in META-INF.

persistence1.png


persistence2.png


jBPM6 introduces a new module called RuntimeManager which simplies the access to KnowledgeSession (KieSession) and taskservice etc.

There are various pre-defined startegies for creating RuntimeManager, such as singleton (one session for all the requests), session per request (a new session for each request) and session per process instance (each process has its own context and all the commands get executed in that context).


This example uses singleton strategy.

runtimemanager.png

Here is a code snippet that shows how to use the taskservice to start and complete a task.

tasksummarycomplete.png


After running the example successfully following results can be seen,

results.png

A SQL client can be used to examine the contents of various process, task and audit tables.

teaskquery.png


processinstancelog.png

This example shows how to use an Excel decision table rules inside a jBPM6 process using the example (JBPM5 - RuleTask Example Using an Excel Decision Table). As this example uses Eclispe plugin, install Drools/JBPM 6 plugin (Drools 6 - Eclipse Plugin Installation and Hello World Example).


Here are rules represented in Excel decision table.


There are three rules in the following decision table. For example, Rule1 (Row 11) means that if the 'userlocation' is set to ‘NewYorkUser’ and the initial count is less 4, then the ‘loopcondition’ is set to 6.


spreadsheet.png

Following is the main process flow diagram. This example has a loop condition which is determined using the rules shown in the above decision table in the RuleTask 'LoopConditionRules'.

process.png

'LoopConditionRules' is a 'Rule Task' component and it needs to have a valid RuleFlowGroup name (e.g.,  EvalLoopcondistion as shown below) and it should match with the 'RULEFLOW-GROUP' name (Column C) of the decision table.

ruleflowgroupprop.png


kmodule.xml file provides the name of the package and the ksession's name.

kmodule.png


processcode.png


This example has a bpmn file (processRuleslooptest777.bpmn), model file (HelloProcessModel.java), rules file (LoopConditionRules.xls) and a test file (ProcessRuleTest.java).

directory.png


After running ProcessRuleTest successfully, following results can be seen.

results.png

This example shows how to use a 'Rule Task' component within a jBPM6 process using the example shown in JBPM5 - RuleTask Example Using a Rule File and it is illustrated using drools/jbpm Eclipse plugin (Drools 6 - Eclipse Plugin Installation and Hello World Example).


This example has a loop condition which is determined using the rules based on the location of the user and the starting condition.This example has a loop condition which is determined using the rules based on the location of the user and the starting condition.


process.png

'LoopConditionRules' is a 'Rule Task' component and it needs to have a valid RuleFlowGroup name (e.g.,  EvalLoopcondistion as shown below).


ruleflowgroupprop.png


The RuleFlowGroup set in the previous step has to match with the 'ruleflow-group' name in the 'drl' rules file as shown below.


drlfile.png

Here is the sample test code to start the process after setting the initial parameters.


sessioncode.png


This example has a bpmn file (processRuleslooptest777.bpmn), model file (HelloProcessModel.java), rules file (LoopConditionRules.drl) and a test file (ProcessRuleTest.java). After running ProcessRuleTest successfully, following results can be seen.


directory.png

result.png

Here are the manual steps to install Drools 6 plug-in and run a sample example in Eclipse.


1.) Download Eclipse Juno:

http://download.eclipse.org/technology/epp/downloads/release/juno/SR2/eclipse-java-juno-SR2-win32-x86_64.zip


Unzip this into a directory, say DROOLS6


2.) Download Drools and JBPM6 plug-in, i.e.,:

http://download.jboss.org/drools/release/6.0.0.Final/droolsjbpm-tools-distribution-6.0.0.Final.zip


Unzip this plugin to a temp directory, say TEMP\drools-update-site. Copy 'features' and 'plugins' directories from TEMP\drools-update-site into

DROOLS6\eclipse


It is required to have a runtime dependant libraries that a Drools project can use.


3.) Set 'Installed Drools Runtimes' to the runtime directory as shown below (Window->Preferences->Installed Drools Runtimes)

runtime.png

4.) Create a new Drools sample project in Eclipse.


newprj1.png

newprj2.png

newprj3.png

newprj4.png

Here are the manual steps to install jBPM6 Modeler and run a sample example in Eclipse.


1.) Download Eclipse Juno:

http://download.eclipse.org/technology/epp/downloads/release/juno/SR2/eclipse-java-juno-SR2-win32-x86_64.zip


Unzip this into a directory, say jbpm6


2.) Download Drools and jBPM6 plugin, i.e.,:

http://download.jboss.org/drools/release/6.0.0.Final/droolsjbpm-tools-distribution-6.0.0.Final.zip


Unzip this plugin to a temp directory, say TEMP\droolsjbpm-tools-distribution-6.0.0.Final. Copy 'features' and 'plugins' directories from TEMP\droolsjbpm-tools-distribution-6.0.0.Final into

JBPM6\eclipse


3.)  Install the BPMN 2 plug-in (http://projects.eclipse.org/projects/soa.bpmn2-modeler) using the update link http://download.eclipse.org/bpmn2-modeler/updates/juno/0.2.7/

It is required to have a runtime dependant libraries that a jBPM6 sample can use.

bpmn2install1.png

bpmn2install2.png

4.) Download the libraries (jbpm-6.0.0.Final-bin.zip ) from

http://sourceforge.net/projects/jbpm/files/jBPM%206/jbpm-6.0.0.Final/jbpm-6.0.0.Final-bin.zip/download

and unzip into a directory, say JBPM6\runtime.

Set 'Installed jBPM Runtimes' to the runtime directory as shown below (Window->Preferences->Installed jBPM Runtimes)


runtime.png

5.) Craete a sample jBPM Project using File->New->Project->jBPM->jBPM Project


bpmproj1.png

bpmproj2.png


proj3.png

Filter Blog

By date:
By tag: