I've seen two major releases of JBoss Tools in my year and a half at JBoss/Red Hat. In that time, the many talented folks we have working on tooling have developed new tools and updated existing ones. Functionality has been added just about anywhere you look in the tooling.
As such, I want to call out just a few of the areas we've made progress in for JBoss Tools 3.2...
First, the ESB Editor gained support for new ESB 4.9 functionality including BPELInvoke, new methods for creating ESB actions via annotations, and Camel ESB integration. And the team also added a first cut at better validation of ESB configurations to help make sure files will will work before they're deployed.
 Next, there's the great BPEL Editor work that Bob has already mentioned here
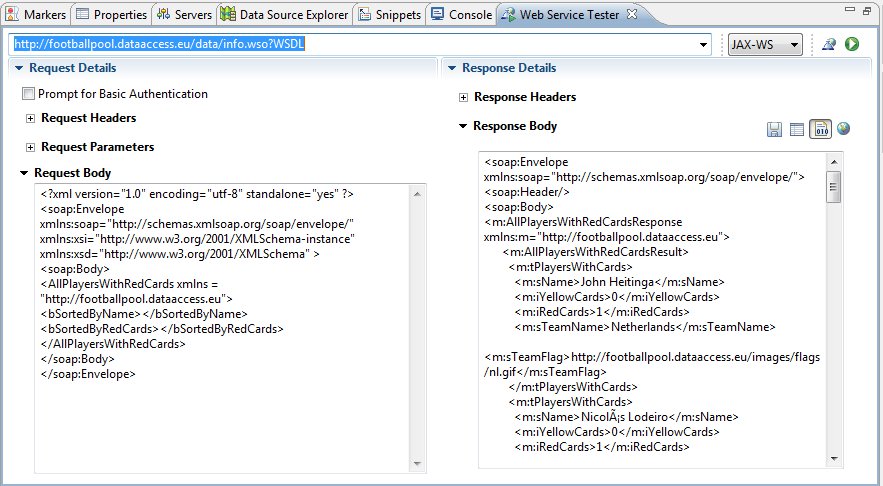
Beyond that, I have to say that I'm happy with the work we've done on the Web Service Tester that's been added. I know Bob uses it for testing web services used in BPEL processes and Lukas has used it extensively in QE. More feedback would be great, but I'm happy with where we are for a first release! You can read more about the WS Tester here.
And I'm also happy with some of the new Web Service wizards we've introduced for bottom-up WS development in this release. Though the WTP Web Service wizard works, it's not the most user friendly beast in the world and it's also not the easiest framework to extend. As such, we reused a few chunks that we'd written and found ways to present a simpler approach for developing web service artifacts for existing annotated classes.
We integrate with JBossWS and JAX-WS annotated classes and we even integrate with RESTful services if you have RESTEasy installed. So hopefully these will help you get work done a bit faster than before. You can read more about these new wizards here.
So there you have a few of the areas we've worked on for this release. As always with JBoss Tools, this is just the tip of the iceberg so be sure to keep an eye out for posts celebrating functionality in other areas!

The Early Access site for JBoss Developer Studio now contains CR1 free for download and if you want the JBoss Enterprise Application platform bundled you just need to and sign up for the early access program here.
Improvements
This release contains a few improvements over the last couple of betas that are worth mentioning.
Most of these stems from the change we made from using the horrible dropin feature of Eclipse to have a proper
P2 enabled Eclipse product build. This should make things like installation, startup and updates much smoother, simpler and in some cases faster.
New Directory Layout
There is no longer a seperate "eclipse" directory; everything related to JBoss Developer Studio is now in the "studio" folder and
instead of using raw eclipse to start you now uses the jbdevstudio, jbdevstudio.exe or the JBoss Developer Studio.app dependent on your
platform to launch.
If you have installed the EAP bundle jboss-eap still lives in <install>/jboss-eap.
Runtime Detection/Setup
You can still use the "Server" page in the installer to setup JBoss server runtimes, but all this that was previously isolated in the installer is now also available from inside JBoss Tools under the Preferences for "JBoss Tools Runtime Detection". Here you can configure directories to scan for runtimes and it supports not only Server runtimes, but also standalone framework runtimes like Seam and Drools.
Welcome Screen
You will also now be greeted with a new shiny Welcome Screen:

...and of course the latest stable fixes and features from JBoss Tools 3.2.
Have fun!
The very first version of Context Dependency Injection (CDI) Tools was introduced as a part of JBoss Tools 3.1.0. But now JBoss Tools 3.2 is moving to its first stable release. Let's have some review of main features of the improved and up coming CDI Tools in JBoss Tools 3.2.
Enabling CDI support
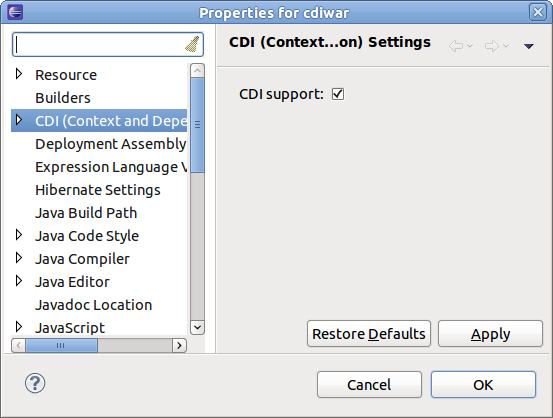
First at all we need to enable CDI support for the project. If you already have some CDI project and don't want to start from scratch then just go toProject Properties->CDI->CDI support to enable all the features.
If your project is Maven-based and the pom.xml references the CDI api jars CDI support will be enabled automatically. If you want to create a brand new WTP project with CDI support, just add a CDI facet to the list of installing facets.
See Max's blog Simple CDI Hello World with Eclipse and JBoss Tools for details.
Make sure you have CDI support enabled for all the related projects. For instance if you have a web project (is to deployed as WAR) which uses some Java project (JAR) then both projects should have CDI support enabled.
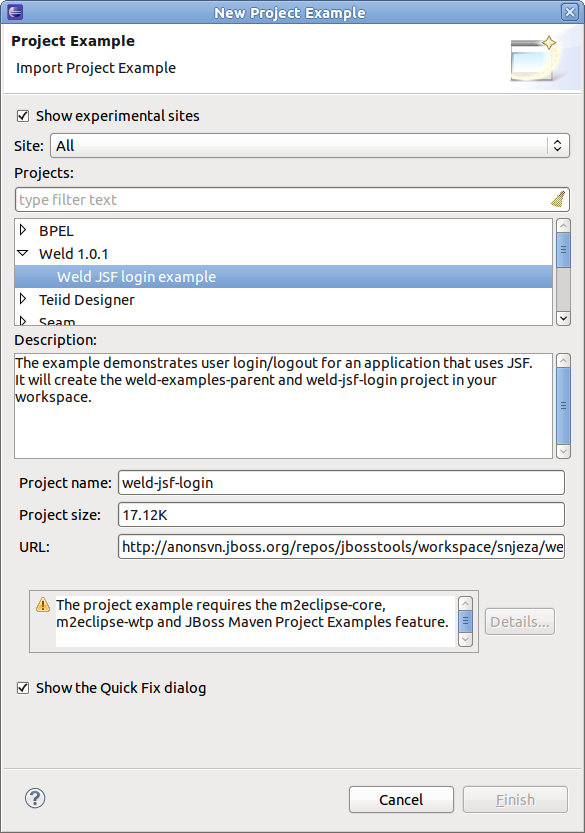
If you are interested in Weld examples (Weld is the reference implementation of CDI spec.) you can download it from JBoss Tools example site.Help->Project Examples->Weld 1.0.1
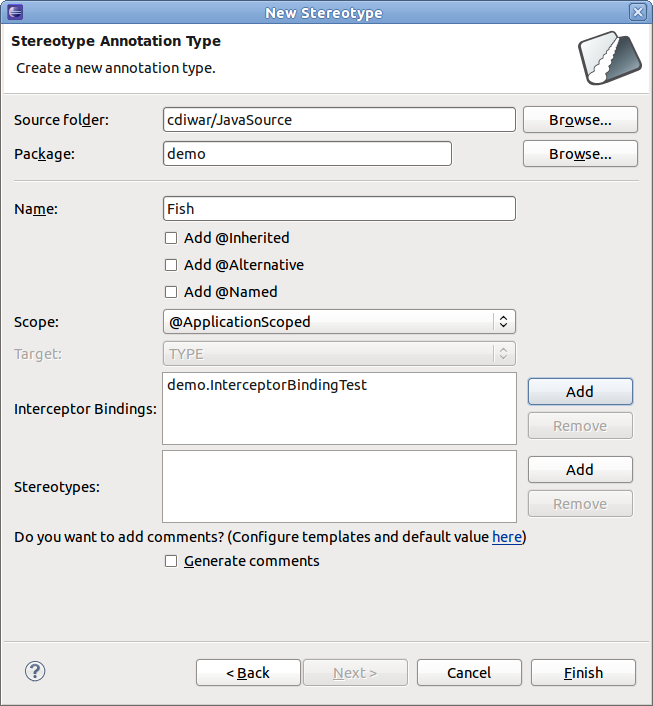
CDI Wizards
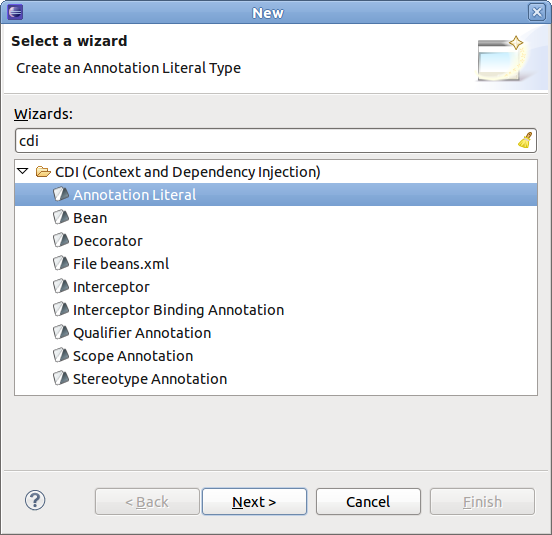
There are a set of CDI Wizards to help you to create basic CDI artifacts. The wizards are available in File->New->Other...->CDI
CDI validation
CDI validation covers most of the rules declared in the JSR-299 specification. There are 100+ validation rules including definition errors and deployment problems. You can see the full list in the CDI Preferences, where you can also control which rules you want to be Errors, Warnings or simply Ignored.
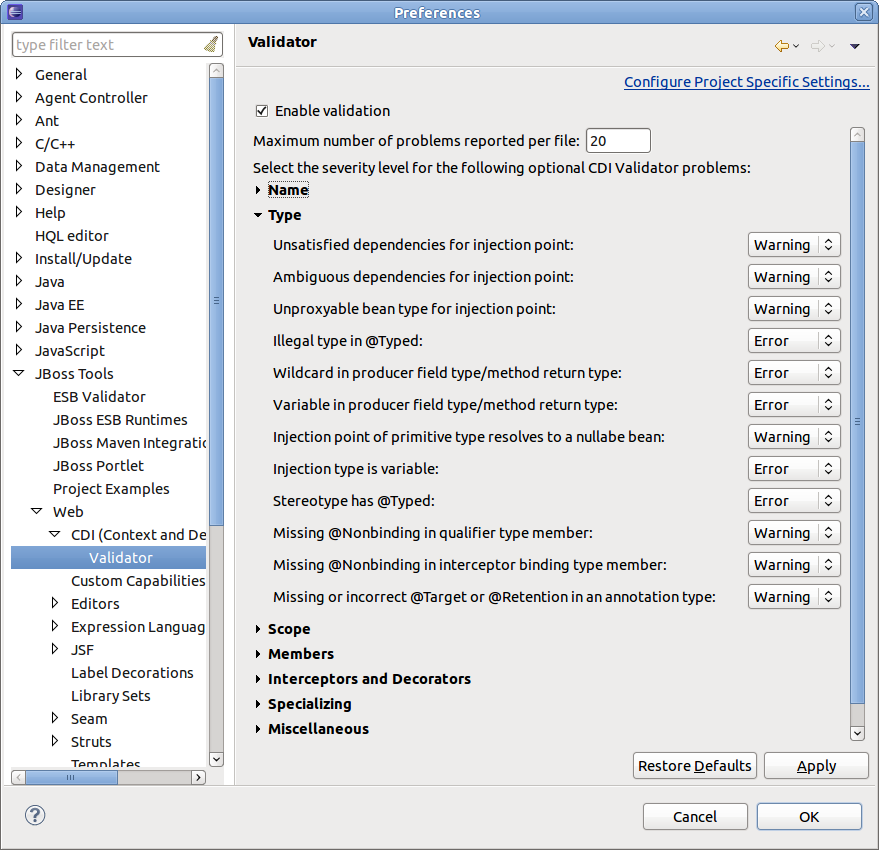
The CDI validator checks for problems in java source files, JSP, XHTML and beans.xml files.
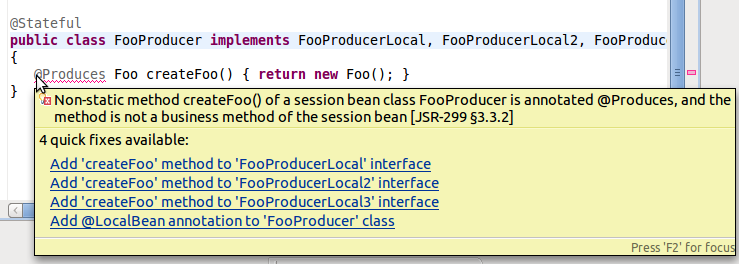
Some of the validation problems can be fixed via Quick Fixes menu (Ctrl+1):
Code completion
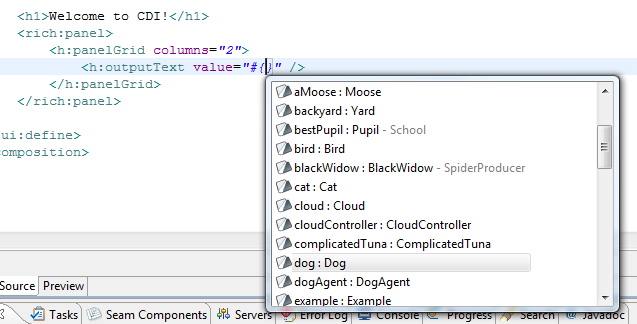
Another useful feature is a code completion. CDI tools provides two types of code completion. Code completion for @Named beans and their members which are available in EL expressions:
And code completion for the relevant types/annotations in beans.xml:
Hyperlinks (OpenOns)
Hyperlinks help you to navigate between source files. For example Ctrl+Click or F3 on any EL will navigate you to the corresponding java source.
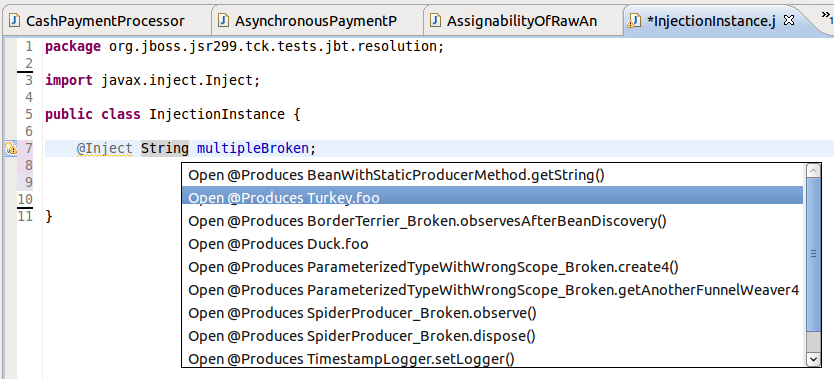
For Injection's it is a bit more tricky. The built-in Java hyperlink for its declared type will open the type. But for Injection there are additional relevant items to navigate to. CDI Tools offers you an alternative navigation to the actual bean which is to be injected.
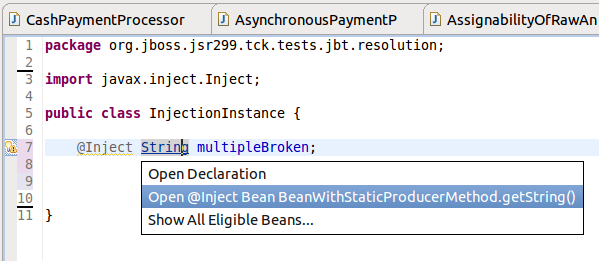
If the injection has multiple eligible beans, you can see a full list of these beans. Btw. you can fix the multiple eligible beans via a quick-fix (Ctrl+1).
Also you can open the corresponding class/interface mentioned in beans.xml via the same Ctrl+Click on the type name.
Observers and Events can be navigated to via OpenOn too.
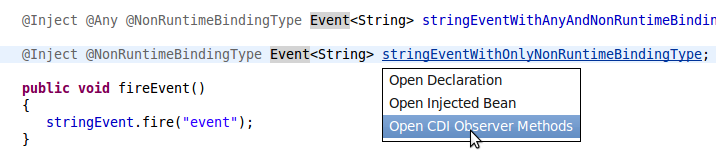

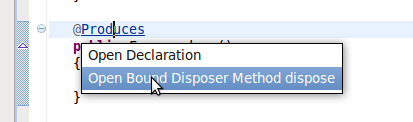
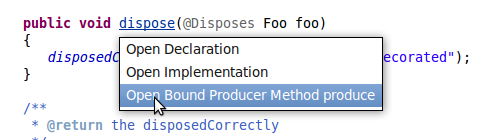
As well as Producer and Disposer methods:
At last we also have:
- EL refactoring. For example if your name the method/field or class name of some bean using Java refactoring dialogs CDI Tools will offer you to update all the EL expressions that use this method/field/type.
- Related CDI Beans are added in search result for field/method references search. See demo movie.
Feedback
This was a quick overview of the main features of up coming JBoss Tools 3.2 for CDI developers.
If you think CDI Tools misses some useful functionality then please create a feature request in JIRA! We are working to help you to enjoy this exciting world of CDI
Over the past few weeks, I have started the integration of Seam Forge into JBoss Tools. Today I am happy to present the first results of this work.
Installation
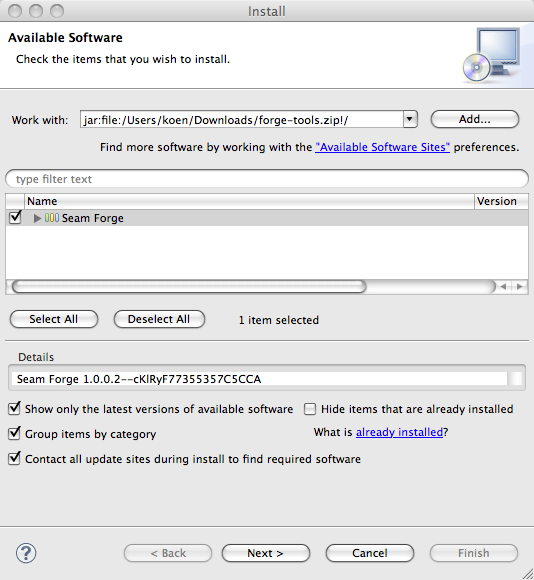
If you are familiar with the Eclipse platform the installation should be a breeze for you. The easiest way is to download a recent Eclipse version and use the 'Help->Install New Software...' wizard to install the latest and greatest JBoss Tools from the update site. Don't forget to include the Maven integration for Eclipse as we will need it later on. After this, use the same mechanism to install the forge tools from this update archive. Restart Eclipse and you should be set to go.
Starting and Stopping
Now that the installation is dealt with, let's have a look whether everything went ok. You can bring up the "Forge Console View" by selecting 'Window->Show View->Other...' and then 'Seam Forge->Forge Console'.
 As you can see the Forge Console View has a toolbar and a dropdown menu that allow you to start and stop Forge. The initial message pane indicates that Forge is not running. Let's get going and push the 'Start Forge' button.
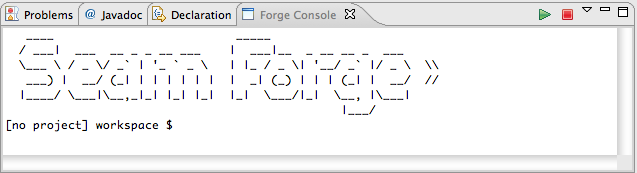
After a while, the Forge welcome banner appears and you are invited to enter forge commands. The very convenient tab completion suggesting the list or possible commands does not work yet, but you can get the suggestions anyway by pressing tab followed by a return. Also, the coloring is not yet enabled like when using Forge directly in a terminal window. When you're done working you can stop Forge by pushing the 'Stop Forge' button.
Create a Project
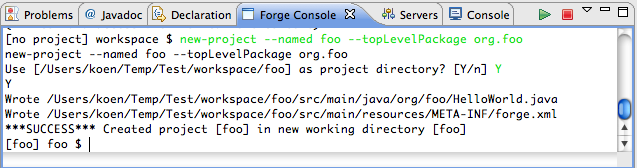
To make things a bit more interesting, let's try the tutorial from Lincoln's blog. We create a new project called 'foo' with top level package 'org.foo':
[no project] workspace $ new-project --named foo --topLevelPackage org.foo
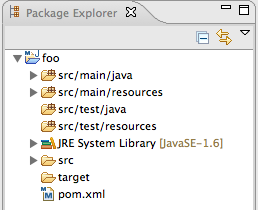
 Now the project is created but unfortunately, we cannot see it in our workspace. This is one of the obvious features that need to be added. For now, we have to import the project in the workspace. Here is where the Maven plugins come into play. For Forge projects are indeed Maven projects too. Select 'File->Import...' and then 'Maven->Existing Maven Project'. Point the wizard at the workspace root and the 'foo' project should show up in the list of projects to import. After importing the project shows up in the package explorer.
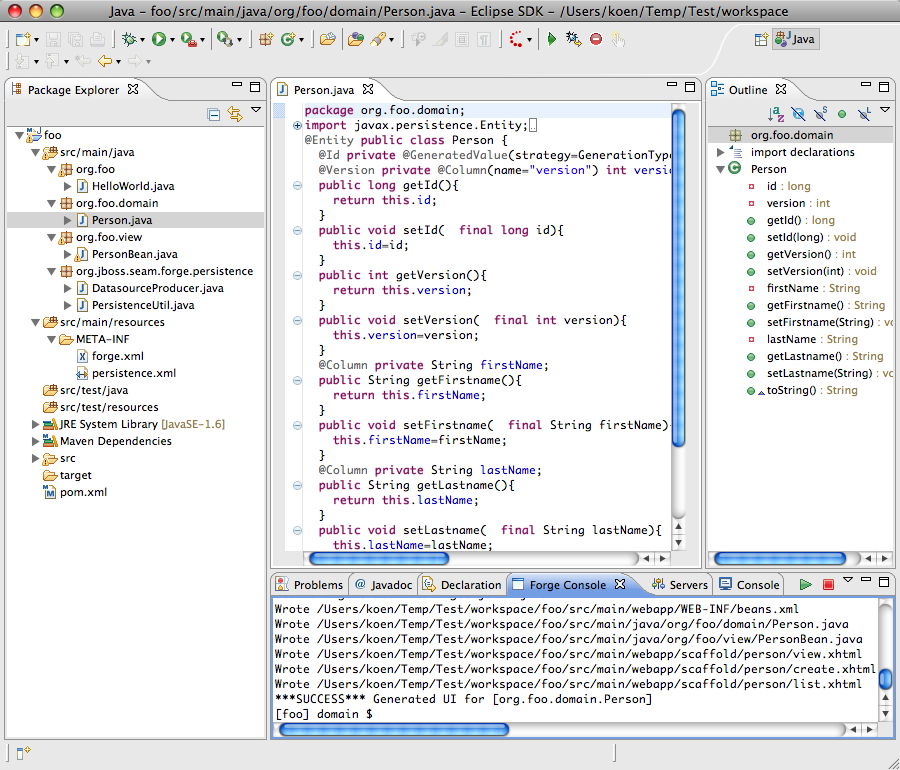
 We enter the next few commands from the tutorial:
[foo] foo $ install forge.scaffold
[foo] foo $ new-entity --named Person
[foo] Person.java $ new-field string --fieldName firstName
[foo] Person.java $ new-field string --fieldName lastName
[foo] Person.java $ cd ..
[foo] domain $ scaffold generate-metawidget-jsf *.java
To see which changes are performed in the project by these commands we need to refresh the project.
Again, it would be good if after issuing each command the relevant changes would be highlighted by setting the relevant folder, file or file element selected. This is more work for the future.
The Future
As suggested, a lot more work is waiting... Some of the features that are on the list are:
- Adding a preference page to be able to add and select Forge runtimes.
- Support for tab completion suggesting the list of possible commands.
- Support for command history.
- Support for colors in the Eclipse Forge Console.
- Show appropriate feedback after each command.
- etc.
If you are interested in helping out implementing some of these features or if you just want to view the code implementing the current console, you can find the sources in the JBoss Tools SVN.
Happy forging!
Koen
3.2.0.CR1
[Download] [Update Site] [Market Place] [What's New] [Documentation] [Forums] [JIRA] [Twitter]
Note: Downloads are now being served from download.jboss.org while we wait for Sourceforge getting their issue fixed.
This release is squashing 400+ issues thus if you use JBoss Tools milestones it is time to upgrade and if you find remaining issues report them as soon as possible.
What's New covers the usability fixes there have been added, and a few new additions/improvements.
Top 6 on Eclipse Marketplace
Even though we haven't been on Eclipse Marketplace for long we are already the 6th most downloaded Eclipse plugin within 30 days on Eclipse Marketplace; and in 9th place of all time.
Thank you for the interest and usage - if you don't know Eclipse Marketplace, you can see how to use it here.
For those already using it, I encourage you to go and give us your star or even a review at our Eclipse Market Place page
Automatic Runtime Detection
First of all this release finally enables one of my favorite new features "Automatic Runtime Detection". It's been possible for a while now to use the "Search" button under JBoss Tools to find JBoss runtimes and have them configured and setup in the IDE for direct usage without having to set up all the individual parts.
In this release we have gone a bit further and allowed you to configure a set (one or many) of directories that JBoss Tools will scan on new workspaces or if you enable it at every startup; if anything new is found it will show the new items and you can then say if you want the runtimes to be installed or not.
This means when you install a new version of JBoss AS, Seam, Drools, EAP, SOA-P, etc. you can simply put in this "watched" directory and JBoss Tools will configure them for you in the IDE. In the future we will add more types of runtime distribution detection such as Java JDK's.
This feature is available under Eclipse Preferences in JBoss Tools > JBoss Tools Runtime Detection
CDI Improvements
For Context Dependency Injection (CDI) we've added a few quick fixes against some of the more common issues our validator finds.
This allows you to use Ctrl+1 on warnings and fix issues. For example fixing @Produces annotations on non-static methods in a Session Bean by making the method static.
We've also added support for the Maven integration to enable CDI automatically if/when your pom.xml file referenes the CDI api jars. Making it simple to import a Maven based CDI project and have all features enabled.
Feedback
There is more shown in What's New, take a look, try the release and let us know how it goes! If nothing major is found we'll be releasing the final version within the next couple of weeks.
Have fun!
 BPEL in SOA-P

Let's face it,BPEL has become the de facto standard for building industrial strength business work flows, despite the fact that it is not for the faint of heart and, much like suicide by lapidation, it requires a strong will and determination to get through the pain.
Red Hat/JBoss recognized the importance of BPEL in the enterprise quite a while ago and as a result, a WS-BPEL 2.0 compliant engine and tooling is being offered as a “Technical Preview” in SOA-P 5.1, which is due to release sometime this spring.
The BPEL tooling and runtime will also be available in JBoss Developer Studio 4 as a Technical Preview and in JBoss Tools, the community (free!) edition.
Technical Preview simply means that it will be bundled with SOA-P but it will not be officially supported until the 5.2 release scheduled for this summer. However, we the developers will still do our best to respond to feature and bug fix requests from the community, as always.
The Runtime
Riftsaw, which is the BPEL engine that ships with the above mentioned products, is based on Apache ODE version 1.3.4 and in fact, JBoss developers have been very active in the ODE community and have been instrumental in determining the future direction of the project.
The Riftsaw engine is optimized for the JBoss Application Server and supports a variety of features which you can read about in the project pages here.
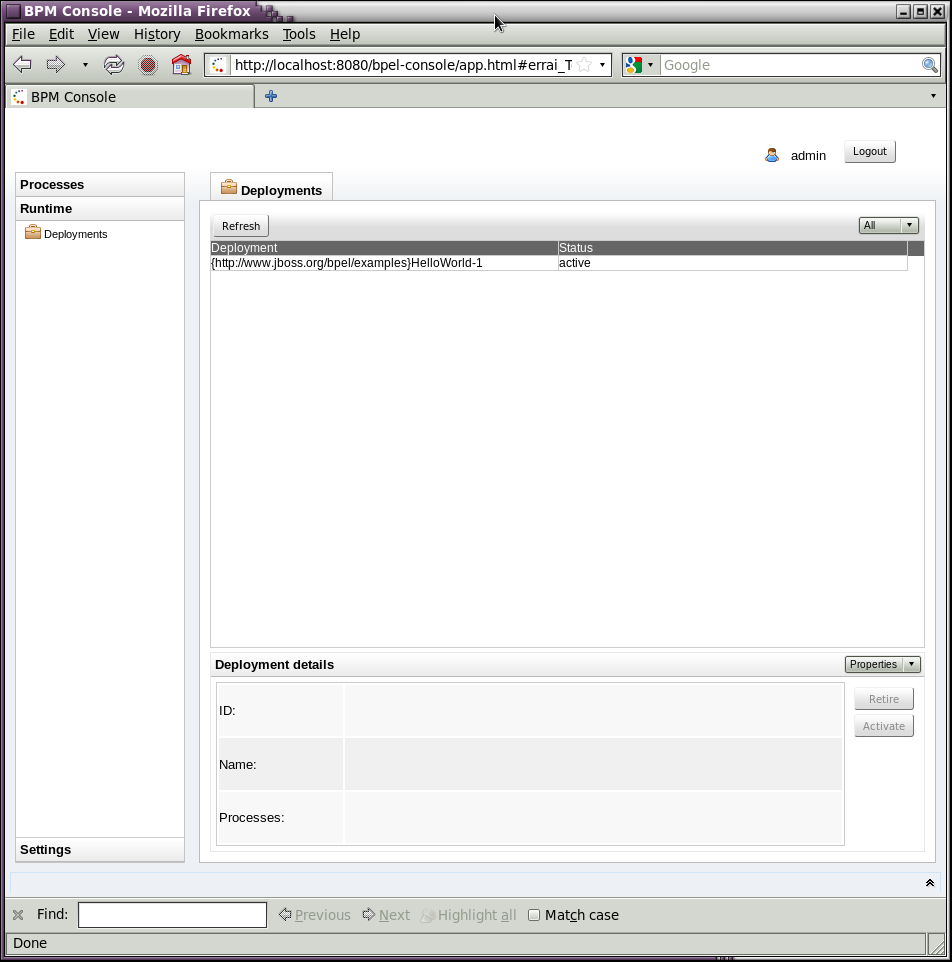
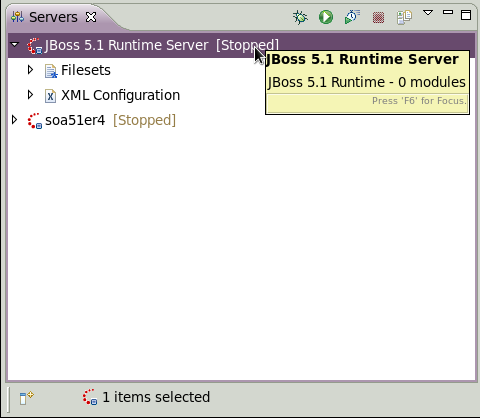
Startup and shutdown of Riftsaw and deployment of business processes to the engine, as well as control of process instances can be done either through the Eclipse tooling, or using the BPEL Console shown below. Before you start, make sure that your JBoss Application Server environment is installed and configured correctly and you have installed Riftsaw as described in the User Guide.
The “Servers”view is used to manage the Riftsaw engine from the Eclipse tooling, as shown here:
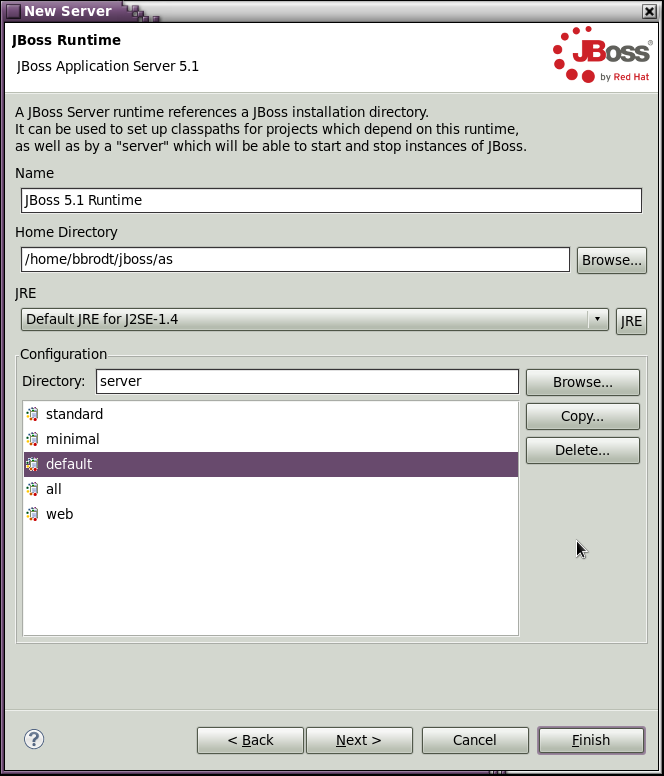
To create a new server instance in Eclipse, simply select “New” from the Servers View context menu (right-click) and follow the wizard; first select the JBoss App Server version. Currently this must be 5.1.0.GA - support for AS 6.0 is being considered for a future release.

Next, select the AS installation directory:
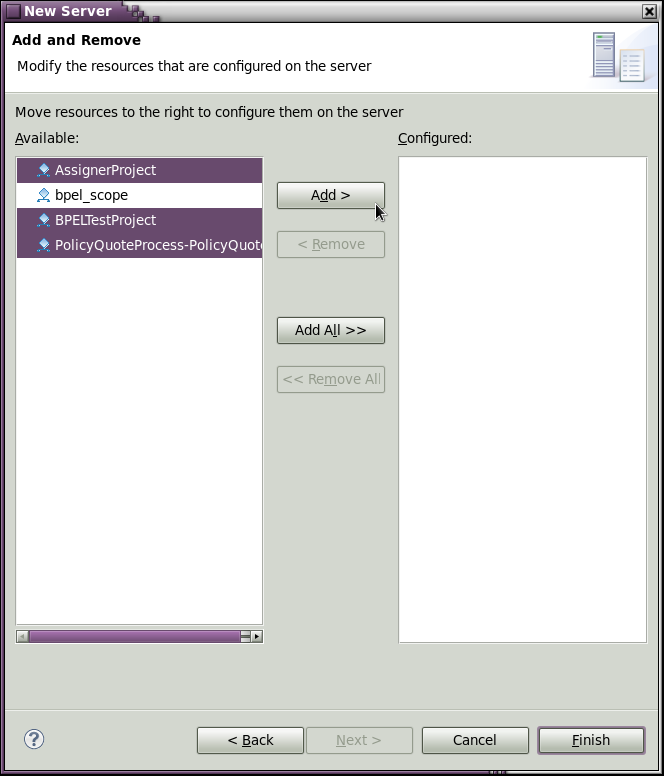
and finally, deploy your processes - that's all there's to it!
The Tooling
Over a year ago, JBoss made the very difficult decision to fork the Eclipse BPEL Designer source because apparently the original development team was unable to commit the time and resources to maintain the editor, for whatever reasons and the project has been floundering until recently. Since then a lot of improvements and bug fixes have been made and the BPEL editor is finally stable enough to be considered a beta release! Not only are there other Eclipse projects that depend on, and use the BPEL Designer, but it has been officially integrated into our QA cycle.
In the coming months these fixes and enhancements will be pushed back upstream to the Eclipse code line and made available to the community. The plan is to rekindle community interest in this project and eventually have it be self-sustaining so that we can finallyretire our forked code line. The fact that we have been able to gain some measure of control over the code at eclipse.org will make this task much simpler.
What's Next?
We still have some features we'd like to see implemented in the editor and runtime, such as:
- Execution simulation and in situ runtime debugging.
- WS-HumanTask or BPEL4People support.
- Clustering to support HA and load balancing.
- Solidifying the BPEL Designer plug-in extension API, especially BPEL extension activities.
- A new “Design” page with a simplified GUI which could be offered as a “BPEL Lite” page vs the current “BPEL Classic” designer.
- A new "Overview" page that simplifies partner link and WSDL management.
The current graphical UI has long been criticized for being less than user friendly and several ideas have been tossed around which would improve the user experience. We hope to implement each of these as time permits.
How You Can Help
The reason for offering BPEL as a Technical Preview is so that early adopters can get their hands on new technology goodies to start playing with them and provide us with valuable feedback! This will help us shake out bugs and help us offer a better product. But this only works if you, the users, provide us with that feedback.
So if you are an early adopter and run across a bug, or you see a need for a new feature/enhancement, please let us know by posting to the JBoss or Riftsaw community user forums. For BPEL Designer-specific issues and questions, you can also post directly to the Eclipse BPEL project forum.
With JBoss Tools 3.2 Beta 2 it is simple to start using CDI (Context Dependency Injection).
All you need is the following:
- JBoss AS 6 or another Eclipse supported CDI container such as Glassfish
- JBoss Developer Studio 4 Beta 2 or another Eclipse with JBoss Tools 3.2 Beta 2 installed
- 5 minutes to watch or read the following blog
Here it is as a video walk through:
...and here are the steps in Screenshot form:
Step 1: Install/Configure the Server runtime
The simplest way to setup JBoss runtimes is to use the "JBoss Runtimes" preference page which are available
via the Preferences or by simply pressing Ctrl+3 and type in "JBoss runtimes".
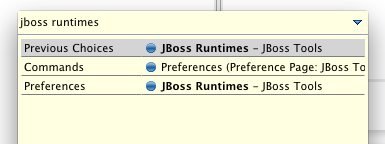
When pressing enter you should see the following Preferences page:
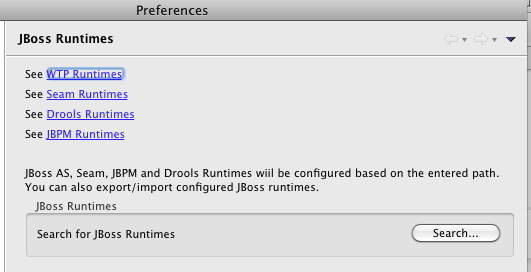
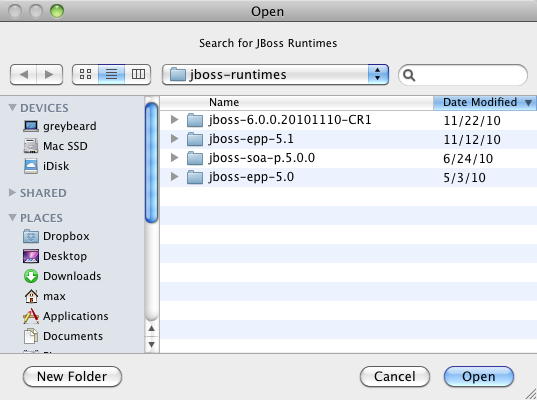
Click the "Search..." button and point it to a directory with your JBoss runtimes; in this case I got a few.
When you have selected the directory JBoss Tools will scan for runtimes it knows about and show
you what it found:
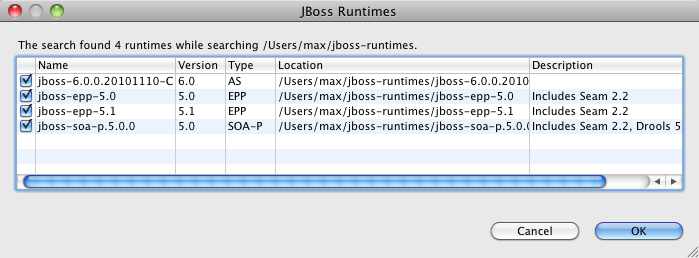
In this dialog you can then remove the checkmarks for runtimes you do not want configured or simply press OK and JBoss Tools will make all selected runtimes available from within the IDE.
For the Server parts it is now availabe in the server view:
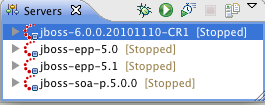
From here you can start the server (in this case JBoss 6) by clicking the Debug or Run icon. If you start via Debug icon the server will wait at any breakpoints you have set in your code and allow you to inspect the current state.
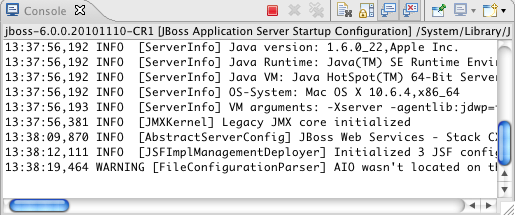
In any case when the server starts up it sends the output of the console to the Console View:
Step 2: Create the Project
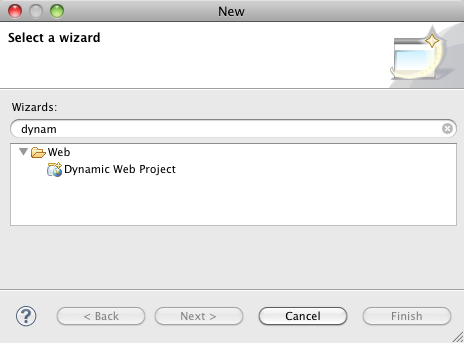
Now use the File > New > Dynamic Web Project or simply press Ctrl+N and find the "Dynamic Web Project" wizard
On the Wizard page, type in a project name (i.e. "cditest") and Click the "Modify" button under Configuration.
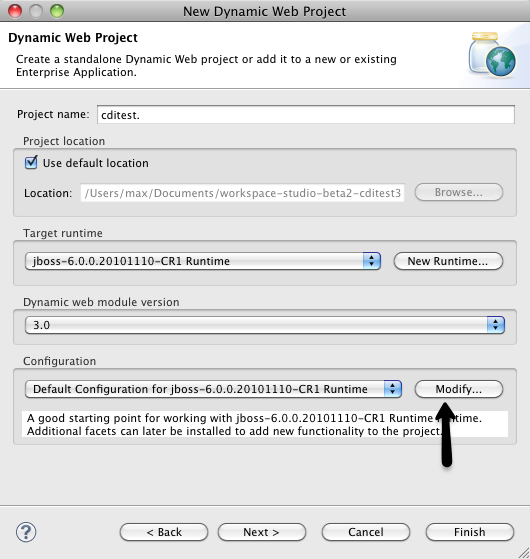
The Modify Configuration is where you can enable/disable what Eclipse calls project facets.
In this case we simply want to enable the Context Dependency Injection facet.
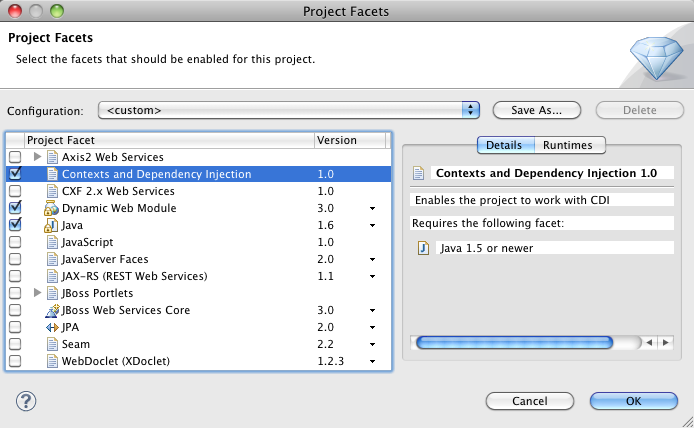
Now Click Ok and press Finish on the Wizard and a basic WAR project will be created for you.
Step 3: Create the code
The code we will create are the minimal for printing out Hello World via a servlet.
We will need to add the following files:
- WebContent/WEB-INF/beans.xml to enable CDI fully for the project (in next revision of JBoss Tools this file will be created for you)
- src/org/cditest/HelloWorld.java the bean for giving the "Hello World" greeting.
- src/org/cditest/HelloServlet.java the servlet for rendering the greeting in its response method.
To create the bean.xml simply use Ctrl+N and type in "XML File" and choose the WebContent/WEB-INF folder and give it the name: beans.xml
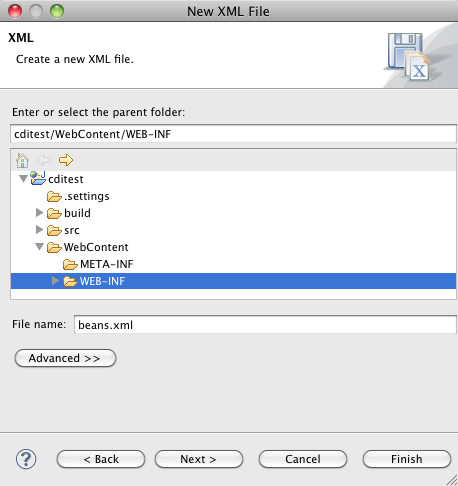
The default file is empty, but we need to add the following content to make it work:
<beans/>
that will suffice for this blog; remember the beans.xml file is simply just
a marker file to inform the CDI container that the War archive should be scanned for beans.
Next on comes the HelloWorld and Servlet class - for this I will just paste the simplest code
which you can paste into two .java files or use Eclipse's excellent wizards for it. If you want to see the full steps for this you can watch the video above.
HelloWorld.java:
package org.cditest;

public class HelloWorld {
    public String getGreeting() {
        return "Hello World!";
    }
}
HelloServlet.java:
package org.cditest;

import java.io.IOException;
import javax.inject.Inject;
import javax.servlet.*;
import javax.servlet.annotation.WebServlet;
import javax.servlet.http.*;

@WebServlet("/HelloServlet")
public class HelloServlet extends HttpServlet {
    @Inject private HelloWorld hello;

    public HelloServlet() {
        super();
    }

    protected void doGet(HttpServletRequest request, HttpServletResponse response)
        throws ServletException, IOException {
        response.getOutputStream().println("<html><h1>" + hello.getGreeting() + "</h1></html>");
    }
}
If you look at the code of the HelloServlet you can see it simply a class with a @WebServlet annotation to specify the context/url name, an @Inject annotated field called Hello and a doGet() method which prints out the value of hello.getGreeting().
In short, the simplest example of @Inject annotation on a servlet.
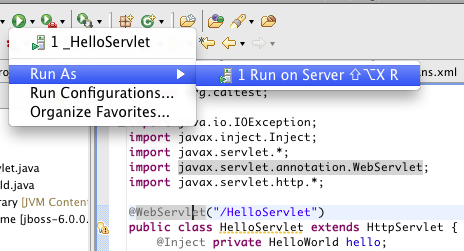
Step 4: Run the Servlet
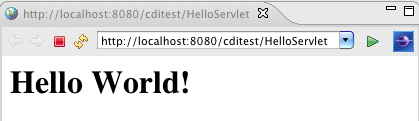
From within Eclipse you can use the Run As... or Debug As... toolbar menu to run what is the current selection and the tools will try and guess what kind of "Run" that means. i.e. for an XHTML page named home.xhtml it might be to open up a browser at http://localhost:8080/home.seam or in this case for a Servlet to open up the browser at the @WebServlet specified location relative to the deployment name, i.e. http://localhost:8080/cditest/HelloServlet.
For new projects like this example Eclipse will ask you what Server you wish to run on:
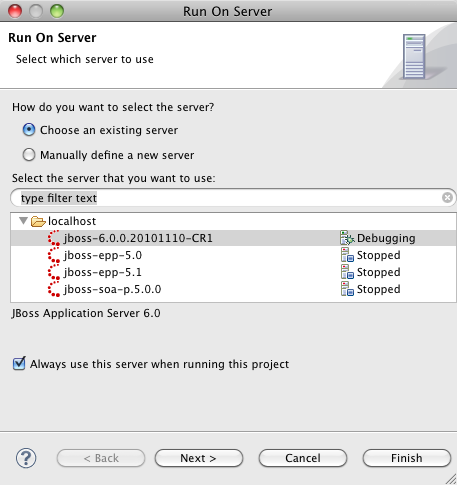
In this case I got several servers available, so I will choose the JBoss 6 server and
choose "Always use this server when running this project" so I will not have to answer
this question again on future Run's.
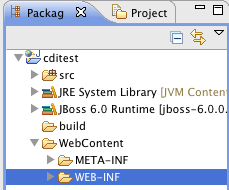
When the server is selected JBoss Tools will deploy the application and show the relevant page
in a browser:
Step 5: Have fun!
That is it - and there is of course more functionallity in the CDI tooling such as validations, quick fixes and code completions but I thought it would be good to just show the simplest application imaginable.
But with the steps described above you now know how to setup any JBoss runtime, create any kind of project and enable the Eclipse facets you want on them.
If you want to see how easy it is to debug your applications then watch the video above, it has a little more details.
Hope you enjoyed it
p.s. the exact same steps can be used to run against Glassfish or other CDI enabled servers that has Eclipse WTP server adapters.
In addition to releasing JBoss Tools 3.2 Beta 2 we've also released the second Beta of JBoss Developer Studio 4 to our early access site which incorporates the updated plugins from the JBoss Tools release.
You can download the full Eclipse based IDE from the early access site for free, and if you want to have the no-fuzz-single-click-install experience with JBoss Enterprise Application platform bundled you just need to go and sign up for the early access program here.
Have fun!
Here is a freshly cut Beta 2 of JBoss Tools 3.2 for you to enjoy this season.
3.2.0.Beta2
[Download] [Update Site] [What's New] [Movies] [Documentation] [Forums] [JIRA] [Twitter]
The end is near!
This is the last beta planned before we do a planned CR1 and then Final next month.
If you are on Eclipse 3.6 (Helios) we definitely recommend you to upgrade to this version. It has never been better.
We are hungry for feedback!
A few last improvements
For this last beta we've squeezed in some improvements within the almost 500 issues fixed in this round.
Simplified Download and installation
The simplest way to install the most commonly downloaded JBoss Tools 3.2.x plugins is now to use Eclipse Marketplace.
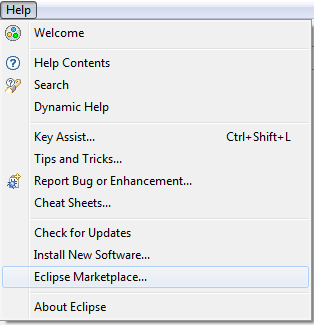
Eclipse Marketplace is available from the Help > Eclipse Marketplace menu in Eclipse.
When you install JBoss Tools via Eclipse Marketplace you get the "Web 2.0" plugins in one click - if you want additional or the complete plugin set you can use the complete Update Site.
Finally we also provide a zipped version of the Update sites from our Download page, which this time is also reduced to just the most popular download options instead of listing all 60+ sub-components individually.
Let us know what you think about this simplified installation!
More Platforms
You can now install all of JBoss Tools on any Eclipse compatible OS and in particular Windows and OS X 64-bit. Previously we limited the installation to those where the Visual Page Editor can run which unfortunately excluded some OS's. That restriction has now been lifted which means all can now get advantage of the complete tooling, except for the visual part of the editor which still only will be available on platforms were there exists working XULRunner/SWT bindings.
Cloud & Remote deployment
There have been done a lot in the area of the JBoss Server adapter Remote System support and for the Delta Cloud tooling but most importantly is that the SteamCannon team is now hosting a DeltaCloud server you can try and use together with JBoss Tools without having to setup your own DeltaCloud server.
The url for this is http://try.steamcannon.org/deltacloud/ and can be used as the URL for a Cloud Connection in the Cloud Wizard in JBoss Tools.
Note: Please beaware that this URL is still driven by experimental code and can at any time stop working - so try it while you can
Performance!
Beta 2 delivers 10 X performance improvements over M2 in the HTML and JSF validation - making this release the fastest ever!
JBoss 6 and CDI
The latest JBoss 6 release provides a full-fledged CDI environment and JBoss Tools now provide full set of code completion, validation, refactoring and quick fixes for CDI. If you are into trying out CDI using JBoss Tools with JBoss 6 gets you started very easily.
...and more!
Hibernate, Seam, Drools, BPEL, ESB, GWT and Modeshape also received a good set of fixes and improvements - you can see more about these in the What's New
Now go Get It and Have Fun!
We've pushed our first Beta of JBoss Developer Studio 4 to our early access site.
You can download the full Eclipse based IDE from the early access site for free, and if you want to have the no-fuzz-single-click-install experience with JBoss Enterprise Application platform bundled you just need to go and sign up for the early access program here.
This release incorporates the changes and improvements done in JBoss Tools 3.2 Beta1.
Have fun!

We've added JBoss Tools 3.1 and 3.2 to Eclipse Marketplace.
What does that mean for users ?
It means you can now from your own Eclipse Help menu choose "Eclipse Marketplace"
...and if you type in "jboss" into the search field you will find JBoss Tools there and click "Install" for the version that is relevant for you.
i.e. 3.1 is for Galileo and 3.2 is for Helios (if in doubt, see the description text in the Marketplace).
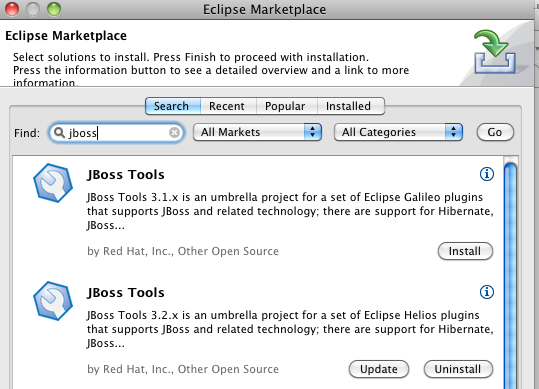
The screenshot also shows how easy it is to Update or Uninstall the installation you already have (in this case I got JBoss Tools 3.2 already installed).
We hope this makes it even easier to install and use JBoss Tools and if you like what you see please go and favorite us (click the Star) or comment on our Eclipse Marketplace page.
It's Beta time for JBoss Tools, the Eclipse plugin suite for JBoss and related technologies.
3.2.0.Beta1
[Download] [Update Site] [What's New] [Movies] [Documentation] [Forums] [JIRA] [Twitter]
Beta Time!
It's beta time, meaning we've locked down new feature additions to most of JBoss Tools and we get to give you the first beta release of JBoss Tools 3.2 - the version of JBoss Tools you should use if you are using Eclipse 3.6 (Helios).
New Features/Improvements
Since it is beta time the focus have been and will be on bugfixing, optimization and stabilization but we do got a few nice new features I would like to highlight - as all ways there is more to see on the What's New page(s).
Faster validation for JSF/XHTML
We've fixed reported issues concerning performance problems with validation of XHTML in larger projects. Our own test project (100.000's of Expression languages and thousands of pages) which before took 15 minutes to validate are now done in much less time when doing a full validation. Making the validation much faster as what is seen in the M2 release. If you continue to have performance problems with Beta1 please let us know, since we are still doing improvmements for this area to beta2!
CDI/Seam Validation and Quickfixes
CDI and Seam have all received some more additional validation (i.e. we now valdiate classnames referenced in CDI descriptors) and a good set of quickfixes allowing you to quickly fix common problems.
MyFaces 2 metadata
MyFaces 2 does not ship TLD's within their project. This make them "invisible" to our default handler for JSF compoenents since we moved to use classpath based lookups to have more correct code completion and validation per project. MyFaces does though ship their own -metadata.xml file that describes their components and we've added support to parse and recognize these now. This should make any new components or changes to existing ones in MyFaces show up in the editor without having to get JBoss Tools updated.
Remote Deployment
JBoss Tools AS Server adapter is now telling the remote server to not scan for changes when remote deployment are done via file copying; preventing "accidental" deployments, making things much more robust.
The remote deployment now also includes optiorns for controlling the start and startup commands used over SSH - allowing you use your own external launch scripts to control how JBoss AS is started/stopped.
Hibernate Comments
HQL (Hibernate Query Language) does not support comments natively, but we have had many requests for allowing it in the Query Editor since it is very useful for quick experiments to be able to comment out parts of your query. Therefore you can now use "--" the beginning of a line to comment it out in the editor. Not a big feature in itself but worth mentioning it since many have asked for it over the years.
Annotation Properties View
We are experiementing with using the new Annotation Properties View which are available via Eclipse WTP JAX-WS support in Helios.
This release therefore are including support for JBoss ESB and JAX-RS (RestEasy) annotations, giving you a more graphical approach to read and write annotations on your service classes.
...and more
Feedback
In M2 we enabled our Usage Tracking and it was a raving success and continues to give us more and more information about where and how JBoss Tools are being used without having users to do anything beyound using our plugins.
We still very much appreciate to hear directly from our users thus don't forget to leave a comment on this blog, post on the forum or report or leave patches to issues on our jira - we love it all.
Have Fun!
I'm looking forward to attend for my first time Eclipse Summit 2010 where as I until now only been at EclipseCon's.

I (luckily?) won't be speaking at the conference, but Chris Aniszczyk and Nick Boldt will:
Tuesday at 14:00, Nick is having a 4-hour symposium together with Henrik Lindberg (Cloudsmith) on the topic of "What's in a Build? Best Practices and Requirements". The intent of this is to work out best practices for how to mange the process of developer, nightly, milestone and release builds for Eclipse projects. Something that we have spent alot of time on in the JBoss Tools project but still know can be improved - looking forward to see if what others have done in projects of our scale/size.
Wednesday at 10:30, Chris is doing his "Using Git in Eclipse" together with Matthias Sohn (SAP) showing of the wonders of Git and the EGit tooling for it.
Thursday at 10:30, Nick Boldt is participating together with Henrik Lindberg (Cloudsmith), Jason Van Zyl (Sonatype), Oisin Hurley and Thomas Hallgren (Cloudsmith) in "Build Systems Exposed: Strengths & Weaknesses of Build Technologies at Eclipse" . This talk will compare the various build systems in use at Eclipse - will we finally reach some concensus ?

I'm looking forward to meet old and new Eclipse friends - if you want to find me, look for someone with a JBoss Tools jacket!
See you there!
In my last article, I talked about how to extend the Annotation Properties view provided as part of WTP in Eclipse Helios. And that gets into the implementation details of adding your own annotations.
Here, I'd like to focus on how you'd use the view in conjunction with ESB support in JBoss Tools to actually create a new ESB action using the annotations added as part of ESB 4.9. Now instead of extending the AbstractActionPipelinedProcessor class you can create your own POJO and annotate to indicate various configuration options, as documented here.
Let's say you want to create a simple PrintMessageAction, similar to the example that extends AbstractActionPipelinedProcessor, but want to see the differences between the two implementations. (You can find the original example implementation in the ESB Programmer's Guide here.)
The original example code looks like this (Listing 1):
public class PrintMessage extends AbstractActionPipelineProcessor {

  private String information;
  private Integer repeatCount;

  public PrintMessage(ConfigTree config) {
    information = config.getAttribute("information");
    repeatCount = new Integer(config.getAttribute("repeatCount"));
  }

  public Message process(Message message) throws ActionProcessingException {
    for (int i=0; i < repeatCount; i++) {
      System.out.println(information);
    }
  }
}
As you can see, if you already had a PrintMessage class, you'd have to revamp it a bit to get it to work. Let's say you have this class (Listing 2):
import org.jboss.soa.esb.message.Message;

public class PrintMessage {

  private String information;
  private Integer repeatCount;

  public void printMessage(Message message) {
    for (int i=0; i < repeatCount; i++) {
      System.out.println(information);
    }
  }
}
If you use the new ESB annotations available in ESB 4.9, this becomes much more straightforward (Listing 3):
import org.jboss.soa.esb.message.Message;

public class PrintMessage {

  @ConfigProperty // this will come from the ESB configuration
  private String information;
  @ConfigProperty // this also will come from the ESB configuration
  private Integer repeatCount;

  @Process // and this is the actual action that will get invoked
  public void printMessage(Message message) {
    for (int i=0; i < repeatCount; i++) {
      System.out.println(information);
    }
  }
}
By now you're wondering - so how does the tooling come into this? Well, with the new Annotation Properties view and the ESB annotations we hooked up in the upcoming JBoss Tools 3.2 Beta1 release, you can let the tooling add the annotations for you.
In JBoss Tools, let's say that you have your original PrintMessage class (Listing 2) open in your ESB project and you want to turn it into an ESB action you can configure for the project.
To open and use the Annotation Properties view
- Go to Window->Show View->Other
- Type "Annotation" in the search box
- Select JAX-WS->Annotation Properties
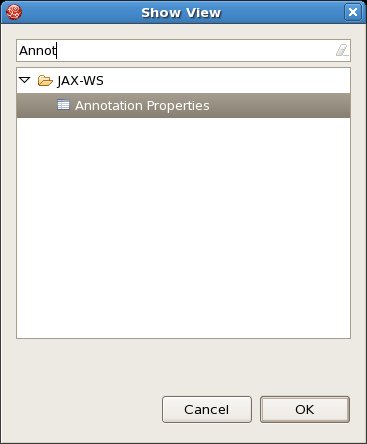
- Click OK.

By default, all available annotations are enabled in the view. This will most likely cause you to see a message such as "No suitable library can be found on the projects classpath." To get around this since we're just interested in ESB annotations at this point, we simply filter out the other types.
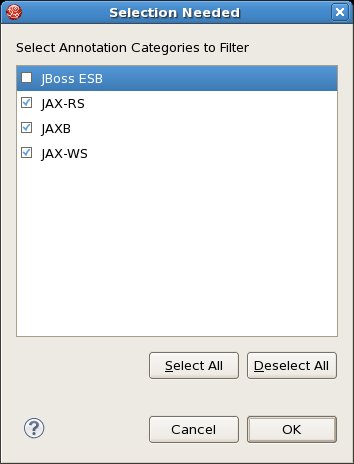
To change the filtered annotation types:
- In the View Menu for the Annotation Properties view, select "Filters..."
- When the Selection Needed dialog appears, make sure that all other annotation types are checked except for JBoss ESB

- Click OK
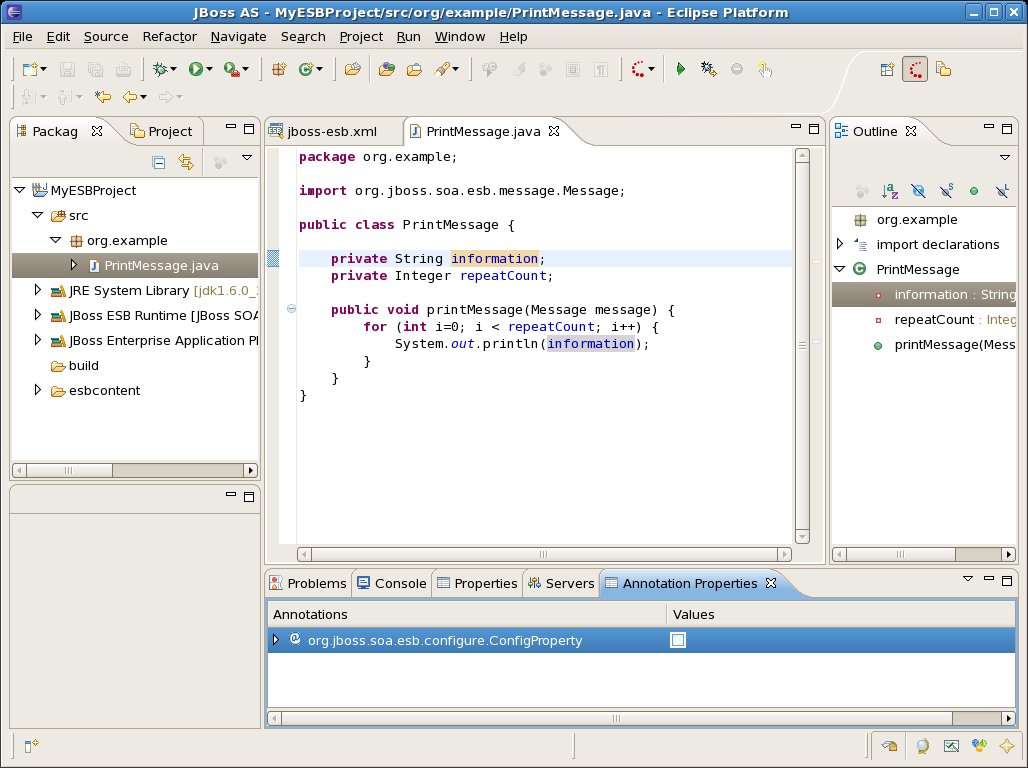
Now, with your PrintMessage class open and the Annotation Properties view open and filtered for ESB annotations, select the "information" class variable. In the Annotations list, you should see org.jboss.soa.esb.configure.ConfigProperty appear, as in the following image:
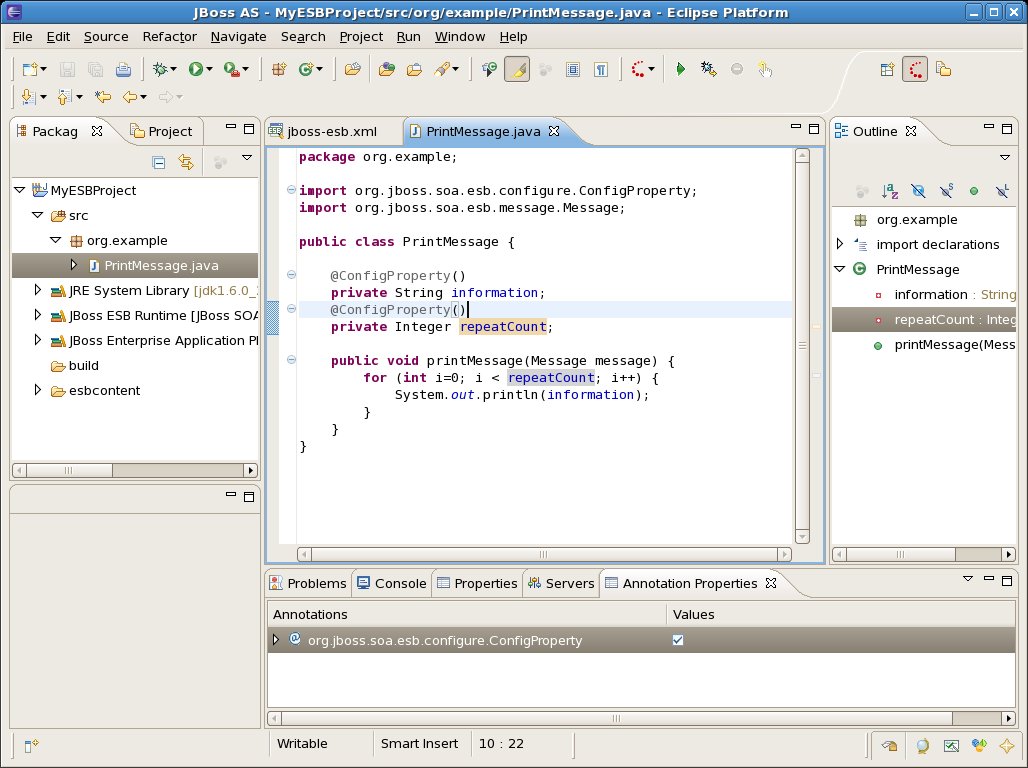
If you click the "Values" checkbox beside the ConfigProperty annotation, you'll see @ConfigProperty() appear above the variable. Do it again for the repeatCount variable as well.
The last step is to click on the method line for printMessage(Message message) and check the @Process annotation box.
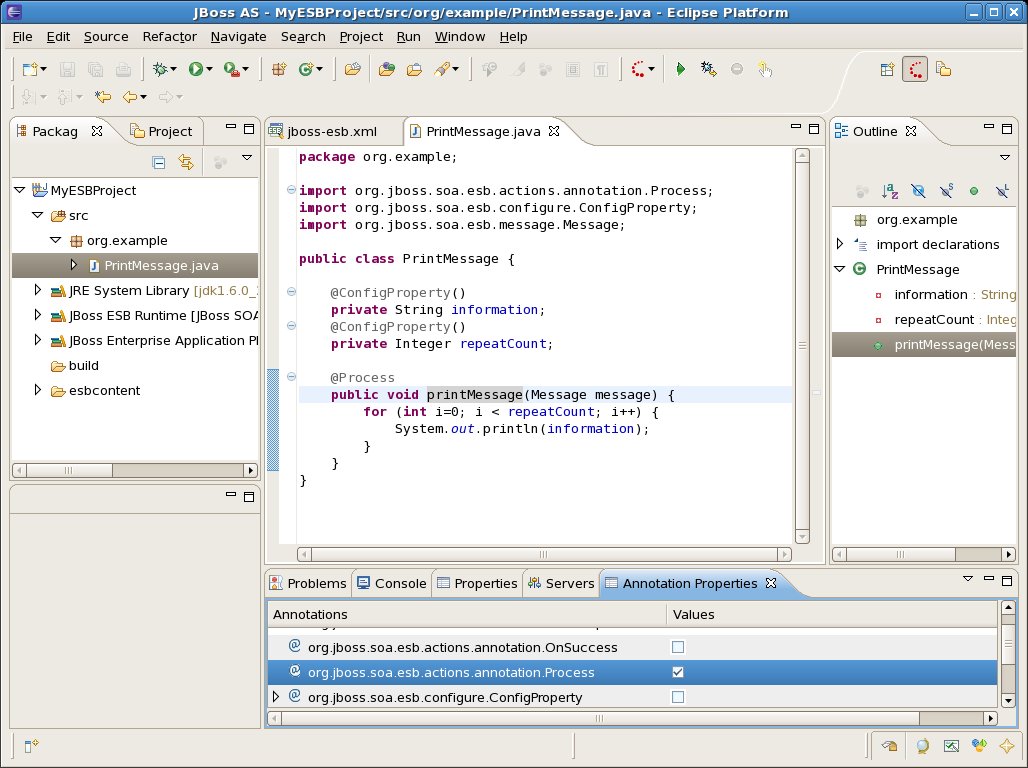
And that's it for this example. You'll notice if you look closely at the @ConfigProperty annotation in the Annotation Properties view that you can expand it and set different properties on the annotation as well. So there is room for further configuration there.
Once you configure your action in an ESB configuration file and deploy it, you can test it. In this case, I'm using a simple JMS queue to send a message to the service to trigger it. The action gets the configuration from the properties we set in the jboss-esb.xml file, and we can see the output in the console:
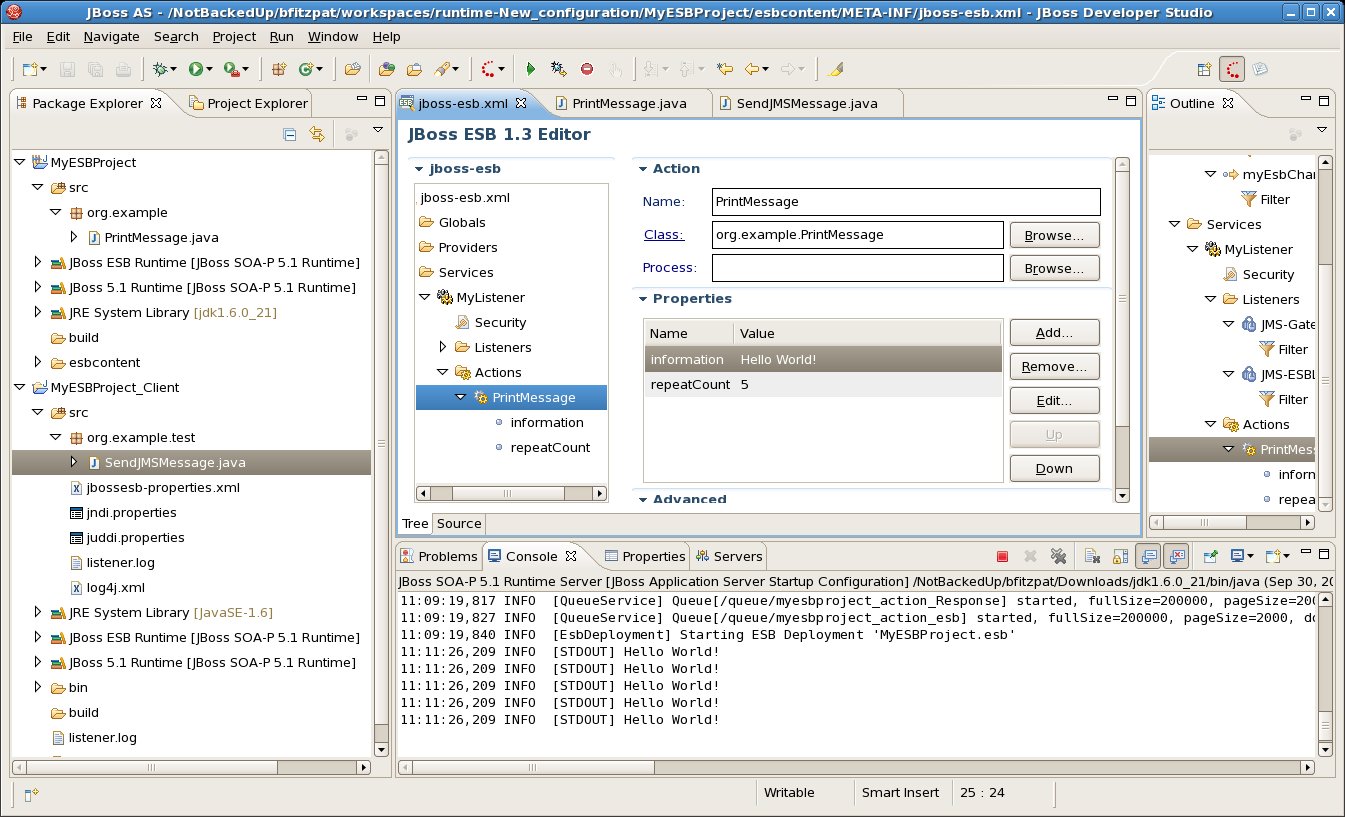
So starting with the JBoss Tools 3.2 Beta you'll have some new tools in the ESB toolbox for custom actions!